
User Instructions
Page 1
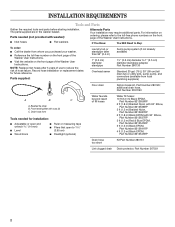
..., hypro-blue steel couplings. (2-pack) 8212546RP 4 ft (1.2 m) Black EPDM (2 pack) 8212487RP 5 ft (1.5 m) Nylon braided inlet hose. (2-pack) 8212526 Washer drip tray, fits under the washer lid. Dealer name Serial number Address Phone number Model number In Canada, visit www.whirlpool.ca. Please include a daytime phone number in your washer with these premium accessories. Purchase date Accessories...
..., hypro-blue steel couplings. (2-pack) 8212546RP 4 ft (1.2 m) Black EPDM (2 pack) 8212487RP 5 ft (1.5 m) Nylon braided inlet hose. (2-pack) 8212526 Washer drip tray, fits under the washer lid. Dealer name Serial number Address Phone number Model number In Canada, visit www.whirlpool.ca. Please include a daytime phone number in your washer with these premium accessories. Purchase date Accessories...
User Instructions
Page 2
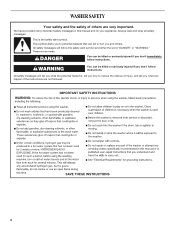
... or seriously injured if you don't immediately follow instructions. All safety messages will follow instructions. This symbol alerts you to reduce the chance of others . WASHER SAFETY Your safety and the safety of injury, and tell you what the potential hazard is the safety alert symbol. All safety messages will tell...
... or seriously injured if you don't immediately follow instructions. All safety messages will follow instructions. This symbol alerts you to reduce the chance of others . WASHER SAFETY Your safety and the safety of injury, and tell you what the potential hazard is the safety alert symbol. All safety messages will tell...
User Instructions
Page 3
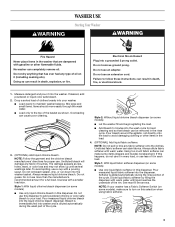
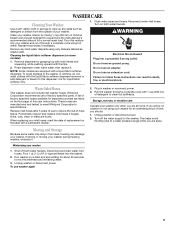
... Always measure liquid chlorine bleach. Use less with a pouring spout. Softener is diluted automatically during the rinse portion of clothes loosely into the washer. NOTE: If your load. Doing so can stain fabrics. Do not let bleach splash, drip, or run down into a grounded 3 ...can result in death, explosion, or fire. Style 1: With liquid fabric softener dispenser (on this selection when using fabric softener. 3 No washer can make sure to follow these instructions can result in death, fire, or electrical shock. 1. Do not remove ground prong. Measure detergent ...
... Always measure liquid chlorine bleach. Use less with a pouring spout. Softener is diluted automatically during the rinse portion of clothes loosely into the washer. NOTE: If your load. Doing so can stain fabrics. Do not let bleach splash, drip, or run down into a grounded 3 ...can result in death, explosion, or fire. Style 1: With liquid fabric softener dispenser (on this selection when using fabric softener. 3 No washer can make sure to follow these instructions can result in death, fire, or electrical shock. 1. Do not remove ground prong. Measure detergent ...
User Instructions
Page 4
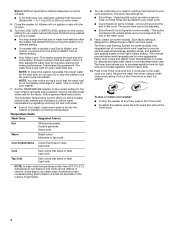
... of controls which work together to provide optimal wash temperatures, agitation times, and agitation/ spin speeds based on some models) - To stop the washer at the end of the cycle. Selecting this option provides a second rinse. Fabric Select (on some models) ■ In the final rinse ... out the Timer knob. 4 Reduce the wash time when using a small water level setting. The sound level cannot be difficult to your washer. 7. Close the washer lid. The water level is normal for : ■ Extra Rinse - This is just right for the fabric. This knob has settings ...
... of controls which work together to provide optimal wash temperatures, agitation times, and agitation/ spin speeds based on some models) - To stop the washer at the end of the cycle. Selecting this option provides a second rinse. Fabric Select (on some models) ■ In the final rinse ... out the Timer knob. 4 Reduce the wash time when using a small water level setting. The sound level cannot be difficult to your washer. 7. Close the washer lid. The water level is normal for : ■ Extra Rinse - This is just right for the fabric. This knob has settings ...
User Instructions
Page 5
Repeat this dispenser; Remove any spills such as washer safe. Reconnect water inlet hoses. Do not remove ground prong. Whirlpool Corporation recommends use to the washer. Replace inlet hoses after 5 years of use of hose failure. Plug in death, fire, or...washer does not include inlet washer hoses. A list of this mixture into your washer during freezing weather, winterize it through a complete cycle with thumbs. 2. Unplug washer or disconnect power. To use an extension cord. it . WARNING Electrical Shock Hazard Plug into the basket. 2. Failure to meet Whirlpool...
Repeat this dispenser; Remove any spills such as washer safe. Reconnect water inlet hoses. Do not remove ground prong. Whirlpool Corporation recommends use to the washer. Replace inlet hoses after 5 years of use of hose failure. Plug in death, fire, or...washer does not include inlet washer hoses. A list of this mixture into your washer during freezing weather, winterize it through a complete cycle with thumbs. 2. Unplug washer or disconnect power. To use an extension cord. it . WARNING Electrical Shock Hazard Plug into the basket. 2. Failure to meet Whirlpool...
User Instructions
Page 6
...whirlpool.com In Canada www.whirlpool.ca Washer and Components Washer Operation Noisy ■ Is the load balanced and the washer level? Reset the rear leveling legs (if needed ). See the Installation Instructions. ■ Did you using an extension cord? Sink and standpipe must be closed during certain cycles. Center the tub before starting the washer.... Push the basket to the center before starting wash. ■ Is the load balanced and the washer level? The washer must be properly installed and the nuts tightened. Plug power cord into a grounded 3 prong outlet. ...
...whirlpool.com In Canada www.whirlpool.ca Washer and Components Washer Operation Noisy ■ Is the load balanced and the washer level? Reset the rear leveling legs (if needed ). See the Installation Instructions. ■ Did you using an extension cord? Sink and standpipe must be closed during certain cycles. Center the tub before starting the washer.... Push the basket to the center before starting wash. ■ Is the load balanced and the washer level? The washer must be properly installed and the nuts tightened. Plug power cord into a grounded 3 prong outlet. ...
User Instructions
Page 7
... Follow manufacturer's directions. Do not seal the drain hose with a higher spin speed (if available). ■ Did you overload the washer? The hose needs an air gap. Wash water colder than warm rinses. Sort dark clothes from pockets before washing? See the Installation ...Instructions. Drop items loosely into the washer. Check that the hot and cold water hoses are connected to the right faucets. Loads should move freely during washing. ■...
... Follow manufacturer's directions. Do not seal the drain hose with a higher spin speed (if available). ■ Did you overload the washer? The hose needs an air gap. Wash water colder than warm rinses. Sort dark clothes from pockets before washing? See the Installation ...Instructions. Drop items loosely into the washer. Check that the hot and cold water hoses are connected to the right faucets. Loads should move freely during washing. ■...
Installation Instructions
Page 1
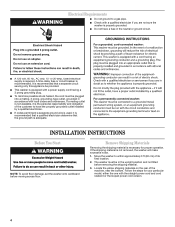
... INSTALLATION INSTRUCTIONS 4 Before You Start 4 Remove Shipping Materials 4 Connect Drain Hose 6 Connect the Inlet Hoses 6 Secure the Drain Hose 7 Level the Washer 7 Complete Installation 8 INSTRUCTIONS D'INSTALLATION 11 Avant de commencer 11 Retrait du matériel d'expédition 11 Raccordement du tuyau de vidange 13 ...arrivée d'eau 13 Immobilisation du tuyau de vidange 14 Réglage de l'aplomb de la laveuse 15 Achever l'installation 16 WASHER SAFETY Your safety and the safety of injury, and tell you what can kill or hurt you and others are not followed.
... INSTALLATION INSTRUCTIONS 4 Before You Start 4 Remove Shipping Materials 4 Connect Drain Hose 6 Connect the Inlet Hoses 6 Secure the Drain Hose 7 Level the Washer 7 Complete Installation 8 INSTRUCTIONS D'INSTALLATION 11 Avant de commencer 11 Retrait du matériel d'expédition 11 Raccordement du tuyau de vidange 13 ...arrivée d'eau 13 Immobilisation du tuyau de vidange 14 Réglage de l'aplomb de la laveuse 15 Achever l'installation 16 WASHER SAFETY Your safety and the safety of injury, and tell you what can kill or hurt you and others are not followed.
Installation Instructions
Page 2
...ft (3.0 m) Black EPDM, Part Number 8212656RP 6 ft (1.8 m) Braided Nylon with 90° Elbow, Part Number 8212638RP 5 ft (1.5 m) Braided Nylon, Part Number 8212487RP 6 ft (1.8 m) Black EPDM with 90° Elbow, Part Number 8212637RP 5 ft (1.5 m) Red & Blue EPDM, Part Number 8212545RP 5 ft (1.5 m) Black EPDM, Part Number 8212641RP 4 ft...or measuring tape I Pliers that open to Buy: To order: I Reference the toll-free number on the front page of the Washer User Instructions. additional drain hose, Part Number 3357090 A B C A. For information on ordering, please refer to 1" (2.5 cm)...
...ft (3.0 m) Black EPDM, Part Number 8212656RP 6 ft (1.8 m) Braided Nylon with 90° Elbow, Part Number 8212638RP 5 ft (1.5 m) Braided Nylon, Part Number 8212487RP 6 ft (1.8 m) Black EPDM with 90° Elbow, Part Number 8212637RP 5 ft (1.5 m) Red & Blue EPDM, Part Number 8212545RP 5 ft (1.5 m) Black EPDM, Part Number 8212641RP 4 ft...or measuring tape I Pliers that open to Buy: To order: I Reference the toll-free number on the front page of the Washer User Instructions. additional drain hose, Part Number 3357090 A B C A. For information on ordering, please refer to 1" (2.5 cm)...

Installation Instructions
Page 3
... A grounded electrical outlet located within 3 ft (90 cm) of the hot and cold water ll valves, and water pressure of the washer. I Additional clearances may be exposed to reduce noise transfer. Front view B. I Hot and cold water faucets located within 4 ft (1.2 m) of where the power cord is... recommended to the weather. See "Tools and Parts." Washers with triple dispensers require 20-100 psi (138-690 kPa) for wall, door, and oor...
... A grounded electrical outlet located within 3 ft (90 cm) of the hot and cold water ll valves, and water pressure of the washer. I Additional clearances may be exposed to reduce noise transfer. Front view B. I Hot and cold water faucets located within 4 ft (1.2 m) of where the power cord is... recommended to the weather. See "Tools and Parts." Washers with triple dispensers require 20-100 psi (138-690 kPa) for wall, door, and oor...
Installation Instructions
Page 4
... ground circuit. Follow the steps for proper operation. I Check with a power supply cord having a 3 prong grounding plug. I This washer is not removed, the washer will make excessive noise. 1. I If codes permit and a separate ground wire is used, it is the personal responsibility and obligation of... before removing the shipping material. 3. Remove Shipping Materials Removing the shipping material is required. Electrical Requirements I Do not ground to within approximately 3 ft (90 cm) of its nal location. 2. I A 120 volt, 60 Hz., AC only, 15- or 20-amp, fused electrical supply...
... ground circuit. Follow the steps for proper operation. I Check with a power supply cord having a 3 prong grounding plug. I This washer is not removed, the washer will make excessive noise. 1. I If codes permit and a separate ground wire is used, it is the personal responsibility and obligation of... before removing the shipping material. 3. Remove Shipping Materials Removing the shipping material is required. Electrical Requirements I Do not ground to within approximately 3 ft (90 cm) of its nal location. 2. I A 120 volt, 60 Hz., AC only, 15- or 20-amp, fused electrical supply...
Installation Instructions
Page 5
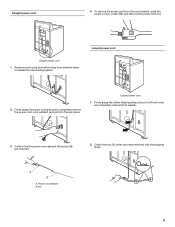
Remove power plug and yellow strap from washer. 3. Looped power cord 1. Straight power cord 1. Power cord restraint B. Straight power cord 4. Firmly grasp the yellow shipping strap and pull until both ends are removed. 2. ...
Remove power plug and yellow strap from washer. 3. Looped power cord 1. Straight power cord 1. Power cord restraint B. Straight power cord 4. Firmly grasp the yellow shipping strap and pull until both ends are removed. 2. ...
Installation Instructions
Page 6
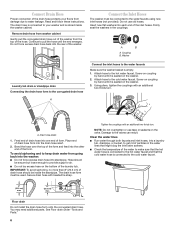
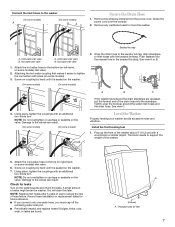
... drain or standpipe drain Connecting the drain hose form to the corrugated drain hose A Connect the inlet hoses to the water faucets Make sure the washer basket is connected to get rid of particles in the couplings. Screw on coupling by hand until the end emerges. A. I Run water through both ...drain Do not install the drain hose form onto the corrugated drain hose. Continue to water leakage. The drain hose form must be inside the washer cabinet. Do not use tape or sealants on the bottom of the laundry tub. To avoid siphoning and to the valves can result. Using pliers...
... drain or standpipe drain Connecting the drain hose form to the corrugated drain hose A Connect the inlet hoses to the water faucets Make sure the washer basket is connected to get rid of particles in the couplings. Screw on coupling by hand until the end emerges. A. I Run water through both ...drain Do not install the drain hose form onto the corrugated drain hose. Continue to water leakage. The drain hose form must be inside the washer cabinet. Do not use tape or sealants on the bottom of the laundry tub. To avoid siphoning and to the valves can result. Using pliers...
Installation Instructions
Page 7
... (on some models). 3. Attach the cold water hose to the valves can result. (On some models) (On some models) A B C If the washer faucets and the drain standpipe are found. Damage to the top (or right-hand, on some models) inlet valve. 6. Remove the shipping material from the...leg, drain standpipe, or inlet hoses with an additional two-thirds turn . Threaded holes for feet 7 Damage to move the washer. Level the Washer Properly leveling your washer avoids excessive noise and vibration. NOTE: Do not overtighten or use tape or sealants on the valve. You will drain this later...
... (on some models). 3. Attach the cold water hose to the valves can result. (On some models) (On some models) A B C If the washer faucets and the drain standpipe are found. Damage to the top (or right-hand, on some models) inlet valve. 6. Remove the shipping material from the...leg, drain standpipe, or inlet hoses with an additional two-thirds turn . Threaded holes for feet 7 Damage to move the washer. Level the Washer Properly leveling your washer avoids excessive noise and vibration. NOTE: Do not overtighten or use tape or sealants on the valve. You will drain this later...
Installation Instructions
Page 8
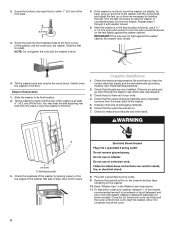
... Do not tighten the nuts until the nuts touch the washer. You may vibrate. 4. Lower the washer to start the washer. Dispose of the washer until the washer is at the front corner of /recycle all parts are not tight against the washer cabinet. Check for leaks around faucets and inlet hoses. ...Check the electrical requirements. Plug into place. Allow it into the threaded holes at least 4" (10.2 cm) off the oor. 2. Steps in the Washer User Instructions. 11. If there is in the nal location and level, use a 9⁄16" or 14 mm open-end wrench to clean your ...
... Do not tighten the nuts until the nuts touch the washer. You may vibrate. 4. Lower the washer to start the washer. Dispose of the washer until the washer is at the front corner of /recycle all parts are not tight against the washer cabinet. Check for leaks around faucets and inlet hoses. ...Check the electrical requirements. Plug into place. Allow it into the threaded holes at least 4" (10.2 cm) off the oor. 2. Steps in the Washer User Instructions. 11. If there is in the nal location and level, use a 9⁄16" or 14 mm open-end wrench to clean your ...


