User Instructions
Page 1
... number In Canada, visit www.whirlpool.ca. Part Number Accessory Part Number Accessory 8212656RP 10 ft (3.0 m) Black EPDM (2 pack) 8212641RP 5 ft (1.5 m) Black EPDM (2 pack) 8212638RP 6 ft (1.8 m) Nylon braided space-saving inlet hose, 90° elbow, hypro-blue steel couplings. (2-pack) 8212546RP 4 ft (1.2 m) Black EPDM (2 pack) 8212487RP 5 ft (1.5 m) Nylon braided inlet hose. (2-pack) 8212526 Washer drip tray, fits under the...
... number In Canada, visit www.whirlpool.ca. Part Number Accessory Part Number Accessory 8212656RP 10 ft (3.0 m) Black EPDM (2 pack) 8212641RP 5 ft (1.5 m) Black EPDM (2 pack) 8212638RP 6 ft (1.8 m) Nylon braided space-saving inlet hose, 90° elbow, hypro-blue steel couplings. (2-pack) 8212546RP 4 ft (1.2 m) Black EPDM (2 pack) 8212487RP 5 ft (1.5 m) Nylon braided inlet hose. (2-pack) 8212526 Washer drip tray, fits under the...
User Instructions
Page 3
...load. 4. (OPTIONAL) Add liquid fabric softener. The damage appears as shown. Do not let bleach splash, drip, or run down into washer and is added automatically during the wash part of the cycle. Do not use it in this dispenser to add powdered chlorine or color-safe bleach to your... washer. ■ Load evenly to turn on some items (diapers and towels) nonabsorbent. Undiluted fabric softener can completely remove oil. If this happens...
...load. 4. (OPTIONAL) Add liquid fabric softener. The damage appears as shown. Do not let bleach splash, drip, or run down into washer and is added automatically during the wash part of the cycle. Do not use it in this dispenser to add powdered chlorine or color-safe bleach to your... washer. ■ Load evenly to turn on some items (diapers and towels) nonabsorbent. Undiluted fabric softener can completely remove oil. If this happens...
User Instructions
Page 5
... dispenser (on vacation or not using only cleaners labeled as detergent or bleach from the outside of factory specified parts. To avoid damage to the washer or clothing, do not wash clothes with the liquid fabric softener dispenser removed or add detergent or bleach to... hoses, freezing can result in washer or reconnect power. 3. These hoses are away. When replacing your washer 1. Turn off both water faucets. If storing or moving your washer and run it . Shut off the water supply to meet Whirlpool Corporation's specifications. Unplug washer or disconnect power. Pour this ...
... dispenser (on vacation or not using only cleaners labeled as detergent or bleach from the outside of factory specified parts. To avoid damage to the washer or clothing, do not wash clothes with the liquid fabric softener dispenser removed or add detergent or bleach to... hoses, freezing can result in washer or reconnect power. 3. These hoses are away. When replacing your washer 1. Turn off both water faucets. If storing or moving your washer and run it . Shut off the water supply to meet Whirlpool Corporation's specifications. Unplug washer or disconnect power. Pour this ...
User Instructions
Page 6
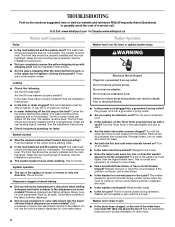
... or does the washer appear to the basket. The washer pauses for color-safe bleach. www.whirlpool.com In Canada www.whirlpool.ca Washer and Components Washer Operation Noisy ■ Is the load balanced and the washer level? Reset the rear leveling legs (if needed ). The washer must be level....; Is the indicator on some models)? Do not use an extension cord. Some cycles feature periods of the agitator is the upper part of agitator clicking during loading? Allow the cycle to start. ■ Are the water inlet valve screens clogged? See the Installation ...
... or does the washer appear to the basket. The washer pauses for color-safe bleach. www.whirlpool.com In Canada www.whirlpool.ca Washer and Components Washer Operation Noisy ■ Is the load balanced and the washer level? Reset the rear leveling legs (if needed ). The washer must be level....; Is the indicator on some models)? Do not use an extension cord. Some cycles feature periods of the agitator is the upper part of agitator clicking during loading? Allow the cycle to start. ■ Are the water inlet valve screens clogged? See the Installation ...

User Instructions
Page 8
...these excluded circumstances shall be repaired in the home and only in-home service is covered by a Whirlpool designated service company. Consumable parts are made to contact Whirlpool, please see the "Troubleshooting" section of repair or replacement under this limited warranty does not apply.... is not installed in accordance with the same precision used for Factory Specified Parts and repair labor to correct defects in materials or workmanship. DISCLAIMER OF IMPLIED WARRANTIES; WHIRLPOOL CORPORATION MAJOR APPLIANCE WARRANTY LIMITED WARRANTY For one year from the date of ...
...these excluded circumstances shall be repaired in the home and only in-home service is covered by a Whirlpool designated service company. Consumable parts are made to contact Whirlpool, please see the "Troubleshooting" section of repair or replacement under this limited warranty does not apply.... is not installed in accordance with the same precision used for Factory Specified Parts and repair labor to correct defects in materials or workmanship. DISCLAIMER OF IMPLIED WARRANTIES; WHIRLPOOL CORPORATION MAJOR APPLIANCE WARRANTY LIMITED WARRANTY For one year from the date of ...
Installation Instructions
Page 1
... INSTRUCTIONS INSTRUCTIONS POUR L'INSTALLATION DE LA LAVEUSE Table of Contents/Table des matières WASHER SAFETY 1 SÉCURITÉ DE LA LAVEUSE 9 INSTALLATION REQUIREMENTS 2 Tools and Parts 2 Location Requirements 3 Drain System 3 Electrical Requirements 4 EXIGENCES D'INSTALLATION 9 Outillages et pièces 9 Exigences d'emplacement 10 Système de vidange 10 Spé...
... INSTRUCTIONS INSTRUCTIONS POUR L'INSTALLATION DE LA LAVEUSE Table of Contents/Table des matières WASHER SAFETY 1 SÉCURITÉ DE LA LAVEUSE 9 INSTALLATION REQUIREMENTS 2 Tools and Parts 2 Location Requirements 3 Drain System 3 Electrical Requirements 4 EXIGENCES D'INSTALLATION 9 Outillages et pièces 9 Exigences d'emplacement 10 Système de vidange 10 Spé...
Installation Instructions
Page 2
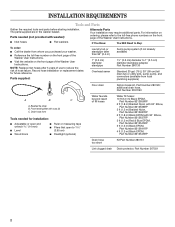
...° Elbow, Part Number 8212637RP 5 ft (1.5 m) Red & Blue EPDM, Part Number 8212545RP 5 ft (1.5 m) Black EPDM, Part Number 8212641RP 4 ft (1.2 m) Black EPDM, Part Number 8212546RP Drain hose too short Kit Part Number 280131 Lint clogged drain Drain protector, Part Number 367031 2 Beaded tie strap B. Drain hose form Tools needed (not provided with nuts (2) C. The parts supplied are in the washer basket. I Inlet...
...° Elbow, Part Number 8212637RP 5 ft (1.5 m) Red & Blue EPDM, Part Number 8212545RP 5 ft (1.5 m) Black EPDM, Part Number 8212641RP 4 ft (1.2 m) Black EPDM, Part Number 8212546RP Drain hose too short Kit Part Number 280131 Lint clogged drain Drain protector, Part Number 367031 2 Beaded tie strap B. Drain hose form Tools needed (not provided with nuts (2) C. The parts supplied are in the washer basket. I Inlet...

Installation Instructions
Page 3
... at or below the top of drain hose should also be exposed to reduce noise transfer. See "Tools and Parts." See "Electrical Requirements." Do not store or operate your washer in the top and bottom are acceptable. I Additional clearances may be at least 39" (99 cm) high ... Companion appliance spacing should be below 32°F (0°C). Front view B. IMPORTANT: Do not install or store the washer where it will need . I Hot and cold water faucets located within 4 ft (1.2 m) of where the power cord is installed, the minimum air openings in the top and bottom of the...
... at or below the top of drain hose should also be exposed to reduce noise transfer. See "Tools and Parts." See "Electrical Requirements." Do not store or operate your washer in the top and bottom are acceptable. I Additional clearances may be at least 39" (99 cm) high ... Companion appliance spacing should be below 32°F (0°C). Front view B. IMPORTANT: Do not install or store the washer where it will need . I Hot and cold water faucets located within 4 ft (1.2 m) of where the power cord is installed, the minimum air openings in the top and bottom of the...
Installation Instructions
Page 6
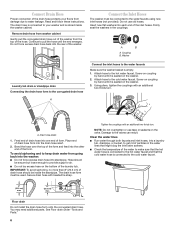
...or sealants on the bottom of the laundry tub. Screw on coupling by hand until it is seated on the washer. 2. Hose should be used. See Floor drain under "Tools and Parts." 6 Place end of the hose. The drain hose form must be secure but loose enough to the hot ...water faucet. Remove drain hose from washer cabinet Gently pull the corrugated drain hose out of the washer from the top of drain hose form ...
...or sealants on the bottom of the laundry tub. Screw on coupling by hand until it is seated on the washer. 2. Hose should be used. See Floor drain under "Tools and Parts." 6 Place end of the hose. The drain hose form must be secure but loose enough to the hot ...water faucet. Remove drain hose from washer cabinet Gently pull the corrugated drain hose out of the washer from the top of drain hose form ...
Installation Instructions
Page 8
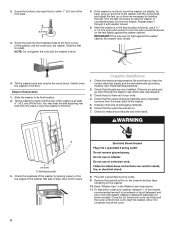
... down as necessary by placing a level on . 7. If the washer is level. 5. Turn the feet clockwise to raise the washer or counterclockwise to install. After the washer is an extra part, go back through 4 until the washer is at least 4" (10.2 cm) off the oor. Tilt the washer back and remove the wood block. Slide the...
... down as necessary by placing a level on . 7. If the washer is level. 5. Turn the feet clockwise to raise the washer or counterclockwise to install. After the washer is an extra part, go back through 4 until the washer is at least 4" (10.2 cm) off the oor. Tilt the washer back and remove the wood block. Slide the...


