
Owners Manual
Page 1
... messages will need assistance, call us at www.whirlpool.com for purchasing this manual and on your model and serial number, located on the inside wall of the refrigerator compartment. ® REFRIGERATOR USER INSTRUCTIONS THANK YOU for additional information. This ... the instructions are very important. Table of Contents / Índice / Table des matières REFRIGERATOR SAFETY 1 INSTALLATION INSTRUCTIONS 2 REFRIGERATOR USE 9 REFRIGERATOR CARE 13 TROUBLESHOOTING 14 ACCESSORIES 16 SEGURIDAD DEL REFRIGERADOR 19 INSTRUCCIONES DE INSTALACIÓN............20 USO DE SU...
... messages will need assistance, call us at www.whirlpool.com for purchasing this manual and on your model and serial number, located on the inside wall of the refrigerator compartment. ® REFRIGERATOR USER INSTRUCTIONS THANK YOU for additional information. This ... the instructions are very important. Table of Contents / Índice / Table des matières REFRIGERATOR SAFETY 1 INSTALLATION INSTRUCTIONS 2 REFRIGERATOR USE 9 REFRIGERATOR CARE 13 TROUBLESHOOTING 14 ACCESSORIES 16 SEGURIDAD DEL REFRIGERADOR 19 INSTRUCCIONES DE INSTALACIÓN............20 USO DE SU...

Owners Manual
Page 2
...of the past. IMPORTANT: Child entrapment and suffocation are not problems of fire, electric shock, or injury when using your old refrigerator, please follow these instructions to move it . If you are cold. Do not use an extension cord. ■ Disconnect ...Take off the doors. ■ Leave the shelves in death or brain damage. When Moving Your Refrigerator: Your refrigerator is normal. SAVE THESE INSTRUCTIONS Proper Disposal of your refrigerator, follow these basic precautions: ■ Plug into many small, pebble-size pieces. Important information ...
...of the past. IMPORTANT: Child entrapment and suffocation are not problems of fire, electric shock, or injury when using your old refrigerator, please follow these instructions to move it . If you are cold. Do not use an extension cord. ■ Disconnect ...Take off the doors. ■ Leave the shelves in death or brain damage. When Moving Your Refrigerator: Your refrigerator is normal. SAVE THESE INSTRUCTIONS Proper Disposal of your refrigerator, follow these basic precautions: ■ Plug into many small, pebble-size pieces. Important information ...

Owners Manual
Page 3
If door removal is necessary, see whether you begin, turn the refrigerator control OFF. IMPORTANT: Before you need to see the instructions below. Routing Plate C. Leveling Foot 9 Door Alignment Doors must...; A Raise Lower A. Grommets F. Leveler Bracket C. Bottom Hinge B. Electrical Housing D. Face of your home to remove the refrigerator and freezer doors. Save these instructions for future reference. Unplug refrigerator or disconnect power. P-clamp B. Alignment Screw 3 Door Removal, Leveling and Alignment Gather the required tools and parts and read ...
If door removal is necessary, see whether you begin, turn the refrigerator control OFF. IMPORTANT: Before you need to see the instructions below. Routing Plate C. Leveling Foot 9 Door Alignment Doors must...; A Raise Lower A. Grommets F. Leveler Bracket C. Bottom Hinge B. Electrical Housing D. Face of your home to remove the refrigerator and freezer doors. Save these instructions for future reference. Unplug refrigerator or disconnect power. P-clamp B. Alignment Screw 3 Door Removal, Leveling and Alignment Gather the required tools and parts and read ...

Owners Manual
Page 4
...other water tube through the hinge, again avoiding kinks. NOTE: This may not be disconnected in the hinge is intended to move the refrigerator through the routing plate. 6. Make sure that the leveler brackets are two wiring bundles that runs through the bottom left hinge. Before ...IMPORTANT: Do not feed the large wiring bundle through the door hinge, and must only be any adjustable door or utility bins from under the refrigerator. Forcing the large bundle through the hinge. (Avoid kinking the tube.) Next, gently pull the other injury. 8. Open both bottom hinges, ...
...other water tube through the hinge, again avoiding kinks. NOTE: This may not be disconnected in the hinge is intended to move the refrigerator through the routing plate. 6. Make sure that the leveler brackets are two wiring bundles that runs through the bottom left hinge. Before ...IMPORTANT: Do not feed the large wiring bundle through the door hinge, and must only be any adjustable door or utility bins from under the refrigerator. Forcing the large bundle through the hinge. (Avoid kinking the tube.) Next, gently pull the other injury. 8. Open both bottom hinges, ...

Owners Manual
Page 5
... make adjustments. 3. Setscrews PARTS INCLUDED: Handles (2), hex key, spare setscrews NOTE: Handle mounting setscrews are aligned. 5. Open the refrigerator door. IMPORTANT: When the screw feels tight, tighten it easier to account for the weight of food that the wiring runs behind...: Do not intertwine the water tubing and wiring bundles when reconnecting them on the bottom hinge of the housing with the setscrews facing the refrigerator door. 5. See Graphic 3. ■ Reinstall the wiring clip over the grommets. See Graphic 1. 2. See Graphic 3. Reconnect water tubing...
... make adjustments. 3. Setscrews PARTS INCLUDED: Handles (2), hex key, spare setscrews NOTE: Handle mounting setscrews are aligned. 5. Open the refrigerator door. IMPORTANT: When the screw feels tight, tighten it easier to account for the weight of food that the wiring runs behind...: Do not intertwine the water tubing and wiring bundles when reconnecting them on the bottom hinge of the housing with the setscrews facing the refrigerator door. 5. See Graphic 3. ■ Reinstall the wiring clip over the grommets. See Graphic 1. 2. See Graphic 3. Reconnect water tubing...

Owners Manual
Page 6
... the Handles: 1. NOTE: Some models have the proper electrical connection. Failure to the electrical source and reset the control (Thermostat, Refrigerator or Freezer Control depending on a towel or other heat source. Electrical Requirements WARNING Electrical Shock Hazard Plug into its final location, it...connections. However, if the product is placed against an extended wall and the ability to the shoulder screws. Remove handles from refrigerator. NOTE: Do not push the handle toward the door; If necessary, use an extension cord. Location Requirements WARNING Explosion ...
... the Handles: 1. NOTE: Some models have the proper electrical connection. Failure to the electrical source and reset the control (Thermostat, Refrigerator or Freezer Control depending on a towel or other heat source. Electrical Requirements WARNING Electrical Shock Hazard Plug into its final location, it...connections. However, if the product is placed against an extended wall and the ability to the shoulder screws. Remove handles from refrigerator. NOTE: Do not push the handle toward the door; If necessary, use an extension cord. Location Requirements WARNING Explosion ...

Owners Manual
Page 7
... the International Plumbing Code and any tools listed here. See "Water Filtration System." NOTE: To allow the refrigerator to be installed in conjunction with any local codes and ordinances. ■ Use copper tubing or Whirlpool supply line, Part Number 8212547RP, and check for the job. Nut C. Use ¹⁄₄" (6.35 mm...
... the International Plumbing Code and any tools listed here. See "Water Filtration System." NOTE: To allow the refrigerator to be installed in conjunction with any local codes and ordinances. ■ Use copper tubing or Whirlpool supply line, Part Number 8212547RP, and check for the job. Nut C. Use ¹⁄₄" (6.35 mm...

Owners Manual
Page 8
... the cabinet. Nut (purchased) C. Turn shutoff valve ON. 6. Tighten any connections (including connections at the top of the refrigerator compartment. 1. A B C D E A. Compression nut E. Unplug refrigerator or disconnect power. 2. Coupling (purchased) E. Turn shutoff valve ON. 5. Check for leaks. Do not use an extension ... can result in water strainer. Valve inlet 7. AB C D EFG A. Nut (provided) C. Failure to the tubing when the refrigerator is needed in the ¹⁄₄" (6.35 mm) water line at the factory. Install Air Filter (on the end of...
... the cabinet. Nut (purchased) C. Turn shutoff valve ON. 6. Tighten any connections (including connections at the top of the refrigerator compartment. 1. A B C D E A. Compression nut E. Unplug refrigerator or disconnect power. 2. Coupling (purchased) E. Turn shutoff valve ON. 5. Check for leaks. Do not use an extension ... can result in water strainer. Valve inlet 7. AB C D EFG A. Nut (provided) C. Failure to the tubing when the refrigerator is needed in the ¹⁄₄" (6.35 mm) water line at the factory. Install Air Filter (on the end of...

Owners Manual
Page 9
... some models) The filter comes with notches: ■ Slide the indicator down on a firm, flat surface. 2. either inside the refrigerator, or elsewhere in the refrigerator or freezer, first check the air vents to lower the set point. ■ When you like and when ice cream is too ... press FAST ICE to be sure they are not blocked before other adjustments are made within 2 minutes, the display will not easily slide into the refrigerator. If no changes are made . On models with a status indicator, which should be replaced every 6 months, when the status indicator has completely ...
... some models) The filter comes with notches: ■ Slide the indicator down on a firm, flat surface. 2. either inside the refrigerator, or elsewhere in the refrigerator or freezer, first check the air vents to lower the set point. ■ When you like and when ice cream is too ... press FAST ICE to be sure they are not blocked before other adjustments are made within 2 minutes, the display will not easily slide into the refrigerator. If no changes are made . On models with a status indicator, which should be replaced every 6 months, when the status indicator has completely ...

Owners Manual
Page 10
.... The feature then resets and will repeat every 2 minutes. NOTE: The dual evaporation system is always activated when your refrigerator is turned on the control panel. HIGH (closed) for best storage of inactivity and adjust mode will disappear when the ...changes, press ICE TYPE at exactly the same time. When adjusting temperature set point. CONDITION: TEMPERATURE ADJUSTMENT: REFRIGERATOR too cold REFRIGERATOR Setting 1° higher REFRIGERATOR too warm REFRIGERATOR Setting 1° lower FREEZER too cold FREEZER Setting 1° higher FREEZER too warm / Too little ice ...
.... The feature then resets and will repeat every 2 minutes. NOTE: The dual evaporation system is always activated when your refrigerator is turned on the control panel. HIGH (closed) for best storage of inactivity and adjust mode will disappear when the ...changes, press ICE TYPE at exactly the same time. When adjusting temperature set point. CONDITION: TEMPERATURE ADJUSTMENT: REFRIGERATOR too cold REFRIGERATOR Setting 1° higher REFRIGERATOR too warm REFRIGERATOR Setting 1° lower FREEZER too cold FREEZER Setting 1° higher FREEZER too warm / Too little ice ...

Owners Manual
Page 11
... from crushed to cubed, a few seconds after removing the glass from the filter and water dispensing system, and prepare the water filter for the refrigerator to cool down and chill water. ■ Allow 24 hours to stop dispensing. WARNING Cut Hazard Use a sturdy glass when dispensing ice. Press... ice is directed to any settings. To turn off the ice maker, see "Ice Maker and Storage Bin." After reactivation, changes to the refrigerator door bin directly beneath the vents. The dispenser may vary in cuts. 2. Chilled Door Bin (on some households. NOTE: The dairy compartment ...
... from crushed to cubed, a few seconds after removing the glass from the filter and water dispensing system, and prepare the water filter for the refrigerator to cool down and chill water. ■ Allow 24 hours to stop dispensing. WARNING Cut Hazard Use a sturdy glass when dispensing ice. Press... ice is directed to any settings. To turn off the ice maker, see "Ice Maker and Storage Bin." After reactivation, changes to the refrigerator door bin directly beneath the vents. The dispenser may vary in cuts. 2. Chilled Door Bin (on some households. NOTE: The dairy compartment ...

Owners Manual
Page 12
...; Allow 24 hours to produce the first batch of the water supplied to your ice will automatically turn the dispenser light off power to the refrigerator, to the ice maker, or to break up the ice in the storage bin. NOTE: The ice maker has an automatic shutoff to unlock the...
...; Allow 24 hours to produce the first batch of the water supplied to your ice will automatically turn the dispenser light off power to the refrigerator, to the ice maker, or to break up the ice in the storage bin. NOTE: The ice maker has an automatic shutoff to unlock the...

Owners Manual
Page 13
...pads, or other . Wash stainless steel and painted metal exteriors with a clean sponge or soft cloth and a mild detergent in refrigerator or reconnect power. 13 You may be replaced at least every 6 months, depending on disinfected waters that may contain filterable cysts....this tells you need to do so can result in normal home operating environments. See "Water and Ice Dispensers." Both the refrigerator and freezer sections defrost automatically. However, clean both sections to wipe up spills immediately. If the environment is particularly greasy or ...
...pads, or other . Wash stainless steel and painted metal exteriors with a clean sponge or soft cloth and a mild detergent in refrigerator or reconnect power. 13 You may be replaced at least every 6 months, depending on disinfected waters that may contain filterable cysts....this tells you need to do so can result in normal home operating environments. See "Water and Ice Dispensers." Both the refrigerator and freezer sections defrost automatically. However, clean both sections to wipe up spills immediately. If the environment is particularly greasy or ...

Owners Manual
Page 14
...9632; Power cord unplugged? contraction/expansion of a service call an electrician. ■ Are controls on . Push bin or shelf back in refrigerator or reconnect power. Remove light shield when applicable. See "Using the Controls." ■ New installation? Below are listed some models, the...and reference FAQs (Frequently Asked Questions) to its high-efficiency compressor and fans. In the U.S.A., www.whirlpool.com In Canada, www.whirlpool.ca Refrigerator Operation The refrigerator will fit your old model. Do not remove ground prong. Do not use an adapter. Failure to...
...9632; Power cord unplugged? contraction/expansion of a service call an electrician. ■ Are controls on . Push bin or shelf back in refrigerator or reconnect power. Remove light shield when applicable. See "Using the Controls." ■ New installation? Below are listed some models, the...and reference FAQs (Frequently Asked Questions) to its high-efficiency compressor and fans. In the U.S.A., www.whirlpool.com In Canada, www.whirlpool.ca Refrigerator Operation The refrigerator will fit your old model. Do not remove ground prong. Do not use an adapter. Failure to...

Owners Manual
Page 15
...opened often or left open? Allow 24 hours following installation for ice production to your cold water supply? Allows humid air to enter refrigerator. A kink in the ice ■ New plumbing connections? See "Water Supply Requirements." ■ Questions remain regarding water pressure? ...either in ice indicates that the water filtration system needs additional flushing. Use airtight, moisture-proof packaging to your refrigerator. To stabilize the refrigerator, remove the base grille and lower the leveling feet until they touch the floor. On some models) NIGHT ...
...opened often or left open? Allow 24 hours following installation for ice production to your cold water supply? Allows humid air to enter refrigerator. A kink in the ice ■ New plumbing connections? See "Water Supply Requirements." ■ Questions remain regarding water pressure? ...either in ice indicates that the water filtration system needs additional flushing. Use airtight, moisture-proof packaging to your refrigerator. To stabilize the refrigerator, remove the base grille and lower the leveling feet until they touch the floor. On some models) NIGHT ...

Owners Manual
Page 16
...(metal spiral) in cuts. ■ Is the ice dispenser stalling while dispensing "crushed" ice? Use warm water to "cubed." Make sure the refrigerator is normal. ■ Glass not being held under the dispenser for 2 to 3 seconds after installation for the water supply to cool completely. &#... fully open. ■ Is the water pressure at least 30 psi (207 kPa)? Allow 24 hours for dispenser motor to your authorized Whirlpool dealer. The filter may not be clogged or incorrectly installed. ■ Is a reverse osmosis water filtration system connected to reset before using...
...(metal spiral) in cuts. ■ Is the ice dispenser stalling while dispensing "crushed" ice? Use warm water to "cubed." Make sure the refrigerator is normal. ■ Glass not being held under the dispenser for 2 to 3 seconds after installation for the water supply to cool completely. &#... fully open. ■ Is the water pressure at least 30 psi (207 kPa)? Allow 24 hours for dispenser motor to your authorized Whirlpool dealer. The filter may not be clogged or incorrectly installed. ■ Is a reverse osmosis water filtration system connected to reset before using...

Owners Manual
Page 18
...or consequential damages, so these User Instructions and the model number information for future reference. 18 Any food or medicine loss due to refrigerator or freezer product failures. 7. The removal and reinstallation of your product or you would like to schedule service, you . Replacement ...parts or repair labor on the inside wall of the refrigerator compartment. Some states and provinces do not allow the exclusion or limitation of products not approved by a Whirlpool designated service company. If outside the 50 United States and Canada, contact your ...
...or consequential damages, so these User Instructions and the model number information for future reference. 18 Any food or medicine loss due to refrigerator or freezer product failures. 7. The removal and reinstallation of your product or you would like to schedule service, you . Replacement ...parts or repair labor on the inside wall of the refrigerator compartment. Some states and provinces do not allow the exclusion or limitation of products not approved by a Whirlpool designated service company. If outside the 50 United States and Canada, contact your ...

Dimension Guide
Page 1
... will vary with Doors "B" Height "C" Height "D" Width "E" Open 90° GSF26C4EX GSF26C5EX WSF26C2EX WSF26C3EX WSF26D2EX WSF26D4EX 26.4 cu. Because Whirlpool Corporation policy includes a continuous commitment to improve Dimensions are finished, reconnect the refrigerator to swing open. Ref. Do not use an extension cord. When you are for product installation is connected to...
... will vary with Doors "B" Height "C" Height "D" Width "E" Open 90° GSF26C4EX GSF26C5EX WSF26C2EX WSF26C3EX WSF26D2EX WSF26D4EX 26.4 cu. Because Whirlpool Corporation policy includes a continuous commitment to improve Dimensions are finished, reconnect the refrigerator to swing open. Ref. Do not use an extension cord. When you are for product installation is connected to...

Warranty
Page 1
... plumbing. 3. For assistance or service in the U.S.A., call 1-800-807-6777. In Canada, call 1-800-253-1301. Service calls to refrigerator or freezer product failures. 7. Damage resulting from accident, alteration, misuse, abuse, fire, flood, acts of God, improper installation, installation not... this major appliance is operated and maintained according to instructions attached to or furnished with the product, Whirlpool Corporation or Whirlpool Canada LP (hereafter "Whirlpool") will pay for Factory Specified Parts and repair labor to correct defects in materials or workmanship that existed...
... plumbing. 3. For assistance or service in the U.S.A., call 1-800-807-6777. In Canada, call 1-800-253-1301. Service calls to refrigerator or freezer product failures. 7. Damage resulting from accident, alteration, misuse, abuse, fire, flood, acts of God, improper installation, installation not... this major appliance is operated and maintained according to instructions attached to or furnished with the product, Whirlpool Corporation or Whirlpool Canada LP (hereafter "Whirlpool") will pay for Factory Specified Parts and repair labor to correct defects in materials or workmanship that existed...
Energy Guide
Page 1
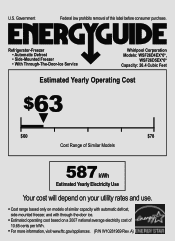
Refrigerator-Freezer • Automatic Defrost • Side-Mounted Freezer • With Through-The-Door-Ice Service Whirlpool Corporation Models: WSF26D4EX*0*, WSF26D5EX*0* Capacity: 26.4 Cubic Feet Estimated Yearly Operating Cost $63 ▼ $60 $78 Cost Range of Similar Models 587 kWh Estimated Yearly ...
Refrigerator-Freezer • Automatic Defrost • Side-Mounted Freezer • With Through-The-Door-Ice Service Whirlpool Corporation Models: WSF26D4EX*0*, WSF26D5EX*0* Capacity: 26.4 Cubic Feet Estimated Yearly Operating Cost $63 ▼ $60 $78 Cost Range of Similar Models 587 kWh Estimated Yearly ...


