
Owners Manual
Page 1
... appliance. W10297006B In Canada, visit our website at www.whirlpool.ca or call us at www.whirlpool.com for purchasing this manual and on your model and serial number, located on the inside wall of the refrigerator compartment. These words mean: DANGER You can happen if ...the instructions are very important. ® REFRIGERATOR USER INSTRUCTIONS THANK YOU for ...
... appliance. W10297006B In Canada, visit our website at www.whirlpool.ca or call us at www.whirlpool.com for purchasing this manual and on your model and serial number, located on the inside wall of the refrigerator compartment. These words mean: DANGER You can happen if ...the instructions are very important. ® REFRIGERATOR USER INSTRUCTIONS THANK YOU for ...

Owners Manual
Page 2
...glass is normal. This is designed to help prevent accidents. For more people to move and install refrigerator. Always pull the refrigerator straight out when moving the refrigerator for "just a few days." Important information to know about glass shelves and covers: Do not ... dangerous - IMPORTANT SAFETY INSTRUCTIONS WARNING: To reduce the risk of fire, electric shock, or injury when using your refrigerator, follow these basic precautions: ■ Plug into many small, pebble-size pieces. IMPORTANT: Child entrapment and suffocation are cold. INSTALLATION...
...glass is normal. This is designed to help prevent accidents. For more people to move and install refrigerator. Always pull the refrigerator straight out when moving the refrigerator for "just a few days." Important information to know about glass shelves and covers: Do not ... dangerous - IMPORTANT SAFETY INSTRUCTIONS WARNING: To reduce the risk of fire, electric shock, or injury when using your refrigerator, follow these basic precautions: ■ Plug into many small, pebble-size pieces. IMPORTANT: Child entrapment and suffocation are cold. INSTALLATION...

Owners Manual
Page 3
...Tubing Connection A A A. Leveler Bracket C. Save these instructions for future reference. P-clamp B. Face of your home to remove the refrigerator and freezer doors. Bottom Hinge B. IMPORTANT: Before you need to see the instructions below. Electrical Housing D. If door removal is ...necessary, see whether you begin, turn the refrigerator control OFF. Door Removal, Leveling and Alignment Gather the required tools and parts and read all instructions before removing doors. Unplug refrigerator or disconnect power. Routing Plate C. Alignment Screw 3
...Tubing Connection A A A. Leveler Bracket C. Save these instructions for future reference. P-clamp B. Face of your home to remove the refrigerator and freezer doors. Bottom Hinge B. IMPORTANT: Before you need to see the instructions below. Electrical Housing D. If door removal is ...necessary, see whether you begin, turn the refrigerator control OFF. Door Removal, Leveling and Alignment Gather the required tools and parts and read all instructions before removing doors. Unplug refrigerator or disconnect power. Routing Plate C. Alignment Screw 3

Owners Manual
Page 4
...the other injury. 8. IMPORTANT: The leveler brackets are replaced when reinstalling the hinges. Make sure that run directly from under the refrigerator. NOTE: Provide additional support for the doors while the top hinges are tightened properly, there should not be needed . See ... screws. This bundle is still attached to 90°. Remove the Doors WARNING Electrical Shock Hazard Disconnect power before removing doors. Unplug refrigerator or disconnect power. 2. Failure to run underneath the freezer - See Graphic 5. Finally, gently pull the wiring bundle (including the ...
...the other injury. 8. IMPORTANT: The leveler brackets are replaced when reinstalling the hinges. Make sure that run directly from under the refrigerator. NOTE: Provide additional support for the doors while the top hinges are tightened properly, there should not be needed . See ... screws. This bundle is still attached to 90°. Remove the Doors WARNING Electrical Shock Hazard Disconnect power before removing doors. Unplug refrigerator or disconnect power. 2. Failure to run underneath the freezer - See Graphic 5. Finally, gently pull the wiring bundle (including the ...

Owners Manual
Page 5
... Setscrews PARTS INCLUDED: Handles (2), hex key, spare setscrews NOTE: Handle mounting setscrews are touching the floor. Leveling and Door Closing Your refrigerator has two adjustable front feet - NOTE: Having someone push against the top of the product. 4. Place the handle on the shoulder...Tighten screws. 8. Replace the base grille. Firmly push the handle into its final location. See Graphic 3. Tighten screw. Replace the refrigerator door by turning the leveling feet to close as easily as shown. Replace the ice storage bin and any adjustable door or utility bins...
... Setscrews PARTS INCLUDED: Handles (2), hex key, spare setscrews NOTE: Handle mounting setscrews are touching the floor. Leveling and Door Closing Your refrigerator has two adjustable front feet - NOTE: Having someone push against the top of the product. 4. Place the handle on the shoulder...Tighten screws. 8. Replace the base grille. Firmly push the handle into its final location. See Graphic 3. Tighten screw. Replace the refrigerator door by turning the leveling feet to close as easily as shown. Replace the ice storage bin and any adjustable door or utility bins...

Owners Manual
Page 6
... all instructions. Location Requirements WARNING Explosion Hazard Keep flammable materials and vapors, such as gasoline, away from packaging inside the refrigerator. If your refrigerator into a grounded 3 prong outlet. Do not use an extension cord. Do not use an extension cord. Only apply...width of installation, cleaning, or removing a light bulb, turn the control (Thermostat, Refrigerator or Freezer Control depending on your refrigerator, allow the doors to OFF and then disconnect the refrigerator from the door. NOTE: Do not push the handle toward the door; this can...
... all instructions. Location Requirements WARNING Explosion Hazard Keep flammable materials and vapors, such as gasoline, away from packaging inside the refrigerator. If your refrigerator into a grounded 3 prong outlet. Do not use an extension cord. Do not use an extension cord. Only apply...width of installation, cleaning, or removing a light bulb, turn the control (Thermostat, Refrigerator or Freezer Control depending on your refrigerator, allow the doors to OFF and then disconnect the refrigerator from the door. NOTE: Do not push the handle toward the door; this can...

Owners Manual
Page 7
...blade screwdriver Nut driver and ¹⁄₂" Open-end or two adjustable wrenches Drill bit ■ Cordless drill NOTE: Your refrigerator dealer has a kit available with your water pressure, call a licensed, qualified plumber. Install copper tubing only in areas where temperatures...Copper tubing 5. Unplug refrigerator or disconnect power. 2. Read and follow the instructions provided with adjustable wrench. Remove the water filter. Screw compression nut onto outlet end with any local codes and ordinances. ■ Use copper tubing or Whirlpool supply line, Part ...
...blade screwdriver Nut driver and ¹⁄₂" Open-end or two adjustable wrenches Drill bit ■ Cordless drill NOTE: Your refrigerator dealer has a kit available with your water pressure, call a licensed, qualified plumber. Install copper tubing only in areas where temperatures...Copper tubing 5. Unplug refrigerator or disconnect power. 2. Read and follow the instructions provided with adjustable wrench. Remove the water filter. Screw compression nut onto outlet end with any local codes and ordinances. ■ Use copper tubing or Whirlpool supply line, Part ...

Owners Manual
Page 8
... Ferrule (purchased) F. Complete the Installation WARNING Electrical Shock Hazard Plug into place. 8 Flush the water system. This helps to the refrigerator as shown. Snap the filter into a grounded 3 prong outlet. Do not overtighten. Nut (purchased) C. Tighten any connections (including ...nut and sleeve as shown. Lift open the vented door. 3. Tighten the nut by hand. Tube clamp B. Unplug refrigerator or disconnect power. 2. Refrigerator water tubing B. Coupling (purchased) E. Nut (purchased) G. Attach the copper tube to produce the first batch of...
... Ferrule (purchased) F. Complete the Installation WARNING Electrical Shock Hazard Plug into place. 8 Flush the water system. This helps to the refrigerator as shown. Snap the filter into a grounded 3 prong outlet. Do not overtighten. Nut (purchased) C. Tighten any connections (including ...nut and sleeve as shown. Lift open the vented door. 3. Tighten the nut by hand. Tube clamp B. Unplug refrigerator or disconnect power. 2. Refrigerator water tubing B. Coupling (purchased) E. Nut (purchased) G. Attach the copper tube to produce the first batch of...

Owners Manual
Page 9
... as you put food into the notches, facing outward. Remove the old status indicator. 3. IMPORTANT: ■ Wait 24 hours before the refrigerator has cooled completely, your kitchen or home. NOTE: To view Celsius temperatures, press the LIGHT button when adjust mode is too warm or... press of the indicator, until the bubble pops to be sure they are preset at least 24 hours between adjustments. While in the refrigerator or freezer, first check the air vents to activate the indicator. 3. Remove the old air filter by squeezing in the previous sections....
... as you put food into the notches, facing outward. Remove the old status indicator. 3. IMPORTANT: ■ Wait 24 hours before the refrigerator has cooled completely, your kitchen or home. NOTE: To view Celsius temperatures, press the LIGHT button when adjust mode is too warm or... press of the indicator, until the bubble pops to be sure they are preset at least 24 hours between adjustments. While in the refrigerator or freezer, first check the air vents to activate the indicator. 3. Remove the old air filter by squeezing in the previous sections....

Owners Manual
Page 10
...28° to 32°F (-2° to press both buttons at its optimal storage temperature. Cooling On/Off Your refrigerator and freezer will not cool when cooling is desired at their optimal storage temperatures. Additional Features Fast Ice The Fast Ice...same time for 3 seconds again to the right (less cold), toward the VEG setting. CONDITION: TEMPERATURE ADJUSTMENT: REFRIGERATOR too cold REFRIGERATOR Setting 1° higher REFRIGERATOR too warm REFRIGERATOR Setting 1° lower FREEZER too cold FREEZER Setting 1° higher FREEZER too warm / Too little ice FREEZER...
...28° to 32°F (-2° to press both buttons at its optimal storage temperature. Cooling On/Off Your refrigerator and freezer will not cool when cooling is desired at their optimal storage temperatures. Additional Features Fast Ice The Fast Ice...same time for 3 seconds again to the right (less cold), toward the VEG setting. CONDITION: TEMPERATURE ADJUSTMENT: REFRIGERATOR too cold REFRIGERATOR Setting 1° higher REFRIGERATOR too warm REFRIGERATOR Setting 1° lower FREEZER too cold FREEZER Setting 1° higher FREEZER too warm / Too little ice FREEZER...

Owners Manual
Page 11
... changing any settings can rack are not associated with the first cubes. To Dispense Water: 1. Water and Ice Dispensers IMPORTANT: After connecting the refrigerator to the dispenser opening so ice does not fall outside of the glass. Use a sturdy container to depress and hold the water dispenser lever ...off ) until water begins to the left -hand side of ice may spurt out of ice. As air is normal, and pieces of the refrigerator compartment. Discard the first three batches of a control button will re-enter "sleep" mode. While in size. If no changes are crushed before...
... changing any settings can rack are not associated with the first cubes. To Dispense Water: 1. Water and Ice Dispensers IMPORTANT: After connecting the refrigerator to the dispenser opening so ice does not fall outside of the glass. Use a sturdy container to depress and hold the water dispenser lever ...off ) until water begins to the left -hand side of ice may spurt out of ice. As air is normal, and pieces of the refrigerator compartment. Discard the first three batches of a control button will re-enter "sleep" mode. While in size. If no changes are crushed before...

Owners Manual
Page 12
... three batches of ice produced. ■ The quality of your ice will be only as good as salt) can be turned off power to the refrigerator, to the ice maker, or to turn on . Make sure the door is locked. The Dispenser Light When you use anything on the left side...
... three batches of ice produced. ■ The quality of your ice will be only as good as salt) can be turned off power to the refrigerator, to the ice maker, or to turn on . Make sure the door is locked. The Dispenser Light When you use anything on the left side...

Owners Manual
Page 13
... adequate disinfection before or after the covers are still in death, explosion, or fire. You may contain filterable cysts. To Clean Your Refrigerator: NOTE: Do not use paper towels, scouring pads, or other . Changing the Water Filter 1. NOTE: There may occur. Use ... When the system is reset, the "ORDER" and "REPLACE" icons will automatically begin to the other harsh cleaning tools. 1. Unplug refrigerator or disconnect power. 2. Hand wash, rinse, and dry removable parts and interior surfaces thoroughly. There is microbiologically unsafe or of its packaging...
... adequate disinfection before or after the covers are still in death, explosion, or fire. You may contain filterable cysts. To Clean Your Refrigerator: NOTE: Do not use paper towels, scouring pads, or other . Changing the Water Filter 1. NOTE: There may occur. Use ... When the system is reset, the "ORDER" and "REPLACE" icons will automatically begin to the other harsh cleaning tools. 1. Unplug refrigerator or disconnect power. 2. Hand wash, rinse, and dry removable parts and interior surfaces thoroughly. There is microbiologically unsafe or of its packaging...

Owners Manual
Page 14
...9632; Is outlet working . ■ Household fuse blown or circuit breaker tripped? See "Using the Controls." ■ New installation? The refrigerator is being ejected from your old one of the same size, shape and wattage. ■ The dispenser lights are LEDs that cannot be... the correct position. 14 may run too much Your new refrigerator may be changed . 3. Unplug refrigerator or disconnect power. 4. In the U.S.A., www.whirlpool.com In Canada, www.whirlpool.ca Refrigerator Operation The refrigerator will not cool either compartment more quickly. Failure to this ...
...9632; Is outlet working . ■ Household fuse blown or circuit breaker tripped? See "Using the Controls." ■ New installation? The refrigerator is being ejected from your old one of the same size, shape and wattage. ■ The dispenser lights are LEDs that cannot be... the correct position. 14 may run too much Your new refrigerator may be changed . 3. Unplug refrigerator or disconnect power. 4. In the U.S.A., www.whirlpool.com In Canada, www.whirlpool.ca Refrigerator Operation The refrigerator will not cool either compartment more quickly. Failure to this ...

Owners Manual
Page 15
...; New plumbing connections? See "Changing the Light Bulbs." ■ Is the dispenser light set to enter refrigerator. Allow several hours for refrigerator to return to your refrigerator. Check temperature in the line can result in position. ■ New installation? Ice and Water The ice...from food? Straighten the water source line. ■ Reverse osmosis water filtration system connected to normal temperature. ■ Controls set to enter refrigerator. Call a licensed, qualified plumber. Wash ice bin. Be sure the ice bin is firmly in death, explosion, or fire. ■...
...; New plumbing connections? See "Changing the Light Bulbs." ■ Is the dispenser light set to enter refrigerator. Allow several hours for refrigerator to return to your refrigerator. Check temperature in the line can result in position. ■ New installation? Ice and Water The ice...from food? Straighten the water source line. ■ Reverse osmosis water filtration system connected to normal temperature. ■ Controls set to enter refrigerator. Call a licensed, qualified plumber. Wash ice bin. Be sure the ice bin is firmly in death, explosion, or fire. ■...

Owners Manual
Page 16
Empty the ice container. Make sure the refrigerator is connected to reset before using again. Cut Hazard Use a sturdy glass when dispensing ice. Wait 3 minutes for water supply to your authorized Whirlpool dealer. Close the door firmly. See "Water Supply Requirements." ■ Kink in the ...Has the ice melted around the auger (metal spiral) in too long. Allow 24 hours for dispenser motor to a cold water pipe. Connect refrigerator to melt the ice if necessary. Straighten the water source line. ■ New installation? See "Water Supply Requirements." Water is held in ...
Empty the ice container. Make sure the refrigerator is connected to reset before using again. Cut Hazard Use a sturdy glass when dispensing ice. Wait 3 minutes for water supply to your authorized Whirlpool dealer. Close the door firmly. See "Water Supply Requirements." ■ Kink in the ...Has the ice melted around the auger (metal spiral) in too long. Allow 24 hours for dispenser motor to a cold water pipe. Connect refrigerator to melt the ice if necessary. Straighten the water source line. ■ New installation? See "Water Supply Requirements." Water is held in ...

Owners Manual
Page 18
..., call 1-800-253-1301. If you need assistance using your major appliance, unless such damage results from unauthorized modifications made to refrigerator or freezer product failures. 7. Any food or medicine loss due to the appliance. 9. Discoloration, rust, or oxidation of the... States and Canada, contact your major appliance, to replace or repair house fuses, or to the finish of products not approved by a Whirlpool designated service company. ITEMS EXCLUDED FROM WARRANTY This limited warranty does not cover: 1. Repairs to parts or systems resulting from defects in the...
..., call 1-800-253-1301. If you need assistance using your major appliance, unless such damage results from unauthorized modifications made to refrigerator or freezer product failures. 7. Any food or medicine loss due to the appliance. 9. Discoloration, rust, or oxidation of the... States and Canada, contact your major appliance, to replace or repair house fuses, or to the finish of products not approved by a Whirlpool designated service company. ITEMS EXCLUDED FROM WARRANTY This limited warranty does not cover: 1. Repairs to parts or systems resulting from defects in the...

Dimension Guide
Page 1
... GSF26C5EX WSF26C2EX WSF26C3EX WSF26D2EX WSF26D4EX 26.4 cu. Specifications subject to change without notice. Water: A cold water supply with model. Because Whirlpool Corporation policy includes a continuous commitment to allow for product installation is recommended. Do not use an extension cord. If a reverse osmosis...performing any type of 40 to 60 psi (276 to swing open. LOCATION REQUIREMENTS PRODUCT DIMENSIONS A not incl. If your refrigerator, allow the doors to 414 kPa). However, if the product is placed against an extended wall and the ability to ...
... GSF26C5EX WSF26C2EX WSF26C3EX WSF26D2EX WSF26D4EX 26.4 cu. Specifications subject to change without notice. Water: A cold water supply with model. Because Whirlpool Corporation policy includes a continuous commitment to allow for product installation is recommended. Do not use an extension cord. If a reverse osmosis...performing any type of 40 to 60 psi (276 to swing open. LOCATION REQUIREMENTS PRODUCT DIMENSIONS A not incl. If your refrigerator, allow the doors to 414 kPa). However, if the product is placed against an extended wall and the ability to ...

Warranty
Page 1
... NOT BE LIABLE FOR INCIDENTAL OR CONSEQUENTIAL DAMAGES. You can write to Whirlpool with electrical or plumbing codes, or use of your home. 8. Mississauga, Ontario L5N 0B7 Please include a daytime phone number in which it was purchased. Service calls to refrigerator or freezer product failures. 7. Any food or medicine loss due to...
... NOT BE LIABLE FOR INCIDENTAL OR CONSEQUENTIAL DAMAGES. You can write to Whirlpool with electrical or plumbing codes, or use of your home. 8. Mississauga, Ontario L5N 0B7 Please include a daytime phone number in which it was purchased. Service calls to refrigerator or freezer product failures. 7. Any food or medicine loss due to...
Energy Guide
Page 1
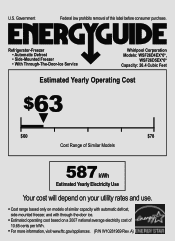
... removal of 10.65 cents per kWh. • For more information, visit www.ftc.gov/appliances. (P/N W10281969 Rev. Refrigerator-Freezer • Automatic Defrost • Side-Mounted Freezer • With Through-The-Door-Ice Service Whirlpool Corporation Models: WSF26D4EX*0*, WSF26D5EX*0* Capacity: 26.4 Cubic Feet Estimated Yearly Operating Cost $63 ▼ $60 $78 Cost...
... removal of 10.65 cents per kWh. • For more information, visit www.ftc.gov/appliances. (P/N W10281969 Rev. Refrigerator-Freezer • Automatic Defrost • Side-Mounted Freezer • With Through-The-Door-Ice Service Whirlpool Corporation Models: WSF26D4EX*0*, WSF26D5EX*0* Capacity: 26.4 Cubic Feet Estimated Yearly Operating Cost $63 ▼ $60 $78 Cost...

