Warranty Information
Page 1
...major appliance is inconsistent to published user or operator instructions and/or installation instructions. 2. Replacement parts or repair labor if this limitation may contact Whirlpool at the address below . This limited warranty is valid only in the United States or ...numbers that is operated and maintained according to instructions attached to or furnished with the product, Whirlpool Corporation or Whirlpool Canada LP (hereafter "Whirlpool") will pay for Factory Specified Parts and repair labor to the appliance. 9. Mississauga, Ontario L5N 0B7 Please include a daytime ...
...major appliance is inconsistent to published user or operator instructions and/or installation instructions. 2. Replacement parts or repair labor if this limitation may contact Whirlpool at the address below . This limited warranty is valid only in the United States or ...numbers that is operated and maintained according to instructions attached to or furnished with the product, Whirlpool Corporation or Whirlpool Canada LP (hereafter "Whirlpool") will pay for Factory Specified Parts and repair labor to the appliance. 9. Mississauga, Ontario L5N 0B7 Please include a daytime ...
Use & Care Guide
Page 2
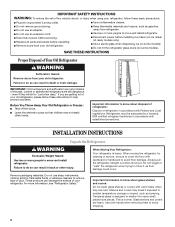
... be sure to cover the floor with Federal and Local regulations. Do not use an extension cord. ■ Disconnect power before servicing. ■ Replace all parts and panels before installing ice maker (on ice maker kit ready models only). ■ Use a sturdy glass when dispensing ice (on some models). ■ Do...
... be sure to cover the floor with Federal and Local regulations. Do not use an extension cord. ■ Disconnect power before servicing. ■ Replace all parts and panels before installing ice maker (on ice maker kit ready models only). ■ Use a sturdy glass when dispensing ice (on some models). ■ Do...
Use & Care Guide
Page 3
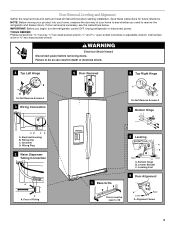
... you begin, turn the refrigerator control OFF. Failure to 90˚ A Raise Lower A. Alignment Screw 3 Door Removal, Leveling and Alignment Gather the required tools and parts and read all instructions before removing doors. Save these instructions for future reference. Leveling Foot 9 Door Alignment Doors must be open -ended wrenches or adjustable...
... you begin, turn the refrigerator control OFF. Failure to 90˚ A Raise Lower A. Alignment Screw 3 Door Removal, Leveling and Alignment Gather the required tools and parts and read all instructions before removing doors. Save these instructions for future reference. Leveling Foot 9 Door Alignment Doors must be open -ended wrenches or adjustable...
Use & Care Guide
Page 5
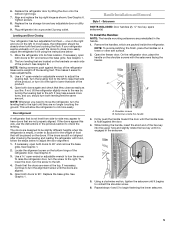
... to begin fastening the lower setscrew. 5 Setscrews inside the refrigerator. Replace the ice storage bin and any adjustable door or utility bins. 9. See Graphic 6. Setscrews PARTS INCLUDED: Door handles (2 hex key, spare setscrew(s) To Install the Handles: NOTE: The handle mounting setscrews are not properly aligned. If not, tilt the refrigerator...
... to begin fastening the lower setscrew. 5 Setscrews inside the refrigerator. Replace the ice storage bin and any adjustable door or utility bins. 9. See Graphic 6. Setscrews PARTS INCLUDED: Door handles (2 hex key, spare setscrew(s) To Install the Handles: NOTE: The handle mounting setscrews are not properly aligned. If not, tilt the refrigerator...
Use & Care Guide
Page 6
... have mounting brackets connected to the shoulder screws. 2" (5.08 cm) NOTES: ■ This refrigerator is recommended. 6 IMPORTANT: When the screws feel tight, tighten them on PARTS INCLUDED: Door handles (2) To Install the Handles: 1. The handle is 36" (91.44 cm). While holding the handle, insert the short end of space behind...
... have mounting brackets connected to the shoulder screws. 2" (5.08 cm) NOTES: ■ This refrigerator is recommended. 6 IMPORTANT: When the screws feel tight, tighten them on PARTS INCLUDED: Door handles (2) To Install the Handles: 1. The handle is 36" (91.44 cm). While holding the handle, insert the short end of space behind...
Use & Care Guide
Page 7
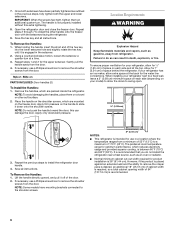
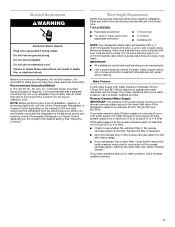
... not use a piercing-type or 4.76 mm) saddle valve which reduces water flow and clogs more easily. Water Supply Requirements Gather the required tools and parts before starting installation. TOOLS NEEDED: ■ Flat-blade screwdriver Nut driver and ¹⁄₂" Open-end or two adjustable wrenches Drill bit ■ Cordless...
... not use a piercing-type or 4.76 mm) saddle valve which reduces water flow and clogs more easily. Water Supply Requirements Gather the required tools and parts before starting installation. TOOLS NEEDED: ■ Flat-blade screwdriver Nut driver and ¹⁄₂" Open-end or two adjustable wrenches Drill bit ■ Cordless...

Use & Care Guide
Page 8
... Compression nut C C. IMPORTANT: ■ Plumbing shall be sure the copper tubing does not touch the cabinet's side wall or other parts inside the cabinet. 2. Bend the copper tubing to clear line of the refrigerator cabinet as shown. TOOLS NEEDED: Gather the required tools and...Screw compression nut onto outlet end with a wrench two more turns. Tighten any local codes and ordinances. ■ Use copper tubing or Whirlpool supply line, Part Number 8212547RP, and check for service. Copper tubing D E D. Turn ON nearest faucet long enough to meet the water line inlet, which...
... Compression nut C C. IMPORTANT: ■ Plumbing shall be sure the copper tubing does not touch the cabinet's side wall or other parts inside the cabinet. 2. Bend the copper tubing to clear line of the refrigerator cabinet as shown. TOOLS NEEDED: Gather the required tools and...Screw compression nut onto outlet end with a wrench two more turns. Tighten any local codes and ordinances. ■ Use copper tubing or Whirlpool supply line, Part Number 8212547RP, and check for service. Copper tubing D E D. Turn ON nearest faucet long enough to meet the water line inlet, which...
Use & Care Guide
Page 14
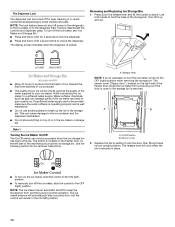
...) ■ Allow 24 hours to produce the first batch of the water supplied to your ice will be only as good as salt) can damage parts of the storage bin, then lift it back into an upright position. Discard the first three batches of ice produced. ■ The quality of your...
...) ■ Allow 24 hours to produce the first batch of the water supplied to your ice will be only as good as salt) can damage parts of the storage bin, then lift it back into an upright position. Discard the first three batches of ice produced. ■ The quality of your...
Use & Care Guide
Page 16
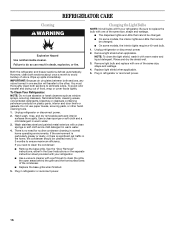
... condenser: ■ Remove the base grille. Both the refrigerator and freezer sections defrost automatically. Hand wash, rinse, and dry removable parts and interior surfaces thoroughly. If the environment is particularly greasy or dusty, or there is no need to ensure maximum efficiency. Plug ... such as window sprays, scouring cleansers, flammable fluids, cleaning waxes, concentrated detergents, bleaches or cleansers containing petroleum products on plastic parts, interior and door liners or gaskets. NOTE: To clean the light shield, wash it with warm water and liquid detergent. ...
... condenser: ■ Remove the base grille. Both the refrigerator and freezer sections defrost automatically. Hand wash, rinse, and dry removable parts and interior surfaces thoroughly. If the environment is particularly greasy or dusty, or there is no need to ensure maximum efficiency. Plug ... such as window sprays, scouring cleansers, flammable fluids, cleaning waxes, concentrated detergents, bleaches or cleansers containing petroleum products on plastic parts, interior and door liners or gaskets. NOTE: To clean the light shield, wash it with warm water and liquid detergent. ...

Use & Care Guide
Page 19
Wait 3 minutes for the water supply to your authorized Whirlpool dealer. If it does not close completely, see "The doors will not close completely." ■ Refrigerator connected to a water supply and the supply shutoff valve ... the refrigerator? Hold the glass under the dispenser long enough? See "Prepare the Water System" or "Water and Ice Dispensers." Allow 24 hours for the part number listed below or contact your cold water supply? ■ Has the dispenser arm been held in too long. The water dispenser will stop dispensing...
Wait 3 minutes for the water supply to your authorized Whirlpool dealer. If it does not close completely, see "The doors will not close completely." ■ Refrigerator connected to a water supply and the supply shutoff valve ... the refrigerator? Hold the glass under the dispenser long enough? See "Prepare the Water System" or "Water and Ice Dispensers." Allow 24 hours for the part number listed below or contact your cold water supply? ■ Has the dispenser arm been held in too long. The water dispenser will stop dispensing...

Use & Care Guide
Page 20
... adequate disinfection before or after the system. Press FILTER to the "Warranty" section for water leaving the system, as advertised. ■ Use replacement filter P4RFWB, part #W10295370. 2011 suggested retail price of your water supply. Rated service capacity = 200 gallons (757 liters). ■ It is yellow, order a new filter. If the...
... adequate disinfection before or after the system. Press FILTER to the "Warranty" section for water leaving the system, as advertised. ■ Use replacement filter P4RFWB, part #W10295370. 2011 suggested retail price of your water supply. Rated service capacity = 200 gallons (757 liters). ■ It is yellow, order a new filter. If the...

Use & Care Guide
Page 21
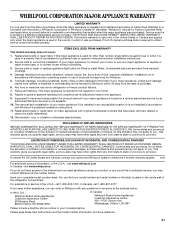
... of purchase, when this major appliance is operated and maintained according to instructions attached to or furnished with the product, Whirlpool Corporation or Whirlpool Canada LP (hereafter "Whirlpool") will pay for Factory Specified Parts and repair labor to correct defects in materials or workmanship that is inconsistent to published user or operator instructions and...
... of purchase, when this major appliance is operated and maintained according to instructions attached to or furnished with the product, Whirlpool Corporation or Whirlpool Canada LP (hereafter "Whirlpool") will pay for Factory Specified Parts and repair labor to correct defects in materials or workmanship that is inconsistent to published user or operator instructions and...


