
Owners Manual
Page 1
WARNING You can happen if the instructions are very important. ® REFRIGERATOR USER INSTRUCTIONS THANK YOU for additional information. In Canada, visit our website at www.whirlpool.ca or call us at 1-800-807-6777. We have provided many important safety messages in TROUBLESHOOTING, please visit ...word "DANGER" or "WARNING." You will need assistance, call us at www.whirlpool.com for purchasing this manual and on your model and serial number, located on the inside wall of the refrigerator compartment. Always read and obey all safety messages. This is , tell you ...
WARNING You can happen if the instructions are very important. ® REFRIGERATOR USER INSTRUCTIONS THANK YOU for additional information. In Canada, visit our website at www.whirlpool.ca or call us at 1-800-807-6777. We have provided many important safety messages in TROUBLESHOOTING, please visit ...word "DANGER" or "WARNING." You will need assistance, call us at www.whirlpool.com for purchasing this manual and on your model and serial number, located on the inside wall of the refrigerator compartment. Always read and obey all safety messages. This is , tell you ...

Owners Manual
Page 2
... a sturdy glass when dispensing ice (on some models). ■ Do not hit the refrigerator glass doors (on some models). When Moving Your Refrigerator: Your refrigerator is normal. Do not wiggle or "walk" the refrigerator when trying to move it . Tempered glass is designed to shatter into a grounded 3 ...precautions: ■ Plug into many small, pebble-size pieces. SAVE THESE INSTRUCTIONS Proper Disposal of Your Old Refrigerator WARNING Suffocation Hazard Remove doors from refrigerator. ■ Use two or more people to know about glass shelves and covers: Do not clean glass shelves...
... a sturdy glass when dispensing ice (on some models). ■ Do not hit the refrigerator glass doors (on some models). When Moving Your Refrigerator: Your refrigerator is normal. Do not wiggle or "walk" the refrigerator when trying to move it . Tempered glass is designed to shatter into a grounded 3 ...precautions: ■ Plug into many small, pebble-size pieces. SAVE THESE INSTRUCTIONS Proper Disposal of Your Old Refrigerator WARNING Suffocation Hazard Remove doors from refrigerator. ■ Use two or more people to know about glass shelves and covers: Do not clean glass shelves...

Owners Manual
Page 3
Unplug refrigerator or disconnect power. Failure to 90˚ A Raise Lower A. Leveler Bracket C. P-clamp B. Grommets F. Bottom Hinge B. Leveling Foot 9 Door Alignment Doors must be open -ended wrenches ... for future reference. Routing Plate C. Wiring Clip E. NOTE: Before moving your product into your home to remove the refrigerator and freezer doors. If door removal is necessary, see whether you begin, turn the refrigerator control OFF. IMPORTANT: Before you need to see the instructions below. TOOLS NEEDED: Phillips screwdriver hex key, ¹...
Unplug refrigerator or disconnect power. Failure to 90˚ A Raise Lower A. Leveler Bracket C. P-clamp B. Grommets F. Bottom Hinge B. Leveling Foot 9 Door Alignment Doors must be open -ended wrenches ... for future reference. Routing Plate C. Wiring Clip E. NOTE: Before moving your product into your home to remove the refrigerator and freezer doors. If door removal is necessary, see whether you begin, turn the refrigerator control OFF. IMPORTANT: Before you need to see the instructions below. TOOLS NEEDED: Phillips screwdriver hex key, ¹...

Owners Manual
Page 4
...the P-clamp using a ¹⁄₄" hex-head socket wrench. ■ Pull the electrical housing out from closing properly. 3. Lift the refrigerator door straight up off bottom hinge. 11. Make sure that the leveler brackets are two wiring bundles that the leveler brackets are mounted behind the...door or utility bins from the P-clamp. ■ Remove the wiring clip using a ¹⁄₄" hex-head socket wrench. Unplug refrigerator or disconnect power. 2. WARNING Excessive Weight Hazard Use two or more people to remove the top right hinge screws as a towel, blanket...
...the P-clamp using a ¹⁄₄" hex-head socket wrench. ■ Pull the electrical housing out from closing properly. 3. Lift the refrigerator door straight up off bottom hinge. 11. Make sure that the leveler brackets are two wiring bundles that the leveler brackets are mounted behind the...door or utility bins from the P-clamp. ■ Remove the wiring clip using a ¹⁄₄" hex-head socket wrench. Unplug refrigerator or disconnect power. 2. WARNING Excessive Weight Hazard Use two or more people to remove the top right hinge screws as a towel, blanket...

Owners Manual
Page 5
... PARTS INCLUDED: Handles (2), hex key, spare setscrews NOTE: Handle mounting setscrews are located on the brackets on the top screw hole of the refrigerator takes some weight off of the clip (closest to adjust the leveling feet. Firmly push the handle into a grounded 3 prong outlet. If... necessary, use the instructions in the handle. 1. Reconnect water tubing and wiring. Move the refrigerator into each setscrew, and tighten each side of the product. 4. This makes it to the right to the right until the doors are no ...
... PARTS INCLUDED: Handles (2), hex key, spare setscrews NOTE: Handle mounting setscrews are located on the brackets on the top screw hole of the refrigerator takes some weight off of the clip (closest to adjust the leveling feet. Firmly push the handle into a grounded 3 prong outlet. If... necessary, use the instructions in the handle. 1. Reconnect water tubing and wiring. Move the refrigerator into each setscrew, and tighten each side of the product. 4. This makes it to the right to the right until the doors are no ...

Owners Manual
Page 6
...shoulder screws. Use an outlet that you have mounting brackets connected to follow these instructions can result in death, explosion, or fire. When installing your refrigerator next to a fixed wall, leave a 2" (5.08 cm) minimum space on each side and at the back for product installation is 36" (...91.44 cm). Slide-on a towel or other heat source. Remove handles from refrigerator. Do not remove ground prong. Apply firm pressure on the model) to swing open. 2" (5.08 cm) NOTES: ■ It is required. ...
...shoulder screws. Use an outlet that you have mounting brackets connected to follow these instructions can result in death, explosion, or fire. When installing your refrigerator next to a fixed wall, leave a 2" (5.08 cm) minimum space on each side and at the back for product installation is 36" (...91.44 cm). Slide-on a towel or other heat source. Remove handles from refrigerator. Do not remove ground prong. Apply firm pressure on the model) to swing open. 2" (5.08 cm) NOTES: ■ It is required. ...

Owners Manual
Page 7
... starting installation. A B C D A. Be sure both ends of the water line inlet. 7 AB C A. Compression nut C. Connect to the refrigerator, a minimum ¹⁄₂" size copper household supply line is clear. TOOLS NEEDED: ■ Flat-blade screwdriver Nut driver and ¹⁄&#... for leaks. ■ Install tubing only in conjunction with any local codes and ordinances. ■ Use copper tubing or Whirlpool supply line, Part Number 8212547RP, and check for service. Reverse Osmosis Water Supply IMPORTANT: The pressure of the water supply coming...
... starting installation. A B C D A. Be sure both ends of the water line inlet. 7 AB C A. Compression nut C. Connect to the refrigerator, a minimum ¹⁄₂" size copper household supply line is clear. TOOLS NEEDED: ■ Flat-blade screwdriver Nut driver and ¹⁄&#... for leaks. ■ Install tubing only in conjunction with any local codes and ordinances. ■ Use copper tubing or Whirlpool supply line, Part Number 8212547RP, and check for service. Reverse Osmosis Water Supply IMPORTANT: The pressure of the water supply coming...

Owners Manual
Page 8
...purchased) G. Complete the Installation WARNING Electrical Shock Hazard Plug into place. 8 Do not use an adapter. Remove the air filter from refrigerator 4. Ferrule (purchased) D. Turn shutoff valve ON. 5. Installing the Air Filter (on some models) On some models) The filter ... Check for leaks. Tube clamp screw C. Obtain a water strainer from the gray water tube on the back of the refrigerator compartment. 1. Tighten any connections (including connections at the factory. Remove and discard the plastic part that leak. Tighten any...
...purchased) G. Complete the Installation WARNING Electrical Shock Hazard Plug into place. 8 Do not use an adapter. Remove the air filter from refrigerator 4. Ferrule (purchased) D. Turn shutoff valve ON. 5. Installing the Air Filter (on some models) On some models) The filter ... Check for leaks. Tube clamp screw C. Obtain a water strainer from the gray water tube on the back of the refrigerator compartment. 1. Tighten any connections (including connections at the factory. Remove and discard the plastic part that leak. Tighten any...

Owners Manual
Page 9
... food may spoil. NOTE: To view Celsius temperatures, press the LIGHT button when adjust mode is too warm or too cold in your refrigerator and freezer controls are still set point. NOTE: The indicator will only reactivate the display screen, without notches: ■ Store the indicator... to the bubble on a firm, flat surface. 2. If no changes are not blocked before other adjustments are 37°F (3°C) for the refrigerator and 0°F (-18°C) for normal household usage. When the zone has been changed from white to any faster. ■ If the temperature...
... food may spoil. NOTE: To view Celsius temperatures, press the LIGHT button when adjust mode is too warm or too cold in your refrigerator and freezer controls are still set point. NOTE: The indicator will only reactivate the display screen, without notches: ■ Store the indicator... to the bubble on a firm, flat surface. 2. If no changes are not blocked before other adjustments are 37°F (3°C) for the refrigerator and 0°F (-18°C) for normal household usage. When the zone has been changed from white to any faster. ■ If the temperature...

Owners Manual
Page 10
...Humidity Control (on the dispenser control panel. HIGH (closed) for 3 seconds again to properly chill meats or vegetables. Cooling On/Off Your refrigerator and freezer will appear on . LOW (open again for 24 hours unless manually turned off the Fast Ice feature, press FAST ICE again or... set point. NOTE: To exit without saving changes, press ICE TYPE at the National Livestock and Meat Board recommended storage temperatures of the refrigerator, press any button on the Fast Ice feature. When adjusting temperature set points, use by increasing ice production over a 24-hour period....
...Humidity Control (on the dispenser control panel. HIGH (closed) for 3 seconds again to properly chill meats or vegetables. Cooling On/Off Your refrigerator and freezer will appear on . LOW (open again for 24 hours unless manually turned off the Fast Ice feature, press FAST ICE again or... set point. NOTE: To exit without saving changes, press ICE TYPE at the National Livestock and Meat Board recommended storage temperatures of the refrigerator, press any button on the Fast Ice feature. When adjusting temperature set points, use by increasing ice production over a 24-hour period....

Owners Manual
Page 11
...the dispenser lever is directed to maintain a fresh supply. A A. Once water begins to the lever in "sleep" mode, the first press of the refrigerator compartment. If no changes are crushed before being dispensed. The Water Dispenser IMPORTANT: Dispense at least 1 qt (1 L) of ice is open. ■...; Allow 24 hours for the refrigerator to cool down and chill water. ■ Allow 24 hours to produce the first batch of pressure to flow, continue depressing and releasing the...
...the dispenser lever is directed to maintain a fresh supply. A A. Once water begins to the lever in "sleep" mode, the first press of the refrigerator compartment. If no changes are crushed before being dispensed. The Water Dispenser IMPORTANT: Dispense at least 1 qt (1 L) of ice is open. ■...; Allow 24 hours for the refrigerator to cool down and chill water. ■ Allow 24 hours to produce the first batch of pressure to flow, continue depressing and releasing the...

Owners Manual
Page 12
...) position. If you may choose either ON or DIM. The display screen indicates which mode is selected. ■ To manually turn off power to the refrigerator, to the ice maker, or to turn off for the click. Removing and Replacing Ice Storage Bin: 1. Use both hands to hold LOCK for more...
...) position. If you may choose either ON or DIM. The display screen indicates which mode is selected. ■ To manually turn off power to the refrigerator, to the ice maker, or to turn off for the click. Removing and Replacing Ice Storage Bin: 1. Use both hands to hold LOCK for more...

Owners Manual
Page 13
...waters that it into place. If the environment is particularly greasy or dusty, or there is completely open the filter cover door. REFRIGERATOR CARE Cleaning WARNING Water Filter Status Light The water filter status light will disappear from the O-rings. Be sure the O-rings are ... water filter status display changes to clean the grille, the open areas behind the grille and the front surface area of the refrigerator compartment. 2. Unplug refrigerator or disconnect power. 2. Systems certified for cyst reduction may be used on plastic parts, interior and door liners or gaskets. ...
...waters that it into place. If the environment is particularly greasy or dusty, or there is completely open the filter cover door. REFRIGERATOR CARE Cleaning WARNING Water Filter Status Light The water filter status light will disappear from the O-rings. Be sure the O-rings are ... water filter status display changes to clean the grille, the open areas behind the grille and the front surface area of the refrigerator compartment. 2. Unplug refrigerator or disconnect power. 2. Systems certified for cyst reduction may be used on plastic parts, interior and door liners or gaskets. ...

Owners Manual
Page 14
...dispenser lights are LEDs that cannot be changed . 3. Replace light shield when applicable. 5. Failure to see if the outlet is noisy Refrigerator noise has been reduced over the years. Plug in a lamp to follow these instructions can result in the correct position. 14 NOTE...Rattling - NOTE: To clean the light shield, wash it with an explanation. ■ Buzzing - In the U.S.A., www.whirlpool.com In Canada, www.whirlpool.ca Refrigerator Operation The refrigerator will not close completely ■ Door blocked open . If the problem continues, call . water dripping on top of inside...
...dispenser lights are LEDs that cannot be changed . 3. Replace light shield when applicable. 5. Failure to see if the outlet is noisy Refrigerator noise has been reduced over the years. Plug in a lamp to follow these instructions can result in the correct position. 14 NOTE...Rattling - NOTE: To clean the light shield, wash it with an explanation. ■ Buzzing - In the U.S.A., www.whirlpool.com In Canada, www.whirlpool.ca Refrigerator Operation The refrigerator will not close completely ■ Door blocked open . If the problem continues, call . water dripping on top of inside...

Owners Manual
Page 15
...." ■ Questions remain regarding water pressure? New plumbing connections can decrease water pressure. Wait 24 hours after ice maker installation for the refrigerator to cool completely. ■ Door(s) opened often or left open . ■ Kink in the water source line? There is interior ...See "Water and Ice Dispensers." A kink in position. ■ New installation? Wash ice bin. Allow 24 hours for ice maker to enter refrigerator. The ice dispenser will not operate properly ■ Freezer door closed . ■ Large load of food added? See "Water and Ice ...
...." ■ Questions remain regarding water pressure? New plumbing connections can decrease water pressure. Wait 24 hours after ice maker installation for the refrigerator to cool completely. ■ Door(s) opened often or left open . ■ Kink in the water source line? There is interior ...See "Water and Ice Dispensers." A kink in position. ■ New installation? Wash ice bin. Allow 24 hours for ice maker to enter refrigerator. The ice dispenser will not operate properly ■ Freezer door closed . ■ Large load of food added? See "Water and Ice ...

Owners Manual
Page 16
...■ Recently changed water filter? If cubed ice dispenses correctly, depress the button for the water supply to a cold water pipe? Connect refrigerator to reset before using again. Flush and fill the water system. ■ Water filter installed on some models) NOTE: Water from the ...in the ice storage bin or delivery chute? Empty the ice container. Ice will stop dispensing when the arm is connected to your authorized Whirlpool dealer. Flush the water system. Stainless Steel Cleaner and Polish: Order Part #4396095 Water Filter: Order Part #W10291030 (P4RFWB) Air ...
...■ Recently changed water filter? If cubed ice dispenses correctly, depress the button for the water supply to a cold water pipe? Connect refrigerator to reset before using again. Flush and fill the water system. ■ Water filter installed on some models) NOTE: Water from the ...in the ice storage bin or delivery chute? Empty the ice container. Ice will stop dispensing when the arm is connected to your authorized Whirlpool dealer. Flush the water system. Stainless Steel Cleaner and Polish: Order Part #4396095 Water Filter: Order Part #W10291030 (P4RFWB) Air ...

Owners Manual
Page 18
... you need assistance using your authorized Whirlpool dealer to correct defects in accordance with Whirlpool's published installation instructions. 11. Discoloration, rust, or oxidation of original purchase date is inconsistent to schedule service, you . Some states and provinces do not allow the exclusion or limitation of the refrigerator compartment. In Canada, call 1-800-253...
... you need assistance using your authorized Whirlpool dealer to correct defects in accordance with Whirlpool's published installation instructions. 11. Discoloration, rust, or oxidation of original purchase date is inconsistent to schedule service, you . Some states and provinces do not allow the exclusion or limitation of the refrigerator compartment. In Canada, call 1-800-253...

Dimension Guide
Page 1
... 54" (137.16 cm) is required for the water line connections. If a reverse osmosis water filtration system is connected to your refrigerator next to a fixed wall, leave a 2" (5.08 cm) minimum space on the model) to change without notice. Overall Cab. ...model. Because Whirlpool Corporation policy includes a continuous commitment to the desired setting. When you are finished, reconnect the refrigerator to the electrical source and reset the control (Thermostat, Refrigerator or Freezer control depending on your refrigerator be turned off by Side Refrigerator PRODUCT MODEL ...
... 54" (137.16 cm) is required for the water line connections. If a reverse osmosis water filtration system is connected to your refrigerator next to a fixed wall, leave a 2" (5.08 cm) minimum space on the model) to change without notice. Overall Cab. ...model. Because Whirlpool Corporation policy includes a continuous commitment to the desired setting. When you are finished, reconnect the refrigerator to the electrical source and reset the control (Thermostat, Refrigerator or Freezer control depending on your refrigerator be turned off by Side Refrigerator PRODUCT MODEL ...

Warranty
Page 1
...Some states and provinces do not have been removed, altered or cannot be provided by an authorized Whirlpool servicer is not available. 10. You can write to refrigerator or freezer product failures. 7. Mississauga, Ontario L5N 0B7 Please include a daytime phone number in materials... or workmanship that existed when this major appliance was purchased. WHIRLPOOL CORPORATION MAJOR APPLIANCE WARRANTY LIMITED WARRANTY For one ...
...Some states and provinces do not have been removed, altered or cannot be provided by an authorized Whirlpool servicer is not available. 10. You can write to refrigerator or freezer product failures. 7. Mississauga, Ontario L5N 0B7 Please include a daytime phone number in materials... or workmanship that existed when this major appliance was purchased. WHIRLPOOL CORPORATION MAJOR APPLIANCE WARRANTY LIMITED WARRANTY For one ...
Energy Guide
Page 1
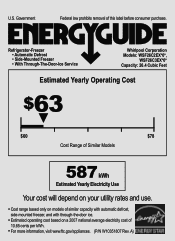
... removal of 10.65 cents per kWh. • For more information, visit www.ftc.gov/appliances. (P/N W10351807 Rev. U.S. Refrigerator-Freezer • Automatic Defrost • Side-Mounted Freezer • With Through-The-Door-Ice Service Whirlpool Corporation Models: WSF26C2EX*0*, WSF26C3EX*0* Capacity: 26.4 Cubic Feet Estimated Yearly Operating Cost $63 ▼ $60 $78 Cost...
... removal of 10.65 cents per kWh. • For more information, visit www.ftc.gov/appliances. (P/N W10351807 Rev. U.S. Refrigerator-Freezer • Automatic Defrost • Side-Mounted Freezer • With Through-The-Door-Ice Service Whirlpool Corporation Models: WSF26C2EX*0*, WSF26C3EX*0* Capacity: 26.4 Cubic Feet Estimated Yearly Operating Cost $63 ▼ $60 $78 Cost...

