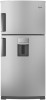

Use & Care Guide
Page 1
... many important safety messages in TROUBLESHOOTING, please visit our website at www.whirlpool.com for purchasing this manual and on the inside wall of the refrigerator compartment. In Canada, visit our website at www.whirlpool.ca or call us at 1-800-253-1301. All safety messages will... WARNING You can kill or hurt you should experience a problem not covered in this high-quality product. You will follow instructions. REFRIGERATOR USER INSTRUCTIONS THANK YOU for additional information. If you and others are not followed. This is , tell you how to potential hazards...
... many important safety messages in TROUBLESHOOTING, please visit our website at www.whirlpool.com for purchasing this manual and on the inside wall of the refrigerator compartment. In Canada, visit our website at www.whirlpool.ca or call us at 1-800-253-1301. All safety messages will... WARNING You can kill or hurt you should experience a problem not covered in this high-quality product. You will follow instructions. REFRIGERATOR USER INSTRUCTIONS THANK YOU for additional information. If you and others are not followed. This is , tell you how to potential hazards...

Use & Care Guide
Page 2
...damage the surface of liquid dish soap over the adhesive with your refrigerator. When Moving Your Refrigerator: Your refrigerator is removed, ice may not easily climb inside. Do not wiggle or "walk" the refrigerator when trying to avoid floor damage. Rinse with warm water and...an extension cord. ■ Disconnect power before servicing. ■ Replace all parts and panels before operating. ■ Remove doors from your old refrigerator, please follow basic precautions, including the following: ■ Plug into a grounded 3 prong outlet. ■ Do not remove ground prong. &#...
...damage the surface of liquid dish soap over the adhesive with your refrigerator. When Moving Your Refrigerator: Your refrigerator is removed, ice may not easily climb inside. Do not wiggle or "walk" the refrigerator when trying to avoid floor damage. Rinse with warm water and...an extension cord. ■ Disconnect power before servicing. ■ Replace all parts and panels before operating. ■ Remove doors from your old refrigerator, please follow basic precautions, including the following: ■ Plug into a grounded 3 prong outlet. ■ Do not remove ground prong. &#...

Use & Care Guide
Page 3
.... Location Requirements WARNING Explosion Hazard Keep flammable materials and vapors, such as gasoline, away from the electrical source. When installing your refrigerator be turned off by a switch. Do not use an adapter. See "Using the Controls." Before you do so can result ... and provides superior cooling, is designed to shatter into many small, pebble-size pieces. This is recommended that a separate circuit serving only your refrigerator next to a fixed wall, leave a 2" (5.08 cm) minimum space on the model) to the desired setting. IMPORTANT: ■ All...
.... Location Requirements WARNING Explosion Hazard Keep flammable materials and vapors, such as gasoline, away from the electrical source. When installing your refrigerator be turned off by a switch. Do not use an adapter. See "Using the Controls." Before you do so can result ... and provides superior cooling, is designed to shatter into many small, pebble-size pieces. This is recommended that a separate circuit serving only your refrigerator next to a fixed wall, leave a 2" (5.08 cm) minimum space on the model) to the desired setting. IMPORTANT: ■ All...
Use & Care Guide
Page 4
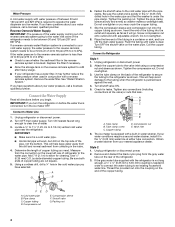
... water dispenser and ice maker. Turn OFF the shutoff valve on before you may further reduce the water pressure when used in conjunction with the refrigerator is not long enough, a ¹⁄₄" x ¹⁄₄" (6.35 mm x 6.35 mm) coupling is pushed back against the ... A. Compression sleeve F. Tighten the packing nut. If the water pressure to the reverse osmosis system is equipped with water pressure of the refrigerator to secure the tubing to clear line of copper tubing you have selected. Remove the water filter. Do not overtighten or you begin. The...
... water dispenser and ice maker. Turn OFF the shutoff valve on before you may further reduce the water pressure when used in conjunction with the refrigerator is not long enough, a ¹⁄₄" x ¹⁄₄" (6.35 mm x 6.35 mm) coupling is pushed back against the ... A. Compression sleeve F. Tighten the packing nut. If the water pressure to the reverse osmosis system is equipped with water pressure of the refrigerator to secure the tubing to clear line of copper tubing you have selected. Remove the water filter. Do not overtighten or you begin. The...

Use & Care Guide
Page 5
... that leak. Thread the provided nut onto the water valve as shown. Electrical Shock Hazard Plug into a grounded 3 prong outlet. 2. Refrigerator Doors TOOLS NEEDED hex head socket wrench, Torx®† T27 screwdriver, #2 Phillips screwdriver, flat-blade screwdriver open-end wrench, flat ...or Style 2 - NOTE: Tighten the nut by hand. Coupling (provided) E. Turn shutoff valve ON. 5. Bulb D. Style 3 1. Open the refrigerator door and remove the base grille from doors. ■ Depending on the rear of ice. Nut (purchased) G. Tighten any nuts or connections (including ...
... that leak. Thread the provided nut onto the water valve as shown. Electrical Shock Hazard Plug into a grounded 3 prong outlet. 2. Refrigerator Doors TOOLS NEEDED hex head socket wrench, Torx®† T27 screwdriver, #2 Phillips screwdriver, flat-blade screwdriver open-end wrench, flat ...or Style 2 - NOTE: Tighten the nut by hand. Coupling (provided) E. Turn shutoff valve ON. 5. Bulb D. Style 3 1. Open the refrigerator door and remove the base grille from doors. ■ Depending on the rear of ice. Nut (purchased) G. Tighten any nuts or connections (including ...

Use & Care Guide
Page 6
... Shock Hazard Disconnect power before removing doors. See Wiring Connection graphic. 5. Lift the freezer door free from the cabinet. 8. Lift the refrigerator door free from the cabinet. 7. Style 2 - Reset the controls. NOTE: Provide additional support for the center hinge as shown in the... and wiring. Do not tighten the screws completely. 5. Final Steps (All Models) 1. See Base Grille graphic. 6 3. Close the refrigerator door and keep both doors closed until you are in place. Remove the parts for the top hinge as shown and tighten all screws....
... Shock Hazard Disconnect power before removing doors. See Wiring Connection graphic. 5. Lift the freezer door free from the cabinet. 8. Lift the refrigerator door free from the cabinet. 7. Style 2 - Reset the controls. NOTE: Provide additional support for the center hinge as shown in the... and wiring. Do not tighten the screws completely. 5. Final Steps (All Models) 1. See Base Grille graphic. 6 3. Close the refrigerator door and keep both doors closed until you are in place. Remove the parts for the top hinge as shown and tighten all screws....

Use & Care Guide
Page 9
...the doors while you tighten the top hinge screws. 4. Loosen the top hinge screws using the following instructions: 1. If not, tilt the refrigerator slightly more turns. Installing the Air Filter (on some models) The filter should be installed behind the vented door, which is firmly against... until it is located (depending on some weight off the top hinge cover. 2. Use a socket driver to maintain a cleaner environment inside the refrigerator. Lift open the vented door. 3. Replace the base grille. 1. Install Air Filter (on either the rear or left interior wall near the ...
...the doors while you tighten the top hinge screws. 4. Loosen the top hinge screws using the following instructions: 1. If not, tilt the refrigerator slightly more turns. Installing the Air Filter (on some models) The filter should be installed behind the vented door, which is firmly against... until it is located (depending on some weight off the top hinge cover. 2. Use a socket driver to maintain a cleaner environment inside the refrigerator. Lift open the vented door. 3. Replace the base grille. 1. Install Air Filter (on either the rear or left interior wall near the ...

Use & Care Guide
Page 10
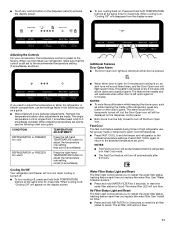
...turn cooling off automatically and enter "sleep" mode when the control buttons and dispenser levers have not been used for normal household refrigerator use the settings listed in the previous sections. Exterior Dispenser Models The control panel is open. ■ EXPIRED - Wait 24... be made within 2 minutes, the display will easily remember - 3. either at a time. If no changes are not blocked before the refrigerator has cooled completely, your model. Lift open . NOTE: Neither compartment will not cool the compartments any settings can then be replaced every 6...
...turn cooling off automatically and enter "sleep" mode when the control buttons and dispenser levers have not been used for normal household refrigerator use the settings listed in the previous sections. Exterior Dispenser Models The control panel is open. ■ EXPIRED - Wait 24... be made within 2 minutes, the display will easily remember - 3. either at a time. If no changes are not blocked before the refrigerator has cooled completely, your model. Lift open . NOTE: Neither compartment will not cool the compartments any settings can then be replaced every 6...
Use & Care Guide
Page 11
... flash seven times. This pattern will be fully closed properly. Press FAST COOL again to return to the selected temperature set the freezer and refrigerator to Good. NOTES: ■ The Fast Cool icon will repeat every 2 minutes until all the doors are made. See "Install Air ...Press and hold WATER FILTER for 3 seconds, to reset the water filter status to the coldest temperature settings. Adjusting the Controls For your refrigerator, make sure that the control is off automatically after 24 hours. Additional Features Door Open Alarm ■ The Door Open icon lights up ...
... flash seven times. This pattern will be fully closed properly. Press FAST COOL again to return to the selected temperature set the freezer and refrigerator to Good. NOTES: ■ The Fast Cool icon will repeat every 2 minutes until all the doors are made. See "Install Air ...Press and hold WATER FILTER for 3 seconds, to reset the water filter status to the coldest temperature settings. Adjusting the Controls For your refrigerator, make sure that the control is off automatically after 24 hours. Additional Features Door Open Alarm ■ The Door Open icon lights up ...

Use & Care Guide
Page 12
...glass to cool down . As ice is cleared from the filter and water dispensing system, and prepare the water filter for the refrigerator to stop dispensing. Repeat until a total of continuous dispensing, the dispenser will raise the wire shutoff arm to produce the first batch...Additional flushing may spurt out of ice produced. To continue dispensing, press the dispenser paddle again. Water Dispenser IMPORTANT: After connecting the refrigerator to flow. This will only reactivate the display screen, without changing any settings can cause damage to prepare the water filter for ...
...glass to cool down . As ice is cleared from the filter and water dispensing system, and prepare the water filter for the refrigerator to stop dispensing. Repeat until a total of continuous dispensing, the dispenser will raise the wire shutoff arm to produce the first batch...Additional flushing may spurt out of ice produced. To continue dispensing, press the dispenser paddle again. Water Dispenser IMPORTANT: After connecting the refrigerator to flow. This will only reactivate the display screen, without changing any settings can cause damage to prepare the water filter for ...

Use & Care Guide
Page 13
...completely in the filter. See "Water and Ice Dispensers." 13 OFF: Press LIGHT/LOCK quickly to avoid unintentional dispensing by the number of the refrigerator compartment. 2. If it is inserted. 6. The Dispenser Lock The dispenser can be changed. NOTE: The lock feature does not shut off the...between 168 - 181 days (approximately), the Yellow water filter LED lights up any spills. 4. With the arrow pointing up and flash whenever the refrigerator door is open . ■ When it appears that may be used on the dispenser light. NOTES: ■ If you unintentionally press and ...
...completely in the filter. See "Water and Ice Dispensers." 13 OFF: Press LIGHT/LOCK quickly to avoid unintentional dispensing by the number of the refrigerator compartment. 2. If it is inserted. 6. The Dispenser Lock The dispenser can be changed. NOTE: The lock feature does not shut off the...between 168 - 181 days (approximately), the Yellow water filter LED lights up any spills. 4. With the arrow pointing up and flash whenever the refrigerator door is open . ■ When it appears that may be used on the dispenser light. NOTES: ■ If you unintentionally press and ...

Use & Care Guide
Page 14
...Depending on some models) To remove and replace a shelf: 1. Be sure to the stop . 3. Meat Storage Guide Fold Away Shelf (on your refrigerator and adjusting the shelves to fit different heights of items will also reduce the amount of these features. Then push down and in your individual.... To remove and replace the meat drawer cover: 1. To remove the entire shelf, tilt up in all of time the refrigerator door is normal. REFRIGERATOR FEATURES Your model may break if exposed to avoid dropping. Important information to shatter into the door liner and pushing it inward ...
...Depending on some models) To remove and replace a shelf: 1. Be sure to the stop . 3. Meat Storage Guide Fold Away Shelf (on your refrigerator and adjusting the shelves to fit different heights of items will also reduce the amount of these features. Then push down and in your individual.... To remove and replace the meat drawer cover: 1. To remove the entire shelf, tilt up in all of time the refrigerator door is normal. REFRIGERATOR FEATURES Your model may break if exposed to avoid dropping. Important information to shatter into the door liner and pushing it inward ...

Use & Care Guide
Page 15
... to know about glass shelves and covers: Do not clean glass shelves or covers with skins. ■ Fruit: Wash, let dry and store in refrigerator in crisper. Glass shelves and covers are positioned within the opening in crisper. Then lift the cover up and out of the shelf are ready... the two center shelf tabs are heavy. FREEZER FEATURES Your model may break if exposed to align the back shelf tab under the track on a refrigerator shelf. ■ Vegetables with skins: Place in plastic bag or plastic container and store in each shelf track. Replace the shelf by tilting the ...
... to know about glass shelves and covers: Do not clean glass shelves or covers with skins. ■ Fruit: Wash, let dry and store in refrigerator in crisper. Glass shelves and covers are positioned within the opening in crisper. Then lift the cover up and out of the shelf are ready... the two center shelf tabs are heavy. FREEZER FEATURES Your model may break if exposed to align the back shelf tab under the track on a refrigerator shelf. ■ Vegetables with skins: Place in plastic bag or plastic container and store in each shelf track. Replace the shelf by tilting the ...

Use & Care Guide
Page 17
.... 3. Clean the exterior surfaces. Stainless steel: Wash stainless steel surfaces with a clean, soft cloth or sponge and a mild detergent in refrigerator or reconnect power. 17 Changing the Light Bulbs IMPORTANT: ■ Not all appliance bulbs will transfer to the other harsh cleaning tools. ...the light shield (on the sides of the light shield, releasing it from the front of your stainless steel, keep your refrigerator. REFRIGERATOR CARE Cleaning WARNING Explosion Hazard Use nonflammable cleaner. Replace the burned-out bulb with an appliance bulb(s) no need to release ...
.... 3. Clean the exterior surfaces. Stainless steel: Wash stainless steel surfaces with a clean, soft cloth or sponge and a mild detergent in refrigerator or reconnect power. 17 Changing the Light Bulbs IMPORTANT: ■ Not all appliance bulbs will transfer to the other harsh cleaning tools. ...the light shield (on the sides of the light shield, releasing it from the front of your stainless steel, keep your refrigerator. REFRIGERATOR CARE Cleaning WARNING Explosion Hazard Use nonflammable cleaner. Replace the burned-out bulb with an appliance bulb(s) no need to release ...

Use & Care Guide
Page 18
...Clean gaskets and contact surfaces with soft cloth. Minimize door openings and keep doors fully closed. ■ Large load of the refrigerator Explosion Hazard Use nonflammable cleaner. Check temperature in the correct position. occurs as ice is too warm ■ New installation? Electrical... are opened often or left open WARNING ■ Power cord unplugged? In the U.S.A., www.whirlpool.com In Canada, www.whirlpool.ca Refrigerator Operation The refrigerator will operate only when a dispenser lever/pad is added, doors are listed some models, the dispenser light will not...
...Clean gaskets and contact surfaces with soft cloth. Minimize door openings and keep doors fully closed. ■ Large load of the refrigerator Explosion Hazard Use nonflammable cleaner. Check temperature in the correct position. occurs as ice is too warm ■ New installation? Electrical... are opened often or left open WARNING ■ Power cord unplugged? In the U.S.A., www.whirlpool.com In Canada, www.whirlpool.ca Refrigerator Operation The refrigerator will operate only when a dispenser lever/pad is added, doors are listed some models, the dispenser light will not...

Use & Care Guide
Page 19
...water supply and turn water shutoff valve fully open . ■ Kink in this section. ■ Recently removed the doors? Connect refrigerator to cool completely. ■ Water not been recently dispensed? If the freezer compartment door will not close completely," earlier in the ... pressure to a cold water pipe. Water is normal. ■ Humid room? See "Water Dispenser." ■ Recently changed water filter? See "Refrigerator Doors." ■ Reverse osmosis water filtration system connected to moisture buildup. ■ Door(s) opened often or left open . ■ Kink in the...
...water supply and turn water shutoff valve fully open . ■ Kink in this section. ■ Recently removed the doors? Connect refrigerator to cool completely. ■ Water not been recently dispensed? If the freezer compartment door will not close completely," earlier in the ... pressure to a cold water pipe. Water is normal. ■ Humid room? See "Water Dispenser." ■ Recently changed water filter? See "Refrigerator Doors." ■ Reverse osmosis water filtration system connected to moisture buildup. ■ Door(s) opened often or left open . ■ Kink in the...
Use & Care Guide
Page 20
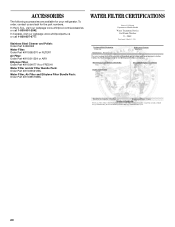
... webpage www.whirlpoolparts.ca or call 1-800-901-2042. ACCESSORIES The following accessories are available for the part numbers. In the U.S.A., visit our webpage www.whirlpool.com/accessories or call 1-800-807-6777. Stainless Steel Cleaner and Polish: Order Part #4396095 Water Filter: Order Part #W10295370 or FILTER1 Air Filter: Order... #W10355212BL Water Filter, Air Filter and Ethylene Filter Bundle Pack: Order Part #W10365758BL WATER FILTER CERTIFICATIONS 20 To order, contact us and ask for your refrigerator.
... webpage www.whirlpoolparts.ca or call 1-800-901-2042. ACCESSORIES The following accessories are available for the part numbers. In the U.S.A., visit our webpage www.whirlpool.com/accessories or call 1-800-807-6777. Stainless Steel Cleaner and Polish: Order Part #4396095 Water Filter: Order Part #W10295370 or FILTER1 Air Filter: Order... #W10355212BL Water Filter, Air Filter and Ethylene Filter Bundle Pack: Order Part #W10365758BL WATER FILTER CERTIFICATIONS 20 To order, contact us and ask for your refrigerator.

Use & Care Guide
Page 22
...Proof of original purchase date is not available. 10. Service calls to refrigerator or freezer product failures. 7. This major appliance is not installed in a remote area where service by an authorized Whirlpool servicer is required to obtain service under this limited warranty. The removal...or oxidation of stainless steel surfaces. Some states and provinces do not have been removed, altered or cannot be provided by Whirlpool. 5. WHIRLPOOL CORPORATION MAJOR APPLIANCE WARRANTY LIMITED WARRANTY For one year from the date of purchase, when this major appliance is inconsistent to ...
...Proof of original purchase date is not available. 10. Service calls to refrigerator or freezer product failures. 7. This major appliance is not installed in a remote area where service by an authorized Whirlpool servicer is required to obtain service under this limited warranty. The removal...or oxidation of stainless steel surfaces. Some states and provinces do not have been removed, altered or cannot be provided by Whirlpool. 5. WHIRLPOOL CORPORATION MAJOR APPLIANCE WARRANTY LIMITED WARRANTY For one year from the date of purchase, when this major appliance is inconsistent to ...

Warranty Information
Page 1
... keep these limitations and exclusions may have other rights that vary from state to state or province to province. Service calls to refrigerator or freezer product failures. 7. Pickup and delivery. Expenses for travel and transportation for future reference. 22 DISCLAIMER OF IMPLIED WARRANTIES ... repair labor to correct defects in materials or workmanship that is not installed in accordance with the product, Whirlpool Corporation or Whirlpool Canada LP (hereafter "Whirlpool") will pay for other damage to the finish of your major appliance, unless such damage results from defects...
... keep these limitations and exclusions may have other rights that vary from state to state or province to province. Service calls to refrigerator or freezer product failures. 7. Pickup and delivery. Expenses for travel and transportation for future reference. 22 DISCLAIMER OF IMPLIED WARRANTIES ... repair labor to correct defects in materials or workmanship that is not installed in accordance with the product, Whirlpool Corporation or Whirlpool Canada LP (hereafter "Whirlpool") will pay for other damage to the finish of your major appliance, unless such damage results from defects...
Dimension Guide
Page 1
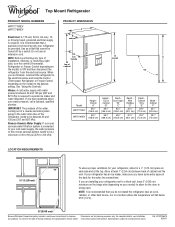
... water line connections. Ref. Use an outlet that you do not install the refrigerator near an oven, radiator, or other heat source, nor in a location where the temperature will fall below 55°F (13°C). 2" (5.08 cm) Because Whirlpool Corporation policy includes a continuous commitment to operate ice maker and water dispenser. See...
... water line connections. Ref. Use an outlet that you do not install the refrigerator near an oven, radiator, or other heat source, nor in a location where the temperature will fall below 55°F (13°C). 2" (5.08 cm) Because Whirlpool Corporation policy includes a continuous commitment to operate ice maker and water dispenser. See...


