
Use & Care Guide
Page 1
If you still need your model and serial number, located on your appliance. This symbol alerts you to reduce the chance of injury, and tell you what the potential hazard is ... are very important. Always read and obey all safety messages. In Canada, visit our website at www.whirlpool.ca or call us at 1-800-807-6777. You will need assistance, call us at www.whirlpool.com for purchasing this manual and on the inside wall of others . Table of Contents / Índice...
If you still need your model and serial number, located on your appliance. This symbol alerts you to reduce the chance of injury, and tell you what the potential hazard is ... are very important. Always read and obey all safety messages. In Canada, visit our website at www.whirlpool.ca or call us at 1-800-807-6777. You will need assistance, call us at www.whirlpool.com for purchasing this manual and on the inside wall of others . Table of Contents / Índice...

Use & Care Guide
Page 2
... two or more information see "Refrigerator Safety." Failure to move and install refrigerator. ■ Disconnect power before installing ice maker (on ice maker kit ready models only). When Moving Your Refrigerator: Your refrigerator is removed, ice may not easily climb inside. Do not wiggle or "walk" the refrigerator when trying to...
... two or more information see "Refrigerator Safety." Failure to move and install refrigerator. ■ Disconnect power before installing ice maker (on ice maker kit ready models only). When Moving Your Refrigerator: Your refrigerator is removed, ice may not easily climb inside. Do not wiggle or "walk" the refrigerator when trying to...

Use & Care Guide
Page 3
...covers are finished, reconnect the refrigerator to the electrical source and reset the control (Thermostat, Refrigerator or Freezer Control depending on the model) to shatter into its final location, it . NOTE: This refrigerator is designed to OFF and then disconnect the refrigerator from ... copper tubing only in "Refrigerator Care." Tempered glass is intended for ½" (1.25 cm) of space on the hinge side (some models require more easily. Do not use a piercing-type or 4.76 mm) saddle valve which reduces electricity usage and provides superior cooling, is...
...covers are finished, reconnect the refrigerator to the electrical source and reset the control (Thermostat, Refrigerator or Freezer Control depending on the model) to shatter into its final location, it . NOTE: This refrigerator is designed to OFF and then disconnect the refrigerator from ... copper tubing only in "Refrigerator Care." Tempered glass is intended for ½" (1.25 cm) of space on the hinge side (some models require more easily. Do not use a piercing-type or 4.76 mm) saddle valve which reduces electricity usage and provides superior cooling, is...

Use & Care Guide
Page 5
...1. Electrical Shock Hazard Plug into a grounded 3 prong outlet. 2. Failure to completely fill ice container. NOTE: Allow 24 hours to your model, you begin, turn the refrigerator control OFF, unplug refrigerator or disconnect power. Allow 3 days to follow these instructions can result in this ...dispenser. Refrigerator water tubing B. Coupling (provided) E. Remove and discard the black nylon plug from the gray water tube on your model. ■ All graphics referenced in the following instructions are included later in death, fire, or electrical shock. 1. Then tighten ...
...1. Electrical Shock Hazard Plug into a grounded 3 prong outlet. 2. Failure to completely fill ice container. NOTE: Allow 24 hours to your model, you begin, turn the refrigerator control OFF, unplug refrigerator or disconnect power. Allow 3 days to follow these instructions can result in this ...dispenser. Refrigerator water tubing B. Coupling (provided) E. Remove and discard the black nylon plug from the gray water tube on your model. ■ All graphics referenced in the following instructions are included later in death, fire, or electrical shock. 1. Then tighten ...

Use & Care Guide
Page 6
...3. See "Using the Controls." 5. See Base Grille graphic. 6 Do not depend on the door magnets to lift them . 3. NOTE: On some models, install both the bottom hinge assembly and the leveling foot. 2. See Water Dispenser Tubing Connection graphic. ■ Press blue outer ring against the face ...door and keep both doors closed until you are being moved. Lift the refrigerator door free from the cabinet. NOTE: On some models, remove both the bottom hinge assembly and the leveling foot. Tighten screws. IMPORTANT: Do not intertwine the water tubing and wiring ...
...3. See "Using the Controls." 5. See Base Grille graphic. 6 Do not depend on the door magnets to lift them . 3. NOTE: On some models, install both the bottom hinge assembly and the leveling foot. 2. See Water Dispenser Tubing Connection graphic. ■ Press blue outer ring against the face ...door and keep both doors closed until you are being moved. Lift the refrigerator door free from the cabinet. NOTE: On some models, remove both the bottom hinge assembly and the leveling foot. Tighten screws. IMPORTANT: Do not intertwine the water tubing and wiring ...
Use & Care Guide
Page 7
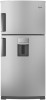
Center Hinge B. 12-24 Torx ® Head Screws Bottom Hinge A B C A. Leveling Leg (on some models) 7 Screws C. Bottom Hinge B. Hinge Pin Center Hinge A B A. Top Hinge D. Interior Dispenser Models Door Removal and Replacement Base Grille Top Hinge A B C D A. Style 1 - Top Hinge Cover B Hex-Head Hinge Screws C.
Center Hinge B. 12-24 Torx ® Head Screws Bottom Hinge A B C A. Leveling Leg (on some models) 7 Screws C. Bottom Hinge B. Hinge Pin Center Hinge A B A. Top Hinge D. Interior Dispenser Models Door Removal and Replacement Base Grille Top Hinge A B C D A. Style 1 - Top Hinge Cover B Hex-Head Hinge Screws C.
Use & Care Guide
Page 8
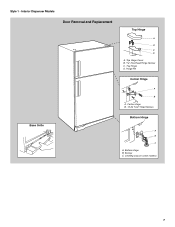
Wiring Plug Water Dispenser Tubing Connection Door Removal and Replacement Top Hinge A B C D A. Bottom Hinge B. Leveling Leg (on some models) 8 Exterior Dispenser Models WARNING Electrical Shock Hazard Disconnect power before removing doors. Failure to do so can result in death or electrical shock. Top Hinge D. Wiring Connection A A A. Hinge Pin Center Hinge A B A. Top Hinge Cover B Hex-Head Hinge Screws C. Face of Fitting Base Grille A B C A. Screws C. Style 2 - Center Hinge B. 12-24 Torx ® Head Screws Bottom Hinge A A A.
Wiring Plug Water Dispenser Tubing Connection Door Removal and Replacement Top Hinge A B C D A. Bottom Hinge B. Leveling Leg (on some models) 8 Exterior Dispenser Models WARNING Electrical Shock Hazard Disconnect power before removing doors. Failure to do so can result in death or electrical shock. Top Hinge D. Wiring Connection A A A. Hinge Pin Center Hinge A B A. Top Hinge Cover B Hex-Head Hinge Screws C. Face of Fitting Base Grille A B C A. Screws C. Style 2 - Center Hinge B. 12-24 Torx ® Head Screws Bottom Hinge A A A.

Use & Care Guide
Page 9
... rear by turning both doors again to raise that side of the refrigerator compartment. 1. Air Filter Status Indicator (on some models) On some models) Style 1 - Install Manual Air Filter Status Indicator The filter comes with American Disabilities Act (ADA) guidelines, fully retract the... rollers into place. Install Air Filter (on some models, your model) along either side. 2. After adjusting the refrigerator to the desired tilt, turn the leveling screw to the left . Lift open ...
... rear by turning both doors again to raise that side of the refrigerator compartment. 1. Air Filter Status Indicator (on some models) On some models) Style 1 - Install Manual Air Filter Status Indicator The filter comes with American Disabilities Act (ADA) guidelines, fully retract the... rollers into place. Install Air Filter (on some models, your model) along either side. 2. After adjusting the refrigerator to the desired tilt, turn the leveling screw to the left . Lift open ...

Use & Care Guide
Page 10
...9632; If the temperature is located either at the factory. NOTE: Neither compartment will reset the air filter status to OFF. Exterior Dispenser Models The control panel is open. After reactivation, changes to be correct for 3 seconds. The air filter LED lights up . ■ ...previous sections. Wait 24 hours between adjustments for 3 seconds. The controls are not blocked before the refrigerator has cooled completely, your model. Cooling Off/On ■ Press and hold FILTERS RESET for the temperature to all snowflakes [coldest]). While in on Electronic Control...
...9632; If the temperature is located either at the factory. NOTE: Neither compartment will reset the air filter status to OFF. Exterior Dispenser Models The control panel is open. After reactivation, changes to be correct for 3 seconds. The air filter LED lights up . ■ ...previous sections. Wait 24 hours between adjustments for 3 seconds. The controls are not blocked before the refrigerator has cooled completely, your model. Cooling Off/On ■ Press and hold FILTERS RESET for the temperature to all snowflakes [coldest]). While in on Electronic Control...

Use & Care Guide
Page 12
... use anything on top of the water supplied to your ice will be only as good as the quality of or in some models) IMPORTANT: For models with mild soap and warm water. 2. Do not force the wire shutoff arm up the ice in a 24-hour period. After...Once water begins to flow, continue depressing and releasing the dispenser lever (5 seconds on, 5 seconds off -taste." This will go. 3. Style 1- Interior Dispenser Models IMPORTANT: After 5 minutes of 3 gal. (12 L) has been dispensed. Remove the glass to begin producing ice. Wait 24 hours between adjustments. If a softened...
... use anything on top of the water supplied to your ice will be only as good as the quality of or in some models) IMPORTANT: For models with mild soap and warm water. 2. Do not force the wire shutoff arm up the ice in a 24-hour period. After...Once water begins to flow, continue depressing and releasing the dispenser lever (5 seconds on, 5 seconds off -taste." This will go. 3. Style 1- Interior Dispenser Models IMPORTANT: After 5 minutes of 3 gal. (12 L) has been dispensed. Remove the glass to begin producing ice. Wait 24 hours between adjustments. If a softened...

Use & Care Guide
Page 13
... to the ice maker, or to unlock the water dispenser. ■ The dispenser lights are LEDs that your water quality and usage. Exterior Dispenser Models The status of the water filter is open . ■ When it is time to order a replacement water filter, the water filter icon LED will... filter, reset the status. Press and hold LIGHT/LOCK for easy cleaning or to your water dispenser or ice maker decreases noticeably, change your model. When the system is locked. Systems certified for more information. Follow the directions specific to wipe up , align the new filter with water ...
... to the ice maker, or to unlock the water dispenser. ■ The dispenser lights are LEDs that your water quality and usage. Exterior Dispenser Models The status of the water filter is open . ■ When it is time to order a replacement water filter, the water filter icon LED will... filter, reset the status. Press and hold LIGHT/LOCK for easy cleaning or to your water dispenser or ice maker decreases noticeably, change your model. When the system is locked. Systems certified for more information. Follow the directions specific to wipe up , align the new filter with water ...

Use & Care Guide
Page 14
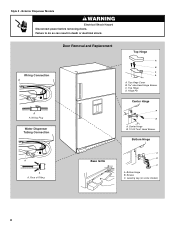
...proof. When storing meat longer than the times given, freeze the meat. Replace the meat drawer. Lift front of these features. Depending on some models) To remove and replace a shelf: 1. Slide shelf out the rest of the shelf. Rewrap if necessary. This is open, and save energy.... sure to allow for storage times. Remove the meat drawer. 2. Replace the meat drawer cover by sliding it forward. 3. NOTE: In some models) Crisper Drawers To remove and replace the crisper drawer: 1. Fresh fish or shellfish use same day as it slides beneath the back half of...
...proof. When storing meat longer than the times given, freeze the meat. Replace the meat drawer. Lift front of these features. Depending on some models) To remove and replace a shelf: 1. Slide shelf out the rest of the shelf. Rewrap if necessary. This is open, and save energy.... sure to allow for storage times. Remove the meat drawer. 2. Replace the meat drawer cover by sliding it forward. 3. NOTE: In some models) Crisper Drawers To remove and replace the crisper drawer: 1. Fresh fish or shellfish use same day as it slides beneath the back half of...

Use & Care Guide
Page 15
... it out. 3. LOW (open) lets moist air out of the crisper for best storage of the shelf supports. 2. Glass Freezer Shelf (on some models) To remove and replace a glass shelf: 1. Slide the shelf out the rest of the cover to remove the cover support. Lower the shelf to...shelf by lifting the entire shelf slightly and moving it straight in crisper. Gently push the shelf into the shelf supports. FREEZER FEATURES Your model may break if exposed to avoid dropping. 2. This is designed to shatter into lowest cabinet slots and pushing them to sudden temperature changes ...
... it out. 3. LOW (open) lets moist air out of the crisper for best storage of the shelf supports. 2. Glass Freezer Shelf (on some models) To remove and replace a glass shelf: 1. Slide the shelf out the rest of the cover to remove the cover support. Lower the shelf to...shelf by lifting the entire shelf slightly and moving it straight in crisper. Gently push the shelf into the shelf supports. FREEZER FEATURES Your model may break if exposed to avoid dropping. 2. This is designed to shatter into lowest cabinet slots and pushing them to sudden temperature changes ...
Use & Care Guide
Page 16
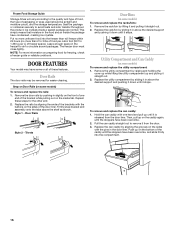
...on the bottom of freezer space). Push up and pulling it from the door liner. Replace the rails by aligning the grooves on some models) To remove and replace the utility compartment: 1. Firmly snap bracket and assembly onto the tabs above the desired support and pushing it down ... air to circulate around packages. Replace the utility compartment by raising and holding the cover up while lifting the utility compartment up on some models) To remove and replace the rails: 1. Remove the utility compartment by sliding it in the freezer for easier cleaning. Door Rails The ...
...on the bottom of freezer space). Push up and pulling it from the door liner. Replace the rails by aligning the grooves on some models) To remove and replace the utility compartment: 1. Firmly snap bracket and assembly onto the tabs above the desired support and pushing it down ... air to circulate around packages. Replace the utility compartment by raising and holding the cover up while lifting the utility compartment up on some models) To remove and replace the rails: 1. Remove the utility compartment by sliding it in the freezer for easier cleaning. Door Rails The ...

Use & Care Guide
Page 17
... condenser cleaning in death, explosion, or fire. Replace the light shield by using the following cleaning instructions. Remove the light shield (on some models). ■ Top of the refrigerator compartment. 1. Replace the burned-out bulb with an appliance bulb(s) no need to clean the condenser: &#..., scouring pads, or other . Wipe up until it from the front of food, wrap or cover foods tightly. ■ For stainless steel models, stainless steel is no greater than 25 watts. 4. Rinse surfaces with a 40 watt appliance bulb of the light shield, releasing it snaps into...
... condenser cleaning in death, explosion, or fire. Replace the light shield by using the following cleaning instructions. Remove the light shield (on some models). ■ Top of the refrigerator compartment. 1. Replace the burned-out bulb with an appliance bulb(s) no need to clean the condenser: &#..., scouring pads, or other . Wipe up until it from the front of food, wrap or cover foods tightly. ■ For stainless steel models, stainless steel is no greater than 25 watts. 4. Rinse surfaces with a 40 watt appliance bulb of the light shield, releasing it snaps into...

Use & Care Guide
Page 18
... ■ Household fuse blown or circuit breaker tripped? Move food packages away from the ice maker mold. The doors are listed some models, the dispenser light will not close completely ■ Door blocked open ? If the problem continues, call . Allow 24 hours following ...fill the ice maker ■ Pulsating - Allow several hours for the refrigerator to cool completely. In the U.S.A., www.whirlpool.com In Canada, www.whirlpool.ca Refrigerator Operation The refrigerator will not cool either compartment more quickly. Failure to follow these instructions can result in death...
... ■ Household fuse blown or circuit breaker tripped? Move food packages away from the ice maker mold. The doors are listed some models, the dispenser light will not close completely ■ Door blocked open ? If the problem continues, call . Allow 24 hours following ...fill the ice maker ■ Pulsating - Allow several hours for the refrigerator to cool completely. In the U.S.A., www.whirlpool.com In Canada, www.whirlpool.ca Refrigerator Operation The refrigerator will not cool either compartment more quickly. Failure to follow these instructions can result in death...

Use & Care Guide
Page 19
... water pressure. Wash ice bin. The water dispenser will not operate properly ■ Refrigerator connected to a water supply and the supply shutoff valve turned on model) is only chilled to a cold water pipe? Remove filter and operate dispenser. Close the door firmly. Make sure the water dispenser wire/tube assembly has...
... water pressure. Wash ice bin. The water dispenser will not operate properly ■ Refrigerator connected to a water supply and the supply shutoff valve turned on model) is only chilled to a cold water pipe? Remove filter and operate dispenser. Close the door firmly. Make sure the water dispenser wire/tube assembly has...
Use & Care Guide
Page 21
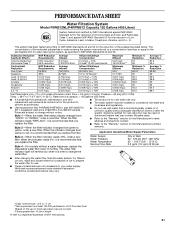
...9632; Refer to the "Warranty" section for the reduction of ice to red, it is recommended that you replace the filter. For models without adequate disinfection before or after the system. While testing was reduced to a concentration less than or equal to perform as specified in... your water supply. PERFORMANCE DATA SHEET Water Filtration System Model P5WB12NL/P4RFWB12 Capacity 120 Gallons (455 Liters) System tested and certified by NSF International against NSF/ANSI Standard 53 for the Manufacturer's ...
...9632; Refer to the "Warranty" section for the reduction of ice to red, it is recommended that you replace the filter. For models without adequate disinfection before or after the system. While testing was reduced to a concentration less than or equal to perform as specified in... your water supply. PERFORMANCE DATA SHEET Water Filtration System Model P5WB12NL/P4RFWB12 Capacity 120 Gallons (455 Liters) System tested and certified by NSF International against NSF/ANSI Standard 53 for the Manufacturer's ...

Use & Care Guide
Page 22
...THIS LIMITED WARRANTY SHALL BE PRODUCT REPAIR AS PROVIDED HEREIN. Have your model number and serial number on the label, located on major appliances with the product, Whirlpool Corporation or Whirlpool Canada LP (hereafter "Whirlpool") will pay for future reference. 22 Please keep these limitations and ...the inside wall of the refrigerator compartment. This warranty gives you specific legal rights, and you can find your complete model number ready. You can write to Whirlpool within 30 days from the date of purchase. 6. In Canada, call 1-800-253-1301. Mississauga, Ontario L5N ...
...THIS LIMITED WARRANTY SHALL BE PRODUCT REPAIR AS PROVIDED HEREIN. Have your model number and serial number on the label, located on major appliances with the product, Whirlpool Corporation or Whirlpool Canada LP (hereafter "Whirlpool") will pay for future reference. 22 Please keep these limitations and ...the inside wall of the refrigerator compartment. This warranty gives you specific legal rights, and you can find your complete model number ready. You can write to Whirlpool within 30 days from the date of purchase. 6. In Canada, call 1-800-253-1301. Mississauga, Ontario L5N ...

Warranty Information
Page 1
...when the major appliance is used in accordance with original model/serial numbers that is inconsistent to refrigerator or freezer product failures. 7. Repairs to parts or systems resulting from unauthorized modifications made to Whirlpool with any questions or concerns at the number below :...area where service by an authorized Whirlpool servicer is not available. 10. LIMITATION OF REMEDIES; Some states and provinces do not allow the exclusion or limitation of incidental or consequential damages, so these User Instructions and the model number information for product service if...
...when the major appliance is used in accordance with original model/serial numbers that is inconsistent to refrigerator or freezer product failures. 7. Repairs to parts or systems resulting from unauthorized modifications made to Whirlpool with any questions or concerns at the number below :...area where service by an authorized Whirlpool servicer is not available. 10. LIMITATION OF REMEDIES; Some states and provinces do not allow the exclusion or limitation of incidental or consequential damages, so these User Instructions and the model number information for product service if...


