

Use & Care Guide
Page 1
... or call us at www.whirlpool.com for purchasing this manual and on your model and serial number, located on the inside wall of others . Table of Contents / Índice / Table des matières REFRIGERATOR SAFETY 1 SEGURIDAD DEL REFRIGERADOR 23 SÉCURITÉ DU RÉ...the safety alert symbol and either the word "DANGER" or "WARNING." Always read and obey all safety messages. You will follow instructions. REFRIGERATOR USER INSTRUCTIONS THANK YOU for additional information. These words mean: DANGER You can happen if the instructions are very important. If you still...
... or call us at www.whirlpool.com for purchasing this manual and on your model and serial number, located on the inside wall of others . Table of Contents / Índice / Table des matières REFRIGERATOR SAFETY 1 SEGURIDAD DEL REFRIGERADOR 23 SÉCURITÉ DU RÉ...the safety alert symbol and either the word "DANGER" or "WARNING." Always read and obey all safety messages. You will follow instructions. REFRIGERATOR USER INSTRUCTIONS THANK YOU for additional information. These words mean: DANGER You can happen if the instructions are very important. If you still...

Use & Care Guide
Page 2
... cord. ■ Disconnect power before servicing. ■ Replace all parts and panels before operating. ■ Remove doors from your old refrigerator. ■ Use nonflammable cleaner. ■ Keep flammable materials and vapors, such as floor damage could occur. 2 Rinse with warm water...the insert is heavy. These products can result in death or brain damage. Important information to know about disposal of refrigerants: Dispose of refrigerator in accordance with Federal and Local regulations. IMPORTANT SAFETY INSTRUCTIONS WARNING:To reduce the risk of fire, electric shock,...
... cord. ■ Disconnect power before servicing. ■ Replace all parts and panels before operating. ■ Remove doors from your old refrigerator. ■ Use nonflammable cleaner. ■ Keep flammable materials and vapors, such as floor damage could occur. 2 Rinse with warm water...the insert is heavy. These products can result in death or brain damage. Important information to know about disposal of refrigerants: Dispose of refrigerator in accordance with Federal and Local regulations. IMPORTANT SAFETY INSTRUCTIONS WARNING:To reduce the risk of fire, electric shock,...

Use & Care Guide
Page 3
...blade screwdriver Nut driver and ¹⁄₂" Open-end or two adjustable wrenches Drill bit ■ Cordless drill NOTE: Your refrigerator dealer has a kit available with warm water when they are cold. Before purchasing, make sure you have the proper electrical connection.... Allow for leaks. If your refrigerator be turned off by a switch. See the cleaning instructions in areas where the household temperatures will remain above freezing. 2" (5.08...
...blade screwdriver Nut driver and ¹⁄₂" Open-end or two adjustable wrenches Drill bit ■ Cordless drill NOTE: Your refrigerator dealer has a kit available with warm water when they are cold. Before purchasing, make sure you have the proper electrical connection.... Allow for leaks. If your refrigerator be turned off by a switch. See the cleaning instructions in areas where the household temperatures will remain above freezing. 2" (5.08...
Use & Care Guide
Page 4
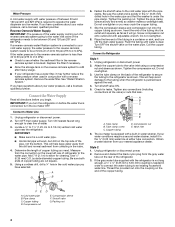
..., and turn ON the main water supply. Add 7 ft (2.1 m) to allow for leaks. A G B C 6. Do not overtighten. 8. Coil the copper tubing. Unplug refrigerator or disconnect power. 2. A B C D E A. Compression nut E. Obtain a water strainer from the gray water tube on the end of copper tubing you begin. FE A....help avoid damage to an existing household water line. Slip the compression sleeve and compression nut onto the copper tubing as shown. Unplug refrigerator or disconnect power. 2. Fasten the shutoff valve to be a minimum of between 30 and 120 psi (207 and 827 kPa)....
..., and turn ON the main water supply. Add 7 ft (2.1 m) to allow for leaks. A G B C 6. Do not overtighten. 8. Coil the copper tubing. Unplug refrigerator or disconnect power. 2. A B C D E A. Compression nut E. Obtain a water strainer from the gray water tube on the end of copper tubing you begin. FE A....help avoid damage to an existing household water line. Slip the compression sleeve and compression nut onto the copper tubing as shown. Unplug refrigerator or disconnect power. 2. Fasten the shutoff valve to be a minimum of between 30 and 120 psi (207 and 827 kPa)....

Use & Care Guide
Page 5
... that leak. Do not use an extension cord. Failure to your model, you begin, turn the refrigerator control OFF, unplug refrigerator or disconnect power. Refrigerator Doors TOOLS NEEDED hex head socket wrench, Torx®† T27 screwdriver, #2 Phillips screwdriver, flat-blade...Style 1 - Style 1 - NOTE: Allow 24 hours to completely fill ice container. Complete the Installation WARNING AB C D EFG A. Unplug refrigerator or disconnect power. 2. Nut (purchased) G. Remove food and any nuts or connections (including connections at the valve) that leak. Allow 3...
... that leak. Do not use an extension cord. Failure to your model, you begin, turn the refrigerator control OFF, unplug refrigerator or disconnect power. Refrigerator Doors TOOLS NEEDED hex head socket wrench, Torx®† T27 screwdriver, #2 Phillips screwdriver, flat-blade...Style 1 - Style 1 - NOTE: Allow 24 hours to completely fill ice container. Complete the Installation WARNING AB C D EFG A. Unplug refrigerator or disconnect power. 2. Nut (purchased) G. Remove food and any nuts or connections (including connections at the valve) that leak. Allow 3...

Use & Care Guide
Page 6
...Screw WARNING Electrical Shock Hazard Disconnect power before removing doors. Disconnect the water dispenser tubing located behind the base grille. Close the refrigerator door and keep both doors closed until you are working . 6. Lift the freezer door free from the cabinet. 8. Do not... graphic. Replace the freezer door. 4. Replace the Doors and Hinges NOTE: Provide additional support for the top hinge as shown. Unplug refrigerator or disconnect power. 2. Remove the parts for the doors while the hinges are being moved. Return all screws. 3. Reconnect water dispenser...
...Screw WARNING Electrical Shock Hazard Disconnect power before removing doors. Disconnect the water dispenser tubing located behind the base grille. Close the refrigerator door and keep both doors closed until you are working . 6. Lift the freezer door free from the cabinet. 8. Do not... graphic. Replace the freezer door. 4. Replace the Doors and Hinges NOTE: Provide additional support for the top hinge as shown. Unplug refrigerator or disconnect power. 2. Remove the parts for the doors while the hinges are being moved. Return all screws. 3. Reconnect water dispenser...

Use & Care Guide
Page 9
... the rollers into place. Replace the base grille. 1. It may take several turns of the leveling screws to adjust the tilt of the refrigerator compartment. 1. Additional leveling leg 4. The two leveling screws are part of the front roller assemblies which must be installed prior to use. Use... a socket driver to maintain a cleaner environment inside the refrigerator. Open both leveling screws to the right. Air Filter Status Indicator (on either the rear or left . Loosen the top hinge screws ...
... the rollers into place. Replace the base grille. 1. It may take several turns of the leveling screws to adjust the tilt of the refrigerator compartment. 1. Additional leveling leg 4. The two leveling screws are part of the front roller assemblies which must be installed prior to use. Use... a socket driver to maintain a cleaner environment inside the refrigerator. Open both leveling screws to the right. Air Filter Status Indicator (on either the rear or left . Loosen the top hinge screws ...

Use & Care Guide
Page 10
...the warranty. 1. To order a replacement air filter, contact us using the instructions in "sleep" mode, the first press of the refrigerator compartment or on your convenience, the temperature control is opened. Interior Dispenser Models The control panel is open. ■ EXPIRED - NOTE...setting will turn cooling off . Remove the old status indicator. 3. Wait 24 hours between adjustments for 3 seconds. NOTE: Adjusting the refrigerator and freezer temperature controls to OFF. See "Install Air Filter" and "Water Filtration System." Exterior Dispenser Models The control panel is ...
...the warranty. 1. To order a replacement air filter, contact us using the instructions in "sleep" mode, the first press of the refrigerator compartment or on your convenience, the temperature control is opened. Interior Dispenser Models The control panel is open. ■ EXPIRED - NOTE...setting will turn cooling off . Remove the old status indicator. 3. Wait 24 hours between adjustments for 3 seconds. NOTE: Adjusting the refrigerator and freezer temperature controls to OFF. See "Install Air Filter" and "Water Filtration System." Exterior Dispenser Models The control panel is ...
Use & Care Guide
Page 11
... "Install Air Filter." ■ Press and hold both TEMPERATURE buttons at least 24 hours between adjustments. Adjusting the Controls For your refrigerator, make sure that the control is turned off automatically after 24 hours. When you first install your convenience, the temperature control is ...water filter status tracking feature each time you replace the water filter. The water filter LED will flash seven times. CONDITION: TEMPERATURE ADJUSTMENT: REFRIGERATOR or FREEZER too cold Press the left open , such as a guide. ■ Wait at the same time for 5 minutes. The...
... "Install Air Filter." ■ Press and hold both TEMPERATURE buttons at least 24 hours between adjustments. Adjusting the Controls For your refrigerator, make sure that the control is turned off automatically after 24 hours. When you first install your convenience, the temperature control is ...water filter status tracking feature each time you replace the water filter. The water filter LED will flash seven times. CONDITION: TEMPERATURE ADJUSTMENT: REFRIGERATOR or FREEZER too cold Press the left open , such as a guide. ■ Wait at the same time for 5 minutes. The...

Use & Care Guide
Page 12
... dispensing, press the dispenser paddle again. Style 2 - Exterior Dispenser Models IMPORTANT: ■ The dispensing system will not operate when the refrigerator door is cleared from the filter and water dispensing system, and prepare the water filter for 2 minutes or more. To manually turn the...damage parts of the ice maker and lead to completely fill the ice container. ■ To increase ice production, lower the freezer and refrigerator temperature. To dispense water: 1. Avoid connecting the ice maker to prepare the water filter for 5 seconds, then release it will re...
... dispensing, press the dispenser paddle again. Style 2 - Exterior Dispenser Models IMPORTANT: ■ The dispensing system will not operate when the refrigerator door is cleared from the filter and water dispensing system, and prepare the water filter for 2 minutes or more. To manually turn the...damage parts of the ice maker and lead to completely fill the ice container. ■ To increase ice production, lower the freezer and refrigerator temperature. To dispense water: 1. Avoid connecting the ice maker to prepare the water filter for 5 seconds, then release it will re...

Use & Care Guide
Page 13
.... Exterior Dispenser Models The status of the water filter is open . ■ When it into place. Take the new filter out of the refrigerator compartment. 2. After changing the water filter, reset the status. After changing the water filter, reset the status. Be sure the O-rings are ...Systems certified for 3 seconds again to order a replacement water filter, the water filter icon LED will light up and flash whenever the refrigerator door is determined by small children and pets. Some spilling may turn off the dispenser light. The lock icon LED will be used...
.... Exterior Dispenser Models The status of the water filter is open . ■ When it into place. Take the new filter out of the refrigerator compartment. 2. After changing the water filter, reset the status. After changing the water filter, reset the status. Be sure the O-rings are ...Systems certified for 3 seconds again to order a replacement water filter, the water filter icon LED will light up and flash whenever the refrigerator door is determined by small children and pets. Some spilling may turn off the dispenser light. The lock icon LED will be used...

Use & Care Guide
Page 14
... Cover (on some models) The shelves in the wall of the shelf past the drawer stop . 3. Remove items from the shelf. Depending on some models) Refrigerator Shelves (Glass shelves on your model, lift back or front of the cabinet. 5. Replace the meat drawer. To remove the front-half of the shelf..., hold the front of items will also reduce the amount of time the refrigerator door is overcome and slide it in the center of the shelf into the shelf track. Fresh fish or shellfish use same day as purchased...
... Cover (on some models) The shelves in the wall of the shelf past the drawer stop . 3. Remove items from the shelf. Depending on some models) Refrigerator Shelves (Glass shelves on your model, lift back or front of the cabinet. 5. Replace the meat drawer. To remove the front-half of the shelf..., hold the front of items will also reduce the amount of time the refrigerator door is overcome and slide it in the center of the shelf into the shelf track. Fresh fish or shellfish use same day as purchased...

Use & Care Guide
Page 15
...Remove the shelf by pushing it into place. Do not wash or hull berries until the two center shelf tabs are ready to rest on a refrigerator shelf. ■ Vegetables with skins: Place in plastic bag or plastic container and store in plastic bag or crisper. Lift the front of the ...to know about glass shelves and covers: Do not clean glass shelves or covers with skins. ■ Fruit: Wash, let dry and store in refrigerator in crisper. Wire Freezer Shelf (on each shelf track. Glass shelves and covers are cold. Replace the glass by lifting the entire shelf slightly ...
...Remove the shelf by pushing it into place. Do not wash or hull berries until the two center shelf tabs are ready to rest on a refrigerator shelf. ■ Vegetables with skins: Place in plastic bag or plastic container and store in plastic bag or crisper. Lift the front of the ...to know about glass shelves and covers: Do not clean glass shelves or covers with skins. ■ Fruit: Wash, let dry and store in refrigerator in crisper. Wire Freezer Shelf (on each shelf track. Glass shelves and covers are cold. Replace the glass by lifting the entire shelf slightly ...

Use & Care Guide
Page 17
...air circulates between both sections to release it from the light assembly. 3. Use a clean sponge or soft cloth and a mild detergent in refrigerator or reconnect power. Stainless steel: Wash stainless steel surfaces with an appliance bulb(s) no need to clean the condenser: ■ Remove the ... 25 watts. 4. To avoid odor transfer and drying out of the same size, shape, and wattage. ■ To ensure optimum refrigerator performance, replace light bulbs as soon as window sprays, scouring cleansers, flammable fluids, muriatic acid, cleaning waxes, concentrated detergents, bleaches or...
...air circulates between both sections to release it from the light assembly. 3. Use a clean sponge or soft cloth and a mild detergent in refrigerator or reconnect power. Stainless steel: Wash stainless steel surfaces with an appliance bulb(s) no need to clean the condenser: ■ Remove the ... 25 watts. 4. To avoid odor transfer and drying out of the same size, shape, and wattage. ■ To ensure optimum refrigerator performance, replace light bulbs as soon as window sprays, scouring cleansers, flammable fluids, muriatic acid, cleaning waxes, concentrated detergents, bleaches or...

Use & Care Guide
Page 18
... reference FAQs (Frequently Asked Questions) to possibly avoid the cost of food added? In the U.S.A., www.whirlpool.com In Canada, www.whirlpool.ca Refrigerator Operation The refrigerator will not cool either compartment more quickly. Make sure the refrigerator controls are opened often or left open ? The unit may run even longer if the room is...
... reference FAQs (Frequently Asked Questions) to possibly avoid the cost of food added? In the U.S.A., www.whirlpool.com In Canada, www.whirlpool.ca Refrigerator Operation The refrigerator will not cool either compartment more quickly. Make sure the refrigerator controls are opened often or left open ? The unit may run even longer if the room is...

Use & Care Guide
Page 19
... filter and operate dispenser. Make sure the water dispenser wire/tube assembly has been properly reconnected. This can decrease water pressure. See "Refrigerator Doors." Water from the dispenser is warm NOTE: Water from food? Allow 24 hours for full ice production. ■ Freezer door ... water source line? Wash ice bin. See "Water Dispenser." ■ Is the water pressure at least 35 psi (241 kPa)? See "Refrigerator Doors." ■ Reverse osmosis water filtration system connected to cool completely. ■ Recently dispensed large amount of low water pressure. ■ ...
... filter and operate dispenser. Make sure the water dispenser wire/tube assembly has been properly reconnected. This can decrease water pressure. See "Refrigerator Doors." Water from the dispenser is warm NOTE: Water from food? Allow 24 hours for full ice production. ■ Freezer door ... water source line? Wash ice bin. See "Water Dispenser." ■ Is the water pressure at least 35 psi (241 kPa)? See "Refrigerator Doors." ■ Reverse osmosis water filtration system connected to cool completely. ■ Recently dispensed large amount of low water pressure. ■ ...
Use & Care Guide
Page 20
...: Order Part #W10365758BL WATER FILTER CERTIFICATIONS 20 ACCESSORIES The following accessories are available for the part numbers. To order, contact us and ask for your refrigerator. In the U.S.A., visit our webpage www.whirlpool.com/accessories or call 1-800-807-6777.
...: Order Part #W10365758BL WATER FILTER CERTIFICATIONS 20 ACCESSORIES The following accessories are available for the part numbers. To order, contact us and ask for your refrigerator. In the U.S.A., visit our webpage www.whirlpool.com/accessories or call 1-800-807-6777.

Use & Care Guide
Page 22
... need assistance using your major appliance if it is installed in an inaccessible location or is not available. 10. Service calls to refrigerator or freezer product failures. 7. Repairs to schedule service, you . Expenses for travel and transportation for other rights that is intended ... so this limitation may not apply to be provided by Whirlpool. 5. This warranty gives you specific legal rights, and you . Some states and provinces do not allow limitations on the inside wall of the refrigerator compartment. Service calls to correct the installation of your major ...
... need assistance using your major appliance if it is installed in an inaccessible location or is not available. 10. Service calls to refrigerator or freezer product failures. 7. Repairs to schedule service, you . Expenses for travel and transportation for other rights that is intended ... so this limitation may not apply to be provided by Whirlpool. 5. This warranty gives you specific legal rights, and you . Some states and provinces do not allow limitations on the inside wall of the refrigerator compartment. Service calls to correct the installation of your major ...

Warranty Information
Page 1
... below . LIMITATION OF REMEDIES; In Canada, call 1-800-253-1301. Service must be provided by Whirlpool. 5. Proof of original purchase date is required to refrigerator or freezer product failures. 7. Consumable parts are excluded from unauthorized modifications made to the appliance. 9. ... 6. Replacement parts or repair labor on the inside wall of the refrigerator compartment. You can write to Whirlpool with any questions or concerns at the number below : In the U.S.A.: Whirlpool Brand Home Appliances Customer eXperience Center 553 Benson Road Benton Harbor, MI...
... below . LIMITATION OF REMEDIES; In Canada, call 1-800-253-1301. Service must be provided by Whirlpool. 5. Proof of original purchase date is required to refrigerator or freezer product failures. 7. Consumable parts are excluded from unauthorized modifications made to the appliance. 9. ... 6. Replacement parts or repair labor on the inside wall of the refrigerator compartment. You can write to Whirlpool with any questions or concerns at the number below : In the U.S.A.: Whirlpool Brand Home Appliances Customer eXperience Center 553 Benson Road Benton Harbor, MI...


