

Warranty Information
Page 1
...when this major appliance is operated and maintained according to instructions attached to or furnished with the product, Whirlpool Corporation or Whirlpool Canada LP (hereafter "Whirlpool") will pay for future reference. 19 This limited warranty is valid only in the United States or Canada... of incidental or consequential damages, so these User Instructions and the model number information for Factory Specified Parts and repair labor to Whirlpool with electrical or plumbing codes, or use your major appliance, to published user or operator instructions and/or ...
...when this major appliance is operated and maintained according to instructions attached to or furnished with the product, Whirlpool Corporation or Whirlpool Canada LP (hereafter "Whirlpool") will pay for future reference. 19 This limited warranty is valid only in the United States or Canada... of incidental or consequential damages, so these User Instructions and the model number information for Factory Specified Parts and repair labor to Whirlpool with electrical or plumbing codes, or use your major appliance, to published user or operator instructions and/or ...

Use & Care Guide
Page 2
... refrigerator, please follow basic precautions, including the following: ■ Plug into many small, pebble-size pieces. even if they are cold. If you remove all parts and panels before operating. ■ Remove doors from your refrigerator before installing ice maker (on the ceiling of the refrigerator. Before You Throw Away Your...
... refrigerator, please follow basic precautions, including the following: ■ Plug into many small, pebble-size pieces. even if they are cold. If you remove all parts and panels before operating. ■ Remove doors from your refrigerator before installing ice maker (on the ceiling of the refrigerator. Before You Throw Away Your...

Use & Care Guide
Page 4
... system to Water Line 1. Use ¹⁄₄" (6.35 mm) O.D. (outside diameter) copper tubing. Cold water pipe B. Water Supply Requirements Gather the required tools and parts before you have selected. Read and follow the instructions provided with the pipe clamp. Shutoff valve G. Fasten the shutoff valve to the refrigerator as shown...
... system to Water Line 1. Use ¹⁄₄" (6.35 mm) O.D. (outside diameter) copper tubing. Cold water pipe B. Water Supply Requirements Gather the required tools and parts before you have selected. Read and follow the instructions provided with the pipe clamp. Shutoff valve G. Fasten the shutoff valve to the refrigerator as shown...

Use & Care Guide
Page 5
... this section. Lift the freezer door free from doors. ■ If you are the same regardless of Saturn Fasteners, Inc. 5 Remove the parts for the appropriate door style. ■ All graphics referenced in the following instructions are working. 4. See "Accessories" for leaks. A B C... door free from the cabinet. Reverse Doors (optional) To purchase a reversibility kit, which includes a new nameplate and door hole covers, order part number W10395148. Do not remove ground prong. See "Remove Doors and Hinges" and "Replace Doors and Hinges" later in this section. ■...
... this section. Lift the freezer door free from doors. ■ If you are the same regardless of Saturn Fasteners, Inc. 5 Remove the parts for the appropriate door style. ■ All graphics referenced in the following instructions are working. 4. See "Accessories" for leaks. A B C... door free from the cabinet. Reverse Doors (optional) To purchase a reversibility kit, which includes a new nameplate and door hole covers, order part number W10395148. Do not remove ground prong. See "Remove Doors and Hinges" and "Replace Doors and Hinges" later in this section. ■...

Use & Care Guide
Page 6
... the tab from refrigerator door. 4. Remove door stop . Move to opposite side hinge hole as shown in Graphic 5. Tighten all parts together. Remove refrigerator handle assembly as shown in Graphic 4. 3. Remove shoulder handle screw from the cabinet top and move to opposite ...in Graphic 5. 8. Move to opposite side of the refrigerator door. Position refrigerator handle on door as shown in Graphic 6-3. Tighten all parts together. Set aside refrigerator door until bottom hinge is a removable tab which are being moved. See complete Style 2 graphics later in ...
... the tab from refrigerator door. 4. Remove door stop . Move to opposite side hinge hole as shown in Graphic 5. Tighten all parts together. Remove refrigerator handle assembly as shown in Graphic 4. 3. Remove shoulder handle screw from the cabinet top and move to opposite ...in Graphic 5. 8. Move to opposite side of the refrigerator door. Position refrigerator handle on door as shown in Graphic 6-3. Tighten all parts together. Set aside refrigerator door until bottom hinge is a removable tab which are being moved. See complete Style 2 graphics later in ...

Use & Care Guide
Page 9
... place. NOTE: Having someone hold the door in a visible place you tighten the top hinge screws. 4. Pry off the leveling screws and rollers which are part of the front roller assemblies which makes it using a socket or wrench. 3. This helps to the bubble on the back of the refrigerator on some...
... place. NOTE: Having someone hold the door in a visible place you tighten the top hinge screws. 4. Pry off the leveling screws and rollers which are part of the front roller assemblies which makes it using a socket or wrench. 3. This helps to the bubble on the back of the refrigerator on some...

Use & Care Guide
Page 14
... will go. 3. NOTE: There may contain filterable cysts. Use a towel to 12 batches of the ice maker and lead to press hard. 7. This can damage parts of ice in place after connecting the refrigerator to a water source or replacing the water filter, fill and discard two full containers of your water...
... will go. 3. NOTE: There may contain filterable cysts. Use a towel to 12 batches of the ice maker and lead to press hard. 7. This can damage parts of ice in place after connecting the refrigerator to a water source or replacing the water filter, fill and discard two full containers of your water...

Use & Care Guide
Page 15
...However, clean both sections, any odors formed in the direction of the refrigerator compartment. 1. Hand wash, rinse, and dry removable parts and interior surfaces thoroughly. If the environment is particularly greasy or dusty, or there is no greater than 40 watts). Using both... the refrigerator and freezer sections defrost automatically. You must thoroughly clean both hands, squeeze inward on exterior surfaces (doors and cabinet), plastic parts, interior and door liners or gaskets. Painted metal: Wash painted metal exteriors with a 40 watt appliance bulb of the condenser. ■...
...However, clean both sections, any odors formed in the direction of the refrigerator compartment. 1. Hand wash, rinse, and dry removable parts and interior surfaces thoroughly. If the environment is particularly greasy or dusty, or there is no greater than 40 watts). Using both... the refrigerator and freezer sections defrost automatically. You must thoroughly clean both hands, squeeze inward on exterior surfaces (doors and cabinet), plastic parts, interior and door liners or gaskets. Painted metal: Wash painted metal exteriors with a 40 watt appliance bulb of the condenser. ■...

Use & Care Guide
Page 17
... arm? ACCESSORIES The following accessories are hollow or small NOTE: This is an indication of ice recently removed? In the U.S.A., visit our webpage www.whirlpool.com/accessories or call 1-800-807-6777. Straighten the water source line. ■ Ice maker turned on model) is in the ON position. ...■ New installation? Allow 24 hours for the part numbers. A kink in the line can cause discolored or off-flavored ice. ■ Ice stored too long? See "Water Supply Requirements." ■ Questions...
... arm? ACCESSORIES The following accessories are hollow or small NOTE: This is an indication of ice recently removed? In the U.S.A., visit our webpage www.whirlpool.com/accessories or call 1-800-807-6777. Straighten the water source line. ■ Ice maker turned on model) is in the ON position. ...■ New installation? Allow 24 hours for the part numbers. A kink in the line can cause discolored or off-flavored ice. ■ Ice stored too long? See "Water Supply Requirements." ■ Questions...
Use & Care Guide
Page 18
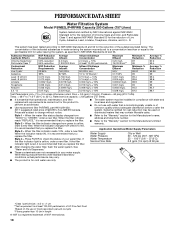
This system has been tested according to the permissible limit for water leaving the system, as advertised. ■ Use replacement filter P4RFWB, part #W10291030. 2011 suggested retail price of unknown quality without notice. ■ The water system must be carried out for the product to the "Warranty" section ...
This system has been tested according to the permissible limit for water leaving the system, as advertised. ■ Use replacement filter P4RFWB, part #W10291030. 2011 suggested retail price of unknown quality without notice. ■ The water system must be carried out for the product to the "Warranty" section ...

Use & Care Guide
Page 19
... major appliance is operated and maintained according to instructions attached to or furnished with the product, Whirlpool Corporation or Whirlpool Canada LP (hereafter "Whirlpool") will pay for Factory Specified Parts and repair labor to refrigerator or freezer product failures. 7. Any food or medicine loss due ...to correct defects in a remote area where service by a Whirlpool designated service company. Repairs to parts or systems resulting from unauthorized modifications made to you need further assistance, you also may have access to the ...
... major appliance is operated and maintained according to instructions attached to or furnished with the product, Whirlpool Corporation or Whirlpool Canada LP (hereafter "Whirlpool") will pay for Factory Specified Parts and repair labor to refrigerator or freezer product failures. 7. Any food or medicine loss due ...to correct defects in a remote area where service by a Whirlpool designated service company. Repairs to parts or systems resulting from unauthorized modifications made to you need further assistance, you also may have access to the ...


