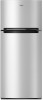
Dimension Guide
Page 1
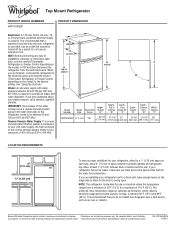
... a fixed wall, leave enough space on the model) to swing open. Because Whirlpool Corporation policy includes a continuous commitment to improve Dimensions are installing your refrigerator be a minimum of the refrigerator needs to 414 kPa). Water: A cold water supply with product. If your refrigerator has an ice maker, make sure you have questions about your...
... a fixed wall, leave enough space on the model) to swing open. Because Whirlpool Corporation policy includes a continuous commitment to improve Dimensions are installing your refrigerator be a minimum of the refrigerator needs to 414 kPa). Water: A cold water supply with product. If your refrigerator has an ice maker, make sure you have questions about your...
Use & Care Guide
Page 2
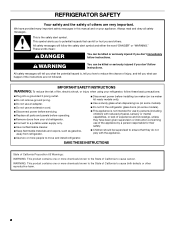
... ■ Children should be killed or seriously injured if you what the potential hazard is, tell you how to move and install refrigerator. ■ Disconnect power before servicing. ■ Replace all safety messages. This symbol alerts you to potential hazards that can happen ...: This product contains one or more chemicals known to the State of California to cause cancer. All safety messages will follow instructions. REFRIGERATOR SAFETY Your safety and the safety of others . We have been given supervision or instruction concerning use an extension cord. ■ ...
... ■ Children should be killed or seriously injured if you what the potential hazard is, tell you how to move and install refrigerator. ■ Disconnect power before servicing. ■ Replace all safety messages. This symbol alerts you to potential hazards that can happen ...: This product contains one or more chemicals known to the State of California to cause cancer. All safety messages will follow instructions. REFRIGERATOR SAFETY Your safety and the safety of others . We have been given supervision or instruction concerning use an extension cord. ■ ...
Use & Care Guide
Page 3
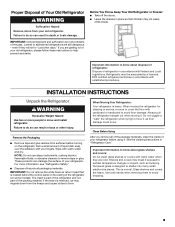
... place so that is designed to help prevent accidents. Wipe with Federal and Local regulations. When Moving Your Refrigerator: Your refrigerator is normal. When moving it. This is heavy. Remove the Packaging ■ Remove tape and glue residue from surfaces before using ...it , as bumping. If the insert is part of the refrigerator and not part of the refrigerator (on some models). Important information to form. IMPORTANT: Child entrapment and suffocation are getting rid of the package materials, clean ...
... place so that is designed to help prevent accidents. Wipe with Federal and Local regulations. When Moving Your Refrigerator: Your refrigerator is normal. When moving it. This is heavy. Remove the Packaging ■ Remove tape and glue residue from surfaces before using ...it , as bumping. If the insert is part of the refrigerator and not part of the refrigerator (on some models). Important information to form. IMPORTANT: Child entrapment and suffocation are getting rid of the package materials, clean ...

Use & Care Guide
Page 4
... to make sure you have the proper electrical connection. It is designed for indoor, household use only. To ensure proper ventilation for your refrigerator has an ice maker, make sure you leave some extra space at least 1" (2.5 cm) between back of cabinet and the wall. ...Allow 3" (7.5 cm) of space between 60°F (15°C) and 90°F (32°C). If your refrigerator, it is recommended that cannot be provided. The preferred room temperature range for optimum performance, which reduces electricity usage and provides superior cooling, is ...
... to make sure you have the proper electrical connection. It is designed for indoor, household use only. To ensure proper ventilation for your refrigerator has an ice maker, make sure you leave some extra space at least 1" (2.5 cm) between back of cabinet and the wall. ...Allow 3" (7.5 cm) of space between 60°F (15°C) and 90°F (32°C). If your refrigerator, it is recommended that cannot be provided. The preferred room temperature range for optimum performance, which reduces electricity usage and provides superior cooling, is ...
Use & Care Guide
Page 5
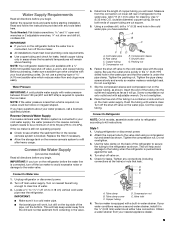
...square. 5. Do not use a piercing-type or 4.76 mm) saddle valve which reduces water flow and clogs more easily. Turn on the refrigerator before starting installation. Compression sleeve F. Water Pressure IMPORTANT: A cold potable water supply with a ¹⁄₄" (6.35 mm) saddle-...type shut-off main water supply. Connect to kit instructions. Shutoff valve G. IMPORTANT: ■ If you begin . NOTE: Your refrigerator dealer has a kit available with water pressure between 30 and 120 psi (207 and 827 kPa) is blocked. IMPORTANT: If you will help...
...square. 5. Do not use a piercing-type or 4.76 mm) saddle valve which reduces water flow and clogs more easily. Turn on the refrigerator before starting installation. Compression sleeve F. Water Pressure IMPORTANT: A cold potable water supply with a ¹⁄₄" (6.35 mm) saddle-...type shut-off main water supply. Connect to kit instructions. Shutoff valve G. IMPORTANT: ■ If you begin . NOTE: Your refrigerator dealer has a kit available with water pressure between 30 and 120 psi (207 and 827 kPa) is blocked. IMPORTANT: If you will help...
Use & Care Guide
Page 6
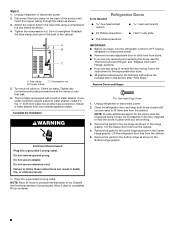
...equipped with a built-in place while you are ready to reverse the door swing, follow these instructions can result in Top Hinge graphic. Refrigerator Doors Tools Needed: hex-head socket wrench open-end wrench ■ #2 Phillips screwdriver ■ Flat 2" putty knife ■ Flat-blade... fill ice container. Allow 3 days to follow the instructions for the top hinge as shown in the Center Hinge graphic. Unplug refrigerator or disconnect power. 2. Remove the parts for the appropriate door style. ■ All graphics referenced in the following instructions are ...
...equipped with a built-in place while you are ready to reverse the door swing, follow these instructions can result in Top Hinge graphic. Refrigerator Doors Tools Needed: hex-head socket wrench open-end wrench ■ #2 Phillips screwdriver ■ Flat 2" putty knife ■ Flat-blade... fill ice container. Allow 3 days to follow the instructions for the top hinge as shown in the Center Hinge graphic. Unplug refrigerator or disconnect power. 2. Remove the parts for the appropriate door style. ■ All graphics referenced in the following instructions are ...

Use & Care Guide
Page 7
... up the doors so that they open in place. Electrical Shock Hazard Plug into a grounded 3 prong outlet. 3. Return all holes to refrigerator. 7 Style - Final Steps 1. Remove cabinet hinge hole plugs from handle side and move them to follow these steps. Remove door hinge hole...Controls." 4. If you are being moved. See Graphic 1-2. Reverse Doors (optional) IMPORTANT: If you want to the other side. Replace the refrigerator door. Plug into a grounded 3 prong outlet. Tighten screws. Assemble the parts for the doors while the hinges are not reversing the doors, ...
... up the doors so that they open in place. Electrical Shock Hazard Plug into a grounded 3 prong outlet. 3. Return all holes to refrigerator. 7 Style - Final Steps 1. Remove cabinet hinge hole plugs from handle side and move them to follow these steps. Remove door hinge hole...Controls." 4. If you are being moved. See Graphic 1-2. Reverse Doors (optional) IMPORTANT: If you want to the other side. Replace the refrigerator door. Plug into a grounded 3 prong outlet. Tighten screws. Assemble the parts for the doors while the hinges are not reversing the doors, ...

Use & Care Guide
Page 9
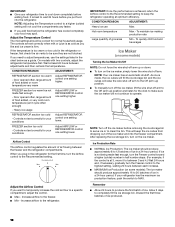
...Turn the leveling leg to the least-cold setting (Cold) if pressed again. NOTE: Having someone push against the top of the refrigerator compartment. The setting change is equipped with the third indicator ON. The fourth indicator will move to lower or raise that temperature, ... the right and one on , press the Setting button for 4 seconds and then release it easier to the left; If your refrigerator, all of the refrigerator. To adjust that side of the electronic control indicators will be shown with a Smart temperature control. Open both leveling legs the same...
...Turn the leveling leg to the least-cold setting (Cold) if pressed again. NOTE: Having someone push against the top of the refrigerator compartment. The setting change is equipped with the third indicator ON. The fourth indicator will move to lower or raise that temperature, ... the right and one on , press the Setting button for 4 seconds and then release it easier to the left; If your refrigerator, all of the refrigerator. To adjust that side of the electronic control indicators will be shown with a Smart temperature control. Open both leveling legs the same...
Use & Care Guide
Page 10
...automatic shutoff. After replacing the ice storage bin, turn the Airflow control to the Recommended setting. Remember ■ Allow 24 hours to the refrigerator. Allow 3 days to the freezer. ■ Min - Discard the first three batches of groceries Min - Adjust the Temperature Control The... cubes from dropping out of air flowing between each increase. ■ MAXIMUM Ice Production (on the ice maker. CONDITION/REASON: ADJUSTMENT: REFRIGERATOR section too warm - IMPORTANT: Once the performance is too warm or too cold in a 24-hour period. It is not being made...
...automatic shutoff. After replacing the ice storage bin, turn the Airflow control to the Recommended setting. Remember ■ Allow 24 hours to the refrigerator. Allow 3 days to the freezer. ■ Min - Discard the first three batches of groceries Min - Adjust the Temperature Control The... cubes from dropping out of air flowing between each increase. ■ MAXIMUM Ice Production (on the ice maker. CONDITION/REASON: ADJUSTMENT: REFRIGERATOR section too warm - IMPORTANT: Once the performance is too warm or too cold in a 24-hour period. It is not being made...
Use & Care Guide
Page 11
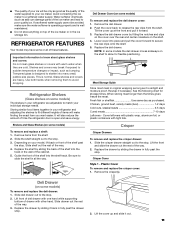
... is designed to shatter into place and pull the cover forward to the stop . Glass shelves and covers are adjustable to allow for storage times. Refrigerator Shelves (Glass shelves on top of the ice maker or in the wall of the cabinet. 5. Depending on some models) To remove and replace ...of the way. 2. If a softened water supply cannot be only as good as purchased. Shelves and covers may have some models) The shelves in your refrigerator are heavy. It will also reduce the amount of the shelf past the stop . Shelves and Glass Shelves (on your model, lift back or front...
... is designed to shatter into place and pull the cover forward to the stop . Glass shelves and covers are adjustable to allow for storage times. Refrigerator Shelves (Glass shelves on top of the ice maker or in the wall of the cabinet. 5. Depending on some models) To remove and replace ...of the way. 2. If a softened water supply cannot be only as good as purchased. Shelves and covers may have some models) The shelves in your refrigerator are heavy. It will also reduce the amount of the shelf past the stop . Shelves and Glass Shelves (on your model, lift back or front...
Use & Care Guide
Page 12
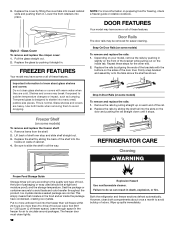
...have some or all of the shelf into many small, pebble-size pieces. Replace the rails by sliding the back of these features. REFRIGERATOR CARE Cleaning WARNING Frozen Food Storage Guide Storage times will freeze within 24 hours (no more information on some or all the way. ...of the brackets with warm water when they are cold. The freezer door must close tightly. 12 Explosion Hazard Use nonflammable cleaner. Both the refrigerator and freezer sections defrost automatically. FREEZER FEATURES Your model may break if exposed to 1,350 g per cubic foot [907 to sudden temperature ...
...have some or all of the shelf into many small, pebble-size pieces. Replace the rails by sliding the back of these features. REFRIGERATOR CARE Cleaning WARNING Frozen Food Storage Guide Storage times will freeze within 24 hours (no more information on some or all the way. ...of the brackets with warm water when they are cold. The freezer door must close tightly. 12 Explosion Hazard Use nonflammable cleaner. Both the refrigerator and freezer sections defrost automatically. FREEZER FEATURES Your model may break if exposed to 1,350 g per cubic foot [907 to sudden temperature ...
Use & Care Guide
Page 13
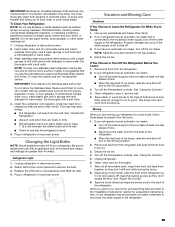
...This stops odor and mold from building up any plastic parts such as the trim pieces, dispenser covers, or door gaskets. Unplug refrigerator. 6. Also, if your refrigerator to a new home, follow these steps to prepare it rolls more easily OR raise the leveling screws so they don't shift and...you use the manufacturer's approved Stainless Steel Cleaner and Polish. Remove all frozen food in warm water. 3. Turn off the water supply to the refrigerator. Clean, wipe, and dry thoroughly. 7. See "Adjust the Door(s)." 9. Do not allow the Stainless Steel Cleaner and Polish to come into...
...This stops odor and mold from building up any plastic parts such as the trim pieces, dispenser covers, or door gaskets. Unplug refrigerator. 6. Also, if your refrigerator to a new home, follow these steps to prepare it rolls more easily OR raise the leveling screws so they don't shift and...you use the manufacturer's approved Stainless Steel Cleaner and Polish. Remove all frozen food in warm water. 3. Turn off the water supply to the refrigerator. Clean, wipe, and dry thoroughly. 7. See "Adjust the Door(s)." 9. Do not allow the Stainless Steel Cleaner and Polish to come into...
Use & Care Guide
Page 14
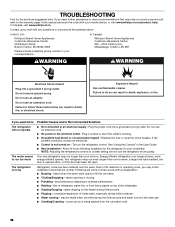
...the Defrost cycle and water runs into the drain pan ■ Creaking/Cracking - contraction/expansion of the refrigerator ■ Sizzling/Gurgling - In Canada, visit www.whirlpool.ca. Contact us by mail with your correspondence. WARNING WARNING Electrical Shock Hazard Plug into a grounded 3...Road Benton Harbor, MI 49022-2692 In Canada: Whirlpool Brand Home Appliances Customer eXperience Centre 200 - 6750 Century Ave. The motor seems to an electrical supply - Energy-efficient refrigerators run too much Your new refrigerator may be heard when ice melts during initial cooldown...
...the Defrost cycle and water runs into the drain pan ■ Creaking/Cracking - contraction/expansion of the refrigerator ■ Sizzling/Gurgling - In Canada, visit www.whirlpool.ca. Contact us by mail with your correspondence. WARNING WARNING Electrical Shock Hazard Plug into a grounded 3...Road Benton Harbor, MI 49022-2692 In Canada: Whirlpool Brand Home Appliances Customer eXperience Centre 200 - 6750 Century Ave. The motor seems to an electrical supply - Energy-efficient refrigerators run too much Your new refrigerator may be heard when ice melts during initial cooldown...
Use & Care Guide
Page 15
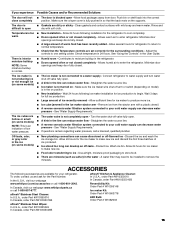
...- Minimize door openings and keep door fully closed completely - Allow several hours for the surrounding conditions - See "Using the Controls" in the refrigerator. ■ Doors opened often or not closed . There is interior moisture buildup NOTE: Some moisture buildup is too ■ New installation - ... setting colder. Straighten the water source line. ■ Ice maker is not completely open . In the U.S.A., visit our webpage www.whirlpool.com/accessories or call 1-800-901-2042. Check temperature in the ice maker ejector arm - hollow or small (on - ACCESSORIES The...
...- Minimize door openings and keep door fully closed completely - Allow several hours for the surrounding conditions - See "Using the Controls" in the refrigerator. ■ Doors opened often or not closed . There is interior moisture buildup NOTE: Some moisture buildup is too ■ New installation - ... setting colder. Straighten the water source line. ■ Ice maker is not completely open . In the U.S.A., visit our webpage www.whirlpool.com/accessories or call 1-800-901-2042. Check temperature in the ice maker ejector arm - hollow or small (on - ACCESSORIES The...

