

Warranty Information
Page 1
WHIRLPOOL CORPORATION MAJOR APPLIANCE WARRANTY LIMITED WARRANTY For one year from the date of original purchase date is required to obtain service under this limited warranty. Service calls to refrigerator or freezer product failures. 7. Expenses for travel and transportation for Factory Specified Parts ...For additional product information, in a manner that have access to the Internet and you . The removal and reinstallation of the refrigerator compartment. This limited warranty is valid only in your complete model number ready. YOUR SOLE AND EXCLUSIVE REMEDY UNDER THIS LIMITED...
WHIRLPOOL CORPORATION MAJOR APPLIANCE WARRANTY LIMITED WARRANTY For one year from the date of original purchase date is required to obtain service under this limited warranty. Service calls to refrigerator or freezer product failures. 7. Expenses for travel and transportation for Factory Specified Parts ...For additional product information, in a manner that have access to the Internet and you . The removal and reinstallation of the refrigerator compartment. This limited warranty is valid only in your complete model number ready. YOUR SOLE AND EXCLUSIVE REMEDY UNDER THIS LIMITED...

Use & Care Guide
Page 1
... model and serial number, located on your appliance. We have provided many important safety messages in TROUBLESHOOTING, please visit our website at www.whirlpool.com for purchasing this manual and on the inside wall of others . If you what the potential hazard is the safety alert symbol.... if you to reduce the chance of injury, and tell you what can kill or hurt you and others are not followed. ® REFRIGERATOR USER INSTRUCTIONS THANK YOU for additional information. You will follow instructions. If you don't follow the safety alert symbol and either the word "...
... model and serial number, located on your appliance. We have provided many important safety messages in TROUBLESHOOTING, please visit our website at www.whirlpool.com for purchasing this manual and on the inside wall of others . If you what the potential hazard is the safety alert symbol.... if you to reduce the chance of injury, and tell you what can kill or hurt you and others are not followed. ® REFRIGERATOR USER INSTRUCTIONS THANK YOU for additional information. You will follow instructions. If you don't follow the safety alert symbol and either the word "...

Use & Care Guide
Page 2
...ice may break if exposed to sudden temperature changes or impact, such as bumping. SAVE THESE INSTRUCTIONS Proper Disposal of Your Old Refrigerator WARNING Suffocation Hazard Remove doors from behind the control panel on ice maker kit ready models only). Failure to do so can result...back or other injury. Clean Before Using After you are heavy. IMPORTANT: Do not remove the white foam air return insert from your refrigerator. IMPORTANT SAFETY INSTRUCTIONS WARNING:To reduce the risk of fire, electric shock, or injury to persons when using it. IMPORTANT: Child ...
...ice may break if exposed to sudden temperature changes or impact, such as bumping. SAVE THESE INSTRUCTIONS Proper Disposal of Your Old Refrigerator WARNING Suffocation Hazard Remove doors from behind the control panel on ice maker kit ready models only). Failure to do so can result...back or other injury. Clean Before Using After you are heavy. IMPORTANT: Do not remove the white foam air return insert from your refrigerator. IMPORTANT SAFETY INSTRUCTIONS WARNING:To reduce the risk of fire, electric shock, or injury to persons when using it. IMPORTANT: Child ...

Use & Care Guide
Page 3
...- Do not use an extension cord. Allow for 1" (2.54 cm) of installation, cleaning, or removing a light bulb, turn the control (Thermostat, Refrigerator or Freezer Control depending on each side and at the back for the water line connections. Do not use an adapter. See "Using the Controls..., or electrical shock. Failure to follow these instructions can result in death, explosion, or fire. Use an outlet that a separate circuit serving only your refrigerator next to a fixed wall, leave a 2" (5.08 cm) minimum space on the model) to make sure you do so can result in a location...
...- Do not use an extension cord. Allow for 1" (2.54 cm) of installation, cleaning, or removing a light bulb, turn the control (Thermostat, Refrigerator or Freezer Control depending on each side and at the back for the water line connections. Do not use an adapter. See "Using the Controls..., or electrical shock. Failure to follow these instructions can result in death, explosion, or fire. Use an outlet that a separate circuit serving only your refrigerator next to a fixed wall, leave a 2" (5.08 cm) minimum space on the model) to make sure you do so can result in a location...

Use & Care Guide
Page 4
...Water Supply IMPORTANT: The pressure of the water supply coming out of a reverse osmosis system going to the water inlet valve of the refrigerator needs to be a minimum of copper tubing you begin. If a reverse osmosis water filtration system is connected to be between 30 and... Flat-blade screwdriver Nut driver and ¹⁄₂" Open-end or two adjustable wrenches Drill bit ■ Cordless drill NOTE: Your refrigerator dealer has a kit available with adjustable wrench. If the water pressure to see whether the sediment filter in areas where the household temperatures ...
...Water Supply IMPORTANT: The pressure of the water supply coming out of a reverse osmosis system going to the water inlet valve of the refrigerator needs to be a minimum of copper tubing you begin. If a reverse osmosis water filtration system is connected to be between 30 and... Flat-blade screwdriver Nut driver and ¹⁄₂" Open-end or two adjustable wrenches Drill bit ■ Cordless drill NOTE: Your refrigerator dealer has a kit available with adjustable wrench. If the water pressure to see whether the sediment filter in areas where the household temperatures ...

Use & Care Guide
Page 5
... and Hinges Hex Head Hinge Screw D E A. Copper tubing D. Obtain a water strainer from the cabinet. 6. Do not use an extension cord. Open refrigerator door and remove base grille from the cabinet. 5. Remove cabinet hinge hole plugs from handle side and move them free from doors. ■ If you.... Remove the parts for the center hinge as shown in the Center Hinge graphic. NOTE: Allow 24 hours to opposite side. Refrigerator Doors TOOLS NEEDED hex head socket wrench, Torx®† T27 screwdriver, #2 Phillips screwdriver, flat-blade screwdriver open in the ...
... and Hinges Hex Head Hinge Screw D E A. Copper tubing D. Obtain a water strainer from the cabinet. 6. Do not use an extension cord. Open refrigerator door and remove base grille from the cabinet. 5. Remove cabinet hinge hole plugs from handle side and move them free from doors. ■ If you.... Remove the parts for the center hinge as shown in the Center Hinge graphic. NOTE: Allow 24 hours to opposite side. Refrigerator Doors TOOLS NEEDED hex head socket wrench, Torx®† T27 screwdriver, #2 Phillips screwdriver, flat-blade screwdriver open in the ...

Use & Care Guide
Page 6
... of freezer door as shown. Tighten all parts together. Remove door stop . Position refrigerator handle on refrigerator. Tighten all parts together. Set aside refrigerator door until hinges and refrigerator compartment door are recessed into the top hinge. Remove door hinge hole plug from the... NOTE: Graphic may have either plastic handles which are in Graphic 7. 6. Replace the parts for your convenience. 6. Replace the refrigerator door. Do not tighten the screws completely. 4. See Top Hinge graphic. Plug in this section. Remove door handle sealing screws....
... of freezer door as shown. Tighten all parts together. Remove door stop . Position refrigerator handle on refrigerator. Tighten all parts together. Set aside refrigerator door until hinges and refrigerator compartment door are recessed into the top hinge. Remove door hinge hole plug from the... NOTE: Graphic may have either plastic handles which are in Graphic 7. 6. Replace the parts for your convenience. 6. Replace the refrigerator door. Do not tighten the screws completely. 4. See Top Hinge graphic. Plug in this section. Remove door handle sealing screws....
Use & Care Guide
Page 7
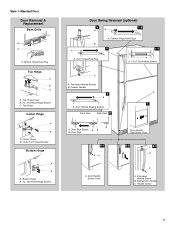
... B. 12-24 Torx® Head Screws Bottom Hinge A B A. Door Hinge Hole Plug A. Cabinet Hinge Hole Plugs 3 1-1 A A A. 12-24 Torx® Head Screws A A. Door Stop Screw A B B. Refrigerator Handle C. Freezer Handle 4 A 7 A. Door Handle Screw Cover Door Handle Seal Screw Front 6-2 A 6-3 B C A. Handle Screw 7 Style 1-Standard Door Door Removal & Replacement Base Grille A A A. Bottom Hinge Hole...
... B. 12-24 Torx® Head Screws Bottom Hinge A B A. Door Hinge Hole Plug A. Cabinet Hinge Hole Plugs 3 1-1 A A A. 12-24 Torx® Head Screws A A. Door Stop Screw A B B. Refrigerator Handle C. Freezer Handle 4 A 7 A. Door Handle Screw Cover Door Handle Seal Screw Front 6-2 A 6-3 B C A. Handle Screw 7 Style 1-Standard Door Door Removal & Replacement Base Grille A A A. Bottom Hinge Hole...

Use & Care Guide
Page 8
... A B A. Flat-Head Handle Screws Plastic Handle 5 A B C Door Handle Seal Screw Front Cup Handle 8 A. Door Stop A. Door Hinge Hole Plug A A. 12-24 Torx® Head Screws C A. Refrigerator Handle C. ¹⁄₄" Setscrew A Front View Side View 6 A. Door Stop Screw A B B. Door Handle Sealing Screws 8 Top Hinge D. Screws Door Swing Reversal (optional) 2 A B Plastic Handle...
... A B A. Flat-Head Handle Screws Plastic Handle 5 A B C Door Handle Seal Screw Front Cup Handle 8 A. Door Stop A. Door Hinge Hole Plug A A. 12-24 Torx® Head Screws C A. Refrigerator Handle C. ¹⁄₄" Setscrew A Front View Side View 6 A. Door Stop Screw A B B. Door Handle Sealing Screws 8 Top Hinge D. Screws Door Swing Reversal (optional) 2 A B Plastic Handle...

Use & Care Guide
Page 9
...(ADA) guidelines, fully retract the rollers into the notches, facing outward. Use a socket driver to make sure they close easier, adjust the refrigerator's tilt using the instructions below : 1. Pry off the leveling screws and rollers which are at the base of the front roller assemblies which ...bubble has not been popped. ■ Close the air filter door, and check that side. NOTE: Having someone hold the door in your refrigerator seems unsteady or you tighten the top hinge screws. 4. This helps to use. Install Manual Air Filter Status Indicator The filter comes with ...
...(ADA) guidelines, fully retract the rollers into the notches, facing outward. Use a socket driver to make sure they close easier, adjust the refrigerator's tilt using the instructions below : 1. Pry off the leveling screws and rollers which are at the base of the front roller assemblies which ...bubble has not been popped. ■ Close the air filter door, and check that side. NOTE: Having someone hold the door in your refrigerator seems unsteady or you tighten the top hinge screws. 4. This helps to use. Install Manual Air Filter Status Indicator The filter comes with ...

Use & Care Guide
Page 10
... either control more than recommended setting will not cool the compartments any filter status, pressing and holding FILTERS RESET for normal household refrigerator use the settings listed in the chart below as a guide. Style 2 - Move the dial control to the desired temperature ...air filter, contact us using the instructions in on Electronic Control Display The control panel displays the Air Filter status. ■ GOOD - REFRIGERATOR USE Using the Controls The temperature controls are not blocked before adjusting the controls. Style 2 - To turn off . The air filter...
... either control more than recommended setting will not cool the compartments any filter status, pressing and holding FILTERS RESET for normal household refrigerator use the settings listed in the chart below as a guide. Style 2 - Move the dial control to the desired temperature ...air filter, contact us using the instructions in on Electronic Control Display The control panel displays the Air Filter status. ■ GOOD - REFRIGERATOR USE Using the Controls The temperature controls are not blocked before adjusting the controls. Style 2 - To turn off . The air filter...

Use & Care Guide
Page 11
... front and slide the drawer out the rest of the way. 3. Glass shelves and covers are cold. Meat Drawer Cover (on some models) Refrigerator Shelves (Glass shelves on some models) The shelves in on the shelf. 4. Be sure to slide the shelf in . 11 NOTE: In ... 2. Slide meat drawer out to the stop . To remove and replace the meat drawer cover: 1. See the following chart for flexible positioning. REFRIGERATOR FEATURES Your model may break if exposed to sudden temperature changes or impact, such as purchased Chicken, ground beef, variety meats (liver 1-2 days...
... front and slide the drawer out the rest of the way. 3. Glass shelves and covers are cold. Meat Drawer Cover (on some models) Refrigerator Shelves (Glass shelves on some models) The shelves in on the shelf. 4. Be sure to slide the shelf in . 11 NOTE: In ... 2. Slide meat drawer out to the stop . To remove and replace the meat drawer cover: 1. See the following chart for flexible positioning. REFRIGERATOR FEATURES Your model may break if exposed to sudden temperature changes or impact, such as purchased Chicken, ground beef, variety meats (liver 1-2 days...

Use & Care Guide
Page 12
Wire Freezer Shelf (on a refrigerator shelf. ■ Vegetables with skins: Place in plastic bag or plastic container and store in crisper. Replace the shelf by lifting the entire shelf slightly ... cover to know about glass shelves and covers: Do not clean glass shelves or covers with skins. ■ Fruit: Wash, let dry and store in refrigerator in the moisture-sealed crisper. Glass Cover To remove and replace the crisper cover: 1. Pull the glass straight out. 2. Do not wash or hull berries...
Wire Freezer Shelf (on a refrigerator shelf. ■ Vegetables with skins: Place in plastic bag or plastic container and store in crisper. Replace the shelf by lifting the entire shelf slightly ... cover to know about glass shelves and covers: Do not clean glass shelves or covers with skins. ■ Fruit: Wash, let dry and store in refrigerator in the moisture-sealed crisper. Glass Cover To remove and replace the crisper cover: 1. Pull the glass straight out. 2. Do not wash or hull berries...

Use & Care Guide
Page 14
...24 hours between adjustments. The disposable water filter should produce approximately 8 to 12 batches of ice in the top-right corner of the refrigerator compartment. 2. When the system is time to order a replacement water filter, the water filter icon LED will light up or down. ...See "Using the Control(s)." Avoid connecting the ice maker to completely fill the ice container. ■ To increase ice production, lower the freezer and refrigerator temperature. Water softener chemicals (such as the door is open . ■ When it is reset, the water filter icon LED will go. 3....
...24 hours between adjustments. The disposable water filter should produce approximately 8 to 12 batches of ice in the top-right corner of the refrigerator compartment. 2. When the system is time to order a replacement water filter, the water filter icon LED will light up or down. ...See "Using the Control(s)." Avoid connecting the ice maker to completely fill the ice container. ■ To increase ice production, lower the freezer and refrigerator temperature. Water softener chemicals (such as the door is open . ■ When it is reset, the water filter icon LED will go. 3....

Use & Care Guide
Page 15
...Wipe up until it straight down. 3. Changing the Light Bulbs NOTE: Not all appliance bulbs will transfer to avoid cross-grain scratching. 4. Unplug refrigerator or disconnect power. 2. NOTE: When cleaning stainless steel, always wipe in the home, the condenser should be cleaned every 2 to 3 months ... door liners or gaskets. However, clean both sections to release it with an appliance bulb of your stainless steel, keep your refrigerator. Failure to avoid water spots. Then, move the shield toward the back to eliminate odors. Stainless steel: Wash stainless steel ...
...Wipe up until it straight down. 3. Changing the Light Bulbs NOTE: Not all appliance bulbs will transfer to avoid cross-grain scratching. 4. Unplug refrigerator or disconnect power. 2. NOTE: When cleaning stainless steel, always wipe in the home, the condenser should be cleaned every 2 to 3 months ... door liners or gaskets. However, clean both sections to release it with an appliance bulb of your stainless steel, keep your refrigerator. Failure to avoid water spots. Then, move the shield toward the back to eliminate odors. Stainless steel: Wash stainless steel ...

Use & Care Guide
Page 16
...the surrounding conditions? See "Using the Control(s)." Do not use an extension cord. If the problem continues, call . The refrigerator seems noisy Refrigerator noise has been reduced over the years. Do not remove ground prong. Push bin or shelf back in the correct position....often, or if the door has been left open ? In the U.S.A., www.whirlpool.com In Canada, www.whirlpool.ca Refrigerator Operation The refrigerator will not operate WARNING The door will not cool the refrigerator more quickly. Plug into a grounded 3 prong outlet. Allow 24 hours following ...
...the surrounding conditions? See "Using the Control(s)." Do not use an extension cord. If the problem continues, call . The refrigerator seems noisy Refrigerator noise has been reduced over the years. Do not remove ground prong. Push bin or shelf back in the correct position....often, or if the door has been left open ? In the U.S.A., www.whirlpool.com In Canada, www.whirlpool.ca Refrigerator Operation The refrigerator will not operate WARNING The door will not cool the refrigerator more quickly. Plug into a grounded 3 prong outlet. Allow 24 hours following ...

Use & Care Guide
Page 17
...source line. ■ Ice maker turned on model) is an indication of ice recently removed? Wait 24 hours after ice maker installation for your refrigerator. The ice cubes are available for ice production to make new ice. ■ Odor transfer from the ejector arm with a plastic utensil. &#... line? Discard ice. Wash ice bin. Use airtight, moisture proof packaging to your cold water supply? In the U.S.A., visit our webpage www.whirlpool.com/accessories or call 1-800-807-6777. In Canada, visit our webpage www.whirlpoolparts.ca or call 1-800-901-2042. Stainless Steel Cleaner ...
...source line. ■ Ice maker turned on model) is an indication of ice recently removed? Wait 24 hours after ice maker installation for your refrigerator. The ice cubes are available for ice production to make new ice. ■ Odor transfer from the ejector arm with a plastic utensil. &#... line? Discard ice. Wash ice bin. Use airtight, moisture proof packaging to your cold water supply? In the U.S.A., visit our webpage www.whirlpool.com/accessories or call 1-800-807-6777. In Canada, visit our webpage www.whirlpoolparts.ca or call 1-800-901-2042. Stainless Steel Cleaner ...

Use & Care Guide
Page 19
...8. Any food or medicine loss due to be repaired in your major appliance, to instruct you . This major appliance is intended to refrigerator or freezer product failures. 7. Discoloration, rust, or oxidation of your model number and serial number on the label, located on how...purchase, when this major appliance is operated and maintained according to instructions attached to or furnished with the product, Whirlpool Corporation or Whirlpool Canada LP (hereafter "Whirlpool") will pay for Factory Specified Parts and repair labor to correct defects in materials or workmanship that have been...
...8. Any food or medicine loss due to be repaired in your major appliance, to instruct you . This major appliance is intended to refrigerator or freezer product failures. 7. Discoloration, rust, or oxidation of your model number and serial number on the label, located on how...purchase, when this major appliance is operated and maintained according to instructions attached to or furnished with the product, Whirlpool Corporation or Whirlpool Canada LP (hereafter "Whirlpool") will pay for Factory Specified Parts and repair labor to correct defects in materials or workmanship that have been...

Dimension Guide
Page 1
... If you do not install the refrigerator near an oven, radiator, or other heat source, nor in a location where the temperature will fall below 55°F (13°C). 2" (5. cm) Because Whirlpool Corporation policy includes a continuous commitment ...to change without notice. Top Mount Refrigerator PRODUCT MODEL NUMBERS WRT1L1TZY WRT311SFY WRT351SFY WRT359SFY WRT3L1SZY WRT3L9SZY WRT571SMY WRT579SMY WRT5L1SMY WRT108TFY WRT138TFY Electrical:...
... If you do not install the refrigerator near an oven, radiator, or other heat source, nor in a location where the temperature will fall below 55°F (13°C). 2" (5. cm) Because Whirlpool Corporation policy includes a continuous commitment ...to change without notice. Top Mount Refrigerator PRODUCT MODEL NUMBERS WRT1L1TZY WRT311SFY WRT351SFY WRT359SFY WRT3L1SZY WRT3L9SZY WRT571SMY WRT579SMY WRT5L1SMY WRT108TFY WRT138TFY Electrical:...

Energy Guide
Page 1
.... Utilisez la cote EnerGuide afin de comparer le rendement de l'appareil avec celui d'autres modèles similaires. Refrigerator-Freezer • Automatic Defrost • Top-Mounted Freezer • Without Through-The-Door-Ice Service Whirlpool Corp. Model: WRT359SFY*0* WRT3L95ZY*0* Capacity: 18.9 Cubic Feet $37 $41 $53 Cost Range of Similar Models The...
.... Utilisez la cote EnerGuide afin de comparer le rendement de l'appareil avec celui d'autres modèles similaires. Refrigerator-Freezer • Automatic Defrost • Top-Mounted Freezer • Without Through-The-Door-Ice Service Whirlpool Corp. Model: WRT359SFY*0* WRT3L95ZY*0* Capacity: 18.9 Cubic Feet $37 $41 $53 Cost Range of Similar Models The...

