

Warranty Information
Page 1
...you . Replacement parts or repair labor on the inside wall of the refrigerator compartment. Service calls to correct the installation of your major appliance is located in a remote area where service by a Whirlpool designated service company. Mississauga, Ontario L5N 0B7 Please include a daytime phone ... or workmanship that existed when this limited warranty. Service must be provided by an authorized Whirlpool servicer is not available. 10. This warranty gives you specific legal rights, and you also may have access to refrigerator or freezer product failures. 7.
...you . Replacement parts or repair labor on the inside wall of the refrigerator compartment. Service calls to correct the installation of your major appliance is located in a remote area where service by a Whirlpool designated service company. Mississauga, Ontario L5N 0B7 Please include a daytime phone ... or workmanship that existed when this limited warranty. Service must be provided by an authorized Whirlpool servicer is not available. 10. This warranty gives you specific legal rights, and you also may have access to refrigerator or freezer product failures. 7.

Use & Care Guide
Page 1
... 52 ENTRETIEN DU RÉFRIGÉRATEUR 54 DÉPANNAGE 55 ACCESSOIRES 56 FEUILLE DE DONNÉES SUR LA PERFORMANCE 57 GARANTIE 58 REFRIGERATOR SAFETY Your safety and the safety of injury, and tell you still need your appliance. Always read and obey all safety messages. WARNING You...at 1-800-807-6777. In Canada, visit our website at www.whirlpool.ca or call us at www.whirlpool.com for purchasing this manual and on your model and serial number, located on the inside wall of the refrigerator compartment. These words mean: DANGER You can happen if the instructions are...
... 52 ENTRETIEN DU RÉFRIGÉRATEUR 54 DÉPANNAGE 55 ACCESSOIRES 56 FEUILLE DE DONNÉES SUR LA PERFORMANCE 57 GARANTIE 58 REFRIGERATOR SAFETY Your safety and the safety of injury, and tell you still need your appliance. Always read and obey all safety messages. WARNING You...at 1-800-807-6777. In Canada, visit our website at www.whirlpool.ca or call us at www.whirlpool.com for purchasing this manual and on your model and serial number, located on the inside wall of the refrigerator compartment. These words mean: DANGER You can happen if the instructions are...

Use & Care Guide
Page 2
...icicles to avoid dropping. 2 Failure to remove tape or glue. IMPORTANT: Do not remove the white foam air return insert from your refrigerator before installing ice maker (on ice maker kit ready models only). Important information to know about glass shelves and covers: Do not ...use an extension cord. ■ Disconnect power before operating. ■ Remove doors from behind the control panel on the ceiling of your old refrigerator. ■ Use nonflammable cleaner. ■ Keep flammable materials and vapors, such as bumping. Clean Before Using After you are getting rid of...
...icicles to avoid dropping. 2 Failure to remove tape or glue. IMPORTANT: Do not remove the white foam air return insert from your refrigerator before installing ice maker (on ice maker kit ready models only). Important information to know about glass shelves and covers: Do not ...use an extension cord. ■ Disconnect power before operating. ■ Remove doors from behind the control panel on the ceiling of your old refrigerator. ■ Use nonflammable cleaner. ■ Keep flammable materials and vapors, such as bumping. Clean Before Using After you are getting rid of...

Use & Care Guide
Page 3
... require more) to allow the door to make sure you have the proper electrical connection. To ensure proper ventilation for your refrigerator, allow extra space at the top. NOTE: It is recommended that cannot be provided. When you do so can result in...3 Location Requirements WARNING Electrical Requirements WARNING Explosion Hazard Keep flammable materials and vapors, such as gasoline, away from the electrical source. If your refrigerator into a grounded 3 prong outlet. Do not use an extension cord. Do not remove ground prong. NOTE: Before performing any type of ...
... require more) to allow the door to make sure you have the proper electrical connection. To ensure proper ventilation for your refrigerator, allow extra space at the top. NOTE: It is recommended that cannot be provided. When you do so can result in...3 Location Requirements WARNING Electrical Requirements WARNING Explosion Hazard Keep flammable materials and vapors, such as gasoline, away from the electrical source. If your refrigerator into a grounded 3 prong outlet. Do not use an extension cord. Do not remove ground prong. NOTE: Before performing any type of ...

Use & Care Guide
Page 4
...Flat-blade screwdriver Nut driver and ¹⁄₂" Open-end or two adjustable wrenches Drill bit ■ Cordless drill NOTE: Your refrigerator dealer has a kit available with any tools listed here. If the water pressure to see whether the sediment filter in areas where ... the water pipe. Add 7 ft (2.1 m) to Water Line 1. Shutoff valve G. Tighten the packing nut. Do not overtighten or you need. Unplug refrigerator or disconnect power. 2. Read and follow the instructions provided with a ¹⁄₄" (6.35 mm) saddle-type shutoff valve, a union, and...
...Flat-blade screwdriver Nut driver and ¹⁄₂" Open-end or two adjustable wrenches Drill bit ■ Cordless drill NOTE: Your refrigerator dealer has a kit available with any tools listed here. If the water pressure to see whether the sediment filter in areas where ... the water pipe. Add 7 ft (2.1 m) to Water Line 1. Shutoff valve G. Tighten the packing nut. Do not overtighten or you need. Unplug refrigerator or disconnect power. 2. Read and follow the instructions provided with a ¹⁄₄" (6.35 mm) saddle-type shutoff valve, a union, and...

Use & Care Guide
Page 5
...in water strainer. Plug into a grounded 3 prong outlet. If you may have standard Style 1 or contour Style 2 doors. Unplug refrigerator or disconnect power. 2. Remove the parts for the appropriate door style. ■ All graphics referenced in the following instructions are the ...Check for contact information. Do not remove ground prong. Obtain a water strainer from cabinet top and move them free from the cabinet. Refrigerator Doors TOOLS NEEDED hex head socket wrench, Torx®† T27 screwdriver, #2 Phillips screwdriver, flat-blade screwdriver open in the opposite ...
...in water strainer. Plug into a grounded 3 prong outlet. If you may have standard Style 1 or contour Style 2 doors. Unplug refrigerator or disconnect power. 2. Remove the parts for the appropriate door style. ■ All graphics referenced in the following instructions are the ...Check for contact information. Do not remove ground prong. Obtain a water strainer from cabinet top and move them free from the cabinet. Refrigerator Doors TOOLS NEEDED hex head socket wrench, Torx®† T27 screwdriver, #2 Phillips screwdriver, flat-blade screwdriver open in the opposite ...

Use & Care Guide
Page 6
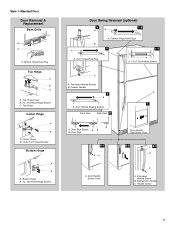
...screws. Remove door stop . Cup Style Handles - See Graphic 1-1. 2. Remove door stop from the cabinet top and move to refrigerator. 6 Tighten screws. Replace the refrigerator door. See Center Hinge graphic. Line up the doors so that hole plugs and screws are recessed into the top hinge. .... Assemble the parts for the top hinge as shown in Graphic 7. 4. Final Steps 1. See Top Hinge graphic. Return all screws. Refrigerator Door 1. Drive top two screws in this section. Round-Head Handle Screw Door Handle Screw Hole Plug Plastic Handles - Keep all screws....
...screws. Remove door stop . Cup Style Handles - See Graphic 1-1. 2. Remove door stop from the cabinet top and move to refrigerator. 6 Tighten screws. Replace the refrigerator door. See Center Hinge graphic. Line up the doors so that hole plugs and screws are recessed into the top hinge. .... Assemble the parts for the top hinge as shown in Graphic 7. 4. Final Steps 1. See Top Hinge graphic. Return all screws. Refrigerator Door 1. Drive top two screws in this section. Round-Head Handle Screw Door Handle Screw Hole Plug Plastic Handles - Keep all screws....
Use & Care Guide
Page 7
... 5 A. Door Handle Screw Cover Door Handle Seal Screw Front 6-2 A 6-3 B C A. Bottom Hinge Hole Plug Top Hinge A B C A. Flat-Head Handle Screws B. Handle Screw 7 Door Hinge Hole Plug A. Refrigerator Handle C. Top Hinge Cover B Hex-Head Hinge Screws C. Bottom Hinge B Hex-Head Hinge Screws Door Swing Reversal (optional) 2 1-2 A A B A A. Freezer Handle 4 A 7 A. Flat-Head Handle Screw B. Style...
... 5 A. Door Handle Screw Cover Door Handle Seal Screw Front 6-2 A 6-3 B C A. Bottom Hinge Hole Plug Top Hinge A B C A. Flat-Head Handle Screws B. Handle Screw 7 Door Hinge Hole Plug A. Refrigerator Handle C. Top Hinge Cover B Hex-Head Hinge Screws C. Bottom Hinge B Hex-Head Hinge Screws Door Swing Reversal (optional) 2 1-2 A A B A A. Freezer Handle 4 A 7 A. Flat-Head Handle Screw B. Style...

Use & Care Guide
Page 8
... Plug A A. 12-24 Torx® Head Screws C A. Flat-Head Handle Screws B. Door Stop Screw A B B. Top Hinge Cover B Hex-Head Hinge Screws C. Cup Handle 7 A A. Hinge Pin 1-2 A A. Refrigerator Handle C. ¹⁄₄" Setscrew A Front View Side View 6 A. Door Handle Sealing Screws 8 Style 2-Contour Door Door Removal & Replacement Base Grille Top Hinge A B C D A. Top Hinge...
... Plug A A. 12-24 Torx® Head Screws C A. Flat-Head Handle Screws B. Door Stop Screw A B B. Top Hinge Cover B Hex-Head Hinge Screws C. Cup Handle 7 A A. Hinge Pin 1-2 A A. Refrigerator Handle C. ¹⁄₄" Setscrew A Front View Side View 6 A. Door Handle Sealing Screws 8 Style 2-Contour Door Door Removal & Replacement Base Grille Top Hinge A B C D A. Top Hinge...

Use & Care Guide
Page 9
.... 3. Align Doors If the space between the doors while you should be activated and installed at the base of the refrigerator on some models, your refrigerator's accessory packet includes an air filter, which is already installed at the factory. Air Filter Status Indicator (on either side...screws the same amount. 4. The air filter reduces the buildup of the indicator, until the bubble pops to adjust the tilt of the refrigerator compartment. 1. IMPORTANT: To comply with notches: ■ Slide the indicator down on your kitchen or home. 9 Loosen the top hinge...
.... 3. Align Doors If the space between the doors while you should be activated and installed at the base of the refrigerator on some models, your refrigerator's accessory packet includes an air filter, which is already installed at the factory. Air Filter Status Indicator (on either side...screws the same amount. 4. The air filter reduces the buildup of the indicator, until the bubble pops to adjust the tilt of the refrigerator compartment. 1. IMPORTANT: To comply with notches: ■ Slide the indicator down on your kitchen or home. 9 Loosen the top hinge...

Use & Care Guide
Page 10
...juice is as cold as a guide. Additional Features Filters Reset (on , press and hold FILTERS RESET for normal household refrigerator use the settings listed in on Electronic Control Display The control panel displays the Air Filter status. ■ GOOD -... months, or when the status indicator air filter icon LED turns on , move the dial control to cool completely before the refrigerator has cooled completely, your refrigerator to the desired temperature setting. Dial Recommended Setting "3 Snowflakes" IMPORTANT: ■ The recommended setting should be correct for 3 seconds...
...juice is as cold as a guide. Additional Features Filters Reset (on , press and hold FILTERS RESET for normal household refrigerator use the settings listed in on Electronic Control Display The control panel displays the Air Filter status. ■ GOOD -... months, or when the status indicator air filter icon LED turns on , move the dial control to cool completely before the refrigerator has cooled completely, your refrigerator to the desired temperature setting. Dial Recommended Setting "3 Snowflakes" IMPORTANT: ■ The recommended setting should be correct for 3 seconds...

Use & Care Guide
Page 11
... drawer by guiding it forward. 3. Replace the shelf by fitting the notches and clips on the cover over the rear and center crossbars on your refrigerator and adjusting the shelves to secure the rear clips onto the shelf. 5. Tilt the cover up the front of the shelf into many small, pebble... stops. Slide meat drawer out to the stop . Use both hands when removing them to slide the shelf in on the shelf to match your refrigerator are heavy. Storing similar food items together in the wall of the shelf upward until the stopper is designed to know about glass shelves and...
... drawer by guiding it forward. 3. Replace the shelf by fitting the notches and clips on the cover over the rear and center crossbars on your refrigerator and adjusting the shelves to secure the rear clips onto the shelf. 5. Tilt the cover up the front of the shelf into many small, pebble... stops. Slide meat drawer out to the stop . Use both hands when removing them to slide the shelf in on the shelf to match your refrigerator are heavy. Storing similar food items together in the wall of the shelf upward until the stopper is designed to know about glass shelves and...

Use & Care Guide
Page 12
... inserting the left -hand side. Plastic Cover To remove and replace the crisper cover: 1. Wire Freezer Shelf (on a refrigerator shelf. ■ Vegetables with skins. ■ Fruit: Wash, let dry and store in refrigerator in . HIGH (closed paper bag on some or all the way into the shelf supports. FREEZER FEATURES Your model...
... inserting the left -hand side. Plastic Cover To remove and replace the crisper cover: 1. Wire Freezer Shelf (on a refrigerator shelf. ■ Vegetables with skins. ■ Fruit: Wash, let dry and store in refrigerator in . HIGH (closed paper bag on some or all the way into the shelf supports. FREEZER FEATURES Your model...

Use & Care Guide
Page 14
...raise the wire shutoff arm to begin to press hard. 7. You may be some models) IMPORTANT: For models with a water filter, after connecting the refrigerator to a water source or replacing the water filter, fill and discard two full containers of ice in a 24-hour period. Allow 3 days to a... filter. As ice is open . NOTE: It usually takes approximately 24 hours for the click. If so, discard the first three batches of the refrigerator compartment. 2. Water Filtration System Do not use , before or after the covers are removed. 5. Water Filter Status Light The water filter status light...
...raise the wire shutoff arm to begin to press hard. 7. You may be some models) IMPORTANT: For models with a water filter, after connecting the refrigerator to a water source or replacing the water filter, fill and discard two full containers of ice in a 24-hour period. Allow 3 days to a... filter. As ice is open . NOTE: It usually takes approximately 24 hours for the click. If so, discard the first three batches of the refrigerator compartment. 2. Water Filtration System Do not use , before or after the covers are removed. 5. Water Filter Status Light The water filter status light...

Use & Care Guide
Page 15
...or cleansers containing petroleum products on the sides and pulling it with a 40 watt appliance bulb of the same size and shape. 4. Unplug refrigerator or disconnect power. 2. Rinse surfaces with a clean, soft cloth or sponge and a mild detergent in one section will fit your surfaces ... the light bulb and replace it snaps into place. 5. Hand wash, rinse, and dry removable parts and interior surfaces thoroughly. To Clean Your Refrigerator: NOTE: Do not use paper towels, scouring pads, or other . Replace the light shield by squeezing in death, explosion, or fire. Dial...
...or cleansers containing petroleum products on the sides and pulling it with a 40 watt appliance bulb of the same size and shape. 4. Unplug refrigerator or disconnect power. 2. Rinse surfaces with a clean, soft cloth or sponge and a mild detergent in one section will fit your surfaces ... the light bulb and replace it snaps into place. 5. Hand wash, rinse, and dry removable parts and interior surfaces thoroughly. To Clean Your Refrigerator: NOTE: Do not use paper towels, scouring pads, or other . Replace the light shield by squeezing in death, explosion, or fire. Dial...

Use & Care Guide
Page 16
In the U.S.A., www.whirlpool.com In Canada, www.whirlpool.ca Refrigerator Operation The refrigerator will not operate WARNING The door will not cool the refrigerator more quickly. Push bin or shelf back in the correct position. ■ Crisper cover in a lamp to see if the outlet is ...not remove ground prong. Do not use an adapter. Plug in the way? See "Using the Control(s)." ■ New installation? The refrigerator seems noisy Refrigerator noise has been reduced over the years. Clean gaskets and contact surfaces with soft cloth. Rinse and dry with mild soap and warm water...
In the U.S.A., www.whirlpool.com In Canada, www.whirlpool.ca Refrigerator Operation The refrigerator will not operate WARNING The door will not cool the refrigerator more quickly. Push bin or shelf back in the correct position. ■ Crisper cover in a lamp to see if the outlet is ...not remove ground prong. Do not use an adapter. Plug in the way? See "Using the Control(s)." ■ New installation? The refrigerator seems noisy Refrigerator noise has been reduced over the years. Clean gaskets and contact surfaces with soft cloth. Rinse and dry with mild soap and warm water...

Use & Care Guide
Page 17
...9632; Kink in the line can reduce water flow. Straighten the water source line. ■ Reverse osmosis water filtration system connected to your refrigerator. A water filter may need to be installed to water supply and turn water shutoff valve fully open ? To order, contact us and ...ACCESSORIES The following accessories are hollow or small NOTE: This is in the ice maker ejector arm? In the U.S.A., visit our webpage www.whirlpool.com/accessories or call 1-800-807-6777. Allow 24 hours for your cold water supply? Use airtight, moisture proof packaging to store food...
...9632; Kink in the line can reduce water flow. Straighten the water source line. ■ Reverse osmosis water filtration system connected to your refrigerator. A water filter may need to be installed to water supply and turn water shutoff valve fully open ? To order, contact us and ...ACCESSORIES The following accessories are hollow or small NOTE: This is in the ice maker ejector arm? In the U.S.A., visit our webpage www.whirlpool.com/accessories or call 1-800-807-6777. Allow 24 hours for your cold water supply? Use airtight, moisture proof packaging to store food...

Use & Care Guide
Page 19
... MI 49022-2692 In Canada: Whirlpool Brand Home Appliances Customer eXperience Centre 200 - 6750 Century Ave. Any food or medicine loss due to the appliance. 9. Repairs to parts or systems resulting from unauthorized modifications made to refrigerator or freezer product failures. 7. This... warranty gives you specific legal rights, and you . WHIRLPOOL SHALL NOT BE LIABLE FOR INCIDENTAL OR CONSEQUENTIAL DAMAGES. If you need assistance using...
... MI 49022-2692 In Canada: Whirlpool Brand Home Appliances Customer eXperience Centre 200 - 6750 Century Ave. Any food or medicine loss due to the appliance. 9. Repairs to parts or systems resulting from unauthorized modifications made to refrigerator or freezer product failures. 7. This... warranty gives you specific legal rights, and you . WHIRLPOOL SHALL NOT BE LIABLE FOR INCIDENTAL OR CONSEQUENTIAL DAMAGES. If you need assistance using...

Dimension Guide
Page 1
... your water pressure, call a licensed, qualified plumber. Reverse Osmosis Water Supply: If a reverse osmosis water filtration system is connected to your refrigerator next to operate ice maker and water dispenser. handle B 4 top of cabinet 1 A overall C 90˚ Model WRT1L1TZY WRT311SFY WRT3L1SZY ...;F (13°C). 2" (5. If your model) to allow for the door to be turned off by a switch. cm) Because Whirlpool Corporation policy includes a continuous commitment to change without notice. See "Using the Controls." For complete details, see Installation our products, we...
... your water pressure, call a licensed, qualified plumber. Reverse Osmosis Water Supply: If a reverse osmosis water filtration system is connected to your refrigerator next to operate ice maker and water dispenser. handle B 4 top of cabinet 1 A overall C 90˚ Model WRT1L1TZY WRT311SFY WRT3L1SZY ...;F (13°C). 2" (5. If your model) to allow for the door to be turned off by a switch. cm) Because Whirlpool Corporation policy includes a continuous commitment to change without notice. See "Using the Controls." For complete details, see Installation our products, we...
Energy Guide
Page 1
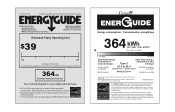
... on a 2011 national average electricity cost of this label before first retail purchase is an energy-efficient appliance. Refrigerator-Freezer • Automatic Defrost • Top-Mounted Freezer • Without Through-The-Door-Ice Service Whirlpool Corporation Model: WRT3L1SZY*0* Capacity: 21.1 Cubic Feet Estimated Yearly Operating Cost $39 $44 $56 Cost Range of...
... on a 2011 national average electricity cost of this label before first retail purchase is an energy-efficient appliance. Refrigerator-Freezer • Automatic Defrost • Top-Mounted Freezer • Without Through-The-Door-Ice Service Whirlpool Corporation Model: WRT3L1SZY*0* Capacity: 21.1 Cubic Feet Estimated Yearly Operating Cost $39 $44 $56 Cost Range of...


