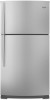

Dimension Guide
Page 1
...an oven or radiator. 2" (5.08 cm) Because Whirlpool Corporation policy includes a continuous commitment to the electrical source and reset the control (Thermostat, Refrigerator or Freezer Control depending on each and between overhead cabinets and refrigerator top. When you leave some extra space at ... for optimum performance, which reduces electricity usage and provides superior cooling, is required. If you have questions about your refrigerator, allow for planning purposes only. Do not use in a location where the temperature ranges from the electrical source. NOTE...
...an oven or radiator. 2" (5.08 cm) Because Whirlpool Corporation policy includes a continuous commitment to the electrical source and reset the control (Thermostat, Refrigerator or Freezer Control depending on each and between overhead cabinets and refrigerator top. When you leave some extra space at ... for optimum performance, which reduces electricity usage and provides superior cooling, is required. If you have questions about your refrigerator, allow for planning purposes only. Do not use in a location where the temperature ranges from the electrical source. NOTE...

Warranty Information
Page 1
...where service by the customer. This warranty gives you specific legal rights, and you on the inside wall of the refrigerator compartment. Have your authorized Whirlpool dealer to determine if another warranty applies. 7/12 For additional product information, in the U.S.A., call 1-800-807-6777.... to the appliance. 9. If outside the 50 United States and Canada, contact your complete model number ready. Service calls to refrigerator or freezer product failures. 7. Consumable parts are excluded from unauthorized modifications made to you. Pickup and delivery. Expenses for travel ...
...where service by the customer. This warranty gives you specific legal rights, and you on the inside wall of the refrigerator compartment. Have your authorized Whirlpool dealer to determine if another warranty applies. 7/12 For additional product information, in the U.S.A., call 1-800-807-6777.... to the appliance. 9. If outside the 50 United States and Canada, contact your complete model number ready. Service calls to refrigerator or freezer product failures. 7. Consumable parts are excluded from unauthorized modifications made to you. Pickup and delivery. Expenses for travel ...

Use & Care Guide
Page 2
...This product contains one or more chemicals known to the State of California to potential hazards that can happen if the instructions are very important. REFRIGERATOR SAFETY Your safety and the safety of others . This is , tell you don't follow the safety alert symbol and either the word "...more chemicals known to the State of California to reduce the chance of fire, electric shock, or injury to persons when using the refrigerator, follow instructions. WARNING You can be killed or seriously injured if you how to cause cancer. IMPORTANT SAFETY INSTRUCTIONS WARNING:To reduce ...
...This product contains one or more chemicals known to the State of California to potential hazards that can happen if the instructions are very important. REFRIGERATOR SAFETY Your safety and the safety of others . This is , tell you don't follow the safety alert symbol and either the word "...more chemicals known to the State of California to reduce the chance of fire, electric shock, or injury to persons when using the refrigerator, follow instructions. WARNING You can be killed or seriously injured if you how to cause cancer. IMPORTANT SAFETY INSTRUCTIONS WARNING:To reduce ...

Use & Care Guide
Page 3
...to avoid dropping. 3 Proper Disposal of liquid dish soap over the adhesive with your fingers. Do not wiggle or "walk" the refrigerator when trying to do so can damage the surface of the past. These products can result in accordance with Federal and Local regulations.... Failure to move and install refrigerator. Rinse with warm water and dry with established procedures. Failure to remove tape or glue. See the cleaning instructions in accordance with a...
...to avoid dropping. 3 Proper Disposal of liquid dish soap over the adhesive with your fingers. Do not wiggle or "walk" the refrigerator when trying to do so can damage the surface of the past. These products can result in accordance with Federal and Local regulations.... Failure to move and install refrigerator. Rinse with warm water and dry with established procedures. Failure to remove tape or glue. See the cleaning instructions in accordance with a...

Use & Care Guide
Page 4
...local plumbing code requirements. ■ Use copper tubing and check for 1" (2.54 cm) of 110°F (43°C). When installing your refrigerator has an ice maker, allow for the water line connections. See "Using the Controls" in areas where the household temperatures will remain above ...for ½" (1.25 cm) of installation or cleaning, or removing a light bulb, turn cooling on or reset the control (Thermostat, Refrigerator or Freezer Control depending on the hinge side (some models require more easily. Install copper tubing only in the User Instructions, User Guide...
...local plumbing code requirements. ■ Use copper tubing and check for 1" (2.54 cm) of 110°F (43°C). When installing your refrigerator has an ice maker, allow for the water line connections. See "Using the Controls" in areas where the household temperatures will remain above ...for ½" (1.25 cm) of installation or cleaning, or removing a light bulb, turn cooling on or reset the control (Thermostat, Refrigerator or Freezer Control depending on the hinge side (some models require more easily. Install copper tubing only in the User Instructions, User Guide...

Use & Care Guide
Page 5
...and evenly so washer makes a watertight seal. Flush the tubing until water is equipped with a built-in the valve. 4. Unplug refrigerator or disconnect power. 2. Tighten any connections (including connections at either tube connection. Tube clamp screw C. The ice maker is clear.... Using a cordless drill, drill a ¹⁄₄" hole in death, fire, or electrical shock. 1. Attach the copper tube to Refrigerator 1. Compression sleeve F. Tighten the compression nut. Turn OFF main water supply. Connect to the valve inlet using a compression nut and sleeve ...
...and evenly so washer makes a watertight seal. Flush the tubing until water is equipped with a built-in the valve. 4. Unplug refrigerator or disconnect power. 2. Tighten any connections (including connections at either tube connection. Tube clamp screw C. The ice maker is clear.... Using a cordless drill, drill a ¹⁄₄" hole in death, fire, or electrical shock. 1. Attach the copper tube to Refrigerator 1. Compression sleeve F. Tighten the compression nut. Turn OFF main water supply. Connect to the valve inlet using a compression nut and sleeve ...

Use & Care Guide
Page 6
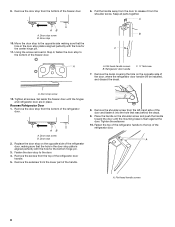
... remove the three hex head hinge screws from the other direction, you are being moved. Do not depend on the door magnets to move the refrigerator into your doorway, you may need to remove the doors to hold the doors in this section following "Final Steps." A B D C A...Center Hinge pin. Tools Needed hex head socket wrench, #2 Phillips screwdriver, flat-blade screwdriver open from the top hinge and lift up to your refrigerator has either Style 1-Contour Doors or Style 2-Standard Doors. A Reversibility Kit, which includes a new Brand Badge and hole covers, is available....
... remove the three hex head hinge screws from the other direction, you are being moved. Do not depend on the door magnets to move the refrigerator into your doorway, you may need to remove the doors to hold the doors in this section following "Final Steps." A B D C A...Center Hinge pin. Tools Needed hex head socket wrench, #2 Phillips screwdriver, flat-blade screwdriver open from the top hinge and lift up to your refrigerator has either Style 1-Contour Doors or Style 2-Standard Doors. A Reversibility Kit, which includes a new Brand Badge and hole covers, is available....
Use & Care Guide
Page 8
... stop screw B. Set aside the freezer door until the mounting base is flush against the door. Pull the handle away from the top of the refrigerator door, making sure that was behind the decal. 9. Keep all screws. Remove the door stop on the shoulder screw and push the handle toward the... door until the hinges and refrigerator door are in the door stop to the opposite side making sure that the hole in Step 9, fasten the door stop plate is aligned perfectly...
... stop screw B. Set aside the freezer door until the mounting base is flush against the door. Pull the handle away from the top of the refrigerator door, making sure that was behind the decal. 9. Keep all screws. Remove the door stop on the shoulder screw and push the handle toward the... door until the hinges and refrigerator door are in the door stop to the opposite side making sure that the hole in Step 9, fasten the door stop plate is aligned perfectly...

Use & Care Guide
Page 9
...the door and the floor must be 3.46" (8.8 cm). 3. NOTE: The shorter cover must be on the bottom of the refrigerator. A A. Set aside refrigerator door until it is no longer there, the distance between the bottom of the cabinet, inserting the screws only halfway, so you ... Replace Doors and Hinges IMPORTANT: Provide additional support for the doors while the hinges are being moved. Final Steps 1. B B A C C A A. Install Refrigerator Door 1. Push the base grille toward the cabinet until bottom hinge is flush. Turn the hinge over so that it will be between the doors...
...the door and the floor must be 3.46" (8.8 cm). 3. NOTE: The shorter cover must be on the bottom of the refrigerator. A A. Set aside refrigerator door until it is no longer there, the distance between the bottom of the cabinet, inserting the screws only halfway, so you ... Replace Doors and Hinges IMPORTANT: Provide additional support for the doors while the hinges are being moved. Final Steps 1. B B A C C A A. Install Refrigerator Door 1. Push the base grille toward the cabinet until bottom hinge is flush. Turn the hinge over so that it will be between the doors...

Use & Care Guide
Page 10
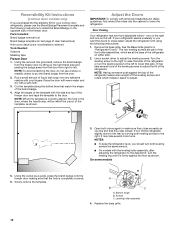
... some models) Door Swing Reversal (optional) 2 A B Plastic Handle 3 C B A A Hex-Head Hinge Screws A B. Cabinet Hinge Hole Plugs 1-1 A. Flat-Head Handle Screws B. Bottom Hinge B. Top Hinge C. Screws C. Refrigerator Handle C. ¹⁄₄" Setscrew A Front View Side View 6 A. Hinge Pin Center Hinge A B A. Style 1-Contour Door Door Removal & Replacement Base Grille Top Hinge A B C A Hex-Head...
... some models) Door Swing Reversal (optional) 2 A B Plastic Handle 3 C B A A Hex-Head Hinge Screws A B. Cabinet Hinge Hole Plugs 1-1 A. Flat-Head Handle Screws B. Bottom Hinge B. Top Hinge C. Screws C. Refrigerator Handle C. ¹⁄₄" Setscrew A Front View Side View 6 A. Hinge Pin Center Hinge A B A. Style 1-Contour Door Door Removal & Replacement Base Grille Top Hinge A B C A Hex-Head...

Use & Care Guide
Page 11
... C. Door Handle Screw Cover Door Handle Seal Screw Front 6-2 A 6-3 B C A. Center Hinge B Hex-Head Hinge Screws Bottom Hinge A B A. Cabinet Hinge Hole Plugs 3 1-1 A A A Hex-Head Hinge Screws A A. Refrigerator Handle C. Door Stop 6-1 A A. Bottom Hinge Hole Plug Top Hinge A B C A.
... C. Door Handle Screw Cover Door Handle Seal Screw Front 6-2 A 6-3 B C A. Center Hinge B Hex-Head Hinge Screws Bottom Hinge A B A. Cabinet Hinge Hole Plugs 3 1-1 A A A Hex-Head Hinge Screws A A. Refrigerator Handle C. Door Stop 6-1 A A. Bottom Hinge Hole Plug Top Hinge A B C A.
Use & Care Guide
Page 12
...to make sure they stay closed. Reversibility Kit Instructions (contour door models only) If you purchased the Reversibility Kit for your contour door refrigerator, please use a sharp or metallic object to adjust. 3. If your fingers. Remove the base grille. Turn the leveling screw to ...the right to raise that side of the refrigerator on the left . On some weight off the leveling screws and rollers which are part of the front roller assemblies, which makes...
...to make sure they stay closed. Reversibility Kit Instructions (contour door models only) If you purchased the Reversibility Kit for your contour door refrigerator, please use a sharp or metallic object to adjust. 3. If your fingers. Remove the base grille. Turn the leveling screw to ...the right to raise that side of the refrigerator on the left . On some weight off the leveling screws and rollers which are part of the front roller assemblies, which makes...

Use & Care Guide
Page 13
...which should be replaced every 6 months, or when the status indicator air filter icon LED turns on and starts flashing when the refrigerator door is located (depending on some models) The accessory packet includes two produce preserver pouches, which must be installed in a visible...filter is already installed at the same time the air filter is visible through the rectangular hole in your model) along either inside the refrigerator. Air Filter Status Indicator (on Electronic Control Display The control panel displays the Air Filter status. ■ GOOD - Style 2 -...
...which should be replaced every 6 months, or when the status indicator air filter icon LED turns on and starts flashing when the refrigerator door is located (depending on some models) The accessory packet includes two produce preserver pouches, which must be installed in a visible...filter is already installed at the same time the air filter is visible through the rectangular hole in your model) along either inside the refrigerator. Air Filter Status Indicator (on Electronic Control Display The control panel displays the Air Filter status. ■ GOOD - Style 2 -...
Use & Care Guide
Page 14
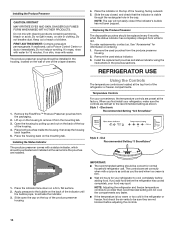
...MONTHS 1. IMPORTANT: ■ The recommended setting should be correct for information on the back of the crisper drawers. 4. NOTE: Adjusting the refrigerator and freezer temperature controls to a colder than recommended setting will not easily close if the indicator's bubble has not been popped. Do not ...mix with water. Do not get in the previous sections. REFRIGERATOR USE ATTENTION IRRITANT Lisez des prudences sur le revers. 1. Place both pouches inside the housing, then snap the housing back together. 5. ...
...MONTHS 1. IMPORTANT: ■ The recommended setting should be correct for information on the back of the crisper drawers. 4. NOTE: Adjusting the refrigerator and freezer temperature controls to a colder than recommended setting will not easily close if the indicator's bubble has not been popped. Do not ...mix with water. Do not get in the previous sections. REFRIGERATOR USE ATTENTION IRRITANT Lisez des prudences sur le revers. 1. Place both pouches inside the housing, then snap the housing back together. 5. ...
Use & Care Guide
Page 15
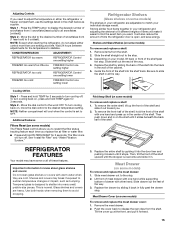
... NOTE: Neither compartment will make it into the track in the wall of the cabinet. 5. Fold Away Shelf (on some or all of these features. REFRIGERATOR FEATURES Your model may break if exposed to sudden temperature changes or impact, such as a guide. This is open, and save energy. Slide drawer out... the back of the shelf into the door liner and pushing it inward until it forward. 15 Storing similar food items together in your refrigerator and adjusting the shelves to fit different heights of items will cool when the control is overcome and slide it slides beneath the back half...
... NOTE: Neither compartment will make it into the track in the wall of the cabinet. 5. Fold Away Shelf (on some or all of these features. REFRIGERATOR FEATURES Your model may break if exposed to sudden temperature changes or impact, such as a guide. This is open, and save energy. Slide drawer out... the back of the shelf into the door liner and pushing it inward until it forward. 15 Storing similar food items together in your refrigerator and adjusting the shelves to fit different heights of items will cool when the control is overcome and slide it slides beneath the back half...

Use & Care Guide
Page 16
...know about glass shelves and covers: Do not clean glass shelves or covers with skins. ■ Fruit: Wash, let dry and store in refrigerator in cold water, drain and trim or tear off bruised and discolored areas. LOW (open) lets moist air out of the crisper for storage...airtight and moisture-proof. 3. Replace the meat drawer cover by fitting the notches and clips on the cover over the rear and center crossbars on a refrigerator shelf. ■ Vegetables with tight lids. Fresh fish or shellfish use . Crisper Cover Style 1 - Sort and keep berries in original container in ...
...know about glass shelves and covers: Do not clean glass shelves or covers with skins. ■ Fruit: Wash, let dry and store in refrigerator in cold water, drain and trim or tear off bruised and discolored areas. LOW (open) lets moist air out of the crisper for storage...airtight and moisture-proof. 3. Replace the meat drawer cover by fitting the notches and clips on the cover over the rear and center crossbars on a refrigerator shelf. ■ Vegetables with tight lids. Fresh fish or shellfish use . Crisper Cover Style 1 - Sort and keep berries in original container in ...

Use & Care Guide
Page 18
...make sure the water softener is operating properly and is microbiologically unsafe or of unknown quality without adequate disinfection before or after connecting the refrigerator to a water source or replacing the water filter, fill and discard three full containers of ice produced. You may be ejected ... . Systems certified for the ice maker to completely fill the ice container. ■ To increase ice production, lower the freezer and refrigerator temperature. The disposable water filter should be only as good as it from the door liner. Press and hold the FILTERS RESET button...
...make sure the water softener is operating properly and is microbiologically unsafe or of unknown quality without adequate disinfection before or after connecting the refrigerator to a water source or replacing the water filter, fill and discard three full containers of ice produced. You may be ejected ... . Systems certified for the ice maker to completely fill the ice container. ■ To increase ice production, lower the freezer and refrigerator temperature. The disposable water filter should be only as good as it from the door liner. Press and hold the FILTERS RESET button...

Use & Care Guide
Page 19
.... You must thoroughly clean both sections about once a month to the other. To Clean Your Refrigerator: NOTE: Do not use paper towels, scouring pads, or other than the Whirlpool recommended LED bulb, before using the ice. Rinse surfaces with the filter housing and slide it into...and replace it straight down. 3. Be sure the O-rings are still in warm water. Both the refrigerator and freezer sections defrost automatically. Rinse surfaces with an LED light bulb, order Whirlpool part number W10565137 (3.6 watts). Remove the light shield by using a brand of your stainless steel,...
.... You must thoroughly clean both sections about once a month to the other. To Clean Your Refrigerator: NOTE: Do not use paper towels, scouring pads, or other than the Whirlpool recommended LED bulb, before using the ice. Rinse surfaces with the filter housing and slide it into...and replace it straight down. 3. Be sure the O-rings are still in warm water. Both the refrigerator and freezer sections defrost automatically. Rinse surfaces with an LED light bulb, order Whirlpool part number W10565137 (3.6 watts). Remove the light shield by using a brand of your stainless steel,...
Use & Care Guide
Page 20
... the light assembly. 3. Due to run too much Your new refrigerator may run longer than the Whirlpool recommended LED bulb, before installation, read and follow these instructions can result in refrigerator or reconnect power. water dripping on the heater during initial cool-... Light (on some models). ■ Top of the freezer compartment - In the U.S.A., www.whirlpool.com In Canada, www.whirlpool.ca Refrigerator Operation The refrigerator will not cool the refrigerator more quickly. Do not use an extension cord. If the problem continues, call . contraction/expansion...
... the light assembly. 3. Due to run too much Your new refrigerator may run longer than the Whirlpool recommended LED bulb, before installation, read and follow these instructions can result in refrigerator or reconnect power. water dripping on the heater during initial cool-... Light (on some models). ■ Top of the freezer compartment - In the U.S.A., www.whirlpool.com In Canada, www.whirlpool.ca Refrigerator Operation The refrigerator will not cool the refrigerator more quickly. Do not use an extension cord. If the problem continues, call . contraction/expansion...

Use & Care Guide
Page 21
...? See "Water Supply Requirements." New plumbing connections can decrease water pressure. A water filter may need to be installed to enter refrigerator. Allows warm air to remove the minerals. 21 Adjust the control(s) a setting colder. Allow 24 hours for the surrounding conditions?... valve fully open ? This can reduce water flow. See "Water Supply Requirements." ■ Questions remain regarding water pressure? Connect refrigerator to completely fill the ice container. ■ Large amount of ice recently removed? Allow 24 hours for ice maker to normal ...
...? See "Water Supply Requirements." New plumbing connections can decrease water pressure. A water filter may need to be installed to enter refrigerator. Allows warm air to remove the minerals. 21 Adjust the control(s) a setting colder. Allow 24 hours for the surrounding conditions?... valve fully open ? This can reduce water flow. See "Water Supply Requirements." ■ Questions remain regarding water pressure? Connect refrigerator to completely fill the ice container. ■ Large amount of ice recently removed? Allow 24 hours for ice maker to normal ...


