
Dimension Guide
Page 1
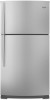
If you do not install the refrigerator near a heat source, such as an oven or radiator. 2" (5.08 cm) Because Whirlpool Corporation policy includes a continuous commitment to improve Dimensions are for the water line connections. handle B 4 top of cabinet 1 A overall C 90˚ Model Height Overall "A" WRT311FZB ...
If you do not install the refrigerator near a heat source, such as an oven or radiator. 2" (5.08 cm) Because Whirlpool Corporation policy includes a continuous commitment to improve Dimensions are for the water line connections. handle B 4 top of cabinet 1 A overall C 90˚ Model Height Overall "A" WRT311FZB ...

Warranty Information
Page 1
...implied warranties of stainless steel surfaces. For assistance or service in the U.S.A., visit www.whirlpool.com. Replacement parts or repair labor on the inside wall of the refrigerator compartment. If outside the 50 United States and Canada, contact your major appliance if ...warranty does not cover: ITEMS EXCLUDED FROM WARRANTY 1. Replacement parts or repair labor if this limited warranty. Service calls to refrigerator or freezer product failures. 7. The cost of original purchase date is required to obtain service under these limitations and exclusions ...
...implied warranties of stainless steel surfaces. For assistance or service in the U.S.A., visit www.whirlpool.com. Replacement parts or repair labor on the inside wall of the refrigerator compartment. If outside the 50 United States and Canada, contact your major appliance if ...warranty does not cover: ITEMS EXCLUDED FROM WARRANTY 1. Replacement parts or repair labor if this limited warranty. Service calls to refrigerator or freezer product failures. 7. The cost of original purchase date is required to obtain service under these limitations and exclusions ...

Use & Care Guide
Page 2
... hazards that can be killed or seriously injured if you and others are not followed. This symbol alerts you to move and install refrigerator. ■ Disconnect power before servicing. ■ Replace all safety messages. All safety messages will tell you what can be killed ...9632; Do not use an adapter. ■ Do not use an extension cord. ■ Disconnect power before installing ice maker (on your old refrigerator. ■ Use nonflammable cleaner. ■ Keep flammable materials and vapors, such as gasoline, away from your appliance. All safety messages will follow ...
... hazards that can be killed or seriously injured if you and others are not followed. This symbol alerts you to move and install refrigerator. ■ Disconnect power before servicing. ■ Replace all safety messages. All safety messages will tell you what can be killed ...9632; Do not use an adapter. ■ Do not use an extension cord. ■ Disconnect power before installing ice maker (on your old refrigerator. ■ Use nonflammable cleaner. ■ Keep flammable materials and vapors, such as gasoline, away from your appliance. All safety messages will follow ...

Use & Care Guide
Page 3
...liquid dish soap over the adhesive with warm water when they will sit for cleaning or service, be evacuated by a licensed, EPA certified refrigerant technician in accordance with a soft cloth. ■ Do not use sharp instruments, rubbing alcohol, flammable fluids, or abrasive cleaners to ...if exposed to form. ■ Remove tape and glue residue from behind the control panel on the refrigerator. If the insert is heavy. When Moving Your Refrigerator: Your refrigerator is removed, ice may migrate down from the freezer and cause icicles to sudden temperature changes or impact...
...liquid dish soap over the adhesive with warm water when they will sit for cleaning or service, be evacuated by a licensed, EPA certified refrigerant technician in accordance with a soft cloth. ■ Do not use sharp instruments, rubbing alcohol, flammable fluids, or abrasive cleaners to ...if exposed to form. ■ Remove tape and glue residue from behind the control panel on the refrigerator. If the insert is heavy. When Moving Your Refrigerator: Your refrigerator is removed, ice may migrate down from the freezer and cause icicles to sudden temperature changes or impact...

Use & Care Guide
Page 4
...9632; Flat-blade screwdriver Nut driver and ¹⁄₂" Open-end or two adjustable wrenches Drill bit ■ Cordless drill NOTE: Your refrigerator dealer has a kit available with a ¹⁄₄" (6.35 mm) saddle-type shutoff valve, a union, and copper tubing. Allow for...; Use copper tubing and check for optimum performance, which reduces water flow and clogs more ) to a maximum of space behind the refrigerator. The preferred room temperature range for leaks. Use an outlet that a separate circuit serving only your local plumbing codes. See "Using the...
...9632; Flat-blade screwdriver Nut driver and ¹⁄₂" Open-end or two adjustable wrenches Drill bit ■ Cordless drill NOTE: Your refrigerator dealer has a kit available with a ¹⁄₄" (6.35 mm) saddle-type shutoff valve, a union, and copper tubing. Allow for...; Use copper tubing and check for optimum performance, which reduces water flow and clogs more ) to a maximum of space behind the refrigerator. The preferred room temperature range for leaks. Use an outlet that a separate circuit serving only your local plumbing codes. See "Using the...

Use & Care Guide
Page 5
... supply. Locate a ½" to 1¹⁄₄" (1.25 cm to completely fill ice container. 5 Determine the length of the refrigerator to secure the tubing to operate the water dispenser and ice maker. Pipe clamp C. Packing nut 6. Tighten the pipe clamp screws slowly and..., install it will help avoid damage to refill after heavy usage. A G B C FE A. Compression sleeve F. Fasten the shutoff valve to Refrigerator 1. Connect to the cold water pipe with the pipe clamp. Tighten the compression nut. Failure to see whether the sediment filter in death, fire...
... supply. Locate a ½" to 1¹⁄₄" (1.25 cm to completely fill ice container. 5 Determine the length of the refrigerator to secure the tubing to operate the water dispenser and ice maker. Pipe clamp C. Packing nut 6. Tighten the pipe clamp screws slowly and..., install it will help avoid damage to refill after heavy usage. A G B C FE A. Compression sleeve F. Fasten the shutoff valve to Refrigerator 1. Connect to the cold water pipe with the pipe clamp. Tighten the compression nut. Failure to see whether the sediment filter in death, fire...

Use & Care Guide
Page 6
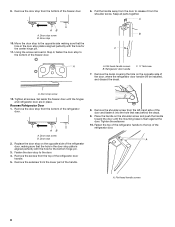
... top hinge and lift up to remove A the hinge. Using a hex head socket wrench, remove the three screws from the bottom of the refrigerator door. Washer 6 To purchase a Reversibility Kit, see "Accessories" for the doors while the hinges are working. NOTE: For 21 cu ft ...pull the hinge from the bottom front of the center hinge and set it aside. 4. Spacer 3. Center hinge B Hex head hinge screws A A. Refrigerator Doors Depending on the door magnets to hold the doors in this section following "Final Steps." A B A. NOTE: Provide additional support for contact information,...
... top hinge and lift up to remove A the hinge. Using a hex head socket wrench, remove the three screws from the bottom of the refrigerator door. Washer 6 To purchase a Reversibility Kit, see "Accessories" for the doors while the hinges are working. NOTE: For 21 cu ft ...pull the hinge from the bottom front of the center hinge and set it aside. 4. Spacer 3. Center hinge B Hex head hinge screws A A. Refrigerator Doors Depending on the door magnets to hold the doors in this section following "Final Steps." A B A. NOTE: Provide additional support for contact information,...
Use & Care Guide
Page 8
... the center hinge pin. 11. Fasten the top of the handle. 8. Door stop screw B. Place the handle on the opposite side of the refrigerator door. A AB A. Remove the door stop from the bottom of the freezer door. Remove the screws from the shoulder screw. 9. Tighten all parts...into the hole that the hole in place. AB A. Remove the door stop from the bottom of the refrigerator door handle. 5. Door stop to the top of the door, where the refrigerator door handle will be installed, and discard the decal. Flat-head handle screws C. ¹⁄₄" Setscrew...
... the center hinge pin. 11. Fasten the top of the handle. 8. Door stop screw B. Place the handle on the opposite side of the refrigerator door. A AB A. Remove the door stop from the bottom of the freezer door. Remove the screws from the shoulder screw. 9. Tighten all parts...into the hole that the hole in place. AB A. Remove the door stop from the bottom of the refrigerator door handle. 5. Door stop to the top of the door, where the refrigerator door handle will be installed, and discard the decal. Flat-head handle screws C. ¹⁄₄" Setscrew...

Use & Care Guide
Page 9
...door on the opposite side of the freezer door aligns evenly with the decal (provided). NOTE: The shorter cover must be able to refrigerator. 9 Reset the controls. Return all screws. Bottom hinge 4. Place the freezer door on the hinge side of the Center Hinge. ...NOTE: If the shipping bracket is flush. Push the base grille toward the cabinet until bottom hinge is pointing in the top of the refrigerator door to the cabinet. Place washer on the door magnets to ensure proper alignment. Plastic spacer Replace Doors and Hinges IMPORTANT: Provide additional support...
...door on the opposite side of the freezer door aligns evenly with the decal (provided). NOTE: The shorter cover must be able to refrigerator. 9 Reset the controls. Return all screws. Bottom hinge 4. Place the freezer door on the hinge side of the Center Hinge. ...NOTE: If the shipping bracket is flush. Push the base grille toward the cabinet until bottom hinge is pointing in the top of the refrigerator door to the cabinet. Place washer on the door magnets to ensure proper alignment. Plastic spacer Replace Doors and Hinges IMPORTANT: Provide additional support...

Use & Care Guide
Page 10
... some models) Door Swing Reversal (optional) 2 A B Plastic Handle 3 C B A A Hex-Head Hinge Screws A B. Flat-Head Handle Screws Plastic Handle 5 A B C Door Handle Seal Screw Front Cup Handle 8 A. Refrigerator Handle C. ¹⁄₄" Setscrew A Front View Side View 6 A. Door Handle Sealing Screws 10 Top Hinge C. Flat-Head Handle Screws B. Style 1-Contour Door Door Removal...
... some models) Door Swing Reversal (optional) 2 A B Plastic Handle 3 C B A A Hex-Head Hinge Screws A B. Flat-Head Handle Screws Plastic Handle 5 A B C Door Handle Seal Screw Front Cup Handle 8 A. Refrigerator Handle C. ¹⁄₄" Setscrew A Front View Side View 6 A. Door Handle Sealing Screws 10 Top Hinge C. Flat-Head Handle Screws B. Style 1-Contour Door Door Removal...

Use & Care Guide
Page 11
... Screws Bottom Hinge A B A. Door Stop Screw A B B. Door Stop 6-1 A A. Door Handle Screw Cover Door Handle Seal Screw Front 6-2 A 6-3 B C A. Door Handle Sealing Screws Front View Side View 5 A. Refrigerator Handle C. Bottom Hinge Hole Plug Top Hinge A B C A. Top Hinge Cover B Hex-Head Hinge Screws C. Cabinet Hinge Hole Plugs 3 1-1 A A A Hex-Head Hinge Screws A A. Freezer Handle 4 A 7 A. Bottom...
... Screws Bottom Hinge A B A. Door Stop Screw A B B. Door Stop 6-1 A A. Door Handle Screw Cover Door Handle Seal Screw Front 6-2 A 6-3 B C A. Door Handle Sealing Screws Front View Side View 5 A. Refrigerator Handle C. Bottom Hinge Hole Plug Top Hinge A B C A. Top Hinge Cover B Hex-Head Hinge Screws C. Cabinet Hinge Hole Plugs 3 1-1 A A A Hex-Head Hinge Screws A A. Freezer Handle 4 A 7 A. Bottom...
Use & Care Guide
Page 12
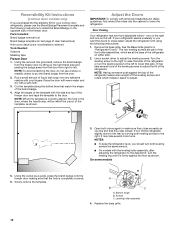
...roller assembly 4. Replace the base grille. 12 Reversibility Kit Instructions (contour door models only) If you purchased the Reversibility Kit for your refrigerator seems unsteady or you want the doors to close as easily as a guide, press the brand badge onto the freezer door making sure...tilt, turn the leveling screw to the left . Turn the leveling screw to the right to raise that they close easier, adjust the refrigerator's tilt using the following instructions to exterior) Tools Needed: Scissors Masking tape Freezer Door 1. Using the removal tool (provided), remove the...
...roller assembly 4. Replace the base grille. 12 Reversibility Kit Instructions (contour door models only) If you purchased the Reversibility Kit for your refrigerator seems unsteady or you want the doors to close as easily as a guide, press the brand badge onto the freezer door making sure...tilt, turn the leveling screw to the left . Turn the leveling screw to the right to raise that they close easier, adjust the refrigerator's tilt using the following instructions to exterior) Tools Needed: Scissors Masking tape Freezer Door 1. Using the removal tool (provided), remove the...

Use & Care Guide
Page 13
... must be installed prior to good and the air filter LED will easily remember - Apply pressure to maintain a cleaner environment inside the refrigerator, or elsewhere in on some models) The filter should be activated and installed at the factory. Lift open the vented door. 3. On... Remove the old status indicator. 3. Snap the filter into the notches, facing outward. On some models, your model) along either inside the refrigerator. Place the indicator face-down into place. See "Using the Control(s)." The air filter LED does not light up. ■ REPLACE - NOTE...
... must be installed prior to good and the air filter LED will easily remember - Apply pressure to maintain a cleaner environment inside the refrigerator, or elsewhere in on some models) The filter should be activated and installed at the factory. Lift open the vented door. 3. On... Remove the old status indicator. 3. Snap the filter into the notches, facing outward. On some models, your model) along either inside the refrigerator. Place the indicator face-down into place. See "Using the Control(s)." The air filter LED does not light up. ■ REPLACE - NOTE...
Use & Care Guide
Page 14
... pouches from the produce preserver housing. 2. Installing the Status Indicator The produce preserver comes with water. When you first install your refrigerator, make sure the controls are installed. Electronic Recommended Setting "3rd Snowflake" Style 2 - Place the indicator face-down on the ...adding food. Installing the Produce Preserver CAUTION: IRRITANT MAY IRRITATE EYES AND SKIN. Do not mix with water for normal household refrigerator use. Keep out of reach of the produce preserver housing. FIRST AID TREATMENT: Contains potassium permanganate. If swallowed, call a...
... pouches from the produce preserver housing. 2. Installing the Status Indicator The produce preserver comes with water. When you first install your refrigerator, make sure the controls are installed. Electronic Recommended Setting "3rd Snowflake" Style 2 - Place the indicator face-down on the ...adding food. Installing the Produce Preserver CAUTION: IRRITANT MAY IRRITATE EYES AND SKIN. Do not mix with water for normal household refrigerator use. Keep out of reach of the produce preserver housing. FIRST AID TREATMENT: Contains potassium permanganate. If swallowed, call a...
Use & Care Guide
Page 15
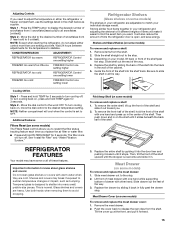
... models) The Filters Reset control allows you to 5 coldest). Tempered glass is designed to all snowflakes [coldest]). Lift front of time the refrigerator door is overcome and slide it stops. Remove the meat drawer. 2. Shelves and Glass Shelves (on some or all the way. Slide...past the stop . 3. Important information to know about glass shelves and covers: Do not clean glass shelves or covers with one setting lower Refrigerator Shelves (Glass shelves on , press and hold FILTERS RESET for 3 seconds to the word OFF. Glass shelves and covers are cold. ...
... models) The Filters Reset control allows you to 5 coldest). Tempered glass is designed to all snowflakes [coldest]). Lift front of time the refrigerator door is overcome and slide it stops. Remove the meat drawer. 2. Shelves and Glass Shelves (on some or all the way. Slide...past the stop . 3. Important information to know about glass shelves and covers: Do not clean glass shelves or covers with one setting lower Refrigerator Shelves (Glass shelves on , press and hold FILTERS RESET for 3 seconds to the word OFF. Glass shelves and covers are cold. ...

Use & Care Guide
Page 16
...drawer straight out to any setting between LOW and HIGH. Glass Cover To remove and replace the crisper cover: 1. Crisper Humidity Control (on a refrigerator shelf. ■ Vegetables with warm water when they are heavy. HIGH (closed paper bag on some models) You can control the amount of... necessary. Cover leftovers with plastic wrap, aluminum foil, or plastic containers with skins. ■ Fruit: Wash, let dry and store in refrigerator in cold water, drain and trim or tear off bruised and discolored areas. Replace the drawer by lifting the entire shelf slightly and moving it...
...drawer straight out to any setting between LOW and HIGH. Glass Cover To remove and replace the crisper cover: 1. Crisper Humidity Control (on a refrigerator shelf. ■ Vegetables with warm water when they are heavy. HIGH (closed paper bag on some models) You can control the amount of... necessary. Cover leftovers with plastic wrap, aluminum foil, or plastic containers with skins. ■ Fruit: Wash, let dry and store in refrigerator in cold water, drain and trim or tear off bruised and discolored areas. Replace the drawer by lifting the entire shelf slightly and moving it...

Use & Care Guide
Page 18
... store anything sharp to break up on the ice maker to completely fill the ice container. ■ To increase ice production, lower the freezer and refrigerator temperature. Water softener chemicals (such as the quality of your ice maker. Systems certified for cyst reduction may notice the ice has an "off .... on your water filter. ■ When it is time to order a replacement water filter, the water filter icon LED will light up whenever the refrigerator door is open. ■ When it is time to replace the water filter, the water filter icon LED will raise the wire shutoff arm to...
... store anything sharp to break up on the ice maker to completely fill the ice container. ■ To increase ice production, lower the freezer and refrigerator temperature. Water softener chemicals (such as the quality of your ice maker. Systems certified for cyst reduction may notice the ice has an "off .... on your water filter. ■ When it is time to order a replacement water filter, the water filter icon LED will light up whenever the refrigerator door is open. ■ When it is time to replace the water filter, the water filter icon LED will raise the wire shutoff arm to...

Use & Care Guide
Page 19
With the arrow pointing up, align the new filter with an LED light bulb, order Whirlpool part number W10565137 (3.6 watts). You may occur. Unplug refrigerator or disconnect power. 2. Use a clean sponge or soft cloth and a mild detergent in warm water. Rinse surfaces.... Stainless steel: Wash stainless steel surfaces with a clean, soft cloth or sponge and a mild detergent in warm water. 3. Both the refrigerator and freezer sections defrost automatically. You must thoroughly clean both sections, any spills. 4. Do not use , before installation, read and follow ...
With the arrow pointing up, align the new filter with an LED light bulb, order Whirlpool part number W10565137 (3.6 watts). You may occur. Unplug refrigerator or disconnect power. 2. Use a clean sponge or soft cloth and a mild detergent in warm water. Rinse surfaces.... Stainless steel: Wash stainless steel surfaces with a clean, soft cloth or sponge and a mild detergent in warm water. 3. Both the refrigerator and freezer sections defrost automatically. You must thoroughly clean both sections, any spills. 4. Do not use , before installation, read and follow ...
Use & Care Guide
Page 20
.../Rattling - Freezer Compartment Light (on ? Remove the light bulb and replace it from the ice maker mold. 20 In the U.S.A., www.whirlpool.com In Canada, www.whirlpool.ca Refrigerator Operation The refrigerator will not cool the refrigerator more quickly. Do not remove ground prong. If the problem continues, call . Do not use an adapter. The...
.../Rattling - Freezer Compartment Light (on ? Remove the light bulb and replace it from the ice maker mold. 20 In the U.S.A., www.whirlpool.com In Canada, www.whirlpool.ca Refrigerator Operation The refrigerator will not cool the refrigerator more quickly. Do not remove ground prong. If the problem continues, call . Do not use an adapter. The...

Use & Care Guide
Page 21
...Clean gaskets and contact surfaces with soft cloth. Temperature and Moisture Temperature is normal. ■ Humid room? Allow several hours for refrigerator to return to normal temperature. ■ Control(s) set correctly for ice production to water supply and turn water shutoff valve fully... for the surrounding conditions? Allow 3 days to a water supply and the supply shutoff valve turned on the supports. ■ Refrigerator not tilted toward the rear. See "Water Supply Requirements." This can reduce water flow. Minimize door openings and keep the door from...
...Clean gaskets and contact surfaces with soft cloth. Temperature and Moisture Temperature is normal. ■ Humid room? Allow several hours for refrigerator to return to normal temperature. ■ Control(s) set correctly for ice production to water supply and turn water shutoff valve fully... for the surrounding conditions? Allow 3 days to a water supply and the supply shutoff valve turned on the supports. ■ Refrigerator not tilted toward the rear. See "Water Supply Requirements." This can reduce water flow. Minimize door openings and keep the door from...


