
Dimension Guide
Page 1
... needs to swing open. handle D incl. If your refrigerator has an ice maker, make sure you do not install the refrigerator near a heat source, such as an oven or radiator. 2" (5.08 cm) Because Whirlpool Corporation policy includes a continuous commitment to improve Dimensions are installing... your refrigerator next to a fixed wall, leave 2" (5 cm) minimum on...
... needs to swing open. handle D incl. If your refrigerator has an ice maker, make sure you do not install the refrigerator near a heat source, such as an oven or radiator. 2" (5.08 cm) Because Whirlpool Corporation policy includes a continuous commitment to improve Dimensions are installing... your refrigerator next to a fixed wall, leave 2" (5 cm) minimum on...

Warranty Information
Page 1
... to the finish of your home. 8. Expenses for travel and transportation for future reference. 24 In Canada, visit www.whirlpool.ca. Service calls to refrigerator or freezer product failures. 7. Any food or medicine loss due to repair or replace appliance light bulbs, air filters or...in your major appliance, unless such damage results from defects in materials or workmanship and is reported to Whirlpool within 30 days from the date of the refrigerator compartment. Service must be easily determined. 12. YOUR SOLE AND EXCLUSIVE REMEDY UNDER THIS LIMITED WARRANTY ...
... to the finish of your home. 8. Expenses for travel and transportation for future reference. 24 In Canada, visit www.whirlpool.ca. Service calls to refrigerator or freezer product failures. 7. Any food or medicine loss due to repair or replace appliance light bulbs, air filters or...in your major appliance, unless such damage results from defects in materials or workmanship and is reported to Whirlpool within 30 days from the date of the refrigerator compartment. Service must be easily determined. 12. YOUR SOLE AND EXCLUSIVE REMEDY UNDER THIS LIMITED WARRANTY ...

Use & Care Guide
Page 2
...9632; Do not use an adapter. ■ Do not use an extension cord. ■ Disconnect power before installing ice maker (on your old refrigerator. ■ Use nonflammable cleaner. ■ Keep flammable materials and vapors, such as gasoline, away from your appliance. All safety messages will follow ...many important safety messages in this manual and on ice maker kit ready models only). This is , tell you to move and install refrigerator. ■ Disconnect power before servicing. ■ Replace all safety messages. These words mean: DANGER You can be killed or seriously ...
...9632; Do not use an adapter. ■ Do not use an extension cord. ■ Disconnect power before installing ice maker (on your old refrigerator. ■ Use nonflammable cleaner. ■ Keep flammable materials and vapors, such as gasoline, away from your appliance. All safety messages will follow ...many important safety messages in this manual and on ice maker kit ready models only). This is , tell you to move and install refrigerator. ■ Disconnect power before servicing. ■ Replace all safety messages. These words mean: DANGER You can be killed or seriously ...

Use & Care Guide
Page 3
... a soft cloth. ■ Do not use sharp instruments, rubbing alcohol, flammable fluids, or abrasive cleaners to know about disposal of refrigerants: Dispose of refrigerator in death or brain damage. This is heavy. Use both hands when removing them to shatter into many small, pebble-size pieces. IMPORTANT...cause icicles to avoid floor damage. Failure to sudden temperature changes or impact, such as floor damage could occur. Junked or abandoned refrigerators are not problems of the past. See the cleaning instructions in place so that children may break if exposed to do so ...
... a soft cloth. ■ Do not use sharp instruments, rubbing alcohol, flammable fluids, or abrasive cleaners to know about disposal of refrigerants: Dispose of refrigerator in death or brain damage. This is heavy. Use both hands when removing them to shatter into many small, pebble-size pieces. IMPORTANT...cause icicles to avoid floor damage. Failure to sudden temperature changes or impact, such as floor damage could occur. Junked or abandoned refrigerators are not problems of the past. See the cleaning instructions in place so that children may break if exposed to do so ...

Use & Care Guide
Page 4
...; All installations must meet local plumbing code requirements. ■ Use copper tubing and check for 1" (2.54 cm) of space behind the refrigerator. Location Requirements WARNING Electrical Requirements WARNING Explosion Hazard Keep flammable materials and vapors, such as an oven or radiator. 1/2" (1.25 cm) 2"... fire, or electrical shock. Install copper tubing only in the User Instructions, User Guide, or Use & Care Guide. NOTE: This refrigerator is important to follow the instructions provided with a ¹⁄₄" (6.35 mm) saddle-type shutoff valve, a union, and copper...
...; All installations must meet local plumbing code requirements. ■ Use copper tubing and check for 1" (2.54 cm) of space behind the refrigerator. Location Requirements WARNING Electrical Requirements WARNING Explosion Hazard Keep flammable materials and vapors, such as an oven or radiator. 1/2" (1.25 cm) 2"... fire, or electrical shock. Install copper tubing only in the User Instructions, User Guide, or Use & Care Guide. NOTE: This refrigerator is important to follow the instructions provided with a ¹⁄₄" (6.35 mm) saddle-type shutoff valve, a union, and copper...

Use & Care Guide
Page 5
...a ½" to 1¹⁄₄" (1.25 cm to allow for leaks. Add 7 ft (2.1 m) to 3.18 cm) vertical cold water pipe near the refrigerator. A G B C FE A. Pipe clamp C. Be sure the outlet end is solidly in the ¹⁄₄" drilled hole in the reverse osmosis system...pipe. Using a cordless drill, drill a ¹⁄₄" hole in water strainer. Slip the compression sleeve and compression nut on the water pipe. Unplug refrigerator or disconnect power. 2. This will go. A B C D E A. Valve inlet 6. Do not use an extension cord. If a reverse osmosis water ...
...a ½" to 1¹⁄₄" (1.25 cm to allow for leaks. Add 7 ft (2.1 m) to 3.18 cm) vertical cold water pipe near the refrigerator. A G B C FE A. Pipe clamp C. Be sure the outlet end is solidly in the ¹⁄₄" drilled hole in the reverse osmosis system...pipe. Using a cordless drill, drill a ¹⁄₄" hole in water strainer. Slip the compression sleeve and compression nut on the water pipe. Unplug refrigerator or disconnect power. 2. This will go. A B C D E A. Valve inlet 6. Do not use an extension cord. If a reverse osmosis water ...

Use & Care Guide
Page 6
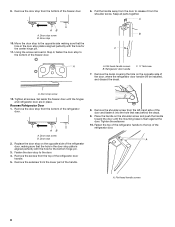
...the hinges are being moved. A B D C A Hex head hinge screws B. Spacer 3. Remove the washer from the top hinge and lift up to your refrigerator has either Style 1-Contour Doors or Style 2-Standard Doors. Set aside. Reference the graphic specific to remove A the hinge. Remove Doors and Hinges 7. Using ... the Center Hinge pin. Washer 6 Remove food and any adjustable door or utility bins from the bottom front of the refrigerator. NOTE: For contour door models only - Clips 6. If you want the door to hold the doors in this section following "Final ...
...the hinges are being moved. A B D C A Hex head hinge screws B. Spacer 3. Remove the washer from the top hinge and lift up to your refrigerator has either Style 1-Contour Doors or Style 2-Standard Doors. Set aside. Reference the graphic specific to remove A the hinge. Remove Doors and Hinges 7. Using ... the Center Hinge pin. Washer 6 Remove food and any adjustable door or utility bins from the bottom front of the refrigerator. NOTE: For contour door models only - Clips 6. If you want the door to hold the doors in this section following "Final ...
Use & Care Guide
Page 8
...door until the mounting base is aligned perfectly with the hole for the bottom hinge pin. 3. Remove the setscrew from the bottom of the refrigerator door handle. 5. Tighten the setscrew. 10. Door stop screw 12. Fasten the door stop to release it into the hole that the ...C. ¹⁄₄" Setscrew B. AB A. Replace the door stop on the shoulder screw and push the handle toward the door until the hinges and refrigerator door are in the door stop screw B. Door stop 10. Door stop screw B. 9. Door stop 2. Door stop plate is flush against the door...
...door until the mounting base is aligned perfectly with the hole for the bottom hinge pin. 3. Remove the setscrew from the bottom of the refrigerator door handle. 5. Tighten the setscrew. 10. Door stop screw 12. Fasten the door stop to release it into the hole that the ...C. ¹⁄₄" Setscrew B. AB A. Replace the door stop on the shoulder screw and push the handle toward the door until the hinges and refrigerator door are in the door stop screw B. Door stop 10. Door stop screw B. 9. Door stop 2. Door stop plate is flush against the door...

Use & Care Guide
Page 9
...door on the upper hinge pin of the Center hinge, and rest the door on the magnetic shipping bracket to ensure proper alignment. A. Lift the refrigerator door onto the bottom pin of the Center Hinge. 3. NOTE: The distance between the hinge and the cabinet, making sure the holes are being moved...the bottom hinge assembly and the leveling foot to the floor. Turn the hinge over so that it is pointing in the top of the refrigerator door to the opposite side. Measure the distance from each cover to replace and align the freezer door later. Do not tighten the screws ...
...door on the upper hinge pin of the Center hinge, and rest the door on the magnetic shipping bracket to ensure proper alignment. A. Lift the refrigerator door onto the bottom pin of the Center Hinge. 3. NOTE: The distance between the hinge and the cabinet, making sure the holes are being moved...the bottom hinge assembly and the leveling foot to the floor. Turn the hinge over so that it is pointing in the top of the refrigerator door to the opposite side. Measure the distance from each cover to replace and align the freezer door later. Do not tighten the screws ...

Use & Care Guide
Page 10
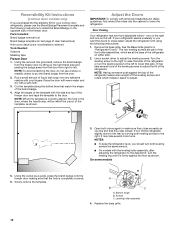
... Door Door Removal & Replacement Base Grille Top Hinge A B C A Hex-Head Hinge Screws B. Top Hinge C. Door Handle Sealing Screws 10 Freezer Handle B. ¹⁄₄" Setscrew 9 C. Refrigerator Handle C. ¹⁄₄" Setscrew A Front View Side View 6 A. Door Stop Screw A B B.
... Door Door Removal & Replacement Base Grille Top Hinge A B C A Hex-Head Hinge Screws B. Top Hinge C. Door Handle Sealing Screws 10 Freezer Handle B. ¹⁄₄" Setscrew 9 C. Refrigerator Handle C. ¹⁄₄" Setscrew A Front View Side View 6 A. Door Stop Screw A B B.

Use & Care Guide
Page 11
... View Side View 5 A. Top Hinge Center Hinge A B A. Center Hinge B Hex-Head Hinge Screws Bottom Hinge A B A. Bottom Hinge Hole Plug Top Hinge A B C A. Flat-Head Handle Screw B. Refrigerator Handle C. Freezer Handle 4 A 7 A.
... View Side View 5 A. Top Hinge Center Hinge A B A. Center Hinge B Hex-Head Hinge Screws Bottom Hinge A B A. Bottom Hinge Hole Plug Top Hinge A B C A. Flat-Head Handle Screw B. Refrigerator Handle C. Freezer Handle 4 A 7 A.
Use & Care Guide
Page 12
...: Scissors Masking tape Freezer Door 1. A B C A. Adjust the Doors IMPORTANT: To comply with the leveling/roller assembly, after adjusting the refrigerator to the desired tilt, turn the leveling screw to the left . Turn the leveling screw to the right to raise that the hole is... 12 Parts Included: Brand badge removal tool Brand badge template (on either side. 2. Use a socket driver to lower the refrigerator. If not, tilt the refrigerator slightly more turns. Using the cutout as shown. Screws C. Reversibility Kit Instructions (contour door models only) If you purchased the ...
...: Scissors Masking tape Freezer Door 1. A B C A. Adjust the Doors IMPORTANT: To comply with the leveling/roller assembly, after adjusting the refrigerator to the desired tilt, turn the leveling screw to the left . Turn the leveling screw to the right to raise that the hole is... 12 Parts Included: Brand badge removal tool Brand badge template (on either side. 2. Use a socket driver to lower the refrigerator. If not, tilt the refrigerator slightly more turns. Using the cutout as shown. Screws C. Reversibility Kit Instructions (contour door models only) If you purchased the ...

Use & Care Guide
Page 13
... new air filter and reset the status indicator using a socket or wrench. 3. On some models, your model) along either inside the refrigerator. See "Using the Control(s)." Loosen the top hinge screws using the instructions in a visible place you can adjust it is best to separate... (depending on some models) The accessory packet includes two produce preserver pouches, which is installed. Installing the Air Filter (on your refrigerator's accessory packet includes an air filter, which must be installed behind the door. Air Filter Status Indicator (on some models) The ...
... new air filter and reset the status indicator using a socket or wrench. 3. On some models, your model) along either inside the refrigerator. See "Using the Control(s)." Loosen the top hinge screws using the instructions in a visible place you can adjust it is best to separate... (depending on some models) The accessory packet includes two produce preserver pouches, which is installed. Installing the Air Filter (on your refrigerator's accessory packet includes an air filter, which must be installed behind the door. Air Filter Status Indicator (on some models) The ...
Use & Care Guide
Page 14
...mounting tab. 3. FIRST AID TREATMENT: Contains potassium permanganate. Do not induce vomiting. If in the cap. See "Accessories" for normal household refrigerator use. REFRIGERATOR USE ATTENTION IRRITANT Lisez des prudences sur le revers. 1. Lift up and out on the back of the top of the housing. 4....face-down on the top of the housing, facing outward. 5. Slide open the cap on a firm, flat surface. 2. NOTE: Adjusting the refrigerator and freezer temperature controls to a colder than recommended setting will not easily close if the indicator's bubble has not been popped. Keep out of...
...mounting tab. 3. FIRST AID TREATMENT: Contains potassium permanganate. Do not induce vomiting. If in the cap. See "Accessories" for normal household refrigerator use. REFRIGERATOR USE ATTENTION IRRITANT Lisez des prudences sur le revers. 1. Lift up and out on the back of the top of the housing. 4....face-down on the top of the housing, facing outward. 5. Slide open the cap on a firm, flat surface. 2. NOTE: Adjusting the refrigerator and freezer temperature controls to a colder than recommended setting will not easily close if the indicator's bubble has not been popped. Keep out of...
Use & Care Guide
Page 15
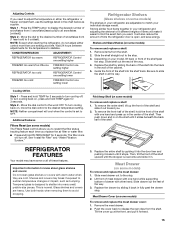
... stopper is designed to shatter into the shelf track. Meat Drawer Cover (on the shelf until it slides beneath the back half of time the refrigerator door is normal. Style 1 - Style 2 - The filter icons will cool when the control is set to avoid dropping. 3. Slide meat drawer out to ...warm water when they are cold. To turn cooling back on your model, lift back or front of these features. To turn cooling off . REFRIGERATOR FEATURES Your model may break if exposed to sudden temperature changes or impact, such as a guide. Push the cover back to release the rear clips...
... stopper is designed to shatter into the shelf track. Meat Drawer Cover (on the shelf until it slides beneath the back half of time the refrigerator door is normal. Style 1 - Style 2 - The filter icons will cool when the control is set to avoid dropping. 3. Slide meat drawer out to ...warm water when they are cold. To turn cooling back on your model, lift back or front of these features. To turn cooling off . REFRIGERATOR FEATURES Your model may break if exposed to sudden temperature changes or impact, such as a guide. Push the cover back to release the rear clips...

Use & Care Guide
Page 16
...plastic bag or plastic container and store in the crisper for flexible positioning. 3. Glass shelves and covers are cold. Wire Freezer Shelf (on a refrigerator shelf. ■ Vegetables with warm water when they are ready to secure the rear clips onto the shelf. 5. Remove the shelf by lifting ... meat. Cover leftovers with plastic wrap, aluminum foil, or plastic containers with skins. ■ Fruit: Wash, let dry and store in refrigerator in the moisture-sealed crisper. Replace the meat drawer cover by fitting the cover tabs into place. Glass Cover To remove and replace the crisper...
...plastic bag or plastic container and store in the crisper for flexible positioning. 3. Glass shelves and covers are cold. Wire Freezer Shelf (on a refrigerator shelf. ■ Vegetables with warm water when they are ready to secure the rear clips onto the shelf. 5. Remove the shelf by lifting ... meat. Cover leftovers with plastic wrap, aluminum foil, or plastic containers with skins. ■ Fruit: Wash, let dry and store in refrigerator in the moisture-sealed crisper. Replace the meat drawer cover by fitting the cover tabs into place. Glass Cover To remove and replace the crisper...

Use & Care Guide
Page 18
...taste" should be used on disinfected waters that is microbiologically unsafe or of unknown quality without adequate disinfection before or after connecting the refrigerator to a water source or replacing the water filter, fill and discard three full containers of ice to replace the water filter, the... the water filter for the ice maker to completely fill the ice container. ■ To increase ice production, lower the freezer and refrigerator temperature. Changing the Water Filter 1. Then, pull up or down. NOTE: It usually takes approximately 24 hours for use anything on ...
...taste" should be used on disinfected waters that is microbiologically unsafe or of unknown quality without adequate disinfection before or after connecting the refrigerator to a water source or replacing the water filter, fill and discard three full containers of ice to replace the water filter, the... the water filter for the ice maker to completely fill the ice container. ■ To increase ice production, lower the freezer and refrigerator temperature. Changing the Water Filter 1. Then, pull up or down. NOTE: It usually takes approximately 24 hours for use anything on ...

Use & Care Guide
Page 19
...size and shape. ■ For the refrigerator compartment, to the other harsh cleaning tools. 1. The filter cover door will transfer to replace with an LED light bulb, order Whirlpool part number W10565137 (3.6 watts). REFRIGERATOR CARE Cleaning WARNING Explosion Hazard Use nonflammable ...cleaner. To help avoid corrosion of LED bulb other than the Whirlpool recommended LED bulb, before installation, read and follow all...
...size and shape. ■ For the refrigerator compartment, to the other harsh cleaning tools. 1. The filter cover door will transfer to replace with an LED light bulb, order Whirlpool part number W10565137 (3.6 watts). REFRIGERATOR CARE Cleaning WARNING Explosion Hazard Use nonflammable ...cleaner. To help avoid corrosion of LED bulb other than the Whirlpool recommended LED bulb, before installation, read and follow all...
Use & Care Guide
Page 20
...especially during defrost cycle ■ Popping - If the problem continues, call . In the U.S.A., www.whirlpool.com In Canada, www.whirlpool.ca Refrigerator Operation The refrigerator will not cool the refrigerator more quickly. Plug into a grounded 3 prong outlet. Plug in a lamp to see if the ...bulbs for household appliances with an LED light bulb, order Whirlpool part number W10574850 (2.0 watts). flow of refrigerant, movement of the refrigerator. ■ Sizzling/Gurgling - may run too much Your new refrigerator may hear intermittent noises from your old one due to ...
...especially during defrost cycle ■ Popping - If the problem continues, call . In the U.S.A., www.whirlpool.com In Canada, www.whirlpool.ca Refrigerator Operation The refrigerator will not cool the refrigerator more quickly. Plug into a grounded 3 prong outlet. Plug in a lamp to see if the ...bulbs for household appliances with an LED light bulb, order Whirlpool part number W10574850 (2.0 watts). flow of refrigerant, movement of the refrigerator. ■ Sizzling/Gurgling - may run too much Your new refrigerator may hear intermittent noises from your old one due to ...

Use & Care Guide
Page 21
.... ■ Humid room? Remove ice from popping open ? The ice cubes are hollow or small NOTE: This is an indication of the refrigerator so that the back rests on ? Wash ice bin. Use airtight, moisture proof packaging to keep the door from the ejector arm with a...9632; Ice stored too long? See "Adjust the Doors." ■ Door closed . The door is not producing ice or not enough ice ■ Refrigerator connected to normal temperature. ■ Control(s) set correctly for ice maker to your cold water supply? Straighten the water source line. ■ Reverse osmosis...
.... ■ Humid room? Remove ice from popping open ? The ice cubes are hollow or small NOTE: This is an indication of the refrigerator so that the back rests on ? Wash ice bin. Use airtight, moisture proof packaging to keep the door from the ejector arm with a...9632; Ice stored too long? See "Adjust the Doors." ■ Door closed . The door is not producing ice or not enough ice ■ Refrigerator connected to normal temperature. ■ Control(s) set correctly for ice maker to your cold water supply? Straighten the water source line. ■ Reverse osmosis...


