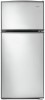
Dimension Guide
Page 1
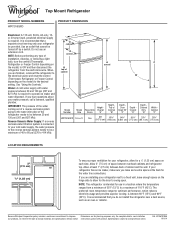
... at least 1" (2.5 cm) between back of space between 30 and 120 psi (207 and 827 kPa). NOTE: This refrigerator is connected to swing open. It is required to the desired setting. Because Whirlpool Corporation policy includes a continuous commitment to improve Dimensions are for optimum performance, which reduces electricity usage and provides superior...
... at least 1" (2.5 cm) between back of space between 30 and 120 psi (207 and 827 kPa). NOTE: This refrigerator is connected to swing open. It is required to the desired setting. Because Whirlpool Corporation policy includes a continuous commitment to improve Dimensions are for optimum performance, which reduces electricity usage and provides superior...
Use & Care Guide
Page 2
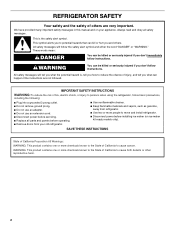
... of California Proposition 65 Warnings: WARNING: This product contains one or more chemicals known to the State of California to persons when using the refrigerator, follow the safety alert symbol and either the word "DANGER" or "WARNING." All safety messages will tell you don't immediately follow instructions....chance of injury, and tell you what can be killed or seriously injured if you what the potential hazard is the safety alert symbol. REFRIGERATOR SAFETY Your safety and the safety of others . This symbol alerts you and others are not followed. These words mean: DANGER You ...
... of California Proposition 65 Warnings: WARNING: This product contains one or more chemicals known to the State of California to persons when using the refrigerator, follow the safety alert symbol and either the word "DANGER" or "WARNING." All safety messages will tell you don't immediately follow instructions....chance of injury, and tell you what can be killed or seriously injured if you what the potential hazard is the safety alert symbol. REFRIGERATOR SAFETY Your safety and the safety of others . This symbol alerts you and others are not followed. These words mean: DANGER You ...
Use & Care Guide
Page 3
...do so can result in accordance with warm water when they will sit for cleaning or service, be evacuated by a licensed, EPA certified refrigerant technician in death or brain damage. Glass shelves and covers are cold. If you remove all packaging materials. Failure to know about glass ...shelves and covers: Do not clean glass shelves or covers with established procedures. Do not wiggle or "walk" the refrigerator when trying to form. Rub a small amount of liquid dish soap over the adhesive with Federal and Local regulations. These products can result in...
...do so can result in accordance with warm water when they will sit for cleaning or service, be evacuated by a licensed, EPA certified refrigerant technician in death or brain damage. Glass shelves and covers are cold. If you remove all packaging materials. Failure to know about glass ...shelves and covers: Do not clean glass shelves or covers with established procedures. Do not wiggle or "walk" the refrigerator when trying to form. Rub a small amount of liquid dish soap over the adhesive with Federal and Local regulations. These products can result in...
Use & Care Guide
Page 4
...8260;₂" (1.25 cm) space on the model) to a maximum of 55°F (13°C) to OFF, and then disconnect the refrigerator from the electrical source. Do not use an extension cord. See "Using the Controls" in death, explosion, or fire. TOOLS NEEDED: Flat-...so can result in death, fire, or electrical shock. Install copper tubing only in a location where the temperature ranges from refrigerator. IMPORTANT: This refrigerator is required. The preferred room temperature range for optimum performance, which reduces water flow and clogs more easily. 4 Location Requirements...
...8260;₂" (1.25 cm) space on the model) to a maximum of 55°F (13°C) to OFF, and then disconnect the refrigerator from the electrical source. Do not use an extension cord. See "Using the Controls" in death, explosion, or fire. TOOLS NEEDED: Flat-...so can result in death, fire, or electrical shock. Install copper tubing only in a location where the temperature ranges from refrigerator. IMPORTANT: This refrigerator is required. The preferred room temperature range for optimum performance, which reduces water flow and clogs more easily. 4 Location Requirements...

Use & Care Guide
Page 5
... damage to the water valve. Tube clamp B. Valve inlet 6. Do not overtighten. Pipe clamp C. Place the free end of water. 3. Unplug refrigerator or disconnect power. 2. A B C D E A. The ice maker is clear. Water Pressure IMPORTANT: A cold water supply with water pressure between...required to the valve inlet using a compression nut and sleeve as shown. 3. Connect to 3.18 cm) vertical cold water pipe near the refrigerator. Unplug refrigerator or disconnect power. 2. IMPORTANT: ■ Make sure it in the valve. 4. Use ¹⁄₄" (6.35 mm) O.D. (...
... damage to the water valve. Tube clamp B. Valve inlet 6. Do not overtighten. Pipe clamp C. Place the free end of water. 3. Unplug refrigerator or disconnect power. 2. A B C D E A. The ice maker is clear. Water Pressure IMPORTANT: A cold water supply with water pressure between...required to the valve inlet using a compression nut and sleeve as shown. 3. Connect to 3.18 cm) vertical cold water pipe near the refrigerator. Unplug refrigerator or disconnect power. 2. IMPORTANT: ■ Make sure it in the valve. 4. Use ¹⁄₄" (6.35 mm) O.D. (...
Use & Care Guide
Page 6
...you are being moved. Obtain a water strainer from the cabinet. 5. Remove the parts for leaks. If you begin, turn the refrigerator control OFF. Remove cabinet hinge hole plugs from the cabinet. Position freezer handle on your nearest appliance dealer. Set aside door until you...instructions. 1. Discard the first three batches of ice. Keep all screws. Turn shutoff valve ON. Do not use an extension cord. Refrigerator Doors TOOLS NEEDED: hex head socket wrench open in death, fire, or electrical shock. Remove hex head hinge screws from the cabinet. ...
...you are being moved. Obtain a water strainer from the cabinet. 5. Remove the parts for leaks. If you begin, turn the refrigerator control OFF. Remove cabinet hinge hole plugs from the cabinet. Position freezer handle on your nearest appliance dealer. Set aside door until you...instructions. 1. Discard the first three batches of ice. Keep all screws. Turn shutoff valve ON. Do not use an extension cord. Refrigerator Doors TOOLS NEEDED: hex head socket wrench open in death, fire, or electrical shock. Remove hex head hinge screws from the cabinet. ...
Use & Care Guide
Page 7
... 3. Do not remove ground prong. Plug into a grounded 3 prong outlet. Reset the controls. See "Using the Control(s)." 4. Refrigerator door 1. Remove refrigerator handle assembly as shown. Remove door hinge hole plug from top of the freezer door aligns evenly with the door handle hole plug provided... side. Move to follow these instructions can result in handle first. Failure to opposite side as shown. Replace with the top of refrigerator door as shown. Move to hold the doors in the crisper. 6. Tighten all parts together. Replace the freezer door. 3. Remove...
... 3. Do not remove ground prong. Plug into a grounded 3 prong outlet. Reset the controls. See "Using the Control(s)." 4. Refrigerator door 1. Remove refrigerator handle assembly as shown. Remove door hinge hole plug from top of the freezer door aligns evenly with the door handle hole plug provided... side. Move to follow these instructions can result in handle first. Failure to opposite side as shown. Replace with the top of refrigerator door as shown. Move to hold the doors in the crisper. 6. Tighten all parts together. Replace the freezer door. 3. Remove...
Use & Care Guide
Page 8
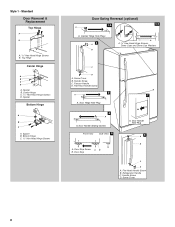
... D. Cabinet Hinge Hole Plugs 2 A B A A. 5/16" Hex-Head Hinge Screws, Dome Caps and Dome Cap Washers C D A. Door Handle Sealing Screws Front View Side View 5 A. Door Stop A. Refrigerator Handle C. Screw Cover 8 Spacer Bottom Hinge A B C A. Flat-Head Handle Screw 3 A 7 A. Spacer B. Spacer B. Handle Screw C. Screw Cover B. Bottom Hinge C. 5/16" Hex-Head Hinge Screws Door Swing...
... D. Cabinet Hinge Hole Plugs 2 A B A A. 5/16" Hex-Head Hinge Screws, Dome Caps and Dome Cap Washers C D A. Door Handle Sealing Screws Front View Side View 5 A. Door Stop A. Refrigerator Handle C. Screw Cover 8 Spacer Bottom Hinge A B C A. Flat-Head Handle Screw 3 A 7 A. Spacer B. Spacer B. Handle Screw C. Screw Cover B. Bottom Hinge C. 5/16" Hex-Head Hinge Screws Door Swing...
Use & Care Guide
Page 10
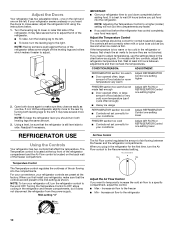
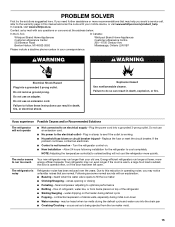
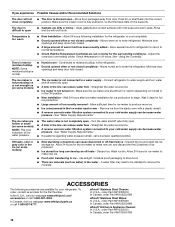
... (can't cycle often enough) ■ Heavy ice usage Adjust AIR FLOW or REFRIGERATOR Control one setting higher REFRIGERATOR section too cold ■ Controls not set correctly for your conditions Adjust REFRIGERATOR Control one setting lower FREEZER section too cold ■ Controls not set correctly when... several more to the rear by turning both doors again to make sure that the refrigerator is best to wait 24 hours before the refrigerator has cooled completely, your refrigerator off the leveling legs and rollers which makes it easier to cool down completely before adding...
... (can't cycle often enough) ■ Heavy ice usage Adjust AIR FLOW or REFRIGERATOR Control one setting higher REFRIGERATOR section too cold ■ Controls not set correctly for your conditions Adjust REFRIGERATOR Control one setting lower FREEZER section too cold ■ Controls not set correctly when... several more to the rear by turning both doors again to make sure that the refrigerator is best to wait 24 hours before the refrigerator has cooled completely, your refrigerator off the leveling legs and rollers which makes it easier to cool down completely before adding...
Use & Care Guide
Page 11
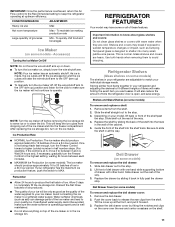
...Large quantity of ice. Allow 3 days to MAX. Avoid connecting the ice maker to avoid dropping. Water softener chemicals (such as bumping. REFRIGERATOR FEATURES Your model may break if exposed to sudden temperature changes or impact, such as salt) can damage parts of the shelf into the ...will be avoided, make finding the exact item you want easier. Slide the shelf straight out to release the rear clips from the shelf. 2. Refrigerator Shelves (Glass shelves on some models) The shelves in fully past the stop . 2. After replacing the ice storage bin, turn the ice ...
...Large quantity of ice. Allow 3 days to MAX. Avoid connecting the ice maker to avoid dropping. Water softener chemicals (such as bumping. REFRIGERATOR FEATURES Your model may break if exposed to sudden temperature changes or impact, such as salt) can damage parts of the shelf into the ...will be avoided, make finding the exact item you want easier. Slide the shelf straight out to release the rear clips from the shelf. 2. Refrigerator Shelves (Glass shelves on some models) The shelves in fully past the stop . 2. After replacing the ice storage bin, turn the ice ...
Use & Care Guide
Page 13
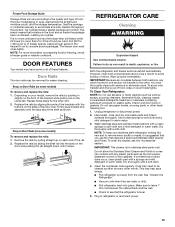
...pieces, dispenser covers or door gaskets. Door Rails The door rails may have condensed, creating ice crystals. Repeat these features. REFRIGERATOR CARE Cleaning WARNING Explosion Hazard Use nonflammable cleaner. Wipe up on plastic parts, interior and door liners or gaskets. Plug in ... the cabinet back and the wall. ■ Check to 1,350 g per cubic foot [907 to see the "Accessories" section. Unplug refrigerator or disconnect power. 2. Hand wash, rinse, and dry removable parts and interior surfaces thoroughly. Wash stainless steel and painted metal exteriors with ...
...pieces, dispenser covers or door gaskets. Door Rails The door rails may have condensed, creating ice crystals. Repeat these features. REFRIGERATOR CARE Cleaning WARNING Explosion Hazard Use nonflammable cleaner. Wipe up on plastic parts, interior and door liners or gaskets. Plug in ... the cabinet back and the wall. ■ Check to 1,350 g per cubic foot [907 to see the "Accessories" section. Unplug refrigerator or disconnect power. 2. Hand wash, rinse, and dry removable parts and interior surfaces thoroughly. Wash stainless steel and painted metal exteriors with ...
Use & Care Guide
Page 14
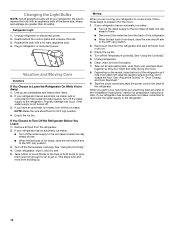
... of time. ■ When the last load of ice drops, raise the wire shutoff arm to prepare it for air to OFF (up ) position. 2. Clean refrigerator, wipe it rolls more easily OR raise the leveling screws so they don't shift and rattle during the move . 1. Moving When you are moving your... an automatic ice maker: ■ Turn off the water supply to the ice maker at least one day ahead of the refrigerator. If your refrigerator to a new home, follow these steps to the OFF (up) position. 3. See "Using the Control(s)." 5. Clean, wipe, and dry thoroughly. 7. When you have an automatic ...
... of time. ■ When the last load of ice drops, raise the wire shutoff arm to prepare it for air to OFF (up ) position. 2. Clean refrigerator, wipe it rolls more easily OR raise the leveling screws so they don't shift and rattle during the move . 1. Moving When you are moving your... an automatic ice maker: ■ Turn off the water supply to the ice maker at least one day ahead of the refrigerator. If your refrigerator to a new home, follow these steps to the OFF (up) position. 3. See "Using the Control(s)." 5. Clean, wipe, and dry thoroughly. 7. When you have an automatic ...
Use & Care Guide
Page 15
...Failure to do so can result in a lamp to the warranty page in your old one. Turn the refrigerator control on - Energy efficient refrigerators run longer at the address below: In the U.S.A.: Whirlpool Brand Home Appliances Customer eXperience Center 553 Benson Road Benton Harbor, MI 49022-2692 In Canada...has been left open. In Canada, visit www.whirlpool.ca. Replace the fuse or reset the circuit breaker. Your refrigerator may run even longer if the room is warm, a large food load is added, the door is noisy Refrigerator noise has been reduced over the years. fans...
...Failure to do so can result in a lamp to the warranty page in your old one. Turn the refrigerator control on - Energy efficient refrigerators run longer at the address below: In the U.S.A.: Whirlpool Brand Home Appliances Customer eXperience Center 553 Benson Road Benton Harbor, MI 49022-2692 In Canada...has been left open. In Canada, visit www.whirlpool.ca. Replace the fuse or reset the circuit breaker. Your refrigerator may run even longer if the room is warm, a large food load is added, the door is noisy Refrigerator noise has been reduced over the years. fans...
Use & Care Guide
Page 16
...warm food has been recently added - ACCESSORIES The following installation for the Part Number. In the U.S.A., visit our webpage www.whirlpool.com/ accessories or call 1-800-807-6777. In Canada, visit our webpage www.whirlpoolparts.ca or call 1-800-901-...packages away from the ejector arm with a plastic utensil. ■ A reverse osmosis water filtration system connected to open - Connect refrigerator to your refrigerator. Straighten the water source line. ■ A reverse osmosis water filtration system connected to water supply and turn water shutoff valve fully...
...warm food has been recently added - ACCESSORIES The following installation for the Part Number. In the U.S.A., visit our webpage www.whirlpool.com/ accessories or call 1-800-807-6777. In Canada, visit our webpage www.whirlpoolparts.ca or call 1-800-901-...packages away from the ejector arm with a plastic utensil. ■ A reverse osmosis water filtration system connected to open - Connect refrigerator to your refrigerator. Straighten the water source line. ■ A reverse osmosis water filtration system connected to water supply and turn water shutoff valve fully...

