

Use & Care Guide
Page 6
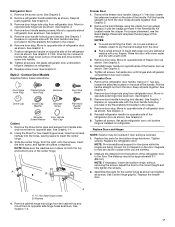
... Hinges." ■ Flat-blade screwdriver IMPORTANT: ■ Before you may have standard (Style 1) or contoured (Style 2) doors. Position freezer handle on opposite side of this section after "Final Steps." Align upper portion of liquid dish soap over any adhesive residue with your model, you ...warm water and dry with the badge provided in Top Hinge graphic. Tighten all parts together. Door Stop Screw Door Handle Sealing Screw Flat-Head Handle Screw Door Handle Hole Plug Door Hinge Hole Plug Cabinet Hinge Hole Plug Dome Cap Dome Cap Washer Cabinet 1. See Graphic 1-1. ...
... Hinges." ■ Flat-blade screwdriver IMPORTANT: ■ Before you may have standard (Style 1) or contoured (Style 2) doors. Position freezer handle on opposite side of this section after "Final Steps." Align upper portion of liquid dish soap over any adhesive residue with your model, you ...warm water and dry with the badge provided in Top Hinge graphic. Tighten all parts together. Door Stop Screw Door Handle Sealing Screw Flat-Head Handle Screw Door Handle Hole Plug Door Hinge Hole Plug Cabinet Hinge Hole Plug Dome Cap Dome Cap Washer Cabinet 1. See Graphic 1-1. ...
Use & Care Guide
Page 7
...185;⁄₈" hex key, loosen the setscrew located on opposite side of liquid dish soap over any adhesive residue with the door handle hole plug provided in the Reversibility Kit located in place on refrigerator. 9. See Graphic 6. 2. Remove door stop . Measure the...lower portion of the center hinge. See Graphic 4. 4. A B Freezer Door 1. Replace the refrigerator door. See Graphic 4. 5. Remove the refrigerator door handle. See Graphic 4. 5. See Graphic 6. 3. See Graphic 6. Contour Door Models Graphics follow these instructions. See Graphic 6. Assemble the parts for the ...
...185;⁄₈" hex key, loosen the setscrew located on opposite side of liquid dish soap over any adhesive residue with the door handle hole plug provided in the Reversibility Kit located in place on refrigerator. 9. See Graphic 6. 2. Remove door stop . Measure the...lower portion of the center hinge. See Graphic 4. 4. A B Freezer Door 1. Replace the refrigerator door. See Graphic 4. 5. Remove the refrigerator door handle. See Graphic 4. 5. See Graphic 6. 3. See Graphic 6. Contour Door Models Graphics follow these instructions. See Graphic 6. Assemble the parts for the ...
Use & Care Guide
Page 9
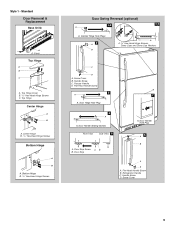
... Screws C. Cabinet Hinge Hole Plugs 2 A B A A. 5/16" Hex-Head Hinge Screws, Dome Caps and Dome Cap Washers C D A. Flat-Head Handle Screw 3 A 7 A. Refrigerator Handle C. Center Hinge B. 5/16" Hex-Head Hinge Screws Bottom Hinge A B A. Screw Cover 9 Door Handle Hole Plug 6 A B C D A. Screw Cover B. Door Stop A. Bottom Hinge B. 5/16" Hex-Head Hinge Screws Door Swing Reversal (optional) 1-2 1-1 A A. Flat...
... Screws C. Cabinet Hinge Hole Plugs 2 A B A A. 5/16" Hex-Head Hinge Screws, Dome Caps and Dome Cap Washers C D A. Flat-Head Handle Screw 3 A 7 A. Refrigerator Handle C. Center Hinge B. 5/16" Hex-Head Hinge Screws Bottom Hinge A B A. Screw Cover 9 Door Handle Hole Plug 6 A B C D A. Screw Cover B. Door Stop A. Bottom Hinge B. 5/16" Hex-Head Hinge Screws Door Swing Reversal (optional) 1-2 1-1 A A. Flat...
Use & Care Guide
Page 10
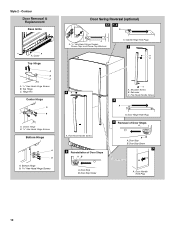
... Door Stops A B A. Setscrew C. Door Hinge Hole Plug 4 Removal of Door Stops AB 3 A C A. Hinge Pin Center Hinge A B A. Flat-Head Handle Screw A. Center Hinge B. 5/16" Hex-Head Hinge Screws Bottom Hinge A B A. Shoulder Screw B. Cabinet Hinge Hole Plugs 2 A B 6A A. Door Stop ...Screw 7 A. Cover Top Hinge A B C A. 5/16" Hex-Head Hinge Screws B. Door Stop B. Door Handle Hole Plug 10 Door Stop B. Bottom Hinge Door Swing Reversal (optional) 1-1 1-2 A A A. 5/16" Hex-Head Hinge Screws, Dome Caps and Dome Cap Washers A....
... Door Stops A B A. Setscrew C. Door Hinge Hole Plug 4 Removal of Door Stops AB 3 A C A. Hinge Pin Center Hinge A B A. Flat-Head Handle Screw A. Center Hinge B. 5/16" Hex-Head Hinge Screws Bottom Hinge A B A. Shoulder Screw B. Cabinet Hinge Hole Plugs 2 A B 6A A. Door Stop ...Screw 7 A. Cover Top Hinge A B C A. 5/16" Hex-Head Hinge Screws B. Door Stop B. Door Handle Hole Plug 10 Door Stop B. Bottom Hinge Door Swing Reversal (optional) 1-1 1-2 A A A. 5/16" Hex-Head Hinge Screws, Dome Caps and Dome Cap Washers A....

Use & Care Guide
Page 11
...the top hinge cover. Using the cutout as a guide, press the brand badge onto the freezer door making sure that side of User Instructions) Door handle hole plug Tools Needed: Scissors Masking tape Freezer Door 1. Replace the base grille. Door Aligning If the space between the doors while you should turn...comply with a soft cloth. 3. Turn the leveling screw to the right to left . Replace the top hinge cover, if removed in the door, where the handle was, will be within the cutout of the refrigerator takes some weight off the leveling screws and rollers which are at the base of the...
...the top hinge cover. Using the cutout as a guide, press the brand badge onto the freezer door making sure that side of User Instructions) Door handle hole plug Tools Needed: Scissors Masking tape Freezer Door 1. Replace the base grille. Door Aligning If the space between the doors while you should turn...comply with a soft cloth. 3. Turn the leveling screw to the right to left . Replace the top hinge cover, if removed in the door, where the handle was, will be within the cutout of the refrigerator takes some weight off the leveling screws and rollers which are at the base of the...

Dimension Guide
Page 1
... REQUIREMENTS 1/2" (1.25 cm) To ensure proper ventilation for the door to be a minimum of Door Open With Cabinet 90° Handles "B" "C" "D" Depth Without Handles "E" Depth Cabinet Only "F" Width Cabinet "G" WRT311FZD 20.5 cu. See "Using the Controls." Depth - Reverse Osmosis Water Supply: If...qualified plumber. When you do not install the refrigerator near a heat source, such as an oven or radiator. 2" (5.08 cm) Because Whirlpool Corporation policy includes a continuous commitment to be between 60°F (15°C) and 90°F (32°C). ft. Depth - ...
... REQUIREMENTS 1/2" (1.25 cm) To ensure proper ventilation for the door to be a minimum of Door Open With Cabinet 90° Handles "B" "C" "D" Depth Without Handles "E" Depth Cabinet Only "F" Width Cabinet "G" WRT311FZD 20.5 cu. See "Using the Controls." Depth - Reverse Osmosis Water Supply: If...qualified plumber. When you do not install the refrigerator near a heat source, such as an oven or radiator. 2" (5.08 cm) Because Whirlpool Corporation policy includes a continuous commitment to be between 60°F (15°C) and 90°F (32°C). ft. Depth - ...


