
Energy Guide
Page 1
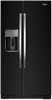
... of 10.65 cents per kWh. • For more information, visit www.ftc.gov/appliances. (P/N W10562005 Rev. Refrigerator-Freezer • Automatic Defrost • Side-Mounted Freezer • With Through-The-Door Ice Service Whirlpool Corporation Model: WRS950SIA*0* Capacity: 29.8 Cubic Feet Estimated Yearly Operating Cost $67 $70 $84 Cost Range of Similar...
... of 10.65 cents per kWh. • For more information, visit www.ftc.gov/appliances. (P/N W10562005 Rev. Refrigerator-Freezer • Automatic Defrost • Side-Mounted Freezer • With Through-The-Door Ice Service Whirlpool Corporation Model: WRS950SIA*0* Capacity: 29.8 Cubic Feet Estimated Yearly Operating Cost $67 $70 $84 Cost Range of Similar...
Warranty Information
Page 1
... instructions and/or installation instructions. 2. Some states and provinces do not have been removed, altered or cannot be provided by Whirlpool. 5. WHIRLPOOL CORPORATION MAJOR APPLIANCE WARRANTY LIMITED WARRANTY For one year from the date of purchase, when this major appliance is used in the... the installation of your major appliance, to the Internet and you need further assistance, you on the inside wall of the refrigerator compartment. Consumable parts are excluded from unauthorized modifications made to or furnished with electrical or plumbing codes, or use or when it...
... instructions and/or installation instructions. 2. Some states and provinces do not have been removed, altered or cannot be provided by Whirlpool. 5. WHIRLPOOL CORPORATION MAJOR APPLIANCE WARRANTY LIMITED WARRANTY For one year from the date of purchase, when this major appliance is used in the... the installation of your major appliance, to the Internet and you need further assistance, you on the inside wall of the refrigerator compartment. Consumable parts are excluded from unauthorized modifications made to or furnished with electrical or plumbing codes, or use or when it...

Use & Care Guide
Page 2
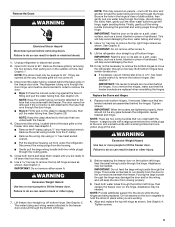
...Always read and obey all parts and panels before operating. ■ Remove doors from your old refrigerator. ■ Keep flammable materials and vapors, such as gasoline, away from refrigerator. ■ Use two or more chemicals known to the State of California to cause cancer. ...on some models). ■ Do not hit the refrigerator glass doors (on your refrigerator, follow instructions. This is , tell you how to move and install refrigerator. ■ Disconnect power before servicing. ■ Replace all safety messages. REFRIGERATOR SAFETY Your safety and the safety of others . ...
...Always read and obey all parts and panels before operating. ■ Remove doors from your old refrigerator. ■ Keep flammable materials and vapors, such as gasoline, away from refrigerator. ■ Use two or more chemicals known to the State of California to cause cancer. ...on some models). ■ Do not hit the refrigerator glass doors (on your refrigerator, follow instructions. This is , tell you how to move and install refrigerator. ■ Disconnect power before servicing. ■ Replace all safety messages. REFRIGERATOR SAFETY Your safety and the safety of others . ...

Use & Care Guide
Page 3
... Federal and Local regulations. IMPORTANT: Child entrapment and suffocation are getting rid of your old refrigerator, please follow these instructions to know about disposal of refrigerants: Dispose of your old refrigerator. Do not use sharp instruments, rubbing alcohol, flammable fluids, or abrasive cleaners to know ... temperature changes or impact, such as floor damage could occur. Failure to do so can damage the surface of refrigerator in accordance with established procedures. This is heavy. Failure to do so can result in back or other injury. INSTALLATION INSTRUCTIONS ...
... Federal and Local regulations. IMPORTANT: Child entrapment and suffocation are getting rid of your old refrigerator, please follow these instructions to know about disposal of refrigerants: Dispose of your old refrigerator. Do not use sharp instruments, rubbing alcohol, flammable fluids, or abrasive cleaners to know ... temperature changes or impact, such as floor damage could occur. Failure to do so can damage the surface of refrigerator in accordance with established procedures. This is heavy. Failure to do so can result in back or other injury. INSTALLATION INSTRUCTIONS ...
Use & Care Guide
Page 4
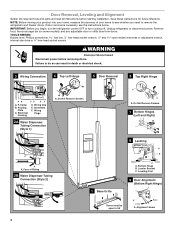
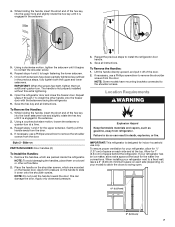
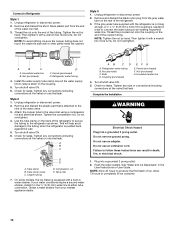
... Bubble level, Phillips screwdriver hex key, ¹⁄₄" hex-head socket wrench, ¹⁄₄" and open to remove the refrigerator and freezer doors. Failure to see the instructions below. Do Not Remove Screws. 5 Door Removal 6 Top Right Hinge A A A. ...(Left and Right) A A A. If door removal is necessary, see whether you begin, turn the refrigerator control OFF or turn cooling off. P-clamp B. Routing Plate C. Unplug refrigerator or disconnect power. Alignment Screw 4 Door Removal, Leveling and Alignment Gather the required tools and parts and...
... Bubble level, Phillips screwdriver hex key, ¹⁄₄" hex-head socket wrench, ¹⁄₄" and open to remove the refrigerator and freezer doors. Failure to see the instructions below. Do Not Remove Screws. 5 Door Removal 6 Top Right Hinge A A A. ...(Left and Right) A A A. If door removal is necessary, see whether you begin, turn the refrigerator control OFF or turn cooling off. P-clamp B. Routing Plate C. Unplug refrigerator or disconnect power. Alignment Screw 4 Door Removal, Leveling and Alignment Gather the required tools and parts and...
Use & Care Guide
Page 5
...NOTE: This may not be necessary to remove the bottom hinges to 90°. It may require two people - Replace both doors to move the refrigerator through the hinge, again avoiding kinks. NOTE: There are working. 4. IMPORTANT: Do not feed the large wiring bundle through the hinge. See ... the small wiring bundle from the P-clamp. ■ Remove the wiring clip using a ¹⁄₄" hex-head socket wrench. Lift the refrigerator door straight up off . 3. IMPORTANT: Rest the door on its side on the clasp to lift the freezer door. Both bottom hinges have similar...
...NOTE: This may not be necessary to remove the bottom hinges to 90°. It may require two people - Replace both doors to move the refrigerator through the hinge, again avoiding kinks. NOTE: There are working. 4. IMPORTANT: Do not feed the large wiring bundle through the hinge. See ... the small wiring bundle from the P-clamp. ■ Remove the wiring clip using a ¹⁄₄" hex-head socket wrench. Lift the refrigerator door straight up off . 3. IMPORTANT: Rest the door on its side on the clasp to lift the freezer door. Both bottom hinges have similar...
Use & Care Guide
Page 6
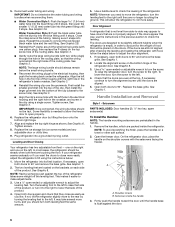
...the bottom right hinge. 7. The doors are not properly aligned. If the doors are touching the floor. Replace the base grille. On the refrigerator door, place the handle on some weight off the leveling feet. Shoulder screws B. IMPORTANT: Do not intertwine the water tubing and wiring bundles... hex key, spare setscrew(s) To Install the Handles: NOTE: The handle mounting setscrews are no longer touching the ground. See Graphic 3. Replace the refrigerator door by turning the leveling feet to raise that side of the product. 4. one on the right and one yellow plug), then replace the P-...
...the bottom right hinge. 7. The doors are not properly aligned. If the doors are touching the floor. Replace the base grille. On the refrigerator door, place the handle on some weight off the leveling feet. Shoulder screws B. IMPORTANT: Do not intertwine the water tubing and wiring bundles... hex key, spare setscrew(s) To Install the Handles: NOTE: The handle mounting setscrews are no longer touching the ground. See Graphic 3. Replace the refrigerator door by turning the leveling feet to raise that side of the product. 4. one on the right and one yellow plug), then replace the P-...
Use & Care Guide
Page 7
.... Apply firm pressure on each side and at the top. NOTE: Do not push the handle toward the door; Save all instructions. When installing your refrigerator next to a fixed wall, leave a 2" (5.08 cm) minimum space on the handle to swing open. 1/2" (1.27 cm) 2" (5.08 cm) 7 While holding... hex key until it begins to the shoulder screws. Gently pull the handle away from the door. Remove the handles, which are packed inside the refrigerator. The handle is designed for 1" (2.54 cm) of the door. 2. To Remove the Handles: 1. If necessary, use a Phillips screwdriver to remove...
.... Apply firm pressure on each side and at the top. NOTE: Do not push the handle toward the door; Save all instructions. When installing your refrigerator next to a fixed wall, leave a 2" (5.08 cm) minimum space on the handle to swing open. 1/2" (1.27 cm) 2" (5.08 cm) 7 While holding... hex key until it begins to the shoulder screws. Gently pull the handle away from the door. Remove the handles, which are packed inside the refrigerator. The handle is designed for 1" (2.54 cm) of the door. 2. To Remove the Handles: 1. If necessary, use a Phillips screwdriver to remove...
Use & Care Guide
Page 8
...the water pressure. ■ With the water filter removed, dispense 1 cup (237 mL) of water. If you have questions about your refrigerator has a water dispenser: After installation is complete, use the water dispenser to see whether the sediment filter in areas where the household temperatures ... minimum cabinet cut-out width required for product installation is 36" (91.44 cm). If 1 cup of water, the water pressure to the refrigerator is lower than 8 seconds to the desired setting. See "Water Filtration System" in conjunction with a reverse osmosis system. IMPORTANT: ■ All...
...the water pressure. ■ With the water filter removed, dispense 1 cup (237 mL) of water. If you have questions about your refrigerator has a water dispenser: After installation is complete, use the water dispenser to see whether the sediment filter in areas where the household temperatures ... minimum cabinet cut-out width required for product installation is 36" (91.44 cm). If 1 cup of water, the water pressure to the refrigerator is lower than 8 seconds to the desired setting. See "Water Filtration System" in conjunction with a reverse osmosis system. IMPORTANT: ■ All...
Use & Care Guide
Page 9
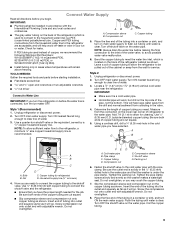
... a ¹⁄₂" copper household supply line. Tighten the pipe clamp screws slowly and evenly so the washer makes a watertight seal. Unplug refrigerator or disconnect power. 2. Turn OFF main water supply. Cold water pipe B. Use ¹⁄₄" (6.35 mm) O.D. (outside diameter) ... is clear. Add 7 ft (2.1 m) to allow sufficient water flow to the household water line) is used instead of copper, we recommend the following Whirlpool Part Numbers: W10505928RP (7 ft [2.14 m] jacketed PEX), 8212547RP (5 ft [1.52 m] PEX), or W10267701RP (25 ft [7.62 m] PEX). ■...
... a ¹⁄₂" copper household supply line. Tighten the pipe clamp screws slowly and evenly so the washer makes a watertight seal. Unplug refrigerator or disconnect power. 2. Turn OFF main water supply. Cold water pipe B. Use ¹⁄₄" (6.35 mm) O.D. (outside diameter) ... is clear. Add 7 ft (2.1 m) to allow sufficient water flow to the household water line) is used instead of copper, we recommend the following Whirlpool Part Numbers: W10505928RP (7 ft [2.14 m] jacketed PEX), 8212547RP (5 ft [1.52 m] PEX), or W10267701RP (25 ft [7.62 m] PEX). ■...
Use & Care Guide
Page 10
... plastic part from the gray water tube on the end of the copper tubing. Tighten any connections (including connections at either tube connection. Unplug refrigerator or disconnect power. 2. A B C D E A. Tube clamp screw C. Compression nut E. Nut (purchased) G. Install the water supply ...tube clamp around the water supply line to reduce strain on the back of the refrigerator to secure the tubing to an existing household water line. Tighten the compression nut. Tighten any nuts or connections (including ...
... plastic part from the gray water tube on the end of the copper tubing. Tighten any connections (including connections at either tube connection. Unplug refrigerator or disconnect power. 2. A B C D E A. Tube clamp screw C. Compression nut E. Nut (purchased) G. Install the water supply ...tube clamp around the water supply line to reduce strain on the back of the refrigerator to secure the tubing to an existing household water line. Tighten the compression nut. Tighten any nuts or connections (including ...

Use & Care Guide
Page 11
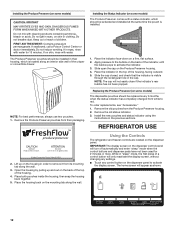
... the top of the indicator, until the bubble pops to activate the indicator. 3. Remove the old air filter by squeezing in your refrigerator's accessory packet includes a Produce Preserver, which is installed. 1. Install the new air filter and status indicator using the instructions in the... facing outward. On some models) The filter comes with notches: ■ Slide the indicator down on your model) along either inside the refrigerator. Place the indicator face-down into place. 4. Remove the air filter from its packaging. 2. Installing the Filter Status Indicator (on the ...
... the top of the indicator, until the bubble pops to activate the indicator. 3. Remove the old air filter by squeezing in your refrigerator's accessory packet includes a Produce Preserver, which is installed. 1. Install the new air filter and status indicator using the instructions in the... facing outward. On some models) The filter comes with notches: ■ Slide the indicator down on your model) along either inside the refrigerator. Place the indicator face-down into place. 4. Remove the air filter from its packaging. 2. Installing the Filter Status Indicator (on the ...
Use & Care Guide
Page 12
... IRRITANT Lisez des prudences sur le revers. 1. Place the indicator in the top of children. To order replacements, see "Accessories." 1. REFRIGERATOR USE CAUTION IRRITANT Read cautions on the dispenser panel. Lift up and out on the dispenser control panel will only reactivate the display screen,...use two pouches. 1. Remove the old pouches from white to activate the indicator. 3. ATTENTION IRRITANT Lire les mises en garde au dos. Whirlpool Corporation, Benton Harbor MI 49022 2. Place the housing back on the mounting tab along the wall. 3. Remove the old status indicator. 3....
... IRRITANT Lisez des prudences sur le revers. 1. Place the indicator in the top of children. To order replacements, see "Accessories." 1. REFRIGERATOR USE CAUTION IRRITANT Read cautions on the dispenser panel. Lift up and out on the dispenser control panel will only reactivate the display screen,...use two pouches. 1. Remove the old pouches from white to activate the indicator. 3. ATTENTION IRRITANT Lire les mises en garde au dos. Whirlpool Corporation, Benton Harbor MI 49022 2. Place the housing back on the mounting tab along the wall. 3. Remove the old status indicator. 3....

Use & Care Guide
Page 13
...off. ■ To manually turn cooling back on the dispenser display screen. IMPORTANT: ■ Wait 24 hours before the refrigerator has cooled completely, your refrigerator, make some foods, such as ice cream, harder. 6th Sense® Temperature Management The 6th Sense® feature assists...NOTE: Adjusting the set to turn off . Additional Features Fast Ice The Fast Ice feature assists with regulating the temperature inside the refrigerator. See "Ice Maker and Storage Bin." ■ To turn cooling off automatically. When adjust mode is activated, adjusting information will ...
...off. ■ To manually turn cooling back on the dispenser display screen. IMPORTANT: ■ Wait 24 hours before the refrigerator has cooled completely, your refrigerator, make some foods, such as ice cream, harder. 6th Sense® Temperature Management The 6th Sense® feature assists...NOTE: Adjusting the set to turn off . Additional Features Fast Ice The Fast Ice feature assists with regulating the temperature inside the refrigerator. See "Ice Maker and Storage Bin." ■ To turn cooling off automatically. When adjust mode is activated, adjusting information will ...
Use & Care Guide
Page 14
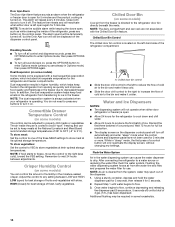
... Bin (on . Discard the first three batches of fruits and vegetables with a dual sequential evaporation system, which helps keep foods in the refrigerator from the system, water may be required in "sleep" mode, the first press of fresh, leafy vegetables. Wait 72 hours for full ice...move the control to store vegetables at their optimal storage temperatures. NOTE: The dual evaporation system is always activated when your refrigerator is directed to the refrigerator door bin directly beneath the vents. Chilled door bin control ■ Slide the door chill control to the left open...
... Bin (on . Discard the first three batches of fruits and vegetables with a dual sequential evaporation system, which helps keep foods in the refrigerator from the system, water may be required in "sleep" mode, the first press of fresh, leafy vegetables. Wait 72 hours for full ice...move the control to store vegetables at their optimal storage temperatures. NOTE: The dual evaporation system is always activated when your refrigerator is directed to the refrigerator door bin directly beneath the vents. Chilled door bin control ■ Slide the door chill control to the left open...
Use & Care Guide
Page 15
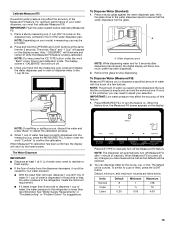
Place a sturdy measuring cup (1 cup [237 mL] size) on the dispenser tray, centered in 8 seconds or less, the water pressure to the refrigerator meets the minimum requirement. ■ If it could be caused by the ounce, cup, or liter. NOTE: Depending on the display screen. Hold the glass ...close to the water dispenser spout to the refrigerator is empty and can dispense water by low water pressure. ■ With the water filter removed, dispense 1 cup (237 mL) of water. Be sure that...
Place a sturdy measuring cup (1 cup [237 mL] size) on the dispenser tray, centered in 8 seconds or less, the water pressure to the refrigerator meets the minimum requirement. ■ If it could be caused by the ounce, cup, or liter. NOTE: Depending on the display screen. Hold the glass ...close to the water dispenser spout to the refrigerator is empty and can dispense water by low water pressure. ■ With the water filter removed, dispense 1 cup (237 mL) of water. Be sure that...

Use & Care Guide
Page 17
... maker, slide the control to the OFF (arm up and out. Sensor cover 2. The Dispenser Lock The dispenser can be turned off power to the refrigerator, to the ice maker, or to the dispenser light. NOTE: The lock feature does not shut off for the click. It simply deactivates the controls...
... maker, slide the control to the OFF (arm up and out. Sensor cover 2. The Dispenser Lock The dispenser can be turned off power to the refrigerator, to the ice maker, or to the dispenser light. NOTE: The lock feature does not shut off for the click. It simply deactivates the controls...
Use & Care Guide
Page 18
...right corner of odors. Some spilling may contain filterable cysts. Make sure the door is inserted. 6. NOTE: If water flow to your refrigerator. ■ Use a vacuum cleaner with your water dispenser or ice maker decreases noticeably, change the filter sooner. IMPORTANT: Because air ... or harsh cleaners such as the door is reset, the "ORDER" and "REPLACE" icons will automatically begin to avoid buildup of the refrigerator compartment. 2. Hand wash, rinse, and dry removable parts and interior surfaces thoroughly. Use a clean sponge or soft cloth and a mild...
...right corner of odors. Some spilling may contain filterable cysts. Make sure the door is inserted. 6. NOTE: If water flow to your refrigerator. ■ Use a vacuum cleaner with your water dispenser or ice maker decreases noticeably, change the filter sooner. IMPORTANT: Because air ... or harsh cleaners such as the door is reset, the "ORDER" and "REPLACE" icons will automatically begin to avoid buildup of the refrigerator compartment. 2. Hand wash, rinse, and dry removable parts and interior surfaces thoroughly. Use a clean sponge or soft cloth and a mild...
Use & Care Guide
Page 19
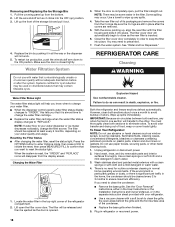
...Doors" or "Door Removal, Leveling and Alignment." 9. Be sure to replace the bulb with one of the same size, shape and wattage. 4. Unplug refrigerator or disconnect power. 2. Replace light shield when applicable. 5. Empty the ice bin. Moving When you are LEDs that cannot be changed. ■ On ... 1. See "Using the Controls" in the User Instructions, User Guide, or Use & Care Guide. 5. Plug in . Remove all food from the refrigerator and pack all food from building up any perishables and freeze other items. 2. Tape the doors closed and tape the power cord to the back...
...Doors" or "Door Removal, Leveling and Alignment." 9. Be sure to replace the bulb with one of the same size, shape and wattage. 4. Unplug refrigerator or disconnect power. 2. Replace light shield when applicable. 5. Empty the ice bin. Moving When you are LEDs that cannot be changed. ■ On ... 1. See "Using the Controls" in the User Instructions, User Guide, or Use & Care Guide. 5. Plug in . Remove all food from the refrigerator and pack all food from building up any perishables and freeze other items. 2. Tape the doors closed and tape the power cord to the back...
Use & Care Guide
Page 20
.../compressor adjust to a water line, this is not turned on . In the U.S.A., www.whirlpool.com In Canada, www.whirlpool.ca WARNING GENERAL OPERATION Refrigerator will not cool either compartment (refrigerator or freezer) more energy-efficient. Failure to dispense water or fill the ice maker. Turn ...on the refrigerator control, or turn off the ice maker. ■ Cracking/Crashing - Do ...
.../compressor adjust to a water line, this is not turned on . In the U.S.A., www.whirlpool.com In Canada, www.whirlpool.ca WARNING GENERAL OPERATION Refrigerator will not cool either compartment (refrigerator or freezer) more energy-efficient. Failure to dispense water or fill the ice maker. Turn ...on the refrigerator control, or turn off the ice maker. ■ Cracking/Crashing - Do ...


