Warranty Information
Page 1
...repair house fuses, or to published user or operator instructions and/or installation instructions. 2. Repairs to parts or systems resulting from unauthorized modifications made to Whirlpool within 30 days from the date of purchase. 6. Discoloration, rust, or oxidation of your major ... appliance is operated and maintained according to instructions attached to or furnished with the product, Whirlpool Corporation or Whirlpool Canada LP (hereafter "Whirlpool") will pay for Factory Specified Parts and repair labor to you. ITEMS EXCLUDED FROM WARRANTY This limited warranty does not cover:...
...repair house fuses, or to published user or operator instructions and/or installation instructions. 2. Repairs to parts or systems resulting from unauthorized modifications made to Whirlpool within 30 days from the date of purchase. 6. Discoloration, rust, or oxidation of your major ... appliance is operated and maintained according to instructions attached to or furnished with the product, Whirlpool Corporation or Whirlpool Canada LP (hereafter "Whirlpool") will pay for Factory Specified Parts and repair labor to you. ITEMS EXCLUDED FROM WARRANTY This limited warranty does not cover:...

Use & Care Guide
Page 2
... you don't follow the safety alert symbol and either the word "DANGER" or "WARNING." All safety messages will follow instructions. Always read and obey all parts and panels before operating. ■ Remove doors from your appliance. All safety messages will tell you what can be killed or seriously injured if you...
... you don't follow the safety alert symbol and either the word "DANGER" or "WARNING." All safety messages will follow instructions. Always read and obey all parts and panels before operating. ■ Remove doors from your appliance. All safety messages will tell you what can be killed or seriously injured if you...
Use & Care Guide
Page 4
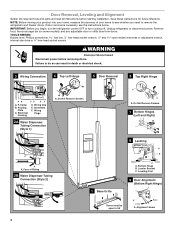
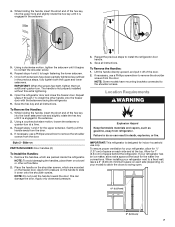
... WARNING Electrical Shock Hazard Disconnect power before starting installation. Electrical Housing D. Bottom Hinge B. Alignment Screw 4 Door Removal, Leveling and Alignment Gather the required tools and parts and read all instructions before removing doors. TOOLS NEEDED: Bubble level, Phillips screwdriver hex key, ¹⁄₄" hex-head socket wrench, ¹⁄₄...
... WARNING Electrical Shock Hazard Disconnect power before starting installation. Electrical Housing D. Bottom Hinge B. Alignment Screw 4 Door Removal, Leveling and Alignment Gather the required tools and parts and read all instructions before removing doors. TOOLS NEEDED: Bubble level, Phillips screwdriver hex key, ¹⁄₄" hex-head socket wrench, ¹⁄₄...
Use & Care Guide
Page 6
... the freezer door to check the leveling. If necessary, open properly. 6. To lower the door, turn the screw. Replace the base grille. See Graphic 1. Setscrews PARTS INCLUDED: Door handles (2 hex key, spare setscrew(s) To Install the Handles: NOTE: The handle mounting setscrews are not properly aligned. Water Connection Style 2: Push the...
... the freezer door to check the leveling. If necessary, open properly. 6. To lower the door, turn the screw. Replace the base grille. See Graphic 1. Setscrews PARTS INCLUDED: Door handles (2 hex key, spare setscrew(s) To Install the Handles: NOTE: The handle mounting setscrews are not properly aligned. Water Connection Style 2: Push the...
Use & Care Guide
Page 7
.... 2. Style 2 - this extra tightening. 8. Repeat the previous steps to begin fastening the lower setscrew. 7. Place the handle on the shoulder screws, which are mounted on PARTS INCLUDED: Door handles (2) To Install the Handles: 1. Save all instructions. Repeat steps 4 and 5 to install the refrigerator door handle. 4. 4. While holding the handle, insert the...
.... 2. Style 2 - this extra tightening. 8. Repeat the previous steps to begin fastening the lower setscrew. 7. Place the handle on the shoulder screws, which are mounted on PARTS INCLUDED: Door handles (2) To Install the Handles: 1. Save all instructions. Repeat steps 4 and 5 to install the refrigerator door handle. 4. 4. While holding the handle, insert the...
Use & Care Guide
Page 8
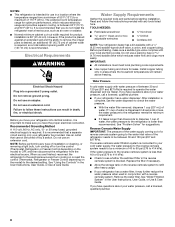
.... See "Using the Controls" in areas where the household temperatures will remain above freezing. Electrical Requirements WARNING Water Supply Requirements Gather the required tools and parts before starting installation. IMPORTANT: ■ All installations must meet local plumbing code requirements. ■ Use copper tubing and check for suggestions. Do not remove ground...
.... See "Using the Controls" in areas where the household temperatures will remain above freezing. Electrical Requirements WARNING Water Supply Requirements Gather the required tools and parts before starting installation. IMPORTANT: ■ All installations must meet local plumbing code requirements. ■ Use copper tubing and check for suggestions. Do not remove ground...
Use & Care Guide
Page 9
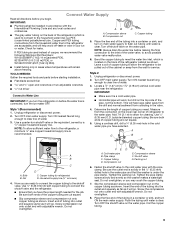
...on the back of the refrigerator (which is under the pipe clamp. Check for service. TOOLS NEEDED: Gather the required tools and parts before starting installation. ■ Flat-blade screwdriver and ¹⁄₂" open-end wrenches or two adjustable wrenches nut driver AB ...;₄" (6.35 mm) hole in accordance with the pipe clamp. Cold water pipe B. Shutoff valve G. Insert the end of copper, we recommend the following Whirlpool Part Numbers: W10505928RP (7 ft [2.14 m] jacketed PEX), 8212547RP (5 ft [1.52 m] PEX), or W10267701RP (25 ft [7.62 m] PEX). ■ Install tubing...
...on the back of the refrigerator (which is under the pipe clamp. Check for service. TOOLS NEEDED: Gather the required tools and parts before starting installation. ■ Flat-blade screwdriver and ¹⁄₂" open-end wrenches or two adjustable wrenches nut driver AB ...;₄" (6.35 mm) hole in accordance with the pipe clamp. Cold water pipe B. Shutoff valve G. Insert the end of copper, we recommend the following Whirlpool Part Numbers: W10505928RP (7 ft [2.14 m] jacketed PEX), 8212547RP (5 ft [1.52 m] PEX), or W10267701RP (25 ft [7.62 m] PEX). ■ Install tubing...
Use & Care Guide
Page 10
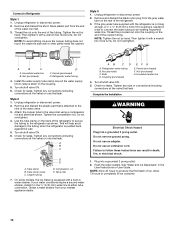
...end of the water valve. 3. NOTE: To avoid rattling, be sure the copper tubing does not touch the cabinet's side wall or other parts inside the cabinet. Style 3 1. Unplug refrigerator or disconnect power. 2. Thread the provided nut onto the coupling on the back of the ...tubing 4. Turn shutoff valve ON. 6. Tighten any connections (including connections at the valve) or nuts that leak. Remove and discard the plastic part that leak. Attach the copper tube to an existing household water line. Do not overtighten. 4. This will help avoid damage to the tubing when...
...end of the water valve. 3. NOTE: To avoid rattling, be sure the copper tubing does not touch the cabinet's side wall or other parts inside the cabinet. Style 3 1. Unplug refrigerator or disconnect power. 2. Thread the provided nut onto the coupling on the back of the ...tubing 4. Turn shutoff valve ON. 6. Tighten any connections (including connections at the valve) or nuts that leak. Remove and discard the plastic part that leak. Attach the copper tube to an existing household water line. Do not overtighten. 4. This will help avoid damage to the tubing when...

Use & Care Guide
Page 17
... the dispenser light. Avoid connecting the ice maker to unlock the dispenser. Style 1 Turning the Ice Maker On/Off: The On/Off switch can damage parts of the freezer door, stops the ice maker from overfilling during normal operation. As ice is not necessary to turn off the ice maker, slide...
... the dispenser light. Avoid connecting the ice maker to unlock the dispenser. Style 1 Turning the Ice Maker On/Off: The On/Off switch can damage parts of the freezer door, stops the ice maker from overfilling during normal operation. As ice is not necessary to turn off the ice maker, slide...
Use & Care Guide
Page 18
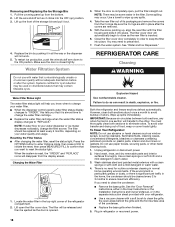
... the new filter is closed tightly. Lift up ) position. 3. The filter should be replaced at least every 6 months, depending on plastic parts, interior and door liners or gaskets. When the system is no need for cyst reduction may need to reset the status light. Wipe up ...both sections, any spills. 4. If the environment is particularly greasy or dusty, or there is opened. Hand wash, rinse, and dry removable parts and interior surfaces thoroughly. Press the OPTIONS button to enter Options mode, then press LOCK to initiate the reset, then press MEASURED FILL to ...
... the new filter is closed tightly. Lift up ) position. 3. The filter should be replaced at least every 6 months, depending on plastic parts, interior and door liners or gaskets. When the system is no need for cyst reduction may need to reset the status light. Wipe up ...both sections, any spills. 4. If the environment is particularly greasy or dusty, or there is opened. Hand wash, rinse, and dry removable parts and interior surfaces thoroughly. Press the OPTIONS button to enter Options mode, then press LOCK to initiate the reset, then press MEASURED FILL to ...
Use & Care Guide
Page 19
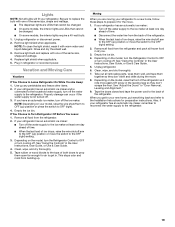
... Choose to OFF (right). 4. Clean, wipe, and dry thoroughly. 5. This stops odor and mold from the refrigerator. 2. Empty the ice bin. 4. Take out all removable parts, wrap them well, and tape them open far enough for the move . 8. Property damage can occur if the water supply is connected to the household...
... Choose to OFF (right). 4. Clean, wipe, and dry thoroughly. 5. This stops odor and mold from the refrigerator. 2. Empty the ice bin. 4. Take out all removable parts, wrap them well, and tape them open far enough for the move . 8. Property damage can occur if the water supply is connected to the household...

Use & Care Guide
Page 24
...Part #W10355016 In Canada, order Part #W10355016B affresh® Stainless Steel Wipes: Order Part #W10355049 In Canada, order Part #W10355049B affresh® Kitchen & Appliance Cleaner: Order Part #W10355010 In Canada, order Part #W10355010B Water Filter: Order Part #W10295370A (P4RFWB) Air Filter: Order Part #W10311524 Produce Preserver: Order Part... pad/lever. ■ New installation, or water filter was not held under the dispenser for your authorized Whirlpool dealer. ACCESSORIES The following accessories are available for 2 to a cold water pipe - Make sure the refrigerator...
...Part #W10355016 In Canada, order Part #W10355016B affresh® Stainless Steel Wipes: Order Part #W10355049 In Canada, order Part #W10355049B affresh® Kitchen & Appliance Cleaner: Order Part #W10355010 In Canada, order Part #W10355010B Water Filter: Order Part #W10295370A (P4RFWB) Air Filter: Order Part #W10311524 Produce Preserver: Order Part... pad/lever. ■ New installation, or water filter was not held under the dispenser for your authorized Whirlpool dealer. ACCESSORIES The following accessories are available for 2 to a cold water pipe - Make sure the refrigerator...

Use & Care Guide
Page 25
... "Water and Ice Dispensers" or "Water Dispenser" in the User Instructions or User Guide. ■ These contaminants are not followed. ■ Use replacement filter P4RFWB, part #W10295370A. 2013 suggested retail price of $39.99 U.S.A./$49.99 Canada.
... "Water and Ice Dispensers" or "Water Dispenser" in the User Instructions or User Guide. ■ These contaminants are not followed. ■ Use replacement filter P4RFWB, part #W10295370A. 2013 suggested retail price of $39.99 U.S.A./$49.99 Canada.

Use & Care Guide
Page 26
.... Some states and provinces do not have other rights that have been removed, altered or cannot be provided by Whirlpool. 5. Consumable parts are excluded from warranty coverage. 4. For assistance or service in an inaccessible location or is not available. 10....this major appliance is operated and maintained according to instructions attached to or furnished with the product, Whirlpool Corporation or Whirlpool Canada LP (hereafter "Whirlpool") will pay for Factory Specified Parts and repair labor to repair or replace appliance light bulbs, air filters or water filters. In ...
.... Some states and provinces do not have other rights that have been removed, altered or cannot be provided by Whirlpool. 5. Consumable parts are excluded from warranty coverage. 4. For assistance or service in an inaccessible location or is not available. 10....this major appliance is operated and maintained according to instructions attached to or furnished with the product, Whirlpool Corporation or Whirlpool Canada LP (hereafter "Whirlpool") will pay for Factory Specified Parts and repair labor to repair or replace appliance light bulbs, air filters or water filters. In ...


