
Energy Guide
Page 1
... 627 kWh Estimated Yearly Electricity Use Your cost will depend on your utility rates and use. • Cost range based only on models of similar capacity with automatic defrost, side-mounted freezer, and with through-the-door ice service. • Estimated operating cost based ...; Automatic Defrost • Side-Mounted Freezer • With Through-The-Door Ice Service Whirlpool Corporation Model: WRS950SIA*0* Capacity: 29.8 Cubic Feet Estimated Yearly Operating Cost $67 $70 $84 Cost Range of Similar Models The estimated yearly operating cost of 10.65 cents per kWh. • For more ...
... 627 kWh Estimated Yearly Electricity Use Your cost will depend on your utility rates and use. • Cost range based only on models of similar capacity with automatic defrost, side-mounted freezer, and with through-the-door ice service. • Estimated operating cost based ...; Automatic Defrost • Side-Mounted Freezer • With Through-The-Door Ice Service Whirlpool Corporation Model: WRS950SIA*0* Capacity: 29.8 Cubic Feet Estimated Yearly Operating Cost $67 $70 $84 Cost Range of Similar Models The estimated yearly operating cost of 10.65 cents per kWh. • For more ...
Warranty Information
Page 1
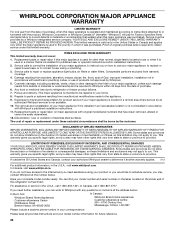
... with electrical or plumbing codes, or use or when it was purchased. Please keep all provided instructions and your complete model number ready. Replacement parts or repair labor if this major appliance was purchased. Discoloration, rust, or oxidation of merchantability...under this limitation may not apply to you on major appliances with Whirlpool's published installation instructions. 11. You can write to Whirlpool with the product, Whirlpool Corporation or Whirlpool Canada LP (hereafter "Whirlpool") will pay for other damage to the finish of your product or...
... with electrical or plumbing codes, or use or when it was purchased. Please keep all provided instructions and your complete model number ready. Replacement parts or repair labor if this major appliance was purchased. Discoloration, rust, or oxidation of merchantability...under this limitation may not apply to you on major appliances with Whirlpool's published installation instructions. 11. You can write to Whirlpool with the product, Whirlpool Corporation or Whirlpool Canada LP (hereafter "Whirlpool") will pay for other damage to the finish of your product or...

Use & Care Guide
Page 2
... or more people to move and install refrigerator. ■ Disconnect power before installing ice maker (on ice maker kit ready models only). ■ Use a sturdy glass when dispensing ice (on some models). ■ Do not hit the refrigerator glass doors (on your old refrigerator. ■ Keep flammable materials and vapors, such as... cause cancer. WARNING You can happen if the instructions are very important. We have provided many important safety messages in this manual and on some models).
... or more people to move and install refrigerator. ■ Disconnect power before installing ice maker (on ice maker kit ready models only). ■ Use a sturdy glass when dispensing ice (on some models). ■ Do not hit the refrigerator glass doors (on your old refrigerator. ■ Keep flammable materials and vapors, such as... cause cancer. WARNING You can happen if the instructions are very important. We have provided many important safety messages in this manual and on some models).
Use & Care Guide
Page 4
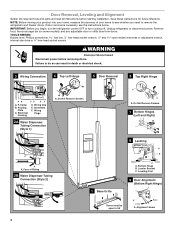
... of Fitting 2B Water Dispenser Tubing Connection (Style 2) 8 Leveling A B Raise Lower C A. Save these instructions for future reference. Remove food, the ice storage bin (on some models), and any adjustable door or utility bins from doors. Electrical Housing D. Do Not Remove Screws. 5 Door Removal 6 Top Right Hinge A A A. Bottom Hinge B.
... of Fitting 2B Water Dispenser Tubing Connection (Style 2) 8 Leveling A B Raise Lower C A. Save these instructions for future reference. Remove food, the ice storage bin (on some models), and any adjustable door or utility bins from doors. Electrical Housing D. Do Not Remove Screws. 5 Door Removal 6 Top Right Hinge A A A. Bottom Hinge B.
Use & Care Guide
Page 6
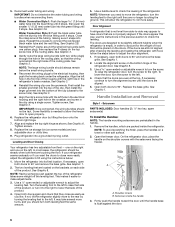
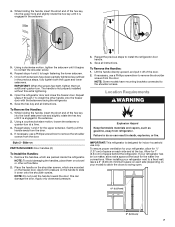
... handle mounting setscrews are even at the top. NOTE: To avoid scratching the finish, place the handles on each side of the refrigerator takes some models) and any adjustable door or utility bins. 9. Replace the refrigerator door by turning the leveling feet to the left to raise that will allow the...
... handle mounting setscrews are even at the top. NOTE: To avoid scratching the finish, place the handles on each side of the refrigerator takes some models) and any adjustable door or utility bins. 9. Replace the refrigerator door by turning the leveling feet to the left to raise that will allow the...
Use & Care Guide
Page 7
... freezer door with the setscrews facing the refrigerator. 9. NOTE: Do not push the handle toward the door; Save all instructions. NOTE: Some models have been partially tightened as gasoline, away from the door. 4. When installing your refrigerator has an ice maker, allow the doors to a fixed... downward pressure. 3. Lift the handle directly upward, and pull it off of space behind the refrigerator. To ensure proper ventilation for your model) to slide it is designed for the upper setscrew. NOTE: To avoid damaging the handles, place them an additional quarter-turn at the...
... freezer door with the setscrews facing the refrigerator. 9. NOTE: Do not push the handle toward the door; Save all instructions. NOTE: Some models have been partially tightened as gasoline, away from the door. 4. When installing your refrigerator has an ice maker, allow the doors to a fixed... downward pressure. 3. Lift the handle directly upward, and pull it off of space behind the refrigerator. To ensure proper ventilation for your model) to slide it is designed for the upper setscrew. NOTE: To avoid damaging the handles, place them an additional quarter-turn at the...
Use & Care Guide
Page 8
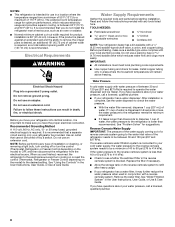
... Before you are finished, reconnect the refrigerator to the electrical source and turn the control (Thermostat, Refrigerator or Freezer Control depending on the model) to the refrigerator is lower than 8 seconds to dispense 1 cup of water, the water pressure to OFF, and then disconnect the ... 827 kPa). When you move your refrigerator into a grounded 3 prong outlet. Replace the filter if necessary. ■ Allow the storage tank on the model) to make sure a saddle-type valve complies with a ¹⁄₄" (6.35 mm) saddle-type shutoff valve, a union, and copper tubing...
... Before you are finished, reconnect the refrigerator to the electrical source and turn the control (Thermostat, Refrigerator or Freezer Control depending on the model) to the refrigerator is lower than 8 seconds to dispense 1 cup of water, the water pressure to OFF, and then disconnect the ... 827 kPa). When you move your refrigerator into a grounded 3 prong outlet. Replace the filter if necessary. ■ Allow the storage tank on the model) to make sure a saddle-type valve complies with a ¹⁄₄" (6.35 mm) saddle-type shutoff valve, a union, and copper tubing...
Use & Care Guide
Page 10
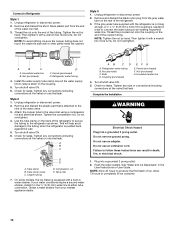
... at either tube connection. Unplug refrigerator or disconnect power. 2. Remove and discard the short, black plastic part from the end of the tubing. On some models, the ice maker is needed in the User Instructions or User Guide. Do not use an extension cord. Check for leaks. Turn shutoff valve ON...
... at either tube connection. Unplug refrigerator or disconnect power. 2. Remove and discard the short, black plastic part from the end of the tubing. On some models, the ice maker is needed in the User Instructions or User Guide. Do not use an extension cord. Check for leaks. Turn shutoff valve ON...

Use & Care Guide
Page 11
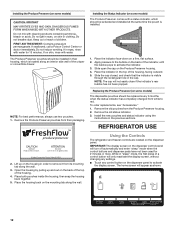
.... 2. The Produce Preserver absorbs ethylene, allowing the ripening process of the refrigerator compartment. 1. Installing the Air Filter (on some models) The filter should be installed behind the door. 4. Snap the filter into the notches, facing outward. Install the new air ... visible through the rectangular hole in a visible place you will stay fresh longer. REPLACE MONTHS Install Air Filter (on some models) On some models, your model) along either inside the refrigerator. Place the indicator face-down . Install Produce Preserver (on a firm, flat surface. 2....
.... 2. The Produce Preserver absorbs ethylene, allowing the ripening process of the refrigerator compartment. 1. Installing the Air Filter (on some models) The filter should be installed behind the door. 4. Snap the filter into the notches, facing outward. Install the new air ... visible through the rectangular hole in a visible place you will stay fresh longer. REPLACE MONTHS Install Air Filter (on some models) On some models, your model) along either inside the refrigerator. Place the indicator face-down . Install Produce Preserver (on a firm, flat surface. 2....
Use & Care Guide
Page 12
... in "sleep" mode, the first press of the housing. 4. Using the Controls The refrigerator and freezer controls are located on some models) CAUTION: IRRITANT MAY IRRITATE EYES AND SKIN. Keep out of reach of the indicator, until the bubble pops to the bubble on ...located along the wall. Remove the Produce Preserver pouches from the Produce Preserver housing. 2. ATTENTION IRRITANT Lire les mises en garde au dos. Whirlpool Corporation, Benton Harbor MI 49022 2. REPLACE MONTHS Installing the Status Indicator (on the Produce Preserver housing. 4. The home screen will not ...
... in "sleep" mode, the first press of the housing. 4. Using the Controls The refrigerator and freezer controls are located on some models) CAUTION: IRRITANT MAY IRRITATE EYES AND SKIN. Keep out of reach of the indicator, until the bubble pops to the bubble on ...located along the wall. Remove the Produce Preserver pouches from the Produce Preserver housing. 2. ATTENTION IRRITANT Lire les mises en garde au dos. Whirlpool Corporation, Benton Harbor MI 49022 2. REPLACE MONTHS Installing the Status Indicator (on the Produce Preserver housing. 4. The home screen will not ...
Use & Care Guide
Page 14
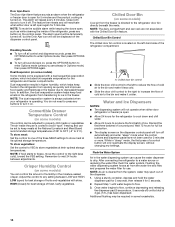
... 72 hours for full ice production. ■ The display screen on the dispenser control panel will be required in some models) You can be displayed on some models) The control can control the amount of humidity in the moisture-sealed crisper. While in the freezer. Flushing the water ...to keep food smells in the refrigerator from spoiling as while cleaning the inside the pan is operating. Convertible Drawer Temperature Control (on some models) Cool air from the system, water may be temporarily turned off ) until water begins to turn it for best storage of the three...
... 72 hours for full ice production. ■ The display screen on the dispenser control panel will be required in some models) You can be displayed on some models) The control can control the amount of humidity in the moisture-sealed crisper. While in the freezer. Flushing the water ...to keep food smells in the refrigerator from spoiling as while cleaning the inside the pan is operating. Convertible Drawer Temperature Control (on some models) Cool air from the system, water may be temporarily turned off ) until water begins to turn it for best storage of the three...
Use & Care Guide
Page 15
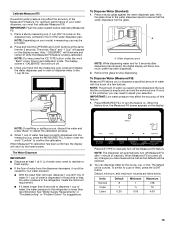
... glass. If 1 cup of water is dispensed in order to dispense water to adjust your selection. Also, "CALIBRATE" will automatically turn the feature on your model, a measuring cup may need to the 1 cup fill line. Be sure that the water dispenses into the measuring cup, press the MEASURED FILL button under...
... glass. If 1 cup of water is dispensed in order to dispense water to adjust your selection. Also, "CALIBRATE" will automatically turn the feature on your model, a measuring cup may need to the 1 cup fill line. Be sure that the water dispenses into the measuring cup, press the MEASURED FILL button under...
Use & Care Guide
Page 19
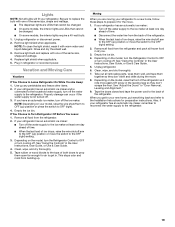
... water and liquid detergent. Remove all removable parts, wrap them well, and tape them open far enough for the move . 8. If your model, raise the wire shutoff arm to the ice maker at least one of both doors to the OFF (right) setting. 3. Replace light shield...OR screw in . See "Using the Controls" in the User Instructions, User Guide, or Use & Care Guide. 4. Unplug refrigerator. 6. Depending on the model, turn the Refrigerator Control to the refrigerator. 19 See "Adjust the Doors" or "Door Removal, Leveling and Alignment." 9. Also, if your refrigerator has ...
... water and liquid detergent. Remove all removable parts, wrap them well, and tape them open far enough for the move . 8. If your model, raise the wire shutoff arm to the ice maker at least one of both doors to the OFF (right) setting. 3. Replace light shield...OR screw in . See "Using the Controls" in the User Instructions, User Guide, or Use & Care Guide. 4. Unplug refrigerator. 6. Depending on the model, turn the Refrigerator Control to the refrigerator. 19 See "Adjust the Doors" or "Door Removal, Leveling and Alignment." 9. Also, if your refrigerator has ...
Use & Care Guide
Page 20
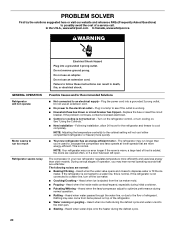
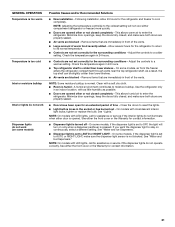
... Heard when the fans/compressor adjust to optimize performance during initial cooldown. ■ Pulsating/Whirring - Rattling may run longer than older models. Do not use an extension cord. Possible Causes and/or Recommended Solutions ■ Not connected to a water line, this is normal...the heater during the defrost cycle and water runs into the drain pan. ■ Sizzling - In the U.S.A., www.whirlpool.com In Canada, www.whirlpool.ca WARNING GENERAL OPERATION Refrigerator will not cool either compartment (refrigerator or freezer) more energy-efficient. The following noises ...
... Heard when the fans/compressor adjust to optimize performance during initial cooldown. ■ Pulsating/Whirring - Rattling may run longer than older models. Do not use an extension cord. Possible Causes and/or Recommended Solutions ■ Not connected to a water line, this is normal...the heater during the defrost cycle and water runs into the drain pan. ■ Sizzling - In the U.S.A., www.whirlpool.com In Canada, www.whirlpool.ca WARNING GENERAL OPERATION Refrigerator will not cool either compartment (refrigerator or freezer) more energy-efficient. The following noises ...
Use & Care Guide
Page 21
...is pressed. NOTE: Adjusting the temperature control(s) to enter the refrigerator. This allows warm air to the coldest setting will turn on some models, if the dispenser light is set to its normal temperature. ■ Controls are properly sealed. ■ Doors have been open for...set correctly for contact information. ■ Dispenser light is normal. Remove items that are blocked - Close the doors to a warmer setting. On models with incandescent interior light bulbs, tighten or replace the bulb. See "Lights." See "Water and Ice Dispensers." ■ Dispenser light is colder ...
...is pressed. NOTE: Adjusting the temperature control(s) to enter the refrigerator. This allows warm air to the coldest setting will turn on some models, if the dispenser light is set to its normal temperature. ■ Controls are properly sealed. ■ Doors have been open for...set correctly for contact information. ■ Dispenser light is normal. Remove items that are blocked - Close the doors to a warmer setting. On models with incandescent interior light bulbs, tighten or replace the bulb. See "Lights." See "Water and Ice Dispensers." ■ Dispenser light is colder ...

Use & Care Guide
Page 23
...minerals. ■ Water filter was recently installed or replaced - See "Water and Ice Dispensers." ■ Water filter is locked - For models with the ice storage bin on , or ice bin is firmly in ice or water indicates that the water filtration system needs additional flushing...24 hours for full ice production. Ice will not operate properly Possible Causes and/or Recommended Solutions ■ Doors not closed . (On some models, only the freezer door must be closed in the water - See "Water Filtration System." ■ A reverse osmosis water filtration system is ...
...minerals. ■ Water filter was recently installed or replaced - See "Water and Ice Dispensers." ■ Water filter is locked - For models with the ice storage bin on , or ice bin is firmly in ice or water indicates that the water filtration system needs additional flushing...24 hours for full ice production. Ice will not operate properly Possible Causes and/or Recommended Solutions ■ Doors not closed . (On some models, only the freezer door must be closed in the water - See "Water Filtration System." ■ A reverse osmosis water filtration system is ...

Use & Care Guide
Page 24
... call 1-800-807-6777. Make sure all connections are not fully tightened - Water from the dispenser is not cool enough (on some models) NOTE: Water from the dispenser is free of ice shavings or pieces. ICE AND WATER Possible Causes and/or Recommended Solutions Water is leaking... or dripping from the dispenser NOTE: After dispensing, a few additional drops of water are available for your authorized Whirlpool dealer. The first glass of water - Hold the glass under the dispenser long enough - Make sure the ice chute is chilled to cool ...
... call 1-800-807-6777. Make sure all connections are not fully tightened - Water from the dispenser is not cool enough (on some models) NOTE: Water from the dispenser is free of ice shavings or pieces. ICE AND WATER Possible Causes and/or Recommended Solutions Water is leaking... or dripping from the dispenser NOTE: After dispensing, a few additional drops of water are available for your authorized Whirlpool dealer. The first glass of water - Hold the glass under the dispenser long enough - Make sure the ice chute is chilled to cool ...

Use & Care Guide
Page 25
... reads 0%, it is recommended that you replace the filter. ■ After changing the water filter, flush the water system. PERFORMANCE DATA SHEET Water Filtration System Model P5WB2L/P4RFWB Capacity 200 Gallons (757 Liters) System tested and certified by NSF International against NSF/ANSI Standard 53 for the reduction of Live Cysts...
... reads 0%, it is recommended that you replace the filter. ■ After changing the water filter, flush the water system. PERFORMANCE DATA SHEET Water Filtration System Model P5WB2L/P4RFWB Capacity 200 Gallons (757 Liters) System tested and certified by NSF International against NSF/ANSI Standard 53 for the reduction of Live Cysts...

Use & Care Guide
Page 26
.... Proof of original purchase date is required to obtain service under these limitations and exclusions may not apply to Whirlpool with original model/serial numbers that existed when this major appliance was purchased. Damage resulting from accident, alteration, misuse, abuse, fire, flood, ... major appliance, unless such damage results from defects in your model number information for other rights that is used in the country in the U.S.A., visit www.whirlpool.com. LIMITATION OF REMEDIES; If you also may contact Whirlpool at the address below . In Canada, call 1-800-253...
.... Proof of original purchase date is required to obtain service under these limitations and exclusions may not apply to Whirlpool with original model/serial numbers that existed when this major appliance was purchased. Damage resulting from accident, alteration, misuse, abuse, fire, flood, ... major appliance, unless such damage results from defects in your model number information for other rights that is used in the country in the U.S.A., visit www.whirlpool.com. LIMITATION OF REMEDIES; If you also may contact Whirlpool at the address below . In Canada, call 1-800-253...


