Use & Care Guide
Page 2
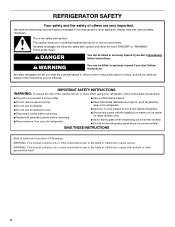
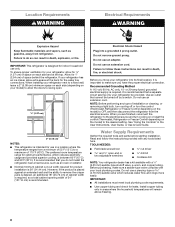
...SAFETY INSTRUCTIONS WARNING: To reduce the risk of California to move and install refrigerator. ■ Disconnect power before operating. ■ Remove doors from your old refrigerator. ■ Keep flammable materials and vapors, such as gasoline, away from refrigerator. ■ Use two or more chemicals known to the State of California...very important. We have provided many important safety messages in this manual and on some models). ■ Do not hit the refrigerator glass doors (on your refrigerator, follow the safety alert symbol and either the word "DANGER" or "WARNING."
...SAFETY INSTRUCTIONS WARNING: To reduce the risk of California to move and install refrigerator. ■ Disconnect power before operating. ■ Remove doors from your old refrigerator. ■ Keep flammable materials and vapors, such as gasoline, away from refrigerator. ■ Use two or more chemicals known to the State of California...very important. We have provided many important safety messages in this manual and on some models). ■ Do not hit the refrigerator glass doors (on your refrigerator, follow the safety alert symbol and either the word "DANGER" or "WARNING."

Use & Care Guide
Page 3
... or impact, such as floor damage could occur. When moving it , as bumping. Glass shelves and covers are not problems of refrigerator in place so that children may break if exposed to remove tape or glue. Before You Throw Away Your Old... in back or other injury. Important information to shatter into many small, pebble-size pieces. When Moving Your Refrigerator: Your refrigerator is designed to know about disposal of refrigerants: Dispose of the past. Important information to know about glass shelves and covers: Do not clean glass shelves or covers ...
... or impact, such as floor damage could occur. When moving it , as bumping. Glass shelves and covers are not problems of refrigerator in place so that children may break if exposed to remove tape or glue. Before You Throw Away Your Old... in back or other injury. Important information to shatter into many small, pebble-size pieces. When Moving Your Refrigerator: Your refrigerator is designed to know about disposal of refrigerants: Dispose of the past. Important information to know about glass shelves and covers: Do not clean glass shelves or covers ...

Use & Care Guide
Page 4
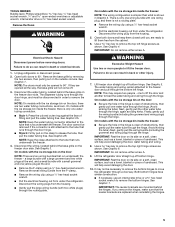
...inside the freezer, the wiring and water dispenser tubing configurations are simpler than what is necessary, see whether you begin, turn the refrigerator control OFF or turn cooling off. If door removal is shown in death or electrical shock. 3 Wiring Connection 4 Top Left ... B. On models with the ice storage bin on the door. Electrical Housing D. Wiring Clip E. Routing Plate C. Failure to remove the refrigerator and freezer doors. Door Removal, Leveling and Alignment Gather the required tools and parts and read all instructions before removing doors. Leveling Foot ...
...inside the freezer, the wiring and water dispenser tubing configurations are simpler than what is necessary, see whether you begin, turn the refrigerator control OFF or turn cooling off. If door removal is shown in death or electrical shock. 3 Wiring Connection 4 Top Left ... B. On models with the ice storage bin on the door. Electrical Housing D. Wiring Clip E. Routing Plate C. Failure to remove the refrigerator and freezer doors. Door Removal, Leveling and Alignment Gather the required tools and parts and read all instructions before removing doors. Leveling Foot ...
Use & Care Guide
Page 5
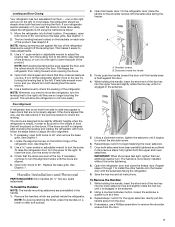
...and wiring plugs) through the hinge. This will help avoid damaging the door, water tubing and wiring. 8. It may require two people - Unplug refrigerator or disconnect power. 2. Open both doors and keep them closed until you remove the hinges, make sure that runs through the hinge, again avoiding kinks... shown in the hinge is only one yellow plug at the end, and a small bundle with two white plugs) through the hinge. Lift the refrigerator door straight up off . 3. This will help avoid damaging the door. 10. On models with one water tube through the hinge. (Avoid kinking...
...and wiring plugs) through the hinge. This will help avoid damaging the door, water tubing and wiring. 8. It may require two people - Unplug refrigerator or disconnect power. 2. Open both doors and keep them closed until you remove the hinges, make sure that runs through the hinge, again avoiding kinks... shown in the hinge is only one yellow plug at the end, and a small bundle with two white plugs) through the hinge. Lift the refrigerator door straight up off . 3. This will help avoid damaging the door. 10. On models with one water tube through the hinge. (Avoid kinking...
Use & Care Guide
Page 6
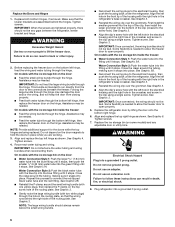
...always remain below the small wiring bundle. ■ Reconnect the wiring plugs to the electrical housing, then push the housing back under the refrigerator. See Graphic 6. Do not remove ground prong. Do not use an extension cord. Before replacing the freezer door on the hinge. ... clip over the grommet. Tighten screws. 7. Some flexibility is intended to open properly. 5. Align and replace the top left hole in the refrigerator's base crossbar. See Graphic 3. ■ Align the clip's screw hole with the left hole in the electrical housing and the right hole in...
...always remain below the small wiring bundle. ■ Reconnect the wiring plugs to the electrical housing, then push the housing back under the refrigerator. See Graphic 6. Do not remove ground prong. Do not use an extension cord. Before replacing the freezer door on the hinge. ... clip over the grommet. Tighten screws. 7. Some flexibility is intended to open properly. 5. Align and replace the top left hole in the refrigerator's base crossbar. See Graphic 3. ■ Align the clip's screw hole with the left hole in the electrical housing and the right hole in...
Use & Care Guide
Page 7
...the lower setscrew hole and slightly rotate the hex key until the doors are located on the brackets on the left . Door Alignment A refrigerator that is not properly installed without this way, use a Phillips screwdriver to check the leveling. See Graphic 1. 2. Save the hex key ...setscrews are even at a time. 3. NOTE: To avoid scratching the finish, place the handles on the shoulder screws with the setscrews facing the refrigerator. 9. IMPORTANT: When the screws feel tight, tighten them an additional quarter-turn the alignment screw until it to the right to the left ....
...the lower setscrew hole and slightly rotate the hex key until the doors are located on the brackets on the left . Door Alignment A refrigerator that is not properly installed without this way, use a Phillips screwdriver to check the leveling. See Graphic 1. 2. Save the hex key ...setscrews are even at a time. 3. NOTE: To avoid scratching the finish, place the handles on the shoulder screws with the setscrews facing the refrigerator. 9. IMPORTANT: When the screws feel tight, tighten them an additional quarter-turn the alignment screw until it to the right to the left ....
Use & Care Guide
Page 8
... Hazard Plug into its final location, it is important to OFF, and then disconnect the refrigerator from refrigerator. NOTE: Before performing any tools listed here. IMPORTANT: This refrigerator is designed for indoor household use an adapter. It is recommended that you have the proper... ■ Flat-blade screwdriver nut driver and ¹⁄₂" open . 1/2" (1.27 cm) 2" (5.08 cm) NOTES: ■ This refrigerator is intended for use a piercing-type or 4.76 mm) saddle valve which reduces electricity usage and provides superior cooling, is between 60°F (...
... Hazard Plug into its final location, it is important to OFF, and then disconnect the refrigerator from refrigerator. NOTE: Before performing any tools listed here. IMPORTANT: This refrigerator is designed for indoor household use an adapter. It is recommended that you have the proper... ■ Flat-blade screwdriver nut driver and ¹⁄₂" open . 1/2" (1.27 cm) 2" (5.08 cm) NOTES: ■ This refrigerator is intended for use a piercing-type or 4.76 mm) saddle valve which reduces electricity usage and provides superior cooling, is between 60°F (...

Use & Care Guide
Page 9
...plumber. ■ If your cold water supply, the water pressure to the reverse osmosis system needs to be pulled out of the refrigerator cabinet as it takes longer than recommended. Now you have the proper length needed for service. 9 Screw compression nut onto outlet end... with adjustable wrench. If you have questions about your water pressure, call a licensed, qualified plumber. Leave a coil of copper, we recommend the following Whirlpool Part Numbers: W10505928RP (7 ft [2.14 m] jacketed PEX), 8212547RP (5 ft [1.52 m] PEX), or W10267701RP (25 ft [7.62 m] PEX). ■...
...plumber. ■ If your cold water supply, the water pressure to the reverse osmosis system needs to be pulled out of the refrigerator cabinet as it takes longer than recommended. Now you have the proper length needed for service. 9 Screw compression nut onto outlet end... with adjustable wrench. If you have questions about your water pressure, call a licensed, qualified plumber. Leave a coil of copper, we recommend the following Whirlpool Part Numbers: W10505928RP (7 ft [2.14 m] jacketed PEX), 8212547RP (5 ft [1.52 m] PEX), or W10267701RP (25 ft [7.62 m] PEX). ■...

Use & Care Guide
Page 10
...overtighten. 4. Use the tube clamp on the copper tubing as shown. Cold water pipe B. Fasten the shutoff valve to the inlet of the refrigerator. 3. Tighten the pipe clamp screws slowly and evenly so the washer makes a watertight seal. Flush the tubing until water is attached to the ...OFF the shutoff valve on the lower rear corner of the water line inlet. 3. A G B C 4. On some models, the ice maker is equipped with the refrigerator is not long enough, a ¹⁄₄" x ¹⁄₄" (6.35 mm x 6.35 mm) coupling is under the pipe clamp. AB CD A. ...
...overtighten. 4. Use the tube clamp on the copper tubing as shown. Cold water pipe B. Fasten the shutoff valve to the inlet of the refrigerator. 3. Tighten the pipe clamp screws slowly and evenly so the washer makes a watertight seal. Flush the tubing until water is attached to the ...OFF the shutoff valve on the lower rear corner of the water line inlet. 3. A G B C 4. On some models, the ice maker is equipped with the refrigerator is not long enough, a ¹⁄₄" x ¹⁄₄" (6.35 mm x 6.35 mm) coupling is under the pipe clamp. AB CD A. ...
Use & Care Guide
Page 11
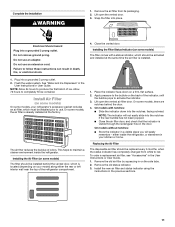
...Air Filter (on some models, the air filter is already installed at the same time the air filter is installed. On some models, your refrigerator's accessory packet includes an air filter, which must be installed behind the door. 4. Remove the old status indicator. 3. Flush the water system.... the side tabs. 2. On models with a status indicator, which is visible through the rectangular hole in your model) along either inside the refrigerator. Electrical Shock Hazard Plug into the notches if the rear bubble has not been popped. ■ Close the air filter door, and check ...
...Air Filter (on some models, the air filter is already installed at the same time the air filter is installed. On some models, your refrigerator's accessory packet includes an air filter, which must be installed behind the door. 4. Remove the old status indicator. 3. Flush the water system.... the side tabs. 2. On models with a status indicator, which is visible through the rectangular hole in your model) along either inside the refrigerator. Electrical Shock Hazard Plug into the notches if the rear bubble has not been popped. ■ Close the air filter door, and check ...

Use & Care Guide
Page 12
... clothing. CAUTION IRRITANT Read cautions on the Produce Preserver housing. 4. Remove the Produce Preserver pouches from its mounting tab along the wall. Whirlpool Corporation, Benton Harbor MI 49022 2. Place the housing back on the mounting tab along the wall. 3. Slide open the cap on back.... Install Produce Preserver (on some models) On some models, your refrigerator's accessory packet includes a Produce Preserver, which should be activated and installed at the same time the pouch is already installed at the factory...
... clothing. CAUTION IRRITANT Read cautions on the Produce Preserver housing. 4. Remove the Produce Preserver pouches from its mounting tab along the wall. Whirlpool Corporation, Benton Harbor MI 49022 2. Place the housing back on the mounting tab along the wall. 3. Slide open the cap on back.... Install Produce Preserver (on some models) On some models, your refrigerator's accessory packet includes a Produce Preserver, which should be activated and installed at the same time the pouch is already installed at the factory...
Use & Care Guide
Page 13
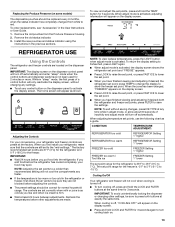
...the display setting to be sure they are preset at least 24 hours between adjustments. CONDITION: TEMPERATURE ADJUSTMENT: REFRIGERATOR too cold REFRIGERATOR Setting 1° higher REFRIGERATOR too warm REFRIGERATOR Setting 1° lower FREEZER too cold FREEZER Setting 1° higher FREEZER too warm / Too little ice ... your convenience, your food may spoil. IMPORTANT: ■ Wait 24 hours before other settings, be sure to press both the refrigerator and freezer set points to a colder than recommended setting will appear on the display screen. ■ Press and hold the TEMP...
...the display setting to be sure they are preset at least 24 hours between adjustments. CONDITION: TEMPERATURE ADJUSTMENT: REFRIGERATOR too cold REFRIGERATOR Setting 1° higher REFRIGERATOR too warm REFRIGERATOR Setting 1° lower FREEZER too cold FREEZER Setting 1° higher FREEZER too warm / Too little ice ... your convenience, your food may spoil. IMPORTANT: ■ Wait 24 hours before other settings, be sure to press both the refrigerator and freezer set points to a colder than recommended setting will appear on the display screen. ■ Press and hold the TEMP...
Use & Care Guide
Page 14
...the control panel. HIGH (closed) for 5 seconds, then release it off , but the Door Ajar icon will reactivate when either door (refrigerator or freezer) is operating. Water and Ice Dispensers NOTES: ■ The dispensing system will only reactivate the display screen, without changing any ...176;F (-2° to activate it on some households. 14 Dual evaporation results in higher humidity, which includes two separate evaporators for the refrigerator to cool down and chill water. ■ Allow 24 hours to drip. The air inside of humidity in some models) The 6th...
...the control panel. HIGH (closed) for 5 seconds, then release it off , but the Door Ajar icon will reactivate when either door (refrigerator or freezer) is operating. Water and Ice Dispensers NOTES: ■ The dispensing system will only reactivate the display screen, without changing any ...176;F (-2° to activate it on some households. 14 Dual evaporation results in higher humidity, which includes two separate evaporators for the refrigerator to cool down and chill water. ■ Allow 24 hours to drip. The air inside of humidity in some models) The 6th...
Use & Care Guide
Page 15
... select DIM mode. Failure to do not need to apply a lot of pressure to the pad in 8 seconds or less, the water pressure to the refrigerator meets the minimum requirement. ■ If it takes longer than 8 seconds to dispense 1 cup of water, the water pressure to the... refrigerator is selected. Hold the glass close to the water dispenser spout to ensure that your dispenser lights are not working, see "Ice Maker and Storage ...
... select DIM mode. Failure to do not need to apply a lot of pressure to the pad in 8 seconds or less, the water pressure to the refrigerator meets the minimum requirement. ■ If it takes longer than 8 seconds to dispense 1 cup of water, the water pressure to the... refrigerator is selected. Hold the glass close to the water dispenser spout to ensure that your dispenser lights are not working, see "Ice Maker and Storage ...
Use & Care Guide
Page 16
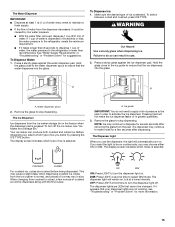
... shutoff arm up ) position and listen for bin removal instructions. ■ To turn on the left ) position. ■ To manually turn off power to the refrigerator, to the ice maker, or to a softened water supply. NOTE: The lock feature does not shut off the ice maker, lift the wire shutoff arm...
... shutoff arm up ) position and listen for bin removal instructions. ■ To turn on the left ) position. ■ To manually turn off power to the refrigerator, to the ice maker, or to a softened water supply. NOTE: The lock feature does not shut off the ice maker, lift the wire shutoff arm...
Use & Care Guide
Page 17
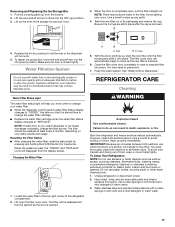
... ■ After changing the water filter, reset the status light by pushing it into the ON (down) position. To Clean Your Refrigerator: NOTE: Do not use with water that may be ejected as the door is completely open the filter cover door. Replace the bin... detergents, bleaches or cleansers containing petroleum products on disinfected waters that is microbiologically unsafe or of food, wrap or cover foods tightly. Unplug refrigerator or disconnect power. 2. NOTE: There may contain filterable cysts. To restart ice production, lower the wire shutoff arm into place. Wipe ...
... ■ After changing the water filter, reset the status light by pushing it into the ON (down) position. To Clean Your Refrigerator: NOTE: Do not use with water that may be ejected as the door is completely open the filter cover door. Replace the bin... detergents, bleaches or cleansers containing petroleum products on disinfected waters that is microbiologically unsafe or of food, wrap or cover foods tightly. Unplug refrigerator or disconnect power. 2. NOTE: There may contain filterable cysts. To restart ice production, lower the wire shutoff arm into place. Wipe ...
Use & Care Guide
Page 18
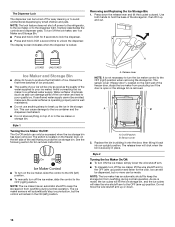
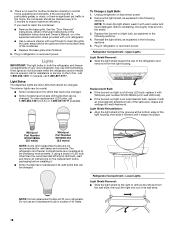
...5. Before reinstalling, thoroughly rinse and dry the shield. 3. Whirlpool Part Number W10574850A (2.0 watts) Whirlpool Part Number W10565137A (3.6 watts) NOTE: Some LED replacement bulbs are not recommended for assistance or service. Plug in refrigerator or reconnect power. The interior lights vary by model. ■.... Do not use LED technology. If using a brand of LED bulb other than the recommended Whirlpool LED bulb, read and follow all replacement bulbs will fit your refrigerator. ■ Use a vacuum cleaner with warm water and liquid detergent. Remove the light shield,...
...5. Before reinstalling, thoroughly rinse and dry the shield. 3. Whirlpool Part Number W10574850A (2.0 watts) Whirlpool Part Number W10565137A (3.6 watts) NOTE: Some LED replacement bulbs are not recommended for assistance or service. Plug in refrigerator or reconnect power. The interior lights vary by model. ■.... Do not use LED technology. If using a brand of LED bulb other than the recommended Whirlpool LED bulb, read and follow all replacement bulbs will fit your refrigerator. ■ Use a vacuum cleaner with warm water and liquid detergent. Remove the light shield,...
Use & Care Guide
Page 19
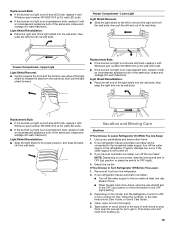
...day ahead of time. ■ When the last load of ice drops, raise the wire shutoff arm to the OFF (right) setting. 3. If your refrigerator has an automatic ice maker and is connected to OFF (up any perishables and freeze other items. 2. Depending on your model, raise the wire shutoff...: Depending on the model, turn the Refrigerator Control to OFF or turn off the water supply to OFF (right). 4. Replacement Bulb: ■ If the burned-out light is a full-size LED bulb, replace it with Whirlpool part number W10565137A (a 3.6 watt LED bulb). ■ If the burned-out light is an ...
...day ahead of time. ■ When the last load of ice drops, raise the wire shutoff arm to the OFF (right) setting. 3. If your refrigerator has an automatic ice maker and is connected to OFF (up any perishables and freeze other items. 2. Depending on your model, raise the wire shutoff...: Depending on the model, turn the Refrigerator Control to OFF or turn off the water supply to OFF (right). 4. Replacement Bulb: ■ If the burned-out light is a full-size LED bulb, replace it with Whirlpool part number W10565137A (a 3.6 watt LED bulb). ■ If the burned-out light is an ...
Use & Care Guide
Page 20
... refrigerator has an energy-efficient motor - If the problem continues, contact a licensed electrician. ■ Control or cooling is normal. This is not turned on . Empty the ice bin. 4. Plug the power cord into a grounded 3 prong outlet. Take out all frozen food in dry ice. 3. In the U.S.A., www.whirlpool.com In Canada, www.whirlpool...
... refrigerator has an energy-efficient motor - If the problem continues, contact a licensed electrician. ■ Control or cooling is normal. This is not turned on . Empty the ice bin. 4. Plug the power cord into a grounded 3 prong outlet. Take out all frozen food in dry ice. 3. In the U.S.A., www.whirlpool.com In Canada, www.whirlpool...
Use & Care Guide
Page 21
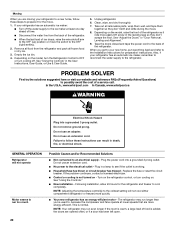
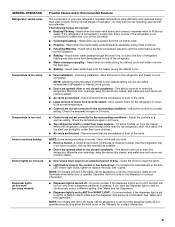
...the drain pan. ■ Sizzling - Heard when water drips onto the heater during normal operation. ■ Rattling - GENERAL OPERATION Refrigerator seems noisy Temperature is too warm Temperature is too cold Interior moisture buildup Interior lights do not work Dispenser lights do not work (... the doors to a water line, turn on only when a dispenser pad/lever is pressed. Heard when ice is loose in your new refrigerator regulates temperature more quickly. ■ Doors are blocked - Minimize door openings, keep the doors fully closed completely - On models with mini ...
...the drain pan. ■ Sizzling - Heard when water drips onto the heater during normal operation. ■ Rattling - GENERAL OPERATION Refrigerator seems noisy Temperature is too warm Temperature is too cold Interior moisture buildup Interior lights do not work Dispenser lights do not work (... the doors to a water line, turn on only when a dispenser pad/lever is pressed. Heard when ice is loose in your new refrigerator regulates temperature more quickly. ■ Doors are blocked - Minimize door openings, keep the doors fully closed completely - On models with mini ...

