Use & Care Guide
Page 2
... more chemicals known to the State of California to cause birth defects or other reproductive harm. 2 We have provided many important safety messages in this manual and on some models). ■ Do not hit the refrigerator glass doors (on your old refrigerator. ■ Keep flammable materials and vapors, such as gasoline...
... more chemicals known to the State of California to cause birth defects or other reproductive harm. 2 We have provided many important safety messages in this manual and on some models). ■ Do not hit the refrigerator glass doors (on your old refrigerator. ■ Keep flammable materials and vapors, such as gasoline...
Use & Care Guide
Page 14
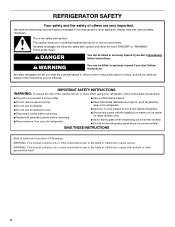
...ice use . NOTE: If increased ice production is cleared from the water line and filter, and prepares the water filter for 24 hours unless manually turned off the Fast Ice feature, press FAST ICE again or adjust the freezer temperature set point to 0°C). You do not need to ...press any buttons to turn off . ■ To manually turn it for the refrigerator and freezer compartments. NOTE: To mute the audible alarm while keeping the doors open . ■ Allow 24 hours for ...
...ice use . NOTE: If increased ice production is cleared from the water line and filter, and prepares the water filter for 24 hours unless manually turned off the Fast Ice feature, press FAST ICE again or adjust the freezer temperature set point to 0°C). You do not need to ...press any buttons to turn off . ■ To manually turn it for the refrigerator and freezer compartments. NOTE: To mute the audible alarm while keeping the doors open . ■ Allow 24 hours for ...
Use & Care Guide
Page 16
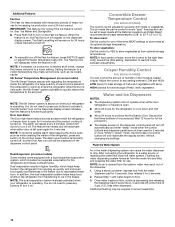
... pads. Sensor cover 2. Style 2 Turning the Ice Maker On/Off: ■ To turn ON the ice maker, simply lower the wire shutoff arm. ■ To manually turn off the ice maker, lift the wire shutoff arm to the OFF (arm up) position and listen for 3 seconds to lock the dispenser. ■... can be turned off for bin removal instructions. ■ To turn on the ice maker, slide the control to the ON (left) position. ■ To manually turn off the ice maker, slide the control to the OFF (right) position. Water softener chemicals (such as the quality of or in the storage...
... pads. Sensor cover 2. Style 2 Turning the Ice Maker On/Off: ■ To turn ON the ice maker, simply lower the wire shutoff arm. ■ To manually turn off the ice maker, lift the wire shutoff arm to the OFF (arm up) position and listen for 3 seconds to lock the dispenser. ■... can be turned off for bin removal instructions. ■ To turn on the ice maker, slide the control to the ON (left) position. ■ To manually turn off the ice maker, slide the control to the OFF (right) position. Water softener chemicals (such as the quality of or in the storage...
Use & Care Guide
Page 18
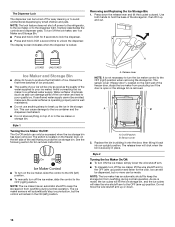
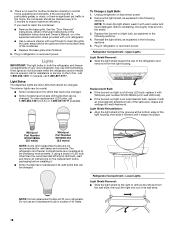
...the "Door Removal" instructions, either in the User Instructions or the Installation Instructions and Owner's Manual, or in the separate instruction sheet provided with your refrigerator. ■ Use a vacuum cleaner with Whirlpool part number W10574850A (a 2.0 watt LED bulb). ■ If the burned-out light is ... burned-out light is a full-size LED bulb, replace it with an incandescent appliance bulb of 40 watts. 18 Whirlpool Part Number W10574850A (2.0 watts) Whirlpool Part Number W10565137A (3.6 watts) NOTE: Some LED replacement bulbs are mini LEDs that can be cleaned every 2 to ...
...the "Door Removal" instructions, either in the User Instructions or the Installation Instructions and Owner's Manual, or in the separate instruction sheet provided with your refrigerator. ■ Use a vacuum cleaner with Whirlpool part number W10574850A (a 2.0 watt LED bulb). ■ If the burned-out light is ... burned-out light is a full-size LED bulb, replace it with an incandescent appliance bulb of 40 watts. 18 Whirlpool Part Number W10574850A (2.0 watts) Whirlpool Part Number W10565137A (3.6 watts) NOTE: Some LED replacement bulbs are mini LEDs that can be cleaned every 2 to ...

Installation Guide
Page 2
... not use an extension cord. ■ Disconnect power before operating. ■ Remove doors from your appliance. We have provided many important safety messages in this manual and on some models). WARNING: This product contains one or more chemicals known to the State of California to reduce the chance of fire, electric...
... not use an extension cord. ■ Disconnect power before operating. ■ Remove doors from your appliance. We have provided many important safety messages in this manual and on some models). WARNING: This product contains one or more chemicals known to the State of California to reduce the chance of fire, electric...
Installation Guide
Page 12
... indicator has completely changed from the Produce Preserver housing. 2. See the "Door Removal" instructions, either in the User Instructions or the Installation Instructions and Owner's Manual, or in the cap. Remove the old pouches from white to close if the indicator's rear bubble has not been popped. Remove the old status...
... indicator has completely changed from the Produce Preserver housing. 2. See the "Door Removal" instructions, either in the User Instructions or the Installation Instructions and Owner's Manual, or in the cap. Remove the old pouches from white to close if the indicator's rear bubble has not been popped. Remove the old status...

