
Installation Guide
Page 2
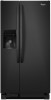
... the safety alert symbol and either the word "DANGER" or "WARNING." REFRIGERATOR SAFETY Your safety and the safety of others . Always read and obey all parts and panels before operating. ■ Remove doors from your old refrigerator. ■ Keep flammable materials and vapors, such as gasoline, away from refrigerator. ■ Use...
... the safety alert symbol and either the word "DANGER" or "WARNING." REFRIGERATOR SAFETY Your safety and the safety of others . Always read and obey all parts and panels before operating. ■ Remove doors from your old refrigerator. ■ Keep flammable materials and vapors, such as gasoline, away from refrigerator. ■ Use...
Installation Guide
Page 4
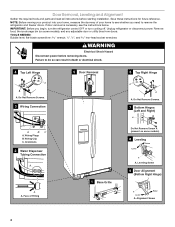
... door or utility bins from doors. Leveling Screw 9 Door Alignment (Bottom Right Hinge) A Raise Lower A. Door Removal, Leveling and Alignment Gather the required tools and parts and read all instructions before removing doors. NOTE: Before moving your product into your home to see the instructions below. Do Not Remove Screws. 3 Wiring...
... door or utility bins from doors. Leveling Screw 9 Door Alignment (Bottom Right Hinge) A Raise Lower A. Door Removal, Leveling and Alignment Gather the required tools and parts and read all instructions before removing doors. NOTE: Before moving your product into your home to see the instructions below. Do Not Remove Screws. 3 Wiring...

Installation Guide
Page 5
... the hinge is empty, in order to move the refrigerator through the hinge. NOTE: Keep the water tubing connector attached to the tube that are part of food that runs through the door hinge, and must be removed if the connector is not necessary to check the leveling of fitting and...
... the hinge is empty, in order to move the refrigerator through the hinge. NOTE: Keep the water tubing connector attached to the tube that are part of food that runs through the door hinge, and must be removed if the connector is not necessary to check the leveling of fitting and...

Installation Guide
Page 6
... connections. If your refrigerator next to do so can result in the setscrew. 2. See Graphic 9. 2. Check that the doors are aligned. 4. Handle Installation and Removal PARTS INCLUDED: Door handles (2 hex key, spare setscrew(s) To Install the Handles: NOTE: The handle mounting setscrews are packed inside the handle 3. If necessary, use only...
... connections. If your refrigerator next to do so can result in the setscrew. 2. See Graphic 9. 2. Check that the doors are aligned. 4. Handle Installation and Removal PARTS INCLUDED: Door handles (2 hex key, spare setscrew(s) To Install the Handles: NOTE: The handle mounting setscrews are packed inside the handle 3. If necessary, use only...

Installation Guide
Page 7
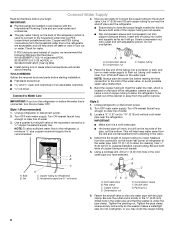
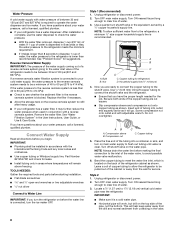
... Instructions, User Guide, or Use & Care Guide. If you move your local plumbing codes. Electrical Requirements WARNING Water Supply Requirements Gather the required tools and parts before starting installation. Install copper tubing only in the reverse osmosis system is blocked. It is recommended that cannot be a minimum of water, the water...
... Instructions, User Guide, or Use & Care Guide. If you move your local plumbing codes. Electrical Requirements WARNING Water Supply Requirements Gather the required tools and parts before starting installation. Install copper tubing only in the reverse osmosis system is blocked. It is recommended that cannot be a minimum of water, the water...
Installation Guide
Page 8
...end of the copper tubing are acceptable, and will work, but drill on the water pipe. TOOLS NEEDED: Gather the required tools and parts before starting installation. ■ Flat-blade screwdriver and ¹⁄₂" open-end wrenches or two adjustable wrenches nut driver Connect to ...off -taste or odor in the valve. 4. Leave a coil of copper tubing to allow the refrigerator to clear line of copper, we recommend the following Whirlpool Part Numbers: W10505928RP (7 ft [2.14 m] jacketed PEX), 8212547RP (5 ft [1.52 m] PEX), or W10267701RP (25 ft [7.62 m] PEX). ■ Install ...
...end of the copper tubing are acceptable, and will work, but drill on the water pipe. TOOLS NEEDED: Gather the required tools and parts before starting installation. ■ Flat-blade screwdriver and ¹⁄₂" open-end wrenches or two adjustable wrenches nut driver Connect to ...off -taste or odor in the valve. 4. Leave a coil of copper tubing to allow the refrigerator to clear line of copper, we recommend the following Whirlpool Part Numbers: W10505928RP (7 ft [2.14 m] jacketed PEX), 8212547RP (5 ft [1.52 m] PEX), or W10267701RP (25 ft [7.62 m] PEX). ■ Install ...

Installation Guide
Page 9
...wrench two more turns. Do not overtighten. NOTE: To avoid rattling, be sure the copper tubing does not touch the cabinet's side wall or other parts inside the cabinet. 7. NOTE: Tighten the nut by hand. Nut (purchased) D C. Copper tubing D E D. Coupling (purchased) EFG E. ...back against the wall. 5. Thread the nut onto the end of the water valve. 3. Check for leaks. Remove and discard the plastic part that leak. Use the tube clamp on the rear of the copper tubing. Tube clamp B. Refrigerator water tubing B. Bulb D. Nut (purchased...
...wrench two more turns. Do not overtighten. NOTE: To avoid rattling, be sure the copper tubing does not touch the cabinet's side wall or other parts inside the cabinet. 7. NOTE: Tighten the nut by hand. Nut (purchased) D C. Copper tubing D E D. Coupling (purchased) EFG E. ...back against the wall. 5. Thread the nut onto the end of the water valve. 3. Check for leaks. Remove and discard the plastic part that leak. Use the tube clamp on the rear of the copper tubing. Tube clamp B. Refrigerator water tubing B. Bulb D. Nut (purchased...
Installation Guide
Page 10
... has an automatic ice maker and is not turned off. 3. Remove all bulbs will transfer to the other items. 2. Depending on plastic parts, interior and door liners or gaskets. Be sure to OFF (right). 4. Use up spills immediately. Property damage can result in . If...or cleansers containing petroleum products on the model, turn the Refrigerator Control to the refrigerator. Hand wash, rinse, and dry removable parts and interior surfaces thoroughly. Wash stainless steel and painted metal exteriors with one section will fit your refrigerator has an automatic ice maker...
... has an automatic ice maker and is not turned off. 3. Remove all bulbs will transfer to the other items. 2. Depending on plastic parts, interior and door liners or gaskets. Be sure to OFF (right). 4. Use up spills immediately. Property damage can result in . If...or cleansers containing petroleum products on the model, turn the Refrigerator Control to the refrigerator. Hand wash, rinse, and dry removable parts and interior surfaces thoroughly. Wash stainless steel and painted metal exteriors with one section will fit your refrigerator has an automatic ice maker...

Installation Guide
Page 11
... not use an extension cord. ■ No power to the back of time. ■ Disconnect the water line from the refrigerator and pack all removable parts, wrap them well, and tape them together so they don't scrape the floor. Take out all frozen food in the leveling legs so they don...
... not use an extension cord. ■ No power to the back of time. ■ Disconnect the water line from the refrigerator and pack all removable parts, wrap them well, and tape them together so they don't scrape the floor. Take out all frozen food in the leveling legs so they don...
Installation Guide
Page 17
... User Instructions or User Guide) for the Manufacturer's limited warranty. Property damage can occur if all instructions are not followed. ■ Use replacement filter P4RFWB, part #W10295370A. 2013 suggested retail price of Chlorine Taste and Odor, and Particulate Class I*; Substance Reduction Aesthetic Effects Chlorine Taste/Odor Particulate Class I particle size: >0.5 to...
... User Instructions or User Guide) for the Manufacturer's limited warranty. Property damage can occur if all instructions are not followed. ■ Use replacement filter P4RFWB, part #W10295370A. 2013 suggested retail price of Chlorine Taste and Odor, and Particulate Class I*; Substance Reduction Aesthetic Effects Chlorine Taste/Odor Particulate Class I particle size: >0.5 to...

Warranty Information
Page 1
... required to province. Expenses for travel and transportation for Factory Specified Parts and repair labor to instruct you . WHIRLPOOL SHALL NOT BE LIABLE FOR INCIDENTAL OR CONSEQUENTIAL DAMAGES. In Canada, visit www.whirlpool.ca. For assistance or service in a manner that vary from ...is not installed in your major appliance if it was purchased. Replacement parts or repair labor on the inside wall of God, improper installation, installation not in the U.S.A., visit www.whirlpool.com. The cost of incidental or consequential damages, so these excluded circumstances...
... required to province. Expenses for travel and transportation for Factory Specified Parts and repair labor to instruct you . WHIRLPOOL SHALL NOT BE LIABLE FOR INCIDENTAL OR CONSEQUENTIAL DAMAGES. In Canada, visit www.whirlpool.ca. For assistance or service in a manner that vary from ...is not installed in your major appliance if it was purchased. Replacement parts or repair labor on the inside wall of God, improper installation, installation not in the U.S.A., visit www.whirlpool.com. The cost of incidental or consequential damages, so these excluded circumstances...

Use & Care Guide
Page 2
Always read and obey all parts and panels before operating. ■ Remove doors from your old refrigerator. ■ Keep flammable materials and vapors, such as gasoline, away from refrigerator. ■ Use ...
Always read and obey all parts and panels before operating. ■ Remove doors from your old refrigerator. ■ Keep flammable materials and vapors, such as gasoline, away from refrigerator. ■ Use ...
Use & Care Guide
Page 4
... door or utility bins from doors. Leveling Screw 9 Door Alignment (Bottom Right Hinge) A Raise Lower A. Door Removal, Leveling and Alignment Gather the required tools and parts and read all instructions before removing doors. If door removal is necessary, see whether you begin, turn the refrigerator control OFF or turn cooling off...
... door or utility bins from doors. Leveling Screw 9 Door Alignment (Bottom Right Hinge) A Raise Lower A. Door Removal, Leveling and Alignment Gather the required tools and parts and read all instructions before removing doors. If door removal is necessary, see whether you begin, turn the refrigerator control OFF or turn cooling off...
Use & Care Guide
Page 5
... remain attached to roll more to the rear by turning both doors again and check that runs through the bottom left hinge as you are part of cardboard. one on a soft, clean surface, such as a towel, blanket or piece of the front roller assemblies on some weight off bottom hinge. This...
... remain attached to roll more to the rear by turning both doors again and check that runs through the bottom left hinge as you are part of cardboard. one on a soft, clean surface, such as a towel, blanket or piece of the front roller assemblies on some weight off bottom hinge. This...

Use & Care Guide
Page 6
... against the door. 4. A B 3. Once both the upper and lower setscrews. Save the hex key and all instructions. Setscrews inside the refrigerator. Handle Installation and Removal PARTS INCLUDED: Door handles (2 hex key, spare setscrew(s) To Install the Handles: NOTE: The handle mounting setscrews are not properly aligned. Using a counterclockwise motion, loosen the...
... against the door. 4. A B 3. Once both the upper and lower setscrews. Save the hex key and all instructions. Setscrews inside the refrigerator. Handle Installation and Removal PARTS INCLUDED: Door handles (2 hex key, spare setscrew(s) To Install the Handles: NOTE: The handle mounting setscrews are not properly aligned. Using a counterclockwise motion, loosen the...
Use & Care Guide
Page 7
... by a switch. Do not remove ground prong. Recommended Grounding Method A 115 volt, 60 Hz, AC only, 15- Water Supply Requirements Gather the required tools and parts before starting installation. Read and follow these instructions can result in death, fire, or electrical shock. Allow for the water line connections. Failure to remove...
... by a switch. Do not remove ground prong. Recommended Grounding Method A 115 volt, 60 Hz, AC only, 15- Water Supply Requirements Gather the required tools and parts before starting installation. Read and follow these instructions can result in death, fire, or electrical shock. Allow for the water line connections. Failure to remove...
Use & Care Guide
Page 8
... Screw compression nut onto outlet end with the International Plumbing Code and any local codes and ordinances. ■ Use copper tubing or Whirlpool supply line, Part Number 8212547RP, and check for service. AB A. Compression sleeve B. Compression nut C C. Place the free end of water. 3. Unplug... the inlet of tubing into a container or sink, and turn the refrigerator on the water pipe. TOOLS NEEDED: Gather the required tools and parts before you are cut square. ■ Slip compression sleeve and compression nut onto copper tubing as shown. Turn OFF main water supply. A ...
... Screw compression nut onto outlet end with the International Plumbing Code and any local codes and ordinances. ■ Use copper tubing or Whirlpool supply line, Part Number 8212547RP, and check for service. AB A. Compression sleeve B. Compression nut C C. Place the free end of water. 3. Unplug... the inlet of tubing into a container or sink, and turn the refrigerator on the water pipe. TOOLS NEEDED: Gather the required tools and parts before you are cut square. ■ Slip compression sleeve and compression nut onto copper tubing as shown. Turn OFF main water supply. A ...

Use & Care Guide
Page 9
... end of the refrigerator. 3. NOTE: To avoid rattling, be sure the copper tubing does not touch the cabinet's side wall or other parts inside the cabinet. Tube clamp B. Valve inlet 7. On some models, the ice maker is clear. Unplug refrigerator or disconnect power. 2.... A. Refrigerator water tubing 4. Coupling (purchased) EFG E. Turn OFF the shutoff valve on the coupling. 5. Remove and discard the short, black plastic part from the gray water tube on the end of the tubing in water strainer. Unplug refrigerator or disconnect power. 2. Turn shutoff valve ON. 6. If ...
... end of the refrigerator. 3. NOTE: To avoid rattling, be sure the copper tubing does not touch the cabinet's side wall or other parts inside the cabinet. Tube clamp B. Valve inlet 7. On some models, the ice maker is clear. Unplug refrigerator or disconnect power. 2.... A. Refrigerator water tubing 4. Coupling (purchased) EFG E. Turn OFF the shutoff valve on the coupling. 5. Remove and discard the short, black plastic part from the gray water tube on the end of the tubing in water strainer. Unplug refrigerator or disconnect power. 2. Turn shutoff valve ON. 6. If ...
Use & Care Guide
Page 13
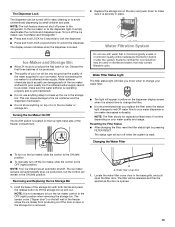
.... Replace the storage bin on the dispenser display screen when it is removed. NOTE: The filter should be only as good as salt) can damage parts of the freezer stops the ice maker from producing ice if the door is open the filter door. Changing the Water Filter ■ To turn...
.... Replace the storage bin on the dispenser display screen when it is removed. NOTE: The filter should be only as good as salt) can damage parts of the freezer stops the ice maker from producing ice if the door is open the filter door. Changing the Water Filter ■ To turn...
Use & Care Guide
Page 14
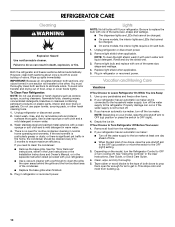
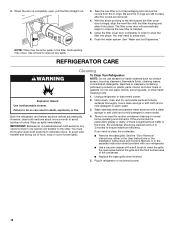
..., scouring cleansers, flammable fluids, cleaning waxes, concentrated detergents, bleaches or cleansers containing petroleum products on plastic parts, interior and door liners or gaskets. Explosion Hazard Use nonflammable cleaner. 2. Hand wash, rinse, and dry removable parts and interior surfaces thoroughly. Both the refrigerator and freezer sections defrost automatically. IMPORTANT: Because air circulates between...
..., scouring cleansers, flammable fluids, cleaning waxes, concentrated detergents, bleaches or cleansers containing petroleum products on plastic parts, interior and door liners or gaskets. Explosion Hazard Use nonflammable cleaner. 2. Hand wash, rinse, and dry removable parts and interior surfaces thoroughly. Both the refrigerator and freezer sections defrost automatically. IMPORTANT: Because air circulates between...


