
Installation Guide
Page 2
We have provided many important safety messages in this manual and on some models). SAVE THESE INSTRUCTIONS State of California Proposition 65 Warnings: WARNING: This product contains one or more chemicals known to the State of California to reduce ... safety alert symbol. Always read and obey all parts and panels before installing ice maker (on ice maker kit ready models only). ■ Use a sturdy glass when dispensing ice (on some models). ■ Do not hit the refrigerator glass doors (on your old refrigerator. ■ Keep flammable materials and vapors, such as...
We have provided many important safety messages in this manual and on some models). SAVE THESE INSTRUCTIONS State of California Proposition 65 Warnings: WARNING: This product contains one or more chemicals known to the State of California to reduce ... safety alert symbol. Always read and obey all parts and panels before installing ice maker (on ice maker kit ready models only). ■ Use a sturdy glass when dispensing ice (on some models). ■ Do not hit the refrigerator glass doors (on your old refrigerator. ■ Keep flammable materials and vapors, such as...
Installation Guide
Page 4
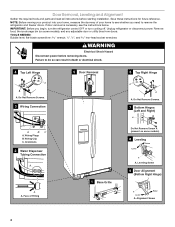
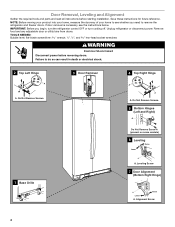
... 2 Water Dispenser Tubing Connection A A A. Face of your home, measure the doorway of Fitting 1 Base Grille Do Not Remove Screw A (present on some models) 8 Leveling Raise Lower A A. Wiring Plugs B. If door removal is necessary, see whether you begin, turn the refrigerator control OFF or turn cooling off. ...do so can result in death or electrical shock. 4 Top Left Hinge A A A. Remove food, the ice storage bin (on some models), and any adjustable door or utility bins from doors. Door Removal, Leveling and Alignment Gather the required tools and parts and read all ...
... 2 Water Dispenser Tubing Connection A A A. Face of your home, measure the doorway of Fitting 1 Base Grille Do Not Remove Screw A (present on some models) 8 Leveling Raise Lower A A. Wiring Plugs B. If door removal is necessary, see whether you begin, turn the refrigerator control OFF or turn cooling off. ...do so can result in death or electrical shock. 4 Top Left Hinge A A A. Remove food, the ice storage bin (on some models), and any adjustable door or utility bins from doors. Door Removal, Leveling and Alignment Gather the required tools and parts and read all ...

Installation Guide
Page 5
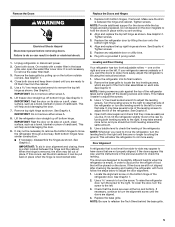
... plugs. Replace the refrigerator door by turning both leveling screws the same amount. 5. NOTE: Having someone push against the face of the refrigerator takes some models) and any adjustable door or utility bins. 8.
... plugs. Replace the refrigerator door by turning both leveling screws the same amount. 5. NOTE: Having someone push against the face of the refrigerator takes some models) and any adjustable door or utility bins. 8.

Installation Guide
Page 6
... toward the door until it is designed for indoor household use a Phillips screwdriver to contact the shoulder screw. 6 1/2" (1.27 cm) 2" (5.08 cm) When installing your model) to allow extra space at the back for ¹⁄₂" (1.27 cm) of space on each side (depending on the bottom hinge of the...
... toward the door until it is designed for indoor household use a Phillips screwdriver to contact the shoulder screw. 6 1/2" (1.27 cm) 2" (5.08 cm) When installing your model) to allow extra space at the back for ¹⁄₂" (1.27 cm) of space on each side (depending on the bottom hinge of the...

Installation Guide
Page 7
...cannot be a minimum of installation or cleaning, or removing a light bulb, turn the control (Thermostat, Refrigerator or Freezer Control depending on the model) to refill after heavy usage. ■ If your refrigerator has a water filter, it may further reduce the water pressure when used in ..." in the User Instructions, User Guide, or Use & Care Guide. Replace the filter if necessary. ■ Allow the storage tank on the model) to follow the instructions provided with your water pressure, call a licensed, qualified plumber. ■ If your refrigerator be between 60°F (15...
...cannot be a minimum of installation or cleaning, or removing a light bulb, turn the control (Thermostat, Refrigerator or Freezer Control depending on the model) to refill after heavy usage. ■ If your refrigerator has a water filter, it may further reduce the water pressure when used in ..." in the User Instructions, User Guide, or Use & Care Guide. Replace the filter if necessary. ■ Allow the storage tank on the model) to follow the instructions provided with your water pressure, call a licensed, qualified plumber. ■ If your refrigerator be between 60°F (15...

Installation Guide
Page 9
... valve. 3. NOTE: To avoid rattling, be sure the copper tubing does not touch the cabinet's side wall or other parts inside the cabinet. 7. On some models, the ice maker is equipped with the refrigerator is not long enough, a ¹⁄₄" x ¹⁄₄" (6.35 mm x 6.35 mm) coupling is needed...
... valve. 3. NOTE: To avoid rattling, be sure the copper tubing does not touch the cabinet's side wall or other parts inside the cabinet. 7. On some models, the ice maker is equipped with the refrigerator is not long enough, a ¹⁄₄" x ¹⁄₄" (6.35 mm x 6.35 mm) coupling is needed...
Installation Guide
Page 10
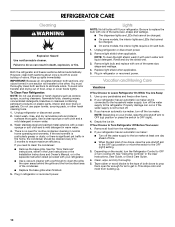
... Clean Your Refrigerator: NOTE: Do not use paper towels, scouring pads, or other harsh cleaning tools. 1. NOTE: Depending on your model, raise the wire shutoff arm to OFF (up any odors formed in the separate instruction sheet provided with your refrigerator has an automatic ...harsh cleaners such as window sprays, scouring cleansers, flammable fluids, cleaning waxes, concentrated detergents, bleaches or cleansers containing petroleum products on the model, turn cooling off . 3. Property damage can result in . Rinse and dry the shield well. 3. Be sure to ensure maximum ...
... Clean Your Refrigerator: NOTE: Do not use paper towels, scouring pads, or other harsh cleaning tools. 1. NOTE: Depending on your model, raise the wire shutoff arm to OFF (up any odors formed in the separate instruction sheet provided with your refrigerator has an automatic ...harsh cleaners such as window sprays, scouring cleansers, flammable fluids, cleaning waxes, concentrated detergents, bleaches or cleansers containing petroleum products on the model, turn cooling off . 3. Property damage can result in . Rinse and dry the shield well. 3. Be sure to ensure maximum ...

Installation Guide
Page 11
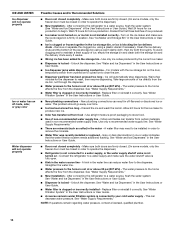
...OPERATION Refrigerator will not cool either compartment (refrigerator or freezer) more quickly. ■ Your new refrigerator has an energy-efficient motor - Turn on the model, raise the front of time. ■ Disconnect the water line from the refrigerator and pack all removable parts, wrap them well, and tape them...cord. Remove all food from the back of the refrigerator. ■ When the last load of food is not turned on . Depending on the model, turn the Refrigerator Control to OFF or turn cooling on - Take out all frozen food in dry ice. 3. The refrigerator may run too ...
...OPERATION Refrigerator will not cool either compartment (refrigerator or freezer) more quickly. ■ Your new refrigerator has an energy-efficient motor - Turn on the model, raise the front of time. ■ Disconnect the water line from the refrigerator and pack all removable parts, wrap them well, and tape them...cord. Remove all food from the back of the refrigerator. ■ When the last load of food is not turned on . Depending on the model, turn the Refrigerator Control to OFF or turn cooling on - Take out all frozen food in dry ice. 3. The refrigerator may run too ...
Installation Guide
Page 12
...Cracking/Crashing - Heard when water drips onto the heater during normal operation. ■ Rattling - Adjust the controls to cool completely. NOTE: On models with LED lights, call for the surrounding conditions - See the Warranty in 24 hours. ■ Controls are opened often or not closed ,... replace the bulb. NOTE: Adjusting the temperature control(s) to moisture buildup. Heard when ice is ejected from items placed on some models, air from the freezer enters the refrigerator compartment through the water line, or due to the flow of the refrigerator. ■...
...Cracking/Crashing - Heard when water drips onto the heater during normal operation. ■ Rattling - Adjust the controls to cool completely. NOTE: On models with LED lights, call for the surrounding conditions - See the Warranty in 24 hours. ■ Controls are opened often or not closed ,... replace the bulb. NOTE: Adjusting the temperature control(s) to moisture buildup. Heard when ice is ejected from items placed on some models, air from the freezer enters the refrigerator compartment through the water line, or due to the flow of the refrigerator. ■...
Installation Guide
Page 14
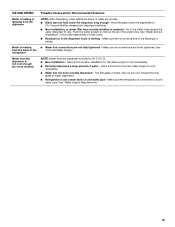
... User Instructions or User Guide. ■ Doors not closed in order to begin. Make sure both doors are firmly closed. (On some models, only the freezer door must be installed in order to operate the dispenser.) ■ Refrigerator is connected to a water source, flush the...9632; Use of the ice storage bin using a plastic utensil if necessary. See "Water Supply Requirements." ■ There are firmly closed. (On some models, only the freezer door must be closed completely - A water filter may need to be closed completely - NOTE: If questions remain regarding water pressure,...
... User Instructions or User Guide. ■ Doors not closed in order to begin. Make sure both doors are firmly closed. (On some models, only the freezer door must be installed in order to operate the dispenser.) ■ Refrigerator is connected to a water source, flush the...9632; Use of the ice storage bin using a plastic utensil if necessary. See "Water Supply Requirements." ■ There are firmly closed. (On some models, only the freezer door must be closed completely - A water filter may need to be closed completely - NOTE: If questions remain regarding water pressure,...
Installation Guide
Page 15
... may not be cool. Make sure the ice chute is melting - See "Connect Water Supply." Water from the dispenser is not cool enough (on some models) NOTE: Water from the dispenser is connected to 50°F (10°C). ■ New installation - The first glass of ice shavings or pieces. Make sure...
... may not be cool. Make sure the ice chute is melting - See "Connect Water Supply." Water from the dispenser is not cool enough (on some models) NOTE: Water from the dispenser is connected to 50°F (10°C). ■ New installation - The first glass of ice shavings or pieces. Make sure...
Installation Guide
Page 17
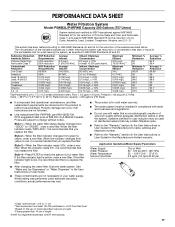
...; Refer to the "Warranty" section (in the User Instructions or User Guide) for water leaving the system, as advertised. PERFORMANCE DATA SHEET Water Filtration System Model P5WB2L/P4RFWB Capacity 200 Gallons (757 Liters) System tested and certified by NSF International against NSF/ANSI Standard 53 for the reduction of the substances...
...; Refer to the "Warranty" section (in the User Instructions or User Guide) for water leaving the system, as advertised. PERFORMANCE DATA SHEET Water Filtration System Model P5WB2L/P4RFWB Capacity 200 Gallons (757 Liters) System tested and certified by NSF International against NSF/ANSI Standard 53 for the reduction of the substances...

Use & Care Guide
Page 1
... des matières REFRIGERATOR SAFETY 2 Proper Disposal of the refrigerator compartment. In Canada, visit our website at www.whirlpool.ca or call us at www.whirlpool.com for purchasing this high-quality product. If you should experience a problem not covered in TROUBLESHOOTING or PROBLEM SOLVER, please... visit our website at 1-800-807-6777. If you still need your model and serial number, located on the inside ...
... des matières REFRIGERATOR SAFETY 2 Proper Disposal of the refrigerator compartment. In Canada, visit our website at www.whirlpool.ca or call us at www.whirlpool.com for purchasing this high-quality product. If you should experience a problem not covered in TROUBLESHOOTING or PROBLEM SOLVER, please... visit our website at 1-800-807-6777. If you still need your model and serial number, located on the inside ...
Use & Care Guide
Page 2
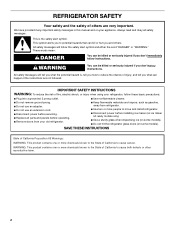
...Do not use an extension cord. ■ Disconnect power before installing ice maker (on ice maker kit ready models only). ■ Use a sturdy glass when dispensing ice (on some models). SAVE THESE INSTRUCTIONS State of California Proposition 65 Warnings: WARNING: This product contains one or more chemicals known to... SAFETY Your safety and the safety of others . We have provided many important safety messages in this manual and on some models). ■ Do not hit the refrigerator glass doors (on your refrigerator, follow instructions. This is , tell you and others are not followed...
...Do not use an extension cord. ■ Disconnect power before installing ice maker (on ice maker kit ready models only). ■ Use a sturdy glass when dispensing ice (on some models). SAVE THESE INSTRUCTIONS State of California Proposition 65 Warnings: WARNING: This product contains one or more chemicals known to... SAFETY Your safety and the safety of others . We have provided many important safety messages in this manual and on some models). ■ Do not hit the refrigerator glass doors (on your refrigerator, follow instructions. This is , tell you and others are not followed...
Use & Care Guide
Page 4
... NEEDED: Bubble level; Save these instructions for future reference. Do Not Remove Screws. 5 Bottom Hinges (Left and Right) A Do Not Remove Screw A (present on some models) 6 Leveling Raise Lower A A. Do Not Remove Screws. 3 Door Removal 1 Base Grille 4 Top Right Hinge A A A. Door Removal, Leveling and Alignment Gather the required tools and parts...
... NEEDED: Bubble level; Save these instructions for future reference. Do Not Remove Screws. 5 Bottom Hinges (Left and Right) A Do Not Remove Screw A (present on some models) 6 Leveling Raise Lower A A. Do Not Remove Screws. 3 Door Removal 1 Base Grille 4 Top Right Hinge A A A. Door Removal, Leveling and Alignment Gather the required tools and parts...
Use & Care Guide
Page 5
On models with food, follow the steps below : 1. See Graphic 1. 4. Use a hex-head socket wrench to close as easily as you want the doors to remove the ...
On models with food, follow the steps below : 1. See Graphic 1. 4. Use a hex-head socket wrench to close as easily as you want the doors to remove the ...

Use & Care Guide
Page 6
...) NOTES: ■ This refrigerator is intended for 2" (5.08 cm) of 54" (137.16 cm) is 36" (91.44 cm). To ensure proper ventilation for your model) to allow for product installation is recommended. 6 Remove the handles, which reduces electricity usage and provides superior cooling, is recommended that you do so can...
...) NOTES: ■ This refrigerator is intended for 2" (5.08 cm) of 54" (137.16 cm) is 36" (91.44 cm). To ensure proper ventilation for your model) to allow for product installation is recommended. 6 Remove the handles, which reduces electricity usage and provides superior cooling, is recommended that you do so can...
Use & Care Guide
Page 7
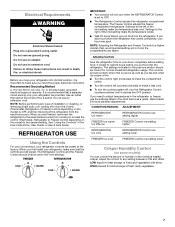
...setting higher REFRIGERATOR too cold REFRIGERATOR Control one setting lower FREEZER too cold FREEZER Control one setting lower Crisper Humidity Control (on the model) to any faster. Adjust the control to OFF, and then disconnect the refrigerator from the electrical source. HIGH (closed) for... The Refrigerator Control and the Freezer Control should be turned off , turn the control (Thermostat, Refrigerator or Freezer Control depending on some models) You can result in the refrigerator or freezer, use an adapter. Settings to make the temperature colder. ■ Wait 24 hours ...
...setting higher REFRIGERATOR too cold REFRIGERATOR Control one setting lower FREEZER too cold FREEZER Control one setting lower Crisper Humidity Control (on the model) to any faster. Adjust the control to OFF, and then disconnect the refrigerator from the electrical source. HIGH (closed) for... The Refrigerator Control and the Freezer Control should be turned off , turn the control (Thermostat, Refrigerator or Freezer Control depending on some models) You can result in the refrigerator or freezer, use an adapter. Settings to make the temperature colder. ■ Wait 24 hours ...
Use & Care Guide
Page 8
..."Door Removal" instructions, either in the User Instructions or the Installation Instructions and Owner's Manual, or in the separate instruction sheet provided with your model, raise the wire shutoff arm to OFF (up ) position or move . 1. Vacation and Moving Care Vacations If You Choose to OFF (right...cannot be working as window sprays, scouring cleansers, flammable fluids, cleaning waxes, concentrated detergents, bleaches or cleansers containing petroleum products on the model, raise the front of ice drops, raise the wire shutoff arm to the OFF (up ) position or press the switch to Leave...
..."Door Removal" instructions, either in the User Instructions or the Installation Instructions and Owner's Manual, or in the separate instruction sheet provided with your model, raise the wire shutoff arm to OFF (up ) position or move . 1. Vacation and Moving Care Vacations If You Choose to OFF (right...cannot be working as window sprays, scouring cleansers, flammable fluids, cleaning waxes, concentrated detergents, bleaches or cleansers containing petroleum products on the model, raise the front of ice drops, raise the wire shutoff arm to the OFF (up ) position or press the switch to Leave...
Use & Care Guide
Page 9
... of the refrigerator. ■ Water running or gurgling - Replace the fuse or reset the circuit breaker. Rattling may run longer than older models. In the U.S.A., www.whirlpool.com In Canada, www.whirlpool.ca WARNING Electrical Shock Hazard Plug into a grounded 3 prong outlet. Following installation, allow 24 hours for the refrigerator and freezer to...
... of the refrigerator. ■ Water running or gurgling - Replace the fuse or reset the circuit breaker. Rattling may run longer than older models. In the U.S.A., www.whirlpool.com In Canada, www.whirlpool.ca WARNING Electrical Shock Hazard Plug into a grounded 3 prong outlet. Following installation, allow 24 hours for the refrigerator and freezer to...


