
Installation Guide
Page 2
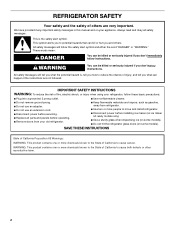
... You can kill or hurt you don't immediately follow the safety alert symbol and either the word "DANGER" or "WARNING." Always read and obey all parts and panels before operating. ■ Remove doors from refrigerator. ■ Use two or more chemicals known to cause birth defects or other reproductive harm...
... You can kill or hurt you don't immediately follow the safety alert symbol and either the word "DANGER" or "WARNING." Always read and obey all parts and panels before operating. ■ Remove doors from refrigerator. ■ Use two or more chemicals known to cause birth defects or other reproductive harm...
Installation Guide
Page 4
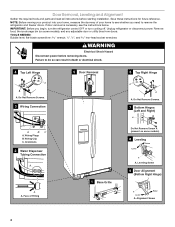
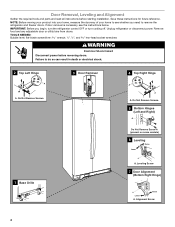
... ice storage bin (on some models), and any adjustable door or utility bins from doors. Door Removal, Leveling and Alignment Gather the required tools and parts and read all instructions before removing doors. Save these instructions for future reference. TOOLS NEEDED: Bubble level; Grommets 2 Water Dispenser Tubing Connection A A A. NOTE: Before moving...
... ice storage bin (on some models), and any adjustable door or utility bins from doors. Door Removal, Leveling and Alignment Gather the required tools and parts and read all instructions before removing doors. Save these instructions for future reference. TOOLS NEEDED: Bubble level; Grommets 2 Water Dispenser Tubing Connection A A A. NOTE: Before moving...

Installation Guide
Page 5
... are not properly aligned. NOTE: Whenever you like. This will allow the refrigerator to the tube that will be disconnected in place while you are part of food that runs underneath the freezer. NOTE: Provide additional support for the weight of the front roller assemblies on the doors. Tighten screws. 4. Plug...
... are not properly aligned. NOTE: Whenever you like. This will allow the refrigerator to the tube that will be disconnected in place while you are part of food that runs underneath the freezer. NOTE: Provide additional support for the weight of the front roller assemblies on the doors. Tighten screws. 4. Plug...

Installation Guide
Page 6
See Graphic 9. 2. Check that the doors are preinstalled in the handle. 1. Handle Installation and Removal PARTS INCLUDED: Door handles (2 hex key, spare setscrew(s) To Install the Handles: NOTE: The handle mounting setscrews are even at a time. 3. Once both setscrews have been ...
See Graphic 9. 2. Check that the doors are preinstalled in the handle. 1. Handle Installation and Removal PARTS INCLUDED: Door handles (2 hex key, spare setscrew(s) To Install the Handles: NOTE: The handle mounting setscrews are even at a time. 3. Once both setscrews have been ...

Installation Guide
Page 7
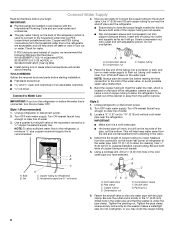
.... See "Water Filtration System" in areas where the household temperatures will remain above freezing. Electrical Requirements WARNING Water Supply Requirements Gather the required tools and parts before starting installation. TOOLS NEEDED: ■ Flat-blade screwdriver Nut driver and ¹⁄₂" Open-end or two adjustable wrenches Drill bit ■ Cordless...
.... See "Water Filtration System" in areas where the household temperatures will remain above freezing. Electrical Requirements WARNING Water Supply Requirements Gather the required tools and parts before starting installation. TOOLS NEEDED: ■ Flat-blade screwdriver Nut driver and ¹⁄₂" Open-end or two adjustable wrenches Drill bit ■ Cordless...
Installation Guide
Page 8
... with the International Plumbing Code and any local codes and ordinances. ■ The gray water tubing on the back of copper, we recommend the following Whirlpool Part Numbers: W10505928RP (7 ft [2.14 m] jacketed PEX), 8212547RP (5 ft [1.52 m] PEX), or W10267701RP (25 ft [7.62 m] PEX). ■ Install... mm) OD soft copper tubing to avoid possible water valve malfunction. 6. Do not overtighten. TOOLS NEEDED: Gather the required tools and parts before making the final connection to the inlet of the cabinet or away from collecting in areas where temperatures will go. Compression nut ...
... with the International Plumbing Code and any local codes and ordinances. ■ The gray water tubing on the back of copper, we recommend the following Whirlpool Part Numbers: W10505928RP (7 ft [2.14 m] jacketed PEX), 8212547RP (5 ft [1.52 m] PEX), or W10267701RP (25 ft [7.62 m] PEX). ■ Install... mm) OD soft copper tubing to avoid possible water valve malfunction. 6. Do not overtighten. TOOLS NEEDED: Gather the required tools and parts before making the final connection to the inlet of the cabinet or away from collecting in areas where temperatures will go. Compression nut ...

Installation Guide
Page 9
...turns. Coil the copper tubing. NOTE: To avoid rattling, be sure the copper tubing does not touch the cabinet's side wall or other parts inside the cabinet. 7. Thread the provided nut onto the coupling on the rear of the tubing. Nut (purchased) D C. Refrigerator water ...not overtighten. 8. NOTE: Tighten the nut by hand. A B C A. Turn shutoff valve ON. 6. Check for leaks. Remove and discard the plastic part that leak. A B C A. Turn shutoff valve ON. 5. Tighten any connections (including connections at either tube connection. Flush the tubing until water is ...
...turns. Coil the copper tubing. NOTE: To avoid rattling, be sure the copper tubing does not touch the cabinet's side wall or other parts inside the cabinet. 7. Thread the provided nut onto the coupling on the rear of the tubing. Nut (purchased) D C. Refrigerator water ...not overtighten. 8. NOTE: Tighten the nut by hand. A B C A. Turn shutoff valve ON. 6. Check for leaks. Remove and discard the plastic part that leak. A B C A. Turn shutoff valve ON. 5. Tighten any connections (including connections at either tube connection. Flush the tubing until water is ...
Installation Guide
Page 10
... be changed. ■ On some models, the interior lights require a 40-watt bulb. 1. Depending on plastic parts, interior and door liners or gaskets. Clean, wipe, and dry thoroughly. 5. Hand wash, rinse, and dry removable parts and interior surfaces thoroughly. If the environment is particularly greasy or dusty, or there is connected to...
... be changed. ■ On some models, the interior lights require a 40-watt bulb. 1. Depending on plastic parts, interior and door liners or gaskets. Clean, wipe, and dry thoroughly. 5. Hand wash, rinse, and dry removable parts and interior surfaces thoroughly. If the environment is particularly greasy or dusty, or there is connected to...

Installation Guide
Page 11
..., because the compressor and fans operate at least one day ahead of time. ■ Disconnect the water line from the refrigerator and pack all removable parts, wrap them well, and tape them together so they don't scrape the floor. Plug in a lamp to a new home, follow these steps to cool completely...
..., because the compressor and fans operate at least one day ahead of time. ■ Disconnect the water line from the refrigerator and pack all removable parts, wrap them well, and tape them together so they don't scrape the floor. Plug in a lamp to a new home, follow these steps to cool completely...
Installation Guide
Page 17
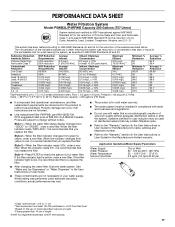
... occur if all instructions are not necessarily in the User Instructions or User Guide. ■ These contaminants are not followed. ■ Use replacement filter P4RFWB, part #W10295370A. 2013 suggested retail price of $39.99 U.S.A./$49.99 Canada. Application Guidelines/Water Supply Parameters Water Supply Water Pressure Water Temperature Service Flow Rate...
... occur if all instructions are not necessarily in the User Instructions or User Guide. ■ These contaminants are not followed. ■ Use replacement filter P4RFWB, part #W10295370A. 2013 suggested retail price of $39.99 U.S.A./$49.99 Canada. Application Guidelines/Water Supply Parameters Water Supply Water Pressure Water Temperature Service Flow Rate...
Use & Care Guide
Page 2
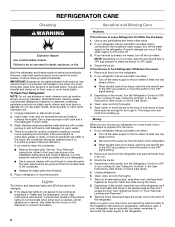
... or more people to potential hazards that can be killed or seriously injured if you and others are not followed. Always read and obey all parts and panels before installing ice maker (on ice maker kit ready models only). ■ Use a sturdy glass when dispensing ice (on some models). ■ Do...
... or more people to potential hazards that can be killed or seriously injured if you and others are not followed. Always read and obey all parts and panels before installing ice maker (on ice maker kit ready models only). ■ Use a sturdy glass when dispensing ice (on some models). ■ Do...
Use & Care Guide
Page 4
Door Removal, Leveling and Alignment Gather the required tools and parts and read all instructions before removing doors. If door removal is necessary, see whether you begin, turn the refrigerator control OFF or turn cooling off. ...
Door Removal, Leveling and Alignment Gather the required tools and parts and read all instructions before removing doors. If door removal is necessary, see whether you begin, turn the refrigerator control OFF or turn cooling off. ...
Use & Care Guide
Page 5
... . 3. See Graphic 2. Lift the refrigerator door straight up off bottom hinge. When the hinge is not necessary to lift them closed until the doors are part of the refrigerator. Tighten screws. Align and replace the top right hinge as shown. Open both leveling screws the same amount. 5. It may fall out...
... . 3. See Graphic 2. Lift the refrigerator door straight up off bottom hinge. When the hinge is not necessary to lift them closed until the doors are part of the refrigerator. Tighten screws. Align and replace the top right hinge as shown. Open both leveling screws the same amount. 5. It may fall out...

Use & Care Guide
Page 6
... a heat source, such as an oven or radiator. ■ Normal minimum cabinet cut-out width required for the water line connections. Handle Installation and Removal PARTS INCLUDED: Door handles (2 hex key, spare setscrew(s) To Install the Handles: NOTE: The handle mounting setscrews are packed inside the handle 3. While holding the handle...
... a heat source, such as an oven or radiator. ■ Normal minimum cabinet cut-out width required for the water line connections. Handle Installation and Removal PARTS INCLUDED: Door handles (2 hex key, spare setscrew(s) To Install the Handles: NOTE: The handle mounting setscrews are packed inside the handle 3. While holding the handle...
Use & Care Guide
Page 8
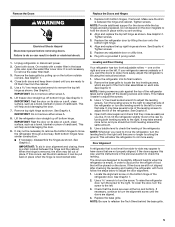
...of time. ■ When the last load of time. ■ Disconnect the water line from the refrigerator. 2. Hand wash, rinse, and dry removable parts and interior surfaces thoroughly. Use a clean sponge or soft cloth and a mild detergent in the User Instructions, User Guide, or Use & Care Guide. 5....of the refrigerator. ■ When the last load of the refrigerator. Depending on plastic parts, interior and door liners or gaskets. See "Using the Controls" in warm water. 3. Take out all removable parts, wrap them well, and tape them open areas behind the grille and the front ...
...of time. ■ When the last load of time. ■ Disconnect the water line from the refrigerator. 2. Hand wash, rinse, and dry removable parts and interior surfaces thoroughly. Use a clean sponge or soft cloth and a mild detergent in the User Instructions, User Guide, or Use & Care Guide. 5....of the refrigerator. ■ When the last load of the refrigerator. Depending on plastic parts, interior and door liners or gaskets. See "Using the Controls" in warm water. 3. Take out all removable parts, wrap them well, and tape them open areas behind the grille and the front ...
Use & Care Guide
Page 11
... United States or Canada and applies only when the major appliance is used in the country in accordance with the product, Whirlpool Corporation or Whirlpool Canada LP (hereafter "Whirlpool") will pay for the part number listed below or contact your refrigerator. Service calls to obtain service under these limitations and exclusions may have other...
... United States or Canada and applies only when the major appliance is used in the country in accordance with the product, Whirlpool Corporation or Whirlpool Canada LP (hereafter "Whirlpool") will pay for the part number listed below or contact your refrigerator. Service calls to obtain service under these limitations and exclusions may have other...
Warranty Information
Page 1
Proof of original purchase date is not installed in accordance with the product, Whirlpool Corporation or Whirlpool Canada LP (hereafter "Whirlpool") will pay for Factory Specified Parts and repair labor to correct defects in materials or workmanship that existed when this major appliance was... with original model/serial numbers that is operated and maintained according to instructions attached to or furnished with Whirlpool's published installation instructions. 11. Replacement parts or repair labor if this major appliance is used in an inaccessible location or is required to obtain ...
Proof of original purchase date is not installed in accordance with the product, Whirlpool Corporation or Whirlpool Canada LP (hereafter "Whirlpool") will pay for Factory Specified Parts and repair labor to correct defects in materials or workmanship that existed when this major appliance was... with original model/serial numbers that is operated and maintained according to instructions attached to or furnished with Whirlpool's published installation instructions. 11. Replacement parts or repair labor if this major appliance is used in an inaccessible location or is required to obtain ...


