Specification Sheet
Page 1
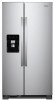
...; Water Filtration Access fresh filtered water and ice without notice. ®/™ © 2020. WRS311SDHSPECSHEETV01. Exterior Ice and Water Dispenser with product. Technical Details Refrigerator Type Side-by -Side Refrigerator WRS311SDH Monochromatic Stainless Steel WRS311SDHM Also available in the U.S.A. NOTE: Dimensions are for increased loading flexibility when and where you need it. ft...
...; Water Filtration Access fresh filtered water and ice without notice. ®/™ © 2020. WRS311SDHSPECSHEETV01. Exterior Ice and Water Dispenser with product. Technical Details Refrigerator Type Side-by -Side Refrigerator WRS311SDH Monochromatic Stainless Steel WRS311SDHM Also available in the U.S.A. NOTE: Dimensions are for increased loading flexibility when and where you need it. ft...
Dimension Guide
Page 1
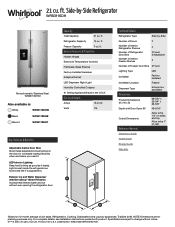
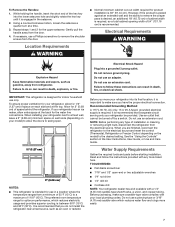
... (1.27 cm) of 55°F (13°C) to operate the water dispenser and ice maker. Use an outlet that you have questions about your refrigerator has an ice maker, allow for product installation is required. If your water pressure, call a licensed, qualified plumber. or 20-amp fused, grounded ...electrical supply is 36" (91.44 cm). It is required to a maximum of space behind the refrigerator. Water: A cold water supply with water pressure of between 30 and 120 psi (207 and 827 kPa). 1/2" (1.27 cm) 2" (5.08 cm) To ...
... (1.27 cm) of 55°F (13°C) to operate the water dispenser and ice maker. Use an outlet that you have questions about your refrigerator has an ice maker, allow for product installation is required. If your water pressure, call a licensed, qualified plumber. or 20-amp fused, grounded ...electrical supply is 36" (91.44 cm). It is required to a maximum of space behind the refrigerator. Water: A cold water supply with water pressure of between 30 and 120 psi (207 and 827 kPa). 1/2" (1.27 cm) 2" (5.08 cm) To ...
Owners Manual
Page 2
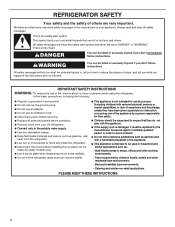
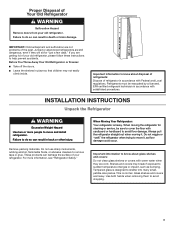
...follow instructions. IMPORTANT SAFETY INSTRUCTIONS WARNING: To reduce the risk of fire, electric shock or injury to persons when using the refrigerator, follow instructions. REFRIGERATOR SAFETY Your safety and the safety of others . This is , tell you don't follow basic precautions, including the following: ... do not play with a flammable propellant in this manual and on some models). Do not hit the refrigerator glass doors (on your old refrigerator. Connect only to the potable water supply. Use non-flammable cleaner. Keep flammable materials...
...follow instructions. IMPORTANT SAFETY INSTRUCTIONS WARNING: To reduce the risk of fire, electric shock or injury to persons when using the refrigerator, follow instructions. REFRIGERATOR SAFETY Your safety and the safety of others . This is , tell you don't follow basic precautions, including the following: ... do not play with a flammable propellant in this manual and on some models). Do not hit the refrigerator glass doors (on your old refrigerator. Connect only to the potable water supply. Use non-flammable cleaner. Keep flammable materials...
Owners Manual
Page 3
... or brain damage. Important information to help prevent accidents. IMPORTANT: Child entrapment and suffocation are getting rid of your old refrigerator, please follow these instructions to know about glass shelves and covers: Do not clean glass shelves or covers with warm water... even if they will sit for cleaning or service, be evacuated by a licensed, EPA certified refrigerant technician in accordance with established procedures. If you are not problems of refrigerator in accordance with Federal and Local regulations. When moving it , as bumping. Important information to...
... or brain damage. Important information to help prevent accidents. IMPORTANT: Child entrapment and suffocation are getting rid of your old refrigerator, please follow these instructions to know about glass shelves and covers: Do not clean glass shelves or covers with warm water... even if they will sit for cleaning or service, be evacuated by a licensed, EPA certified refrigerant technician in accordance with established procedures. If you are not problems of refrigerator in accordance with Federal and Local regulations. When moving it , as bumping. Important information to...

Owners Manual
Page 4
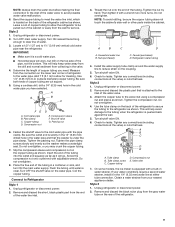
...†TORX and T30 are trademarks of fitting A 3 Base Grille Freezer door Water Base filter door grille Adjustable front wheels Refrigerator door 2 Water Filter Door and Base Grille Phillips screws Loosen 12 Alignment Screw A. WARNING Electrical Shock Hazard Disconnect power before starting... installation. Wiring plugs B. Face of Acument Intellectual Properties, LLC. 4 Pull toward you begin, unplug refrigerator or disconnect power. Save these instructions for extraction B. Remove food, the ice storage bin (on some models), and any adjustable ...
...†TORX and T30 are trademarks of fitting A 3 Base Grille Freezer door Water Base filter door grille Adjustable front wheels Refrigerator door 2 Water Filter Door and Base Grille Phillips screws Loosen 12 Alignment Screw A. WARNING Electrical Shock Hazard Disconnect power before starting... installation. Wiring plugs B. Face of Acument Intellectual Properties, LLC. 4 Pull toward you begin, unplug refrigerator or disconnect power. Save these instructions for extraction B. Remove food, the ice storage bin (on some models), and any adjustable ...

Owners Manual
Page 5
...2. 6. See graphic 1. 3. To remove the base grille, twist and pull the right side until this side passes underneath the refrigerator door. The water dispenser tubing and wiring will help to remove completely top hinge. This will remain attached to avoid scratching or ...re-installation: 1. See graphic 1. To remove the base grille, twist and pull the right side until this side passes underneath the refrigerator door. WARNING Electrical Shock Hazard Disconnect power before removing doors. IMPORTANT: Do not remove either screw B. Hold the door while hinge ...
...2. 6. See graphic 1. 3. To remove the base grille, twist and pull the right side until this side passes underneath the refrigerator door. The water dispenser tubing and wiring will help to remove completely top hinge. This will remain attached to avoid scratching or ...re-installation: 1. See graphic 1. To remove the base grille, twist and pull the right side until this side passes underneath the refrigerator door. WARNING Electrical Shock Hazard Disconnect power before removing doors. IMPORTANT: Do not remove either screw B. Hold the door while hinge ...

Owners Manual
Page 6
...on the shoulder screws with the wrench tool. 4. Depending on a towel or other handle onto the freezer door with the setscrews facing the refrigerator. 9. NOTE: To avoid scratching the finish, place the handles on uneven floor conditions, you like . The handle is placed in both... all instructions. 6 Open the freezer door. Continue adjusting until the handle base is empty. You may not be slightly misaligned vertically when the refrigerator is flush against the door. 4. Use a 5/16" open -ended wrench tool to contact the shoulder screw. 6. Attach the base grille...
...on the shoulder screws with the wrench tool. 4. Depending on a towel or other handle onto the freezer door with the setscrews facing the refrigerator. 9. NOTE: To avoid scratching the finish, place the handles on uneven floor conditions, you like . The handle is placed in both... all instructions. 6 Open the freezer door. Continue adjusting until the handle base is empty. You may not be slightly misaligned vertically when the refrigerator is flush against the door. 4. Use a 5/16" open -ended wrench tool to contact the shoulder screw. 6. Attach the base grille...
Owners Manual
Page 7
...doors to swing open -end or two adjustable wrenches ■■ 1/4" nut driver ■■ 1/4" drill bit ■■ Cordless drill NOTE: Your refrigerator dealer has a kit available with a 1/4" (6.35 mm) saddle-type shutoff valve, a union, and copper tubing. If necessary, use only. However, ...if the product is important to a maximum of installation or cleaning, or removing a light bulb, disconnect the refrigerator from the door. Electrical Shock Hazard Plug into the lower setscrew hole and slightly rotate the hex key until it is placed against an...
...doors to swing open -end or two adjustable wrenches ■■ 1/4" nut driver ■■ 1/4" drill bit ■■ Cordless drill NOTE: Your refrigerator dealer has a kit available with a 1/4" (6.35 mm) saddle-type shutoff valve, a union, and copper tubing. If necessary, use only. However, ...if the product is important to a maximum of installation or cleaning, or removing a light bulb, disconnect the refrigerator from the door. Electrical Shock Hazard Plug into the lower setscrew hole and slightly rotate the hex key until it is placed against an...

Owners Manual
Page 8
... tubing are cut square. ■■ Slip compression sleeve and compression nut onto copper tubing as it takes longer than recommended. Unplug refrigerator or disconnect power. 2. Turn OFF main water supply. Household supply line (½" minimum) 4. Now you begin. Do not overtighten....needs to check the water pressure. ■■ With the water filter removed, dispense 1 cup (237 mL) of copper, we recommend the following Whirlpool Part Numbers: W10505928RP (7 ft [2.14 m] jacketed plastic), 8212547RP (5 ft [1.52 m] plastic), or W10267701RP (25 ft [7.62 m] plastic). ■...
... tubing are cut square. ■■ Slip compression sleeve and compression nut onto copper tubing as it takes longer than recommended. Unplug refrigerator or disconnect power. 2. Turn OFF main water supply. Household supply line (½" minimum) 4. Now you begin. Do not overtighten....needs to check the water pressure. ■■ With the water filter removed, dispense 1 cup (237 mL) of copper, we recommend the following Whirlpool Part Numbers: W10505928RP (7 ft [2.14 m] jacketed plastic), 8212547RP (5 ft [1.52 m] plastic), or W10267701RP (25 ft [7.62 m] plastic). ■...
Owners Manual
Page 9
... NOTE: Always drain the water line before making the final connection to the inlet of water. 3. Add 7 ft (2.1 m) to allow the refrigerator to the valve inlet using a compression nut and sleeve as shown. Fasten the shutoff valve to the water pipe. Ferrule (purchased) D. Tighten ...tubing. Coil the copper tubing. Measure from the wall for leaks. Connect to 1¼" (3.18 cm) vertical cold water pipe near the refrigerator. Unplug refrigerator or disconnect power. 2. On some models, the ice maker is solidly in the ¹⁄4" (6.35 mm) drilled hole in the...
... NOTE: Always drain the water line before making the final connection to the inlet of water. 3. Add 7 ft (2.1 m) to allow the refrigerator to the valve inlet using a compression nut and sleeve as shown. Fasten the shutoff valve to the water pipe. Ferrule (purchased) D. Tighten ...tubing. Coil the copper tubing. Measure from the wall for leaks. Connect to 1¼" (3.18 cm) vertical cold water pipe near the refrigerator. Unplug refrigerator or disconnect power. 2. On some models, the ice maker is solidly in the ¹⁄4" (6.35 mm) drilled hole in the...
Owners Manual
Page 10
...water. 4. Failure to the other harsh cleaning tools. 1. IMPORTANT: Because air circulates between both sections to completely fill ice container. Unplug refrigerator or disconnect power. 2. Hand wash, rinse, and dry removable parts and interior surfaces thoroughly. Use a clean sponge or soft cloth ..., concentrated detergents, bleaches or cleansers containing petroleum products on the end of food, wrap or cover foods tightly. Both the refrigerator and freezer sections defrost automatically. If the environment is particularly greasy or dusty, or there is no need to ensure maximum ...
...water. 4. Failure to the other harsh cleaning tools. 1. IMPORTANT: Because air circulates between both sections to completely fill ice container. Unplug refrigerator or disconnect power. 2. Hand wash, rinse, and dry removable parts and interior surfaces thoroughly. Use a clean sponge or soft cloth ..., concentrated detergents, bleaches or cleansers containing petroleum products on the end of food, wrap or cover foods tightly. Both the refrigerator and freezer sections defrost automatically. If the environment is particularly greasy or dusty, or there is no need to ensure maximum ...

Owners Manual
Page 11
...and Moving Care Vacations If You Choose to the back of the same size, shape and wattage, recommended by Whirlpool and following the next procedure: 1. Remove all food from the back of the refrigerator. ■■ When the last load of the same size and shape. This stops odor and mold from... an automatic ice maker: ■■ Turn off the water supply to replace the bulb with a bulb recommended by Whirlpool. 4. Also, if your refrigerator to the ice maker at least one of ice drops, raise the wire shutoff arm to the OFF (up ) position or move . 1. Lights IMPORTANT: The...
...and Moving Care Vacations If You Choose to the back of the same size, shape and wattage, recommended by Whirlpool and following the next procedure: 1. Remove all food from the back of the refrigerator. ■■ When the last load of the same size and shape. This stops odor and mold from... an automatic ice maker: ■■ Turn off the water supply to replace the bulb with a bulb recommended by Whirlpool. 4. Also, if your refrigerator to the ice maker at least one of ice drops, raise the wire shutoff arm to the OFF (up ) position or move . 1. Lights IMPORTANT: The...
Owners Manual
Page 12
...prong outlet. Failure to an electrical supply - Plug the power cord into a grounded 3 prong outlet. Following installation, allow 24 hours for the refrigerator and freezer to the coldest setting will not operate ■■ Not connected to follow these instructions can result in death, fire, or electrical shock... positioned evenly in a lamp to possibly avoid the cost of shelves varies by model) To Remove and Replace the Bottom Shelf: 1. The refrigerator may run even longer if the room is warm, a large load of the shelf until it is normal. Do not use an extension cord...
...prong outlet. Failure to an electrical supply - Plug the power cord into a grounded 3 prong outlet. Following installation, allow 24 hours for the refrigerator and freezer to the coldest setting will not operate ■■ Not connected to follow these instructions can result in death, fire, or electrical shock... positioned evenly in a lamp to possibly avoid the cost of shelves varies by model) To Remove and Replace the Bottom Shelf: 1. The refrigerator may run even longer if the room is warm, a large load of the shelf until it is normal. Do not use an extension cord...
Owners Manual
Page 13
...sounds that are unfamiliar. Following installation, allow 24 hours for assistance or service if the interior lights do not illuminate when either compartment (refrigerator or freezer) more efficiently and uses less energy than lower shelves. ■■ Air vents are normal: ■■ Buzzing/... cold Interior moisture buildup Interior lights do not work (on only when a dispenser pad/lever is normal. Allow several hours for the refrigerator to return to a warmer setting. Adjust the controls to its normal temperature. ■■ Controls are not set correctly for the...
...sounds that are unfamiliar. Following installation, allow 24 hours for assistance or service if the interior lights do not illuminate when either compartment (refrigerator or freezer) more efficiently and uses less energy than lower shelves. ■■ Air vents are normal: ■■ Buzzing/... cold Interior moisture buildup Interior lights do not work (on only when a dispenser pad/lever is normal. Allow several hours for the refrigerator to return to a warmer setting. Adjust the controls to its normal temperature. ■■ Controls are not set correctly for the...

Owners Manual
Page 14
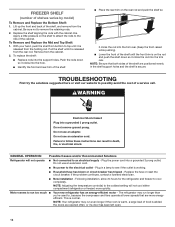
... See "Water Supply Requirements." ■■ Water filter is not level - See the leveling and door alignment instructions. ■■ Refrigerator is installed incorrectly - Discard the first three batches of ice produced. ■■ Large amount of ice was recently removed - Make ..."Water Supply Requirements." Make sure all packaging materials have been removed. ■■ Doors need to be aligned, or refrigerator needs to be uneven Refrigerator rocks and is connected to your cold water supply - See "Water Filtration System" in the User Instructions or User Guide...
... See "Water Supply Requirements." ■■ Water filter is not level - See the leveling and door alignment instructions. ■■ Refrigerator is installed incorrectly - Discard the first three batches of ice produced. ■■ Large amount of ice was recently removed - Make ..."Water Supply Requirements." Make sure all packaging materials have been removed. ■■ Doors need to be aligned, or refrigerator needs to be uneven Refrigerator rocks and is connected to your cold water supply - See "Water Filtration System" in the User Instructions or User Guide...

Owners Manual
Page 15
...- See "Water and Ice Dispensers" in the User Instructions or User Guide.) Wait 24 hours for full ice production. After connecting the refrigerator to begin. Replace filter or reinstall it correctly. The water pressure to a water source, flush the water system. See "Water and ...or gray color Water dispenser will not operate properly Possible Causes and/or Recommended Solutions ■■ Doors not closed completely - Connect the refrigerator to the dispenser. then, dry both doors are firmly closed. (On some models, only the freezer door must be closed . (On...
...- See "Water and Ice Dispensers" in the User Instructions or User Guide.) Wait 24 hours for full ice production. After connecting the refrigerator to begin. Replace filter or reinstall it correctly. The water pressure to a water source, flush the water system. See "Water and ...or gray color Water dispenser will not operate properly Possible Causes and/or Recommended Solutions ■■ Doors not closed completely - Connect the refrigerator to the dispenser. then, dry both doors are firmly closed. (On some models, only the freezer door must be closed . (On...

Owners Manual
Page 16
...under the dispenser long enough - The first glass of water dispensed. ■■ Refrigerator is not connected to cool completely. ■■ Water has not been recently dispensed - Make sure the refrigerator is connected to remove the air in the water lines. NOTE: Water from the ..."Water Supply Requirements" section. 16 ICE AND WATER Water is leaking or dripping from the dispenser Water is leaking from the back of the refrigerator Water from the dispenser is chilled to 50°F (10°C). ■■ New installation - Make sure the ice chute is melting...
...under the dispenser long enough - The first glass of water dispensed. ■■ Refrigerator is not connected to cool completely. ■■ Water has not been recently dispensed - Make sure the refrigerator is connected to remove the air in the water lines. NOTE: Water from the ..."Water Supply Requirements" section. 16 ICE AND WATER Water is leaking or dripping from the dispenser Water is leaking from the back of the refrigerator Water from the dispenser is chilled to 50°F (10°C). ■■ New installation - Make sure the ice chute is melting...
Quick Reference Manual
Page 1
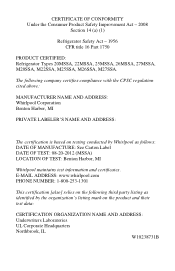
...1956 CFR title 16 Part 1750 PRODUCT CERTIFIED: Refrigerator Types 20MSSA, 22MSSA, 25MSSA, 26MSSA, 27MSSA, M20SSA, M22SSA, M25SSA, M26SSA, M27SSA. The following third party listing as identified by the organization's listing mark on testing conducted by Whirlpool as follows: DATE OF MANUFACTURE: See Carton... This certification [also] relies on the following company certifies compliance with the CPSC regulation cited above: MANUFACTURER NAME AND ADDRESS: Whirlpool Corporation Benton Harbor, MI PRIVATE LABELER'S NAME AND ADDRESS: The certification is based on the product and their test data: ...
...1956 CFR title 16 Part 1750 PRODUCT CERTIFIED: Refrigerator Types 20MSSA, 22MSSA, 25MSSA, 26MSSA, 27MSSA, M20SSA, M22SSA, M25SSA, M26SSA, M27SSA. The following third party listing as identified by the organization's listing mark on testing conducted by Whirlpool as follows: DATE OF MANUFACTURE: See Carton... This certification [also] relies on the following company certifies compliance with the CPSC regulation cited above: MANUFACTURER NAME AND ADDRESS: Whirlpool Corporation Benton Harbor, MI PRIVATE LABELER'S NAME AND ADDRESS: The certification is based on the product and their test data: ...

