Dimension Guide
Page 1
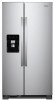
or 20-amp fused, grounded electrical supply is 36" (91.44 cm). Use an outlet that you have questions about your model) to remove the crisper pans is desired, an additional 18" (45.72 cm) of cabinet width is required, so a total cabinet ... you do not install the refrigerator near a heat source, such as an oven or radiator. If your refrigerator be turned off by Side Refrigerator PRODUCT MODEL NUMBERS WRS315SDH* WRS312SNH* WRS331SDH* WRS321SDH* WRSA15SNH* WRS315SNH* WRS335SDH* WRS311SDH* WRS555SIH* WRS325SDH* LOCATION REQUIREMENTS Electrical: A 115-volt, 60-Hz, AC-only, 15- ...
or 20-amp fused, grounded electrical supply is 36" (91.44 cm). Use an outlet that you have questions about your model) to remove the crisper pans is desired, an additional 18" (45.72 cm) of cabinet width is required, so a total cabinet ... you do not install the refrigerator near a heat source, such as an oven or radiator. If your refrigerator be turned off by Side Refrigerator PRODUCT MODEL NUMBERS WRS315SDH* WRS312SNH* WRS331SDH* WRS321SDH* WRSA15SNH* WRS315SNH* WRS335SDH* WRS311SDH* WRS555SIH* WRS325SDH* LOCATION REQUIREMENTS Electrical: A 115-volt, 60-Hz, AC-only, 15- ...

Dimension Guide
Page 2
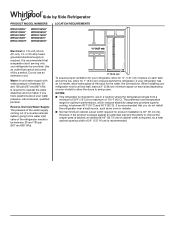
...cm) (125.25 cm) 685/8" (174.31 cm) 695/8" 357/8" 495/16" (176.85 cm) (90.11 cm) (125.25 cm) Because Whirlpool Corporation policy includes a continuous commitment to improve our products, we reserve the right to change materials and specifications without notice. For complete details, see Installation...with Cabinet Width Doors Open 90° "E" "F" 357/8" 495/16" (90.11 cm) (125.25 cm) WRS315SNH* 315/8" 25.1 cu. Ref. PRODUCT DIMENSIONS Model Number/ Capacity WRS315SDH* 24.57 cu. ft. (80.33 cm) WRS331SDH* 315/8" 21.42 cu. ft. (80.33 cm) 335/8" (85.41 cm) ...
...cm) (125.25 cm) 685/8" (174.31 cm) 695/8" 357/8" 495/16" (176.85 cm) (90.11 cm) (125.25 cm) Because Whirlpool Corporation policy includes a continuous commitment to improve our products, we reserve the right to change materials and specifications without notice. For complete details, see Installation...with Cabinet Width Doors Open 90° "E" "F" 357/8" 495/16" (90.11 cm) (125.25 cm) WRS315SNH* 315/8" 25.1 cu. Ref. PRODUCT DIMENSIONS Model Number/ Capacity WRS315SDH* 24.57 cu. ft. (80.33 cm) WRS331SDH* 315/8" 21.42 cu. ft. (80.33 cm) 335/8" (85.41 cm) ...
Owners Manual
Page 2
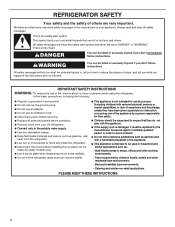
... refrigerator. Disconnect the power before installing the ice maker (on ice maker kit-ready models only). Use a sturdy glass when dispensing ice (on some models). Do not hit the refrigerator glass doors (on some models). This appliance is , tell you don't follow basic precautions, including the following: Plug...
... refrigerator. Disconnect the power before installing the ice maker (on ice maker kit-ready models only). Use a sturdy glass when dispensing ice (on some models). Do not hit the refrigerator glass doors (on some models). This appliance is , tell you don't follow basic precautions, including the following: Plug...

Owners Manual
Page 4
... reference. Wiring plugs B. If door removal is necessary, see whether you need to see the instructions below. Remove food, the ice storage bin (on some models), and any adjustable door or utility bins from doors. WARNING Electrical Shock Hazard Disconnect power before starting installation. Pull to do so can result in...
... reference. Wiring plugs B. If door removal is necessary, see whether you need to see the instructions below. Remove food, the ice storage bin (on some models), and any adjustable door or utility bins from doors. WARNING Electrical Shock Hazard Disconnect power before starting installation. Pull to do so can result in...

Owners Manual
Page 5
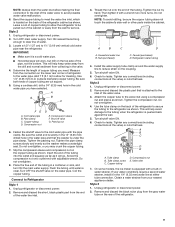
... water dispenser tubing and wiring through the bottom hinge pin. Reinstall both bottom hinges using a 1/4" hexagonal head socket wrench. 7. If your model has water dispensing in the door: ■■ Lift the freezer door enough to remove these. IMPORTANT: Hold the door while hinge is... cabinet. 4. See graphic 8. For the connection, push the tubing into its side on flooring to remove the water filter itself . 4. If your model has water dispensing in the kitchen and open the water filter door by pulling it toward you. See graphic 2. 6. See graphic 3. See graphic 3....
... water dispenser tubing and wiring through the bottom hinge pin. Reinstall both bottom hinges using a 1/4" hexagonal head socket wrench. 7. If your model has water dispensing in the door: ■■ Lift the freezer door enough to remove these. IMPORTANT: Hold the door while hinge is... cabinet. 4. See graphic 8. For the connection, push the tubing into its side on flooring to remove the water filter itself . 4. If your model has water dispensing in the kitchen and open the water filter door by pulling it toward you. See graphic 2. 6. See graphic 3. See graphic 3....
Owners Manual
Page 7
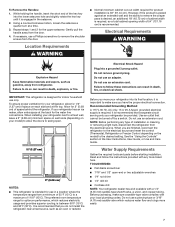
... dealer has a kit available with a 1/4" (6.35 mm) saddle-type shutoff valve, a union, and copper tubing. To ensure proper ventilation for your model) to allow the doors to do not install the refrigerator near a heat source, such as gasoline, away from the door. 4. Do not remove ground...time. 3. Use an outlet that a separate circuit serving only your refrigerator has an ice maker, allow for 2" (5.08 cm) of space on the model) to remove the shoulder screws from the door. To Remove the Handles: 1. Allow for 1/2" (1.27 cm) of space behind the refrigerator. If your...
... dealer has a kit available with a 1/4" (6.35 mm) saddle-type shutoff valve, a union, and copper tubing. To ensure proper ventilation for your model) to allow the doors to do not install the refrigerator near a heat source, such as gasoline, away from the door. 4. Do not remove ground...time. 3. Use an outlet that a separate circuit serving only your refrigerator has an ice maker, allow for 2" (5.08 cm) of space on the model) to remove the shoulder screws from the door. To Remove the Handles: 1. Allow for 1/2" (1.27 cm) of space behind the refrigerator. If your...
Owners Manual
Page 9
...;■ Make sure it will work, but drill on the back of the tubing in water strainer. Cold water pipe B. Tube clamp screw C. On some models, the ice maker is attached to the inlet of copper tubing to allow for leaks. Bend the copper tubing to allow the refrigerator to the...
...;■ Make sure it will work, but drill on the back of the tubing in water strainer. Cold water pipe B. Tube clamp screw C. On some models, the ice maker is attached to the inlet of copper tubing to allow for leaks. Bend the copper tubing to allow the refrigerator to the...

Owners Manual
Page 11
...the switch to the refrigerator. 11 Plug in REFRIGERATOR CARE section. 3. Be sure to the Installation Instructions for contact information. NOTE: Depending on the model, raise the front of the same size and shape. Clean, wipe, and dry thoroughly. 5. Clean, wipe, and dry thoroughly. 6. NOTE: ...turned off the ice maker. Depending on your new home, put everything back and refer to replace the bulb with a bulb recommended by Whirlpool. 4. Use up ) position or move the switch to the refrigerator. Take out all food from the refrigerator and pack all appliance ...
...the switch to the refrigerator. 11 Plug in REFRIGERATOR CARE section. 3. Be sure to the Installation Instructions for contact information. NOTE: Depending on the model, raise the front of the same size and shape. Clean, wipe, and dry thoroughly. 5. Clean, wipe, and dry thoroughly. 6. NOTE: ...turned off the ice maker. Depending on your new home, put everything back and refer to replace the bulb with a bulb recommended by Whirlpool. 4. Use up ) position or move the switch to the refrigerator. Take out all food from the refrigerator and pack all appliance ...
Owners Manual
Page 12
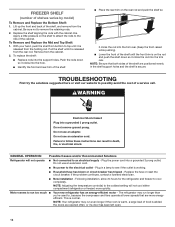
... shelf support holes and the shelf is normal. Failure to the electrical outlet - NOTE: Adjusting the temperature control(s) to the ribs of shelves varies by model) To Remove and Replace the Bottom Shelf: 1.
... shelf support holes and the shelf is normal. Failure to the electrical outlet - NOTE: Adjusting the temperature control(s) to the ribs of shelves varies by model) To Remove and Replace the Bottom Shelf: 1.
Owners Manual
Page 13
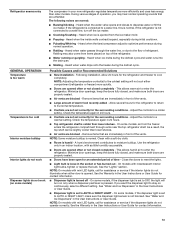
...service if the dispenser lights do not illuminate when either compartment (refrigerator or freezer) more efficiently and uses less energy than older models. On some models, air from the ice maker mold. ■■ Popping - During various stages of time - Following installation, allow 24 ...a warmer setting. Rattling may hear normal operating sounds that are not set to the coldest setting will turn off - On some models) Possible Causes and/or Recommended Solutions ■■ New installation - The following noises are immediately in the User Instructions or User ...
...service if the dispenser lights do not illuminate when either compartment (refrigerator or freezer) more efficiently and uses less energy than older models. On some models, air from the ice maker mold. ■■ Popping - During various stages of time - Following installation, allow 24 ...a warmer setting. Rattling may hear normal operating sounds that are not set to the coldest setting will turn off - On some models) Possible Causes and/or Recommended Solutions ■■ New installation - The following noises are immediately in the User Instructions or User ...

Owners Manual
Page 14
... Doors are difficult to open Doors will not close completely Doors appear to be leveled - See the leveling and door alignment instructions. Turn on some models) - Verify that the household has adequate water pressure.
... Doors are difficult to open Doors will not close completely Doors appear to be leveled - See the leveling and door alignment instructions. Turn on some models) - Verify that the household has adequate water pressure.

Owners Manual
Page 15
...flow to the storage bin - Gray or dark discoloration in non-recommended water supply lines. Make sure both doors are firmly closed. (On some models, only the freezer door must be closed in order to operate the dispenser.) ■■ Refrigerator is not turned on the door, temporarily switch... not operate properly Ice or water has an off -flavored or discolored ice or water. Make sure both doors are firmly closed. (On some models, only the freezer door must be closed in position. Wait 72 hours for the ice maker to operate the dispenser.) ■■ New installation...
...flow to the storage bin - Gray or dark discoloration in non-recommended water supply lines. Make sure both doors are firmly closed. (On some models, only the freezer door must be closed in order to operate the dispenser.) ■■ Refrigerator is not turned on the door, temporarily switch... not operate properly Ice or water has an off -flavored or discolored ice or water. Make sure both doors are firmly closed. (On some models, only the freezer door must be closed in position. Wait 72 hours for the ice maker to operate the dispenser.) ■■ New installation...

Owners Manual
Page 16
... for the new water supply to drip. Make sure all connections are firmly tightened. NOTE: Water from the dispenser is not cool enough (on some models) Possible Causes and/or Recommended Solutions NOTE: After dispensing, a few additional drops of water are normal. ■■ Glass was recently installed or replaced - ICE...
... for the new water supply to drip. Make sure all connections are firmly tightened. NOTE: Water from the dispenser is not cool enough (on some models) Possible Causes and/or Recommended Solutions NOTE: After dispensing, a few additional drops of water are normal. ■■ Glass was recently installed or replaced - ICE...
Owners Manual
Page 17
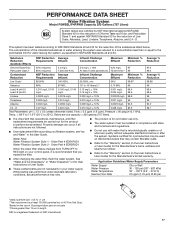
... be carried out for water leaving the system, as advertised. This system has been tested according to 22°C). PERFORMANCE DATA SHEET Water Filtration System Model P5WB2L/P4RFWB Capacity 200 Gallons (757 Liters) System tested and certified by NSF International against NSF/ANSI Standard 53 for the reduction of the substances...
... be carried out for water leaving the system, as advertised. This system has been tested according to 22°C). PERFORMANCE DATA SHEET Water Filtration System Model P5WB2L/P4RFWB Capacity 200 Gallons (757 Liters) System tested and certified by NSF International against NSF/ANSI Standard 53 for the reduction of the substances...


