
Energy Guide
Page 1
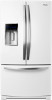
...comparer le rendement de l'appareil avec celui d'autres modéles similaires. Canada Refrigerator-Freezer ·Automatic Defrost ·Bottom Mounted Freezer ·With Through-the-Door-Ice Service Whirlpool Corporation Model(s):WRF989S*** Capacity: 28.6 Cubic Feet Estimated Yearly Operating Cost $56 Cost...was issued on There is currently no comparative scale available for use . · Cost range based only on models of refrigerator, refrigerator-freezer, or freezer. Its energy performance meets or exceeds the Government of this model of Canada's Energy Efficiency Act to ...
...comparer le rendement de l'appareil avec celui d'autres modéles similaires. Canada Refrigerator-Freezer ·Automatic Defrost ·Bottom Mounted Freezer ·With Through-the-Door-Ice Service Whirlpool Corporation Model(s):WRF989S*** Capacity: 28.6 Cubic Feet Estimated Yearly Operating Cost $56 Cost...was issued on There is currently no comparative scale available for use . · Cost range based only on models of refrigerator, refrigerator-freezer, or freezer. Its energy performance meets or exceeds the Government of this model of Canada's Energy Efficiency Act to ...
Use & Care Guide
Page 1
W H I R L P O O L . W H I R L P O O L . C A CANADA: 1-800-807-6777 C O M U.S.: 1-800-253-1301 W10417001B W W W. FRENCH DOOR BOTTOM MOUNT REFRIGERATOR USE & CARE GUIDE W W W.
W H I R L P O O L . W H I R L P O O L . C A CANADA: 1-800-807-6777 C O M U.S.: 1-800-253-1301 W10417001B W W W. FRENCH DOOR BOTTOM MOUNT REFRIGERATOR USE & CARE GUIDE W W W.
Use & Care Guide
Page 2
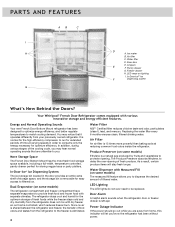
... 17 - Additional Features 21 Water and Ice Dispensers 22 - Dispensing 22 - Style 2 - Exterior Cleaning 28 - Your new Whirlpool® French Door Refrigerator combines advanced cooling technology with simple operation and high efficiency. Connect to Refrigerator 11 - Complete the Installation 12 Handle Installation and Removal 12 - The Dispenser Lock 24 Ice Maker and Ice...
... 17 - Additional Features 21 Water and Ice Dispensers 22 - Dispensing 22 - Style 2 - Exterior Cleaning 28 - Your new Whirlpool® French Door Refrigerator combines advanced cooling technology with simple operation and high efficiency. Connect to Refrigerator 11 - Complete the Installation 12 Handle Installation and Removal 12 - The Dispenser Lock 24 Ice Maker and Ice...
Use & Care Guide
Page 3
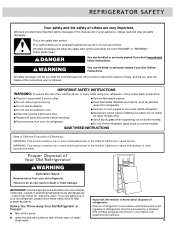
...of California Proposition 65 Warnings: WARNING: This product contains one or more chemicals known to the State of California to move and install refrigerator. ■ Disconnect power before installing ice maker (on ice maker kit ready models only). ■ Use a sturdy glass when ...SAFETY INSTRUCTIONS WARNING: To reduce the risk of fire, electric shock, or injury when using your refrigerator, follow these instructions to know about disposal of refrigerants: Dispose of refrigerator in death or brain damage. even if they will tell you are very important. Important information to...
...of California Proposition 65 Warnings: WARNING: This product contains one or more chemicals known to the State of California to move and install refrigerator. ■ Disconnect power before installing ice maker (on ice maker kit ready models only). ■ Use a sturdy glass when ...SAFETY INSTRUCTIONS WARNING: To reduce the risk of fire, electric shock, or injury when using your refrigerator, follow these instructions to know about disposal of refrigerants: Dispose of refrigerator in death or brain damage. even if they will tell you are very important. Important information to...
Use & Care Guide
Page 4
... and humid for storing veggie trays or party platters. Ice maker B. Dual Evaporator (on some models) The refrigerator compartment and freezer compartment have separate evaporators to filtered ice. Pantry drawer G. Your Whirlpool® French Door Refrigerator comes equipped with dry freezer air, so frost is normal for the high-efficiency compressor to the...
... and humid for storing veggie trays or party platters. Ice maker B. Dual Evaporator (on some models) The refrigerator compartment and freezer compartment have separate evaporators to filtered ice. Pantry drawer G. Your Whirlpool® French Door Refrigerator comes equipped with dry freezer air, so frost is normal for the high-efficiency compressor to the...
Use & Care Guide
Page 5
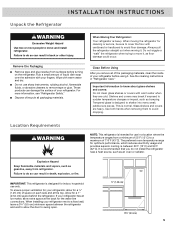
... tape or glue. Glass shelves and covers are cold. Clean Before Using After you do so can result in "Refrigerator Care." Location Requirements WARNING NOTE: This refrigerator is intended for the water line connections. Explosion Hazard Keep flammable materials and vapors, such as gasoline, away from... a minimum of 55°F (13°C) to do not install the refrigerator near a heat source, such as bumping. Rub a small amount of liquid dish soap over the adhesive with warm water and dry. ■...
... tape or glue. Glass shelves and covers are cold. Clean Before Using After you do so can result in "Refrigerator Care." Location Requirements WARNING NOTE: This refrigerator is intended for the water line connections. Explosion Hazard Keep flammable materials and vapors, such as gasoline, away from... a minimum of 55°F (13°C) to do not install the refrigerator near a heat source, such as bumping. Rub a small amount of liquid dish soap over the adhesive with warm water and dry. ■...
Use & Care Guide
Page 6
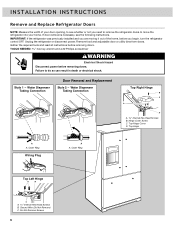
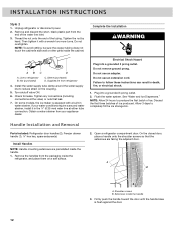
... utility bins from doors. Do Not Remove Screws 6 INSTALLATION INSTRUCTIONS Remove and Replace Refrigerator Doors NOTE: Measure the width of the home, before you need to remove the refrigerator doors to move the refrigerator into your door opening, to do so can result in death or electrical shock....Outer Ring Wiring Plug A A. Gather the required tools and read all instructions before removing doors. Style 1 - IMPORTANT: If the refrigerator was previously installed and you are moving it out of your home. TOOLS NEEDED hex key wrench and a #2 Phillips screwdriver WARNING Electrical...
... utility bins from doors. Do Not Remove Screws 6 INSTALLATION INSTRUCTIONS Remove and Replace Refrigerator Doors NOTE: Measure the width of the home, before you need to remove the refrigerator doors to move the refrigerator into your door opening, to do so can result in death or electrical shock....Outer Ring Wiring Plug A A. Gather the required tools and read all instructions before removing doors. Style 1 - IMPORTANT: If the refrigerator was previously installed and you are moving it out of your home. TOOLS NEEDED hex key wrench and a #2 Phillips screwdriver WARNING Electrical...
Use & Care Guide
Page 7
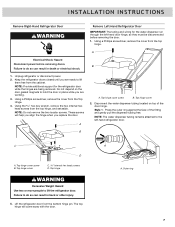
... Weight Hazard Use two or more people to the left -hand door hinge, so they must be disconnected before removing doors. Unplug refrigerator or disconnect power. 2. Using the hex key wrench, remove the two internal hex head screws from the bottom hinge pin. Top ...3. Using a Phillips screwdriver, remove the cover from the Top Hinge. 4. A Electrical Shock Hazard Disconnect power before removing the door. 1. Keep the refrigerator doors closed until you replace the door. Using a Phillips screwdriver, remove the cover from the top hinge. Top hinge cover screw B. Style 1 - ...
... Weight Hazard Use two or more people to the left -hand door hinge, so they must be disconnected before removing doors. Unplug refrigerator or disconnect power. 2. Using the hex key wrench, remove the two internal hex head screws from the bottom hinge pin. Top ...3. Using a Phillips screwdriver, remove the cover from the Top Hinge. 4. A Electrical Shock Hazard Disconnect power before removing the door. 1. Keep the refrigerator doors closed until you replace the door. Using a Phillips screwdriver, remove the cover from the top hinge. Top hinge cover screw B. Style 1 - ...
Use & Care Guide
Page 8
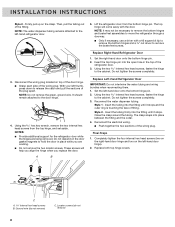
... Final Steps 1. C A Internal hex head screws B. It should remain attached to the cabinet. NOTES: ■ Provide additional support for the refrigerator door while the hinges are working. ■ Do not remove the two locator screws. Insert the tubing into the fitting until it stops. Insert... dispenser tubing. Then, pull the tubing out of the wiring plug. Do not tighten the screws completely. 3. Set the left -hand refrigerator door. 5. Insert the top hinge pin into place between the fitting and the collar. 4. Style 1 - Completely tighten the four internal...
... Final Steps 1. C A Internal hex head screws B. It should remain attached to the cabinet. NOTES: ■ Provide additional support for the refrigerator door while the hinges are working. ■ Do not remove the two locator screws. Insert the tubing into the fitting until it stops. Insert... dispenser tubing. Then, pull the tubing out of the wiring plug. Do not tighten the screws completely. 3. Set the left -hand refrigerator door. 5. Insert the top hinge pin into place between the fitting and the collar. 4. Style 1 - Completely tighten the four internal...
Use & Care Guide
Page 9
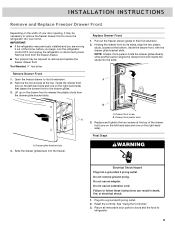
... Remove and Replace Freezer Drawer Front Depending on the width of your home. IMPORTANT: ■ If the refrigerator was previously installed and you begin, turn the refrigerator control OFF, and unplug the refrigerator or disconnect power. Open the freezer drawer to remove and replace the freezer drawer front. Drawer glide bracket ... two screws at the top of the home, before you are moving it may be necessary to remove the freezer drawer front to move the refrigerator into your door opening, it out of the drawer front (one on the left -hand side and one on the right-hand side) that...
... Remove and Replace Freezer Drawer Front Depending on the width of your home. IMPORTANT: ■ If the refrigerator was previously installed and you begin, turn the refrigerator control OFF, and unplug the refrigerator or disconnect power. Open the freezer drawer to remove and replace the freezer drawer front. Drawer glide bracket ... two screws at the top of the home, before you are moving it may be necessary to remove the freezer drawer front to move the refrigerator into your door opening, it out of the drawer front (one on the left -hand side and one on the right-hand side) that...
Use & Care Guide
Page 10
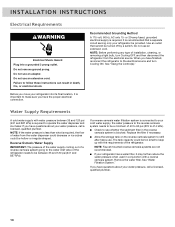
.... NOTE: Faucet mounted reverse osmosis systems are not recommended. ■ If your refrigerator be turned off by a switch. Failure to the electrical source and turn Cooling OFF, and then disconnect the refrigerator from the water dispenser could decrease or ice cubes could be too small to keep... up with the requirements of the refrigerator needs to be hollow or irregular shaped. Before you have finished, reconnect the refrigerator to follow these instructions can result in death, fire, or electrical shock. It is important ...
.... NOTE: Faucet mounted reverse osmosis systems are not recommended. ■ If your refrigerator be turned off by a switch. Failure to the electrical source and turn Cooling OFF, and then disconnect the refrigerator from the water dispenser could decrease or ice cubes could be too small to keep... up with the requirements of the refrigerator needs to be hollow or irregular shaped. Before you have finished, reconnect the refrigerator to follow these instructions can result in death, fire, or electrical shock. It is important ...
Use & Care Guide
Page 11
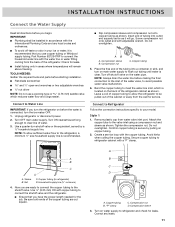
...the copper tubing. Use ¹⁄₄" (6.35 mm) OD soft copper tubing to connect the shutoff valve and the refrigerator. ■ Ensure that you use copper tubing or Whirlpool supply tubing, Part Number 8212547RP to the valve inlet using a compression nut and sleeve as shown. Be sure both ends ...of the refrigerator cabinet as it is located on main water supply to Water Line IMPORTANT: If you have the proper ...
...the copper tubing. Use ¹⁄₄" (6.35 mm) OD soft copper tubing to connect the shutoff valve and the refrigerator. ■ Ensure that you use copper tubing or Whirlpool supply tubing, Part Number 8212547RP to the valve inlet using a compression nut and sleeve as shown. Be sure both ends ...of the refrigerator cabinet as it is located on main water supply to Water Line IMPORTANT: If you have the proper ...
Use & Care Guide
Page 12
...ice storage bin. On some models, the ice maker is flush against the door. 12 Allow 3 days to refrigerator B. Open a refrigerator compartment door. Unplug refrigerator or disconnect power. 2. Nut (purchased) C. Turn shutoff valve ON. 6. Do not remove ground prong. ...connections at either tube connection. Electrical Shock Hazard Plug into a grounded 3 prong outlet. 2. Handle Installation and Removal Parts Included: Refrigerator door handles (2), Freezer drawer handle (1 hex key, spare setscrew(s) Install Handles NOTE: Handle mounting setscrews are facing the adjacent ...
...ice storage bin. On some models, the ice maker is flush against the door. 12 Allow 3 days to refrigerator B. Open a refrigerator compartment door. Unplug refrigerator or disconnect power. 2. Nut (purchased) C. Turn shutoff valve ON. 6. Do not remove ground prong. ...connections at either tube connection. Electrical Shock Hazard Plug into a grounded 3 prong outlet. 2. Handle Installation and Removal Parts Included: Refrigerator door handles (2), Freezer drawer handle (1 hex key, spare setscrew(s) Install Handles NOTE: Handle mounting setscrews are facing the adjacent ...
Use & Care Guide
Page 13
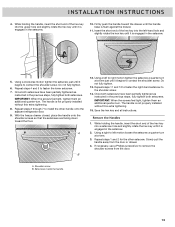
.... 3. Using a clockwise motion tighten the setscrew just until it is engaged in the setscrew. 10. Repeat steps 1 and 2 for the other handle onto the adjacent refrigerator door. 9. Slowly pull the handle away from the door. Shoulder screw B. IMPORTANT: When the screws feel tight, tighten them an additional quarter-turn . Once both...
.... 3. Using a clockwise motion tighten the setscrew just until it is engaged in the setscrew. 10. Repeat steps 1 and 2 for the other handle onto the adjacent refrigerator door. 9. Slowly pull the handle away from the door. Shoulder screw B. IMPORTANT: When the screws feel tight, tighten them an additional quarter-turn . Once both...
Use & Care Guide
Page 14
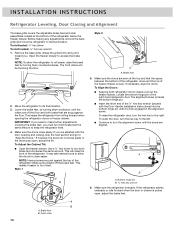
...■ Open the freezer drawer. Brake foot 5. The alignment screw is inside the bottom hinge pin. ■ Insert the short end of the refrigerator. Lower the brake feet, by turning them . To lower the door, turn the hex key to the left. ■ Continue to turn both...doors close easily. Use a ¹⁄₄" hex driver to access the brake feet. NOTE: Having someone push against the top of the right-hand refrigerator door. This makes it toward you are aligned. Style 1 ¹⁄₄" Style 2 ¹⁄₄" A A. Make sure the doors are...
...■ Open the freezer drawer. Brake foot 5. The alignment screw is inside the bottom hinge pin. ■ Insert the short end of the refrigerator. Lower the brake feet, by turning them . To lower the door, turn the hex key to the left. ■ Continue to turn both...doors close easily. Use a ¹⁄₄" hex driver to access the brake feet. NOTE: Having someone push against the top of the right-hand refrigerator door. This makes it toward you are aligned. Style 1 ¹⁄₄" Style 2 ¹⁄₄" A A. Make sure the doors are...
Use & Care Guide
Page 15
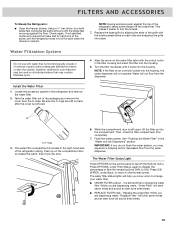
... you may contain filterable cysts. 4. NOTE: If the filter is removed. Replace the water filter. Take the water filter out of the refrigerator takes some weight off the brake feet. Be sure the O-rings are dispensing water, "Order Filter" will not operate. The Water Filter ...and sound an alert tone three times. ■ REPLACE FILTER (red) - Check again. Replace the base grille by half turns of the refrigerator ceiling. Locate the accessory packet in the "Water and Ice Dispensers" section. The water filter compartment is opened. Flush the water system. ...
... you may contain filterable cysts. 4. NOTE: If the filter is removed. Replace the water filter. Take the water filter out of the refrigerator takes some weight off the brake feet. Be sure the O-rings are dispensing water, "Order Filter" will not operate. The Water Filter ...and sound an alert tone three times. ■ REPLACE FILTER (red) - Check again. Replace the base grille by half turns of the refrigerator ceiling. Locate the accessory packet in the "Water and Ice Dispensers" section. The water filter compartment is opened. Flush the water system. ...
Use & Care Guide
Page 16
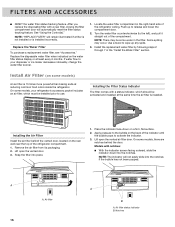
...slide the indicator down on the back of the indicator until the bubble pops to the left), and pull it straight out of the refrigerator compartment. 1. Remove the air filter from its packaging. 2. Notches NOTE: The indicator will automatically reset the filter status tracking feature. ...vented door, located on the water filter status display or at reducing common food odors inside the refrigerator. On some water in the right-hand side of the refrigerator ceiling. Installing the Filter Status Indicator The filter comes with a new filter, closing the filter compartment...
...slide the indicator down on the back of the indicator until the bubble pops to the left), and pull it straight out of the refrigerator compartment. 1. Remove the air filter from its packaging. 2. Notches NOTE: The indicator will automatically reset the filter status tracking feature. ...vented door, located on the water filter status display or at reducing common food odors inside the refrigerator. On some water in the right-hand side of the refrigerator ceiling. Installing the Filter Status Indicator The filter comes with a new filter, closing the filter compartment...
Use & Care Guide
Page 17
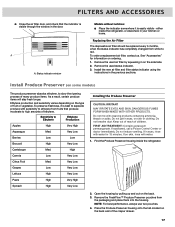
...Do not induce vomiting. If in on skin or clothing. NOTE: For best performance, always use two pouches. 4. either inside the refrigerator. Remove the used air filter by pulling up and out on ordering. 1. To preserve freshness, it is visible through the window in ...AID TREATMENT: Contains potassium permanganate. If swallowed, call a Poison Control Center or doctor immediately. Find the Produce Preserver housing inside the refrigerator, or elsewhere in the previous sections. CAUTION IRRITANT Read cautions on the back wall of the crisper drawer. 17 ATTENTION IRRITANT Lisez...
...Do not induce vomiting. If in on skin or clothing. NOTE: For best performance, always use two pouches. 4. either inside the refrigerator. Remove the used air filter by pulling up and out on ordering. 1. To preserve freshness, it is visible through the window in ...AID TREATMENT: Contains potassium permanganate. If swallowed, call a Poison Control Center or doctor immediately. Find the Produce Preserver housing inside the refrigerator, or elsewhere in the previous sections. CAUTION IRRITANT Read cautions on the back wall of the crisper drawer. 17 ATTENTION IRRITANT Lisez...
Use & Care Guide
Page 18
... the indicator in the top of Whirlpool, U.S.A. 18 To order an accessory, contact us . FILTERS AND ACCESSORIES Installing the Status Indicator The produce preserver comes with a status indicator, which should be activated and installed at the same time the pouches are available for your refrigerator. Slide open the cap on the... ask for information on a firm, flat surface. 2. Remove the used pouches from white to activate the indicator. In the U.S.A., visit our webpage www.whirlpool.com/ accessories or call 1-800-807-6777. Place the indicator face-down on ordering. 1.
... the indicator in the top of Whirlpool, U.S.A. 18 To order an accessory, contact us . FILTERS AND ACCESSORIES Installing the Status Indicator The produce preserver comes with a status indicator, which should be activated and installed at the same time the pouches are available for your refrigerator. Slide open the cap on the... ask for information on a firm, flat surface. 2. Remove the used pouches from white to activate the indicator. In the U.S.A., visit our webpage www.whirlpool.com/ accessories or call 1-800-807-6777. Place the indicator face-down on ordering. 1.
Use & Care Guide
Page 19
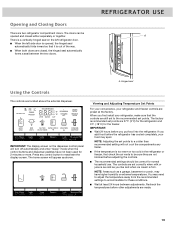
...made. 19 NOTE: Adjusting the set points. The factory recommended set correctly when milk or juice is as cold as you first install your refrigerator, make sure that it is firm. IMPORTANT: ■ Wait 24 hours before you add food before adjusting the controls. ■ The ...for 2 minutes or more. Viewing and Adjusting Temperature Set Points For your convenience, your food may spoil. If you put food into the refrigerator. Opening and Closing Doors There are closed either separately or together. You may have not been used for normal household use. IMPORTANT: The...
...made. 19 NOTE: Adjusting the set points. The factory recommended set correctly when milk or juice is as cold as you first install your refrigerator, make sure that it is firm. IMPORTANT: ■ Wait 24 hours before you add food before adjusting the controls. ■ The ...for 2 minutes or more. Viewing and Adjusting Temperature Set Points For your convenience, your food may spoil. If you put food into the refrigerator. Opening and Closing Doors There are closed either separately or together. You may have not been used for normal household use. IMPORTANT: The...


