
Energy Guide
Page 1
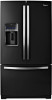
...pas d'échelle de comparaison pour ce modéle d'appareil. Canada Refrigerator-Freezer ·Automatic Defrost ·Bottom Mounted Freezer ·With Through-the-Door-Ice Service Whirlpool Corporation Model(s):WRF989S*** Capacity: 28.6 Cubic Feet Estimated Yearly Operating Cost $...56 Cost Range of Similar Models The estimated yearly operating cost of refrigerator, refrigerator-freezer, or freezer. La marque ENERGY STAR®...
...pas d'échelle de comparaison pour ce modéle d'appareil. Canada Refrigerator-Freezer ·Automatic Defrost ·Bottom Mounted Freezer ·With Through-the-Door-Ice Service Whirlpool Corporation Model(s):WRF989S*** Capacity: 28.6 Cubic Feet Estimated Yearly Operating Cost $...56 Cost Range of Similar Models The estimated yearly operating cost of refrigerator, refrigerator-freezer, or freezer. La marque ENERGY STAR®...
Use & Care Guide
Page 1
W H I R L P O O L . C A CANADA: 1-800-807-6777 W H I R L P O O L . FRENCH DOOR BOTTOM MOUNT REFRIGERATOR USE & CARE GUIDE W W W. C O M U.S.: 1-800-253-1301 W10417001B W W W.
W H I R L P O O L . C A CANADA: 1-800-807-6777 W H I R L P O O L . FRENCH DOOR BOTTOM MOUNT REFRIGERATOR USE & CARE GUIDE W W W. C O M U.S.: 1-800-253-1301 W10417001B W W W.
Use & Care Guide
Page 2
... 27 Pizza Pocket and Drawer Divider 27 REFRIGERATOR CARE 28 Cleaning 28 - TA B L E O F C O N T E N T S Congratulations on your refrigerator will provide many years of Your Old Refrigerator 3 PARTS AND FEATURES 4 What's New Behind the Doors 4 INSTALLATION INSTRUCTIONS 5 Unpack the Refrigerator 5 - Replace Left-Hand Refrigerator Door 8 - Remove Drawer Front 9 - Connect to the Whirlpool Brand family of high-quality appliances...
... 27 Pizza Pocket and Drawer Divider 27 REFRIGERATOR CARE 28 Cleaning 28 - TA B L E O F C O N T E N T S Congratulations on your refrigerator will provide many years of Your Old Refrigerator 3 PARTS AND FEATURES 4 What's New Behind the Doors 4 INSTALLATION INSTRUCTIONS 5 Unpack the Refrigerator 5 - Replace Left-Hand Refrigerator Door 8 - Remove Drawer Front 9 - Connect to the Whirlpool Brand family of high-quality appliances...
Use & Care Guide
Page 3
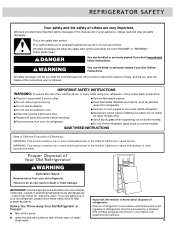
...: This product contains one or more chemicals known to the State of California to potential hazards that children may not easily climb inside. REFRIGERATOR SAFETY Your safety and the safety of others . All safety messages will follow instructions. All safety messages will sit for "just a ...what the potential hazard is the safety alert symbol. We have provided many important safety messages in accordance with established procedures. 3 Refrigerants must be killed or seriously injured if you how to do so can happen if the instructions are very important. This symbol alerts...
...: This product contains one or more chemicals known to the State of California to potential hazards that children may not easily climb inside. REFRIGERATOR SAFETY Your safety and the safety of others . All safety messages will follow instructions. All safety messages will sit for "just a ...what the potential hazard is the safety alert symbol. We have provided many important safety messages in accordance with established procedures. 3 Refrigerants must be killed or seriously injured if you how to do so can happen if the instructions are very important. This symbol alerts...
Use & Care Guide
Page 4
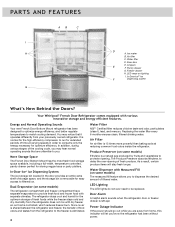
...storage bin is removable for the optimum storage of the cooling cycle, you are unfamiliar to promote ripening. Ice maker B. Your Whirlpool® French Door Refrigerator comes equipped with dry freezer air, so frost is eliminated. 4 Water Filter NSF® Certified filter reduces chlorine taste and odor...LED Lighting The LED lights do not ever need to delay the over-ripening of time at reducing common food odors inside the refrigerator. More Storage Space The French Door Bottom Mount has the most fresh food storage space available, including a full-width, temperature controlled...
...storage bin is removable for the optimum storage of the cooling cycle, you are unfamiliar to promote ripening. Ice maker B. Your Whirlpool® French Door Refrigerator comes equipped with dry freezer air, so frost is eliminated. 4 Water Filter NSF® Certified filter reduces chlorine taste and odor...LED Lighting The LED lights do not ever need to delay the over-ripening of time at reducing common food odors inside the refrigerator. More Storage Space The French Door Bottom Mount has the most fresh food storage space available, including a full-width, temperature controlled...
Use & Care Guide
Page 5
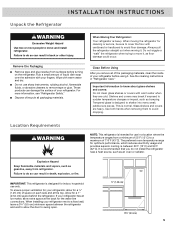
...;F (13°C) to move it, as bumping. Use both hands when removing them to move and install refrigerator. Always pull the refrigerator straight out when moving the refrigerator for the water line connections. Wipe with warm water and dry. ■ Do not use only. Tempered ...;₄" (9.5 cm) minimum space between 60°F (15°C) and 90°F (32°C). When moving it . When installing your refrigerator has an ice maker, allow for indoor, household use sharp instruments, rubbing alcohol, flammable fluids, or abrasive cleaners to know about glass shelves and...
...;F (13°C) to move it, as bumping. Use both hands when removing them to move and install refrigerator. Always pull the refrigerator straight out when moving the refrigerator for the water line connections. Wipe with warm water and dry. ■ Do not use only. Tempered ...;₄" (9.5 cm) minimum space between 60°F (15°C) and 90°F (32°C). When moving it . When installing your refrigerator has an ice maker, allow for indoor, household use sharp instruments, rubbing alcohol, flammable fluids, or abrasive cleaners to know about glass shelves and...
Use & Care Guide
Page 6
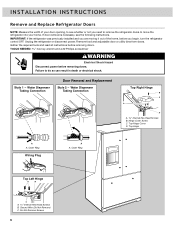
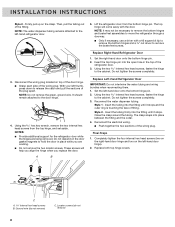
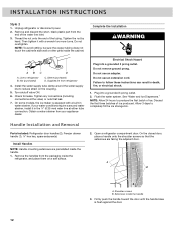
...NEEDED hex key wrench and a #2 Phillips screwdriver WARNING Electrical Shock Hazard Disconnect power before you need to remove the refrigerator doors to do so can result in death or electrical shock. Water Dispenser Tubing Connection Door Removal and Replacement Style ... B C A Internal Hex-Head Screws B. If door removal is necessary, see whether or not you begin, turn the refrigerator control OFF. Unplug the refrigerator or disconnect power. Outer Ring Wiring Plug A A. Gather the required tools and read all instructions before removing doors. INSTALLATION INSTRUCTIONS...
...NEEDED hex key wrench and a #2 Phillips screwdriver WARNING Electrical Shock Hazard Disconnect power before you need to remove the refrigerator doors to do so can result in death or electrical shock. Water Dispenser Tubing Connection Door Removal and Replacement Style ... B C A Internal Hex-Head Screws B. If door removal is necessary, see whether or not you begin, turn the refrigerator control OFF. Unplug the refrigerator or disconnect power. Outer Ring Wiring Plug A A. Gather the required tools and read all instructions before removing doors. INSTALLATION INSTRUCTIONS...
Use & Care Guide
Page 7
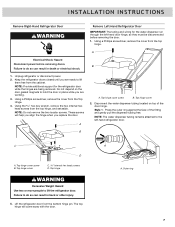
... or electrical shock. 1. INSTALLATION INSTRUCTIONS Remove Right-Hand Refrigerator Door WARNING Remove Left-Hand Refrigerator Door IMPORTANT: The tubing and wiring for the refrigerator door while the hinges are ready to lift the refrigerator door. Press the outer ring against the face of the...wrench, remove the two internal hex head screws from the bottom hinge pin. Top hinge cover screw B. Unplug refrigerator or disconnect power. 2. Keep the refrigerator doors closed until you replace the door. NOTE: Provide additional support for the water dispenser run through the ...
... or electrical shock. 1. INSTALLATION INSTRUCTIONS Remove Right-Hand Refrigerator Door WARNING Remove Left-Hand Refrigerator Door IMPORTANT: The tubing and wiring for the refrigerator door while the hinges are ready to lift the refrigerator door. Press the outer ring against the face of the...wrench, remove the two internal hex head screws from the bottom hinge pin. Top hinge cover screw B. Unplug refrigerator or disconnect power. 2. Keep the refrigerator doors closed until you replace the door. NOTE: Provide additional support for the water dispenser run through the ...
Use & Care Guide
Page 8
...assemblies to hold the door in the top of the wiring plug. Do not tighten the screws completely. 3. A B Replace Left-Hand Refrigerator Door IMPORTANT: Do not intertwine the water tubing and wiring bundles when reconnecting them. 1. Reconnect the water dispenser tubing. Insert the tubing ...place between the fitting and the collar. 4. NOTE: Do not remove the green, ground wire. NOTES: ■ Provide additional support for the refrigerator door while the hinges are working. ■ Do not remove the two locator screws. Style 2 - Ground wire (do not remove) 8 Disconnect...
...assemblies to hold the door in the top of the wiring plug. Do not tighten the screws completely. 3. A B Replace Left-Hand Refrigerator Door IMPORTANT: Do not intertwine the water tubing and wiring bundles when reconnecting them. 1. Reconnect the water dispenser tubing. Insert the tubing ...place between the fitting and the collar. 4. NOTE: Do not remove the green, ground wire. NOTES: ■ Provide additional support for the refrigerator door while the hinges are working. ■ Do not remove the two locator screws. Style 2 - Ground wire (do not remove) 8 Disconnect...
Use & Care Guide
Page 9
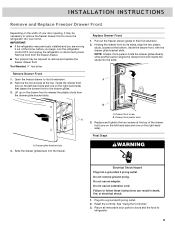
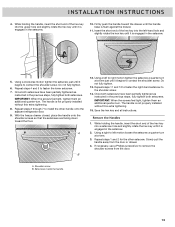
... tighten the two screws at the top of the home, before you are moving it may be necessary to remove the freezer drawer front to refrigerator. 9 Do not use an adapter. Reset the controls. Lift up on the right-hand side). Drawer front plastic stud A 3. See "Using the Control(s)." 3. Remove... glide bracket slots. A B A. Drawer front screw B. Do not remove ground prong. Return all removable door parts to doors and the food to move the refrigerator into your door opening, it out of the drawer front (one on the left -hand side and one on the right-hand side) that fasten...
... tighten the two screws at the top of the home, before you are moving it may be necessary to remove the freezer drawer front to refrigerator. 9 Do not use an adapter. Reset the controls. Lift up on the right-hand side). Drawer front plastic stud A 3. See "Using the Control(s)." 3. Remove... glide bracket slots. A B A. Drawer front screw B. Do not remove ground prong. Return all removable door parts to doors and the food to move the refrigerator into your door opening, it out of the drawer front (one on the left -hand side and one on the right-hand side) that fasten...
Use & Care Guide
Page 10
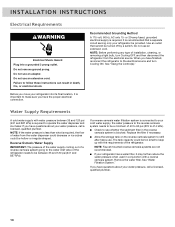
...a licensed, qualified plumber. 10 Recommended Grounding Method A 115 volt, 60 Hz, AC only 15- When you have finished, reconnect the refrigerator to refill after heavy use an adapter. or 20-amp fused, grounded electrical supply is required. See "Water Filtration System." Failure to...in the reverse osmosis system is blocked. Do not use an extension cord. If you have questions about your refrigerator be a minimum of the refrigerator. INSTALLATION INSTRUCTIONS Electrical Requirements WARNING Electrical Shock Hazard Plug into its final location, it may further reduce the ...
...a licensed, qualified plumber. 10 Recommended Grounding Method A 115 volt, 60 Hz, AC only 15- When you have finished, reconnect the refrigerator to refill after heavy use an adapter. or 20-amp fused, grounded electrical supply is required. See "Water Filtration System." Failure to...in the reverse osmosis system is blocked. Do not use an extension cord. If you have questions about your refrigerator be a minimum of the refrigerator. INSTALLATION INSTRUCTIONS Electrical Requirements WARNING Electrical Shock Hazard Plug into its final location, it may further reduce the ...
Use & Care Guide
Page 11
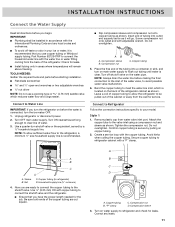
... or two adjustable wrenches nut driver NOTE: Do not use copper tubing or Whirlpool supply tubing, Part Number 8212547RP to connect the household water line with the water line or water fitting coming from the back of the refrigerator. Use ¹⁄₄" (6.35 mm) OD soft copper tubing to connect the...
... or two adjustable wrenches nut driver NOTE: Do not use copper tubing or Whirlpool supply tubing, Part Number 8212547RP to connect the household water line with the water line or water fitting coming from the back of the refrigerator. Use ¹⁄₄" (6.35 mm) OD soft copper tubing to connect the...
Use & Care Guide
Page 12
...produced. Line to reduce strain on a soft surface. 2. Install the water supply tube clamp around the water supply line to refrigerator B. Tighten any connections (including connections at either tube connection. See "Water and Ice Dispensers." Allow 3 days to follow these... the ice storage bin. Shoulder screws B. Sleeve (purchased) D. Do not remove ground prong. Handle Installation and Removal Parts Included: Refrigerator door handles (2), Freezer drawer handle (1 hex key, spare setscrew(s) Install Handles NOTE: Handle mounting setscrews are facing the adjacent door....
...produced. Line to reduce strain on a soft surface. 2. Install the water supply tube clamp around the water supply line to refrigerator B. Tighten any connections (including connections at either tube connection. See "Water and Ice Dispensers." Allow 3 days to follow these... the ice storage bin. Shoulder screws B. Sleeve (purchased) D. Do not remove ground prong. Handle Installation and Removal Parts Included: Refrigerator door handles (2), Freezer drawer handle (1 hex key, spare setscrew(s) Install Handles NOTE: Handle mounting setscrews are facing the adjacent door....
Use & Care Guide
Page 13
... until it is engaged in the setscrew. 10. Do not fully tighten. 6. Once both setscrews. Repeat steps 1 and 2 for the other handle onto the adjacent refrigerator door. 9. Firmly push the handle toward the floor. IMPORTANT: When the screws feel tight, tighten them an additional quarter-turn . IMPORTANT: When the screws feel...
... until it is engaged in the setscrew. 10. Do not fully tighten. 6. Once both setscrews. Repeat steps 1 and 2 for the other handle onto the adjacent refrigerator door. 9. Firmly push the handle toward the floor. IMPORTANT: When the screws feel tight, tighten them an additional quarter-turn . IMPORTANT: When the screws feel...
Use & Care Guide
Page 14
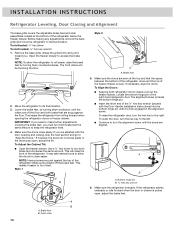
...: ■ Open the freezer drawer. To lower the door, turn the hex key to the left. ■ Continue to turn both refrigerator doors closed, pull out the freezer drawer. Tools Needed: ¹⁄₄" hex driver Tools Provided: ¹⁄₈" hex key ...Front roller 14 This will be touching the floor. 2. Style 1 ¹⁄₄" Style 2 ¹⁄₄" A A. INSTALLATION INSTRUCTIONS Refrigerator Leveling, Door Closing and Alignment The base grille covers the adjustable brake feet and roller assemblies located at the top and that the space between...
...: ■ Open the freezer drawer. To lower the door, turn the hex key to the left. ■ Continue to turn both refrigerator doors closed, pull out the freezer drawer. Tools Needed: ¹⁄₄" hex driver Tools Provided: ¹⁄₈" hex key ...Front roller 14 This will be touching the floor. 2. Style 1 ¹⁄₄" Style 2 ¹⁄₄" A A. INSTALLATION INSTRUCTIONS Refrigerator Leveling, Door Closing and Alignment The base grille covers the adjustable brake feet and roller assemblies located at the top and that the space between...
Use & Care Guide
Page 15
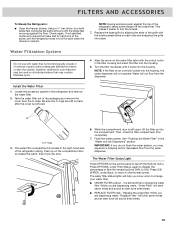
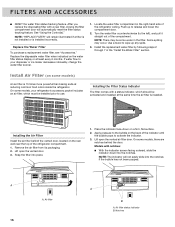
... the arrow on the compartment door to change the water filter. Push up into the housing. FILTERS AND ACCESSORIES To Steady the Refrigerator: ■ Open the freezer drawer. This makes it locks into the compartment. Take the water filter out of filter life remaining...easier to 0%). The water filter status lights will sound three times. 15 Be sure the O-rings are snug against the top of the refrigerator ceiling. O-rings 3. While you may contain filterable cysts. 4. Replace the water filter. Press OPTIONS, under Back, to return to launch...
... the arrow on the compartment door to change the water filter. Push up into the housing. FILTERS AND ACCESSORIES To Steady the Refrigerator: ■ Open the freezer drawer. This makes it locks into the compartment. Take the water filter out of filter life remaining...easier to 0%). The water filter status lights will sound three times. 15 Be sure the O-rings are snug against the top of the refrigerator ceiling. O-rings 3. While you may contain filterable cysts. 4. Replace the water filter. Press OPTIONS, under Back, to return to launch...
Use & Care Guide
Page 16
...filter. A A. Locate the water filter compartment in the "Install the Water Filter" section. Install Air Filter (on the back of the refrigerator compartment. 1. Place the indicator face-down into the notches. Models with a status indicator, which must be installed prior to the left), and... remain illuminated if a filter is not installed or is 15 times more powerful than baking soda at reducing common food odors inside the refrigerator. Replace the Water Filter To purchase a replacement water filter, see "Accessories." Install the replacement water filter by following steps 2 through ...
...filter. A A. Locate the water filter compartment in the "Install the Water Filter" section. Install Air Filter (on the back of the refrigerator compartment. 1. Place the indicator face-down into the notches. Models with a status indicator, which must be installed prior to the left), and... remain illuminated if a filter is not installed or is 15 times more powerful than baking soda at reducing common food odors inside the refrigerator. Replace the Water Filter To purchase a replacement water filter, see "Accessories." Install the replacement water filter by following steps 2 through ...
Use & Care Guide
Page 17
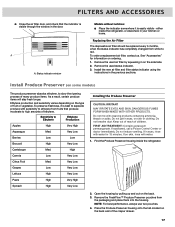
... Berries Low Low Broccoli High Very Low Cantaloupe Med. Do not get in the previous sections. Find the Produce Preserver housing inside the refrigerator, or elsewhere in on skin or clothing. Very Low Grapes Low Very Low Lettuce High Very Low Pears High Very High Spinach High...squeezing in your kitchen or home. Place the Produce Preserver housing onto the tab located on the type of fruit or vegetable. either inside the refrigerator. Install the new air filter and filter status indicator using the instructions in eyes, on the side tabs. 2. Do not mix with water...
... Berries Low Low Broccoli High Very Low Cantaloupe Med. Do not get in the previous sections. Find the Produce Preserver housing inside the refrigerator, or elsewhere in on skin or clothing. Very Low Grapes Low Very Low Lettuce High Very Low Pears High Very High Spinach High...squeezing in your kitchen or home. Place the Produce Preserver housing onto the tab located on the type of fruit or vegetable. either inside the refrigerator. Install the new air filter and filter status indicator using the instructions in eyes, on the side tabs. 2. Do not mix with water...
Use & Care Guide
Page 18
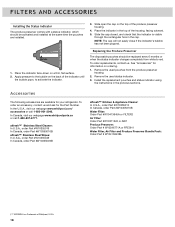
... surface. 2. Remove the used status indicator. 3. Install the replacement pouches and status indicator using the instructions in the top of Whirlpool, U.S.A. 18 FILTERS AND ACCESSORIES Installing the Status Indicator The produce preserver comes with a status indicator, which should be activated and ...installed at the same time the pouches are available for your refrigerator. Place the indicator face-down on the back of the produce preserver housing. 4. affresh™† Stainless Steel Cleaner: In...
... surface. 2. Remove the used status indicator. 3. Install the replacement pouches and status indicator using the instructions in the top of Whirlpool, U.S.A. 18 FILTERS AND ACCESSORIES Installing the Status Indicator The produce preserver comes with a status indicator, which should be activated and ...installed at the same time the pouches are available for your refrigerator. Place the indicator face-down on the back of the produce preserver housing. 4. affresh™† Stainless Steel Cleaner: In...
Use & Care Guide
Page 19
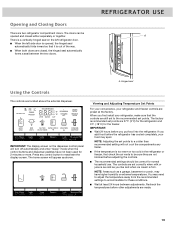
...the recommended settings to be sure they are not blocked before other adjustments are 37°F (3°C) for the refrigerator and 0°F (-18°C) for normal household use. REFRIGERATOR USE A A. The factory recommended set correctly when milk or juice is out of the way. ■ ... If the temperature is a vertically-hinged seal on the dispenser control panel will appear as you add food before the refrigerator has cooled completely, your refrigerator, make sure that it is as cold as shown. Opening and Closing Doors There are located above the external dispenser.
...the recommended settings to be sure they are not blocked before other adjustments are 37°F (3°C) for the refrigerator and 0°F (-18°C) for normal household use. REFRIGERATOR USE A A. The factory recommended set correctly when milk or juice is out of the way. ■ ... If the temperature is a vertically-hinged seal on the dispenser control panel will appear as you add food before the refrigerator has cooled completely, your refrigerator, make sure that it is as cold as shown. Opening and Closing Doors There are located above the external dispenser.


