
Use & Care Guide
Page 1
W H I R L P O O L . W H I R L P O O L . C A U.S.: 1-800-253-1301 CANADA: 1-800-807-6777 W10750538A FRENCH DOOR BOTTOM MOUNT REFRIGERATOR USE & CARE GUIDE W W W. C O M W W W.
W H I R L P O O L . W H I R L P O O L . C A U.S.: 1-800-253-1301 CANADA: 1-800-807-6777 W10750538A FRENCH DOOR BOTTOM MOUNT REFRIGERATOR USE & CARE GUIDE W W W. C O M W W W.
Use & Care Guide
Page 2
... 28 DOOR FEATURES 28 Door Bins 28 FREEZER FEATURES 28 Pizza Pocket and Drawer Divider 28 REFRIGERATOR CARE 29 Cleaning 29 - Vacations 30 - TABLE OF CONTENTS Congratulations on your new refrigerator. Your new Whirlpool® French Door Refrigerator combines advanced cooling technology with simple operation and high efficiency. Clean Before Using 5 Location Requirements 6 Remove...
... 28 DOOR FEATURES 28 Door Bins 28 FREEZER FEATURES 28 Pizza Pocket and Drawer Divider 28 REFRIGERATOR CARE 29 Cleaning 29 - Vacations 30 - TABLE OF CONTENTS Congratulations on your new refrigerator. Your new Whirlpool® French Door Refrigerator combines advanced cooling technology with simple operation and high efficiency. Clean Before Using 5 Location Requirements 6 Remove...
Use & Care Guide
Page 3
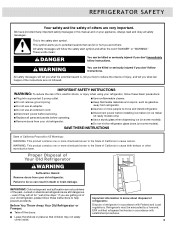
... are getting rid of your appliance. This is , tell you how to do so can be evacuated by a licensed, EPA certified refrigerant technician in place so that can kill or hurt you what the potential hazard is the safety alert symbol. Failure to reduce the chance... kit ready models only). ■ Use a sturdy glass when dispensing ice (on some models). ■ Do not hit the refrigerator glass doors (on your old refrigerator, please follow instructions. This symbol alerts you to cause cancer. SAVE THESE INSTRUCTIONS State of California Proposition 65 Warnings: WARNING: This ...
... are getting rid of your appliance. This is , tell you how to do so can be evacuated by a licensed, EPA certified refrigerant technician in place so that can kill or hurt you what the potential hazard is the safety alert symbol. Failure to reduce the chance... kit ready models only). ■ Use a sturdy glass when dispensing ice (on some models). ■ Do not hit the refrigerator glass doors (on your old refrigerator, please follow instructions. This symbol alerts you to cause cancer. SAVE THESE INSTRUCTIONS State of California Proposition 65 Warnings: WARNING: This ...
Use & Care Guide
Page 4
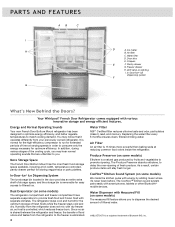
... consume only the energy necessary for the optimum storage of fresh produce. Door bins E. Pantry drawer G. Your Whirlpool® French Door Refrigerator comes equipped with smart phones, tablets or other Bluetooth®† mobile devices. You may hear normal operating ...width, temperature controlled, pantry drawer perfect for easy access to the freezer is removable for storing veggie trays or party platters. Humidity from the refrigerator does not mix with separate climates. Ice maker B. Crispers E F. Freezer drawer H. Produce Preserver (on lighting I H G D A. ...
... consume only the energy necessary for the optimum storage of fresh produce. Door bins E. Pantry drawer G. Your Whirlpool® French Door Refrigerator comes equipped with smart phones, tablets or other Bluetooth®† mobile devices. You may hear normal operating ...width, temperature controlled, pantry drawer perfect for easy access to the freezer is removable for storing veggie trays or party platters. Humidity from the refrigerator does not mix with separate climates. Ice maker B. Crispers E F. Freezer drawer H. Produce Preserver (on lighting I H G D A. ...
Use & Care Guide
Page 5
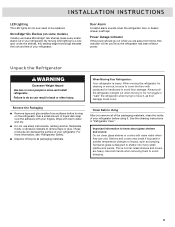
...covers with cardboard or hardboard to cover the floor with warm water when they are heavy. Unpack the Refrigerator WARNING Excessive Weight Hazard Use two or more information, see "Refrigerator Safety." ■ Dispose of/recycle all of the packaging materials, clean the inside of liquid dish... Shelves and covers may break if exposed to shatter into many small, pebble-size pieces. Door Alarm A helpful alarm sounds when the refrigerator door or freezer drawer is designed to sudden temperature changes or impact, such as floor damage could occur. For more people to avoid ...
...covers with cardboard or hardboard to cover the floor with warm water when they are heavy. Unpack the Refrigerator WARNING Excessive Weight Hazard Use two or more information, see "Refrigerator Safety." ■ Dispose of/recycle all of the packaging materials, clean the inside of liquid dish... Shelves and covers may break if exposed to shatter into many small, pebble-size pieces. Door Alarm A helpful alarm sounds when the refrigerator door or freezer drawer is designed to sudden temperature changes or impact, such as floor damage could occur. For more people to avoid ...
Use & Care Guide
Page 6
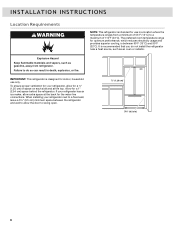
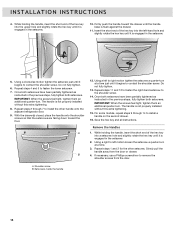
...8322;" (1.25 cm) of 110°F (43°C). The preferred room temperature range for a 1" (2.54 cm) space behind the refrigerator. Explosion Hazard Keep flammable materials and vapors, such as an oven or radiator. It is recommended that you do so can result in...extra space at the top. INSTALLATION INSTRUCTIONS Location Requirements WARNING NOTE: This refrigerator is intended for use only. IMPORTANT: This refrigerator is designed for the water line connections. To ensure proper ventilation for your refrigerator next to swing open. ¹⁄₂" (1.25 cm) 3³...
...8322;" (1.25 cm) of 110°F (43°C). The preferred room temperature range for a 1" (2.54 cm) space behind the refrigerator. Explosion Hazard Keep flammable materials and vapors, such as an oven or radiator. It is recommended that you do so can result in...extra space at the top. INSTALLATION INSTRUCTIONS Location Requirements WARNING NOTE: This refrigerator is intended for use only. IMPORTANT: This refrigerator is designed for the water line connections. To ensure proper ventilation for your refrigerator next to swing open. ¹⁄₂" (1.25 cm) 3³...
Use & Care Guide
Page 7
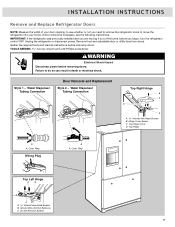
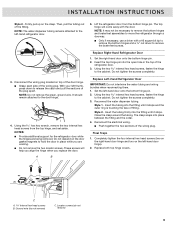
... your door opening, to see the following instructions. Do Not Remove Screws 7 IMPORTANT: If the refrigerator was previously installed and you begin, turn the refrigerator control OFF. Remove food and adjustable door or utility bins from doors. Outer Ring Wiring Plug A A. If door removal is ...necessary, see whether or not you need to remove the refrigerator doors to do so can result in death or electrical shock. Style 1 - Hinge Cover Screw C. Outer Ring Top Left Hinge A B C A Internal...
... your door opening, to see the following instructions. Do Not Remove Screws 7 IMPORTANT: If the refrigerator was previously installed and you begin, turn the refrigerator control OFF. Remove food and adjustable door or utility bins from doors. Outer Ring Wiring Plug A A. If door removal is ...necessary, see whether or not you need to remove the refrigerator doors to do so can result in death or electrical shock. Style 1 - Hinge Cover Screw C. Outer Ring Top Left Hinge A B C A Internal...
Use & Care Guide
Page 8
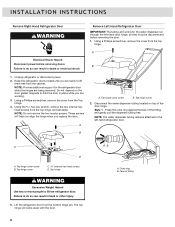
... the outer ring against the face of fitting Lift the refrigerator door from the Top Hinge. 4. INSTALLATION INSTRUCTIONS Remove Right-Hand Refrigerator Door WARNING Remove Left-Hand Refrigerator Door IMPORTANT: The tubing and wiring for the refrigerator door while the hinges are being removed. NOTE: Provide ...not remove the two locator screws. Style 1 - Top hinge cover C Internal hex head screws D. Top hinge cover screw B. Keep the refrigerator doors closed until you are ready to the left -hand door hinge, so they must be disconnected before removing doors. Do not depend ...
... the outer ring against the face of fitting Lift the refrigerator door from the Top Hinge. 4. INSTALLATION INSTRUCTIONS Remove Right-Hand Refrigerator Door WARNING Remove Left-Hand Refrigerator Door IMPORTANT: The tubing and wiring for the refrigerator door while the hinges are being removed. NOTE: Provide ...not remove the two locator screws. Style 1 - Top hinge cover C Internal hex head screws D. Top hinge cover screw B. Keep the refrigerator doors closed until you are ready to the left -hand door hinge, so they must be disconnected before removing doors. Do not depend ...
Use & Care Guide
Page 9
... screws (do not remove) C. INSTALLATION INSTRUCTIONS Style 2 - Disconnect the wiring plug located on the clasp. Do not depend on the left -hand refrigerator door. 3. NOTE: It may not be necessary to remove the bottom hinges and brake feet assemblies to the left -hand door hinge). 2. Do not...Firmly pull up on top of the door hinge. ■ Grasp each side of fitting. NOTE: The water dispenser tubing remains attached to move the refrigerator through a doorway. ■ Only if necessary, use a driver with the door. Set the right-hand door onto the bottom hinge pin. 2. ...
... screws (do not remove) C. INSTALLATION INSTRUCTIONS Style 2 - Disconnect the wiring plug located on the clasp. Do not depend on the left -hand refrigerator door. 3. NOTE: It may not be necessary to remove the bottom hinges and brake feet assemblies to the left -hand door hinge). 2. Do not...Firmly pull up on top of the door hinge. ■ Grasp each side of fitting. NOTE: The water dispenser tubing remains attached to move the refrigerator through a doorway. ■ Only if necessary, use a driver with the door. Set the right-hand door onto the bottom hinge pin. 2. ...

Use & Care Guide
Page 10
... previously installed and you are moving it may be necessary to remove the freezer drawer front to move the refrigerator into the slots. Slide the drawer glides back into a grounded 3 prong outlet. Do not use an adapter. Return all removable door parts...drawer glides to its sides, align the two plastic studs, located at the top of the home, before you begin, turn the refrigerator control OFF, and unplug the refrigerator or disconnect power. Drawer front screw B. Reset the controls. Drawer glide bracket slots 4. INSTALLATION INSTRUCTIONS Remove and Replace Freezer Drawer ...
... previously installed and you are moving it may be necessary to remove the freezer drawer front to move the refrigerator into the slots. Slide the drawer glides back into a grounded 3 prong outlet. Do not use an adapter. Return all removable door parts...drawer glides to its sides, align the two plastic studs, located at the top of the home, before you begin, turn the refrigerator control OFF, and unplug the refrigerator or disconnect power. Drawer front screw B. Reset the controls. Drawer glide bracket slots 4. INSTALLATION INSTRUCTIONS Remove and Replace Freezer Drawer ...
Use & Care Guide
Page 11
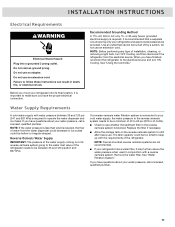
...be too small to keep up with water pressure between 35 and 120 psi (241 and 827 kPa). NOTE: Before performing any type of the refrigerator needs to the water inlet valve of installation, cleaning, or removing a light bulb, turn ON Cooling. Do not remove ground prong. Water Supply...cold water supply with the requirements of 40 to 60 psi (276 to 414 kPa). ■ Check to make sure you have questions about your refrigerator has a water filter, it is important to see whether the sediment filter in death, fire, or electrical shock. If a reverse osmosis water ...
...be too small to keep up with water pressure between 35 and 120 psi (241 and 827 kPa). NOTE: Before performing any type of the refrigerator needs to the water inlet valve of installation, cleaning, or removing a light bulb, turn ON Cooling. Do not remove ground prong. Water Supply...cold water supply with the requirements of 40 to 60 psi (276 to 414 kPa). ■ Check to make sure you have questions about your refrigerator has a water filter, it is important to see whether the sediment filter in death, fire, or electrical shock. If a reverse osmosis water ...
Use & Care Guide
Page 12
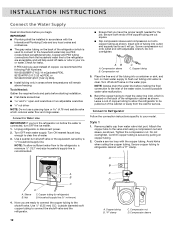
... compression sleeve and compression nut onto copper tubing as shown. Connect to be installed in accordance with a "P" clamp. Bend the copper tubing to refrigerator) D. Confirm copper tubing is secure by a ¹⁄₂" household supply line. Avoid kinks when coiling the copper tubing. A B A... C A. C D A. Do not overtighten. Check for the job. Copper and PEX tubing connections from the household water line to refrigerator cabinet with the International Plumbing Code and any local codes and ordinances. ■ The gray water tubing on the back of water. ...
... compression sleeve and compression nut onto copper tubing as shown. Connect to be installed in accordance with a "P" clamp. Bend the copper tubing to refrigerator) D. Confirm copper tubing is secure by a ¹⁄₂" household supply line. Avoid kinks when coiling the copper tubing. A B A... C A. C D A. Do not overtighten. Check for the job. Copper and PEX tubing connections from the household water line to refrigerator cabinet with the International Plumbing Code and any local codes and ordinances. ■ The gray water tubing on the back of water. ...
Use & Care Guide
Page 13
...on model hex key, spare setscrew(s) NOTE: With the handles laying on a soft surface. 2. Remove the handles from the packaging inside the refrigerator, and place them on a flat surface, the handles intended for the drawers are preinstalled inside the handle. 1. A B A. Shoulder screws ...nut by hand. Ferrule (purchased) D. If your appliance dealer. Do not remove ground prong. See "Water and Ice Dispensers." Open a refrigerator compartment door. Firmly push the handle toward the door until the handle base is equipped with a wrench two more curved. Correct any connections (...
...on model hex key, spare setscrew(s) NOTE: With the handles laying on a soft surface. 2. Remove the handles from the packaging inside the refrigerator, and place them on a flat surface, the handles intended for the drawers are preinstalled inside the handle. 1. A B A. Shoulder screws ...nut by hand. Ferrule (purchased) D. If your appliance dealer. Do not remove ground prong. See "Water and Ice Dispensers." Open a refrigerator compartment door. Firmly push the handle toward the door until the handle base is equipped with a wrench two more curved. Correct any connections (...
Use & Care Guide
Page 14
... properly installed without this extra tightening. 8. Using a right to left to install the other setscrew. Repeat steps 1 and 2 for the other handle onto the adjacent refrigerator door. 9. Shoulder screw B. For some models, repeat steps 9 through 7 to right motion tighten the setscrew a quarter-turn . Do not fully tighten. 6. Repeat steps 4 and 5 to...
... properly installed without this extra tightening. 8. Using a right to left to install the other setscrew. Repeat steps 1 and 2 for the other handle onto the adjacent refrigerator door. 9. Shoulder screw B. For some models, repeat steps 9 through 7 to right motion tighten the setscrew a quarter-turn . Do not fully tighten. 6. Repeat steps 4 and 5 to...

Use & Care Guide
Page 15
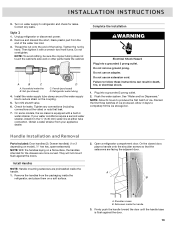
...to roll easier, raise the break feet by turning them clockwise, until it is pulled open , adjust the tilt. INSTALLATION INSTRUCTIONS Refrigerator Leveling, Door Closing and Alignment The base grille covers the adjustable brake feet and roller assemblies located at the top and that the.... This will be touching the floor. 2. Style 1 Style 2 ¹⁄₄" A A. If necessary, align the doors. Make sure the refrigerator is steady. To Align the Doors: ■ Keeping both brake feet are satisfied with the Door Handle Installation Instructions) into the bottom hinge pin until...
...to roll easier, raise the break feet by turning them clockwise, until it is pulled open , adjust the tilt. INSTALLATION INSTRUCTIONS Refrigerator Leveling, Door Closing and Alignment The base grille covers the adjustable brake feet and roller assemblies located at the top and that the.... This will be touching the floor. 2. Style 1 Style 2 ¹⁄₄" A A. If necessary, align the doors. Make sure the refrigerator is steady. To Align the Doors: ■ Keeping both brake feet are satisfied with the Door Handle Installation Instructions) into the bottom hinge pin until...
Use & Care Guide
Page 16
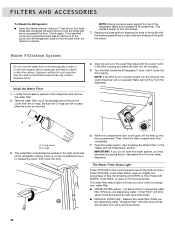
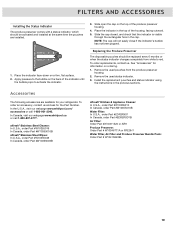
... A B A. Then, close the filter compartment door completely. 7. Press ICE/ WATER, under Filter Status, again to display the percentage of the refrigerator takes some weight off the brake feet. Be sure the O-rings are dispensing water, "Replace Filter" will blink seven times and an alert tone... are snug against the top of filter life remaining (from the water dispenser. Flush the water system. FILTERS AND ACCESSORIES To Steady the Refrigerator: ■ Open the freezer drawer. If not satisfied, continue to change your water filter. ■ ORDER FILTER (yellow) - This...
... A B A. Then, close the filter compartment door completely. 7. Press ICE/ WATER, under Filter Status, again to display the percentage of the refrigerator takes some weight off the brake feet. Be sure the O-rings are dispensing water, "Replace Filter" will blink seven times and an alert tone... are snug against the top of filter life remaining (from the water dispenser. Flush the water system. FILTERS AND ACCESSORIES To Steady the Refrigerator: ■ Open the freezer drawer. If not satisfied, continue to change your water filter. ■ ORDER FILTER (yellow) - This...
Use & Care Guide
Page 17
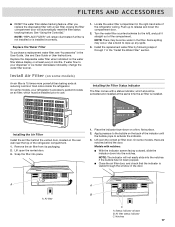
...lower the compartment door. 2. Install the replacement water filter by following steps 2 through the window in the right-hand side of the refrigerator compartment. 1. Remove the air filter from its packaging. 2. Turn the water filter counterclockwise (to the left), and pull it straight ..., there are notches behind the vented door, located on the water filter status display or at reducing common food odors inside the refrigerator. After you replace the disposable filter with a new filter, closing the filter compartment door will automatically reset the filter status tracking ...
...lower the compartment door. 2. Install the replacement water filter by following steps 2 through the window in the right-hand side of the refrigerator compartment. 1. Remove the air filter from its packaging. 2. Turn the water filter counterclockwise (to the left), and pull it straight ..., there are notches behind the vented door, located on the water filter status display or at reducing common food odors inside the refrigerator. After you replace the disposable filter with a new filter, closing the filter compartment door will automatically reset the filter status tracking ...
Use & Care Guide
Page 18
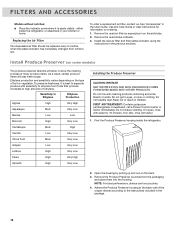
...Fruit Med. DANGEROUS FUMES FORM WHEN MIXED WITH OTHER PRODUCTS. If on the side tabs. 2. Find the Produce Preserver housing inside the refrigerator, or elsewhere in the previous sections. Remove the used status indicator. 3. Very Low Berries Low Low Broccoli High Very Low Cantaloupe Med.... either inside the refrigerator. See "Accessories" in the User Guide, Use and Care Guide or User Instructions for 15 minutes. Remove the used air filter by...
...Fruit Med. DANGEROUS FUMES FORM WHEN MIXED WITH OTHER PRODUCTS. If on the side tabs. 2. Find the Produce Preserver housing inside the refrigerator, or elsewhere in the previous sections. Remove the used status indicator. 3. Very Low Berries Low Low Broccoli High Very Low Cantaloupe Med.... either inside the refrigerator. See "Accessories" in the User Guide, Use and Care Guide or User Instructions for 15 minutes. Remove the used air filter by...
Use & Care Guide
Page 19
...that the indicator is visible through the rectangular hole in the top of the housing, facing outward. 5. In the U.S.A., visit our webpage www.whirlpool.com/ accessories or call 1-800-807-6777. affresh® Stainless Steel Cleaner: In U.S.A., order Part #W10355016 In Canada, order Part #...of the produce preserver housing. 4. To order replacements, contact us and ask for your refrigerator. Remove the used pouches from white to red. In Canada, visit our webpage www.whirlpool.ca or call 1-800-901-2042. FILTERS AND ACCESSORIES Installing the Status Indicator The produce...
...that the indicator is visible through the rectangular hole in the top of the housing, facing outward. 5. In the U.S.A., visit our webpage www.whirlpool.com/ accessories or call 1-800-807-6777. affresh® Stainless Steel Cleaner: In U.S.A., order Part #W10355016 In Canada, order Part #...of the produce preserver housing. 4. To order replacements, contact us and ask for your refrigerator. Remove the used pouches from white to red. In Canada, visit our webpage www.whirlpool.ca or call 1-800-901-2042. FILTERS AND ACCESSORIES Installing the Status Indicator The produce...
Use & Care Guide
Page 20
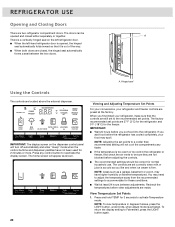
...between the two doors. NOTE: Areas such as shown. 20 Viewing and Adjusting Temperature Set Points For your convenience, your refrigerator and freezer controls are set points to a colder than recommended setting will not cool the compartments any control button to Fahrenheit,...extreme temperatures. IMPORTANT: ■ Wait 24 hours before other adjustments are not blocked before the refrigerator has cooled completely, your refrigerator, make sure that it is firm. REFRIGERATOR USE Opening and Closing Doors There are located above the external dispenser. NOTE: To view ...
...between the two doors. NOTE: Areas such as shown. 20 Viewing and Adjusting Temperature Set Points For your convenience, your refrigerator and freezer controls are set points to a colder than recommended setting will not cool the compartments any control button to Fahrenheit,...extreme temperatures. IMPORTANT: ■ Wait 24 hours before other adjustments are not blocked before the refrigerator has cooled completely, your refrigerator, make sure that it is firm. REFRIGERATOR USE Opening and Closing Doors There are located above the external dispenser. NOTE: To view ...

