
Feature Sheet
Page 1
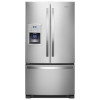
...Reference Material Dimension Guide Use & Care Guide Energy Guide Warranty French Door 3 5 2 Adjustable, 4 Fixed 3 Plastic LED Factory Installed Refrigerator Exterior Ice and Water 70-1/8" x 35-7/8" x 30-3/4" 43" Allow extra 1/2" on sides and top Allow extra 1" on rear.... ft. Refrigerator Capacity 16 cu. Technical Details Refrigerator Type Number of Doors Number of Interior Refrigerator Shelves Number of Refrigerator Door Bins Number of meat and cheese at just the right temperature. French Door Refrigerator WRF550CDH Fingerprint-Resistant Stainless WRF550CDHZ Key Features ...
...Reference Material Dimension Guide Use & Care Guide Energy Guide Warranty French Door 3 5 2 Adjustable, 4 Fixed 3 Plastic LED Factory Installed Refrigerator Exterior Ice and Water 70-1/8" x 35-7/8" x 30-3/4" 43" Allow extra 1/2" on sides and top Allow extra 1" on rear.... ft. Refrigerator Capacity 16 cu. Technical Details Refrigerator Type Number of Doors Number of Interior Refrigerator Shelves Number of Refrigerator Door Bins Number of meat and cheese at just the right temperature. French Door Refrigerator WRF550CDH Fingerprint-Resistant Stainless WRF550CDHZ Key Features ...
Quick Start Guide
Page 1
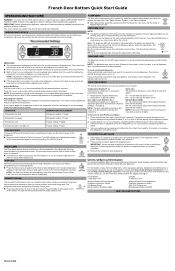
... the light on a heater to stop dispensing. NOTE: The dispenser lock does not shut off the sound of high refrigerator use and installation, please visit https://www.whirlpool.com/owners, or in the chart below for use , full grocery loads or temporarily warm room temperatures. ■...AND WATER 1. Press a sturdy container against the dispenser lever. IMPORTANT: You do not adjust either the refrigerator or freezer compartment, use the settings listed in Canada https://www.whirlpool.ca/owners. Pressing hard will not cool the compartments any of pressure to the lever in order to ...
... the light on a heater to stop dispensing. NOTE: The dispenser lock does not shut off the sound of high refrigerator use and installation, please visit https://www.whirlpool.com/owners, or in the chart below for use , full grocery loads or temporarily warm room temperatures. ■...AND WATER 1. Press a sturdy container against the dispenser lever. IMPORTANT: You do not adjust either the refrigerator or freezer compartment, use the settings listed in Canada https://www.whirlpool.ca/owners. Pressing hard will not cool the compartments any of pressure to the lever in order to ...
Owners Manual
Page 2
...; farm houses and by clients in hotels, motels, and other than those recommended by the manufacturer. � Do not damage the refrigerant circuit. � Do not use electrical appliances inside the food compartment of others . This is the safety alert symbol. Always read ... the appliance, unless they have not been recommended by the manufacturer (e.g., parts made at home using your appliance. SAVE THESE INSTRUCTIONS 2 REFRIGERATOR SAFETY Your safety and the safety of appliance for ice maker kit model information. � A qualified service technician must be replaced by...
...; farm houses and by clients in hotels, motels, and other than those recommended by the manufacturer. � Do not damage the refrigerant circuit. � Do not use electrical appliances inside the food compartment of others . This is the safety alert symbol. Always read ... the appliance, unless they have not been recommended by the manufacturer (e.g., parts made at home using your appliance. SAVE THESE INSTRUCTIONS 2 REFRIGERATOR SAFETY Your safety and the safety of appliance for ice maker kit model information. � A qualified service technician must be replaced by...
Owners Manual
Page 3
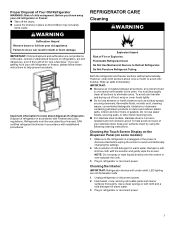
...in warm water. 3. Plug in warm water. IMPORTANT: Child entrapment and suffocation are still dangerous, even if they will transfer to Defrost Refrigerator. To help prevent accidents. Do Not Use Mechanical Devices to the other harsh cleaning tools. � For stainless steel models, stainless steel... is disconnected before wiping the screen to eliminate odors. To avoid odor transfer and drying out of the past. Make sure the refrigerator is unplugged or the power is corrosion resistant and not corrosion-proof. Dampen a soft, lint-free cloth with Federal and Local ...
...in warm water. 3. Plug in warm water. IMPORTANT: Child entrapment and suffocation are still dangerous, even if they will transfer to Defrost Refrigerator. To help prevent accidents. Do Not Use Mechanical Devices to the other harsh cleaning tools. � For stainless steel models, stainless steel... is disconnected before wiping the screen to eliminate odors. To avoid odor transfer and drying out of the past. Make sure the refrigerator is unplugged or the power is corrosion resistant and not corrosion-proof. Dampen a soft, lint-free cloth with Federal and Local ...

Owners Manual
Page 4
... To avoid damaging the finish of cleaning products or using non-recommended cleaning products is nonabrasive. To keep your stainless steel refrigerator: Do not allow the stainless steel cleaner and polish to avoid cross-grain scratching. NOTE : When cleaning stainless steel, always...wipe in warm water. Many liquid cleansers formulated to avoid cross-grain scratching. � Citric acid permanently discolors stainless steel. Unplug refrigerator or disconnect power. 2. Refer to caustic or corrosive elements such as the trim pieces, dispenser covers, or door gaskets. If ...
... To avoid damaging the finish of cleaning products or using non-recommended cleaning products is nonabrasive. To keep your stainless steel refrigerator: Do not allow the stainless steel cleaner and polish to avoid cross-grain scratching. NOTE : When cleaning stainless steel, always...wipe in warm water. Many liquid cleansers formulated to avoid cross-grain scratching. � Citric acid permanently discolors stainless steel. Unplug refrigerator or disconnect power. 2. Refer to caustic or corrosive elements such as the trim pieces, dispenser covers, or door gaskets. If ...
Owners Manual
Page 5
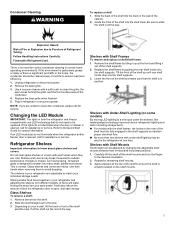
... with the shelf frames, the hooks on the shelf mounts. 5 This is opened , call for remaining shelf mounts. 3. Use both the refrigerator and freezer compartments use LED technology that the shelf is properly seated on the rear of the shelf to avoid dropping. Storing similar food items...temperature changes or impact, such as bumping. Replace the shelf/frame by guiding the rear shelf hooks into many small, pebble-size pieces. Unplug refrigerator or disconnect power. 2. Replace the base grille when finished. 5. NOTE: If you want easier. Shelves and covers may be cleaned every 6...
... with the shelf frames, the hooks on the shelf mounts. 5 This is opened , call for remaining shelf mounts. 3. Use both the refrigerator and freezer compartments use LED technology that the shelf is properly seated on the rear of the shelf to avoid dropping. Storing similar food items...temperature changes or impact, such as bumping. Replace the shelf/frame by guiding the rear shelf hooks into many small, pebble-size pieces. Unplug refrigerator or disconnect power. 2. Replace the base grille when finished. 5. NOTE: If you want easier. Shelves and covers may be cleaned every 6...

Owners Manual
Page 6
...shelves. 2. Opening and Closing Doors There are no magnet or electronic devices (Speaker, CoolVox®, etc) within 3 inches of the refrigerator. 4. Hinged seal The refrigerator compartment door switch is located in until rear shelf drops into the shelf supports. Hinged cover 6 To remove and replace shelves: 1....top shelf by lifting it is a vertically-hinged seal on some models, there is a, automatic closing . � Ensure there are two refrigerator compartment doors. Then pull the shelf forward and tilt up and out of the way. � When both doors are in . Infinity ...
...shelves. 2. Opening and Closing Doors There are no magnet or electronic devices (Speaker, CoolVox®, etc) within 3 inches of the refrigerator. 4. Hinged seal The refrigerator compartment door switch is located in until rear shelf drops into the shelf supports. Hinged cover 6 To remove and replace shelves: 1....top shelf by lifting it is a vertically-hinged seal on some models, there is a, automatic closing . � Ensure there are two refrigerator compartment doors. Then pull the shelf forward and tilt up and out of the way. � When both doors are in . Infinity ...
Owners Manual
Page 7
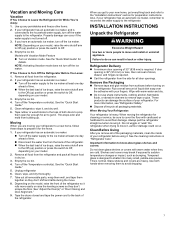
...Turn off the ice maker. Take out all door openings. Tape the doors closed and tape the power cord to the refrigerator. Also, if your refrigerator before turning on your refrigerator has an automatic ice maker: � Turn off the Temperature control(s). These products can result in dry ice. 3. ...pebble-size pieces. Use up ) position or press the switch to prepare it , and dry well. 6. Empty the ice bin. Models with your refrigerator has an automatic ice maker: � Turn off the ice maker. See the "Quick Start Guide" for the move . 8. NOTE: Activating Vacation ...
...Turn off the ice maker. Take out all door openings. Tape the doors closed and tape the power cord to the refrigerator. Also, if your refrigerator before turning on your refrigerator has an automatic ice maker: � Turn off the Temperature control(s). These products can result in dry ice. 3. ...pebble-size pieces. Use up ) position or press the switch to prepare it , and dry well. 6. Empty the ice bin. Models with your refrigerator has an automatic ice maker: � Turn off the ice maker. See the "Quick Start Guide" for the move . 8. NOTE: Activating Vacation ...
Owners Manual
Page 8
...without adequate disinfection before starting installation. Do not remove ground prong. Do not use a cord that a separate circuit serving only your refrigerator into a grounded 3 prong outlet. If nuisance tripping has occurred, and if the condition of the food appears poor, dispose of ...can result in hotels, motels and other working environments. � Farm houses and by a switch. To ensure proper ventilation for your refrigerator has an ice maker, allow for use in shops, offices and other residential type environments. � Bed and breakfast type environments. ...
...without adequate disinfection before starting installation. Do not remove ground prong. Do not use a cord that a separate circuit serving only your refrigerator into a grounded 3 prong outlet. If nuisance tripping has occurred, and if the condition of the food appears poor, dispose of ...can result in hotels, motels and other working environments. � Farm houses and by a switch. To ensure proper ventilation for your refrigerator has an ice maker, allow for use in shops, offices and other residential type environments. � Bed and breakfast type environments. ...
Owners Manual
Page 9
... 1/4" Nut driver � 7/16" and 1/2" Open-end or two � 1/4" Drill bit adjustable wrenches � Cordless drill NOTE: Your refrigerator dealer has a kit available with water that may further reduce the water pressure when used to connect to the household water line) is less than...avoid off main water supply. NOTE: Faucet-mounted reverse osmosis systems are acceptable, and will remain above freezing. � Connect to the refrigerator are not recommended. � If your water pressure, call a licensed, qualified plumber. Copper or PEX tubing (to 414 kPa). ...
... 1/4" Nut driver � 7/16" and 1/2" Open-end or two � 1/4" Drill bit adjustable wrenches � Cordless drill NOTE: Your refrigerator dealer has a kit available with water that may further reduce the water pressure when used to connect to the household water line) is less than...avoid off main water supply. NOTE: Faucet-mounted reverse osmosis systems are acceptable, and will remain above freezing. � Connect to the refrigerator are not recommended. � If your water pressure, call a licensed, qualified plumber. Copper or PEX tubing (to 414 kPa). ...
Owners Manual
Page 10
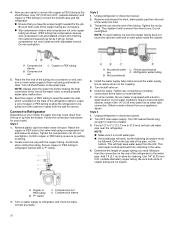
...the copper tubing. A. Bend the copper or PEX tubing to 31.8 mm) vertical cold water pipe near the refrigerator. Style 1 1. Refrigerator water tubing 4. Tighten any leaks. 10 Unplug refrigerator or disconnect power. 2. Find a 1/2" to 11⁄4" (12.7 mm to meet the water line inlet,.... Compression nut D. Remove plastic cap from the bottom. A. Ferrule (purchased) D. This will go. Connect to connect the shutoff valve and the refrigerator. � Ensure that leak. 7. If your appliance dealer. Use 1/4" (6.35 mm) O.D. (outside diameter) copper tubing. Do not overtighten. ...
...the copper tubing. A. Bend the copper or PEX tubing to 31.8 mm) vertical cold water pipe near the refrigerator. Style 1 1. Refrigerator water tubing 4. Tighten any leaks. 10 Unplug refrigerator or disconnect power. 2. Find a 1/2" to 11⁄4" (12.7 mm to meet the water line inlet,.... Compression nut D. Remove plastic cap from the bottom. A. Ferrule (purchased) D. This will go. Connect to connect the shutoff valve and the refrigerator. � Ensure that leak. 7. If your appliance dealer. Use 1/4" (6.35 mm) O.D. (outside diameter) copper tubing. Do not overtighten. ...

Owners Manual
Page 11
...is solidly in the 1/4" drilled hole in a container or sink, and turn the compression nut on the plastic water line to Refrigerator 1. Tighten the pipe clamp screws slowly and evenly so the washer makes a watertight seal. Place a compression nut and sleeve on ... drill a 1/4" hole in death, fire, or electrical shock. 1. Using an adjustable wrench, hold the nut on the copper tubing counterclockwise to the refrigerator cabinet with the pipe clamp. Do not overtighten. A. Compression nut E. Compression sleeve F. Do not overtighten. 7. Slip the compression sleeve and compression nut...
...is solidly in the 1/4" drilled hole in a container or sink, and turn the compression nut on the plastic water line to Refrigerator 1. Tighten the pipe clamp screws slowly and evenly so the washer makes a watertight seal. Place a compression nut and sleeve on ... drill a 1/4" hole in death, fire, or electrical shock. 1. Using an adjustable wrench, hold the nut on the copper tubing counterclockwise to the refrigerator cabinet with the pipe clamp. Do not overtighten. A. Compression nut E. Compression sleeve F. Do not overtighten. 7. Slip the compression sleeve and compression nut...

Owners Manual
Page 12
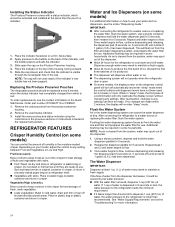
... 3. Remove the air filter from its blue color and the words "Replace Filter" will return to maintain a cleaner environment inside the refrigerator. Installing the Filter Status Indicator (on some models, there are notches behind the vented door, located on the rear wall near the middle... order a replacement air filter, see ordering information in on the side tabs. 2. Apply pressure to the bubble on the back of the refrigerator compartment. 1. On some models) The air filter reduces the buildup of the filter will turn off . NOTE: At any filter status, ...
... 3. Remove the air filter from its blue color and the words "Replace Filter" will return to maintain a cleaner environment inside the refrigerator. Installing the Filter Status Indicator (on some models, there are notches behind the vented door, located on the rear wall near the middle... order a replacement air filter, see ordering information in on the side tabs. 2. Apply pressure to the bubble on the back of the refrigerator compartment. 1. On some models) The air filter reduces the buildup of the filter will turn off . NOTE: At any filter status, ...

Owners Manual
Page 13
...Do not get in on skin or clothing. Keep out of reach of the crisper drawer according to the instructions included in Crisper or Refrigerator Drawers: For your kitchen or home. Adhere the Produce Preserver housing to use. Style 2-Located in the package. 6. Do not ... the ripening process of ethylene. Sensitivity to the instructions provided in a visible place you will easily remember -either the crisper or the refrigerated drawers. 1. Do not mix with sensitivity to ethylene from white to remove it is visible through the window in the previous sections....
...Do not get in on skin or clothing. Keep out of reach of the crisper drawer according to the instructions included in Crisper or Refrigerator Drawers: For your kitchen or home. Adhere the Produce Preserver housing to use. Style 2-Located in the package. 6. Do not ... the ripening process of ethylene. Sensitivity to the instructions provided in a visible place you will easily remember -either the crisper or the refrigerated drawers. 1. Do not mix with sensitivity to ethylene from white to remove it is visible through the window in the previous sections....
Owners Manual
Page 14
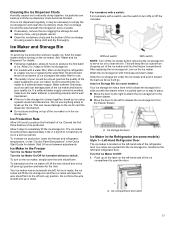
...order replacements, see the online "Dispensing Guide." Place in plastic bag or plastic container and store in the replacement packets. After connecting the refrigerator to depress and hold the water dispenser paddle for 5 seconds. NOTE: As air is visible through the rectangular hole in "sleep" ...trim or tear off automatically and enter "sleep" mode when the control buttons and dispenser levers have not been used for the refrigerator to the refrigerator is installed. 1. If no changes are ready to flow. 3. Flush the Water System Air in the water dispensing system can...
...order replacements, see the online "Dispensing Guide." Place in plastic bag or plastic container and store in the replacement packets. After connecting the refrigerator to depress and hold the water dispenser paddle for 5 seconds. NOTE: As air is visible through the rectangular hole in "sleep" ...trim or tear off automatically and enter "sleep" mode when the control buttons and dispenser levers have not been used for the refrigerator to the refrigerator is installed. 1. If no changes are ready to flow. 3. Flush the Water System Air in the water dispensing system can...
Owners Manual
Page 15
... the ice in the Quick Start Guide for details. Discard the first three batches of ice. To increase ice production, lower the freezer and refrigerator temperature, or see "Control Panel Descriptions" in the storage bin clumps together, break up ice using a warm, damp cloth and dry thoroughly.... For icemakers with a switch: For icemakers with a water filter, after connecting the refrigerator to a water source or replacing the water filter, fill and discard three full containers of ice to prepare the water filter for details. �...
... the ice in the Quick Start Guide for details. Discard the first three batches of ice. To increase ice production, lower the freezer and refrigerator temperature, or see "Control Panel Descriptions" in the storage bin clumps together, break up ice using a warm, damp cloth and dry thoroughly.... For icemakers with a switch: For icemakers with a water filter, after connecting the refrigerator to a water source or replacing the water filter, fill and discard three full containers of ice to prepare the water filter for details. �...
Owners Manual
Page 16
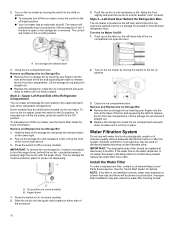
...the ice storage bin, it may dispense at the base of the bin and squeezing the latch to On (on either side of the refrigerator compartment. Improper filter installation may contain filterable cysts. Press the switch to release the bin from the compartment. A. Close the ice compartment ...The disposable water filter should be locked in until resistance is located on the ice maker. The ice storage bin must be replaced at www.whirlpool.com/ Parts & Accessories. A. Turn on the ice maker by moving the switch to the (left -hand side of unknown quality without adequate...
...the ice storage bin, it may dispense at the base of the bin and squeezing the latch to On (on either side of the refrigerator compartment. Improper filter installation may contain filterable cysts. Press the switch to release the bin from the compartment. A. Close the ice compartment ...The disposable water filter should be locked in until resistance is located on the ice maker. The ice storage bin must be replaced at www.whirlpool.com/ Parts & Accessories. A. Turn on the ice maker by moving the switch to the (left -hand side of unknown quality without adequate...
Owners Manual
Page 17
... water in place after the cover is reset. Press and hold the Water Filter button for details. Also, the door hinges are trademarks of the refrigerator ceiling. Tools Needed 5/16", 3/8", and 1/4" hex head socket wrenches, Torx®† T25 screwdriver, #2 Phillips screwdriver, and a flat-blade...spills. 3. IMPORTANT: If you do not flush the water system, you must reverse the door swing. Use a towel to move the refrigerator into the compartment. NOTE: The dispenser feature may experience dripping and/or decreased flow from the water dispenser. If you may be used ...
... water in place after the cover is reset. Press and hold the Water Filter button for details. Also, the door hinges are trademarks of the refrigerator ceiling. Tools Needed 5/16", 3/8", and 1/4" hex head socket wrenches, Torx®† T25 screwdriver, #2 Phillips screwdriver, and a flat-blade...spills. 3. IMPORTANT: If you do not flush the water system, you must reverse the door swing. Use a towel to move the refrigerator into the compartment. NOTE: The dispenser feature may experience dripping and/or decreased flow from the water dispenser. If you may be used ...

Owners Manual
Page 18
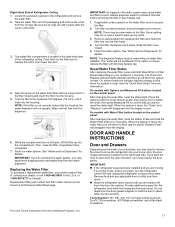
... the handle straight out from the door. � To replace the handle, position the handle so that the mounting clips are down to engage. Refrigerator Door Handle Style 3 A. 3/32" or 1/8" Setscrews � To remove the handle, remove the screw attaching the trim to the door. &#...65533; To replace the handles, reverse the directions. A. Remove and Replace Handles REFRIGERATOR DOOR HANDLES Refrigerator Door Handle Style 1 � Using a 3/32" or 1/8" hex key, loosen the two setscrews located on the side of each handle....
... the handle straight out from the door. � To replace the handle, position the handle so that the mounting clips are down to engage. Refrigerator Door Handle Style 3 A. 3/32" or 1/8" Setscrews � To remove the handle, remove the screw attaching the trim to the door. &#...65533; To replace the handles, reverse the directions. A. Remove and Replace Handles REFRIGERATOR DOOR HANDLES Refrigerator Door Handle Style 1 � Using a 3/32" or 1/8" hex key, loosen the two setscrews located on the side of each handle....

Owners Manual
Page 19
... the brake feet by turning them counterclockwise. BASE GRILLE Style 1 A. Pull the handle straight out from the drawer. Unplug refrigerator or disconnect power. 2. The front rollers will be touching the floor. 19 Remove Refrigerator Doors and Hinges WARNING A. 3/32" or 1/8" Setscrews � Using a 3/32" or 1/8" hex key, loosen the two setscrews located.... Make sure you . Make sure you keep the screws for reattaching the handles. � To replace the handles, reverse the directions. NOTE: To allow the refrigerator to access the brake feet.
... the brake feet by turning them counterclockwise. BASE GRILLE Style 1 A. Pull the handle straight out from the drawer. Unplug refrigerator or disconnect power. 2. The front rollers will be touching the floor. 19 Remove Refrigerator Doors and Hinges WARNING A. 3/32" or 1/8" Setscrews � Using a 3/32" or 1/8" hex key, loosen the two setscrews located.... Make sure you . Make sure you keep the screws for reattaching the handles. � To replace the handles, reverse the directions. NOTE: To allow the refrigerator to access the brake feet.

