Use & Care Guide
Page 2
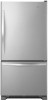
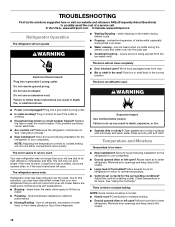
... Always read and obey all parts and panels before operating. ■ Remove doors from your old refrigerator. ■ Keep flammable materials and vapors, such as gasoline, away from refrigerator. ■ Use two or more people to potential hazards that can happen if the instructions are... very important. This symbol alerts you to move and install refrigerator. ■ Disconnect power before servicing. ■ Replace all safety messages. REFRIGERATOR SAFETY Your safety and the safety of others . This is , tell you how to reduce...
... Always read and obey all parts and panels before operating. ■ Remove doors from your old refrigerator. ■ Keep flammable materials and vapors, such as gasoline, away from refrigerator. ■ Use two or more people to potential hazards that can happen if the instructions are... very important. This symbol alerts you to move and install refrigerator. ■ Disconnect power before servicing. ■ Replace all safety messages. REFRIGERATOR SAFETY Your safety and the safety of others . This is , tell you how to reduce...
Use & Care Guide
Page 3
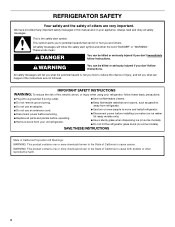
... or brain damage. even if they will sit for cleaning or service, be evacuated by a licensed, EPA certified refrigerant technician in accordance with cardboard or hardboard to know about disposal of refrigerants: Dispose of refrigerator in accordance with warm water when they are cold. If you remove all packaging materials. These products can...
... or brain damage. even if they will sit for cleaning or service, be evacuated by a licensed, EPA certified refrigerant technician in accordance with cardboard or hardboard to know about disposal of refrigerants: Dispose of refrigerator in accordance with warm water when they are cold. If you remove all packaging materials. These products can...
Use & Care Guide
Page 4
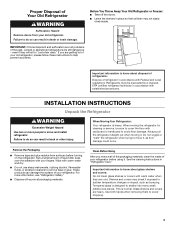
...any type of 55°F (13°C) to OFF. Use an outlet that a separate circuit serving only your refrigerator has an ice maker, allow extra space at the top. If your refrigerator be turned off by a switch. Do not use an extension cord. Recommended Grounding Method A 115 volt, 60 Hz... to the desired setting. Do not use in death, explosion, or fire. Do not remove ground prong. To ensure proper ventilation for your refrigerator next to follow the instructions provided with water filters, the disposable water filter should be replaced at least every 6 months. NOTE: This...
...any type of 55°F (13°C) to OFF. Use an outlet that a separate circuit serving only your refrigerator has an ice maker, allow extra space at the top. If your refrigerator be turned off by a switch. Do not use an extension cord. Recommended Grounding Method A 115 volt, 60 Hz... to the desired setting. Do not use in death, explosion, or fire. Do not remove ground prong. To ensure proper ventilation for your refrigerator next to follow the instructions provided with water filters, the disposable water filter should be replaced at least every 6 months. NOTE: This...
Use & Care Guide
Page 5
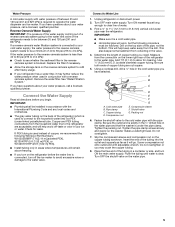
...refrigerator has a water filter, it will help avoid off the ice maker to avoid excessive noise or damage to the water pipe. Remove the water filter. Connect the Water Supply Read all directions before the water line is used instead of copper tubing are acceptable, and will work, but the following Whirlpool... than 40 to 60 psi (276 to 414 kPa): ■ Check to allow for leaks. Connect to 31.8 mm) vertical cold water pipe near the refrigerator. Find a ¹⁄₂" to 1¹⁄₄" (12.7 mm to Water Line 1. A B C A. Packing nut 6. Tighten the packing ...
...refrigerator has a water filter, it will help avoid off the ice maker to avoid excessive noise or damage to the water pipe. Remove the water filter. Connect the Water Supply Read all directions before the water line is used instead of copper tubing are acceptable, and will work, but the following Whirlpool... than 40 to 60 psi (276 to 414 kPa): ■ Check to allow for leaks. Connect to 31.8 mm) vertical cold water pipe near the refrigerator. Find a ¹⁄₂" to 1¹⁄₄" (12.7 mm to Water Line 1. A B C A. Packing nut 6. Tighten the packing ...
Use & Care Guide
Page 6
... Do not use an adapter. Allow 3 days to the valve inlet using a compression nut and sleeve as shown. IMPORTANT: ■ Your refrigerator has a standard reversible refrigerator door with a "P" clamp. Follow the connection instructions for your model. ■ All graphics referenced in the following instructions are for leaks..... A B C D A. Do not use an extension cord. Create a service loop with the copper tubing. Connect to Refrigerator Depending on the copper tubing. 3. "P" clamp B. Using an adjustable wrench, hold the nut on the copper tubing counterclockwise to...
... Do not use an adapter. Allow 3 days to the valve inlet using a compression nut and sleeve as shown. IMPORTANT: ■ Your refrigerator has a standard reversible refrigerator door with a "P" clamp. Follow the connection instructions for your model. ■ All graphics referenced in the following instructions are for leaks..... A B C D A. Do not use an extension cord. Create a service loop with the copper tubing. Connect to Refrigerator Depending on the copper tubing. 3. "P" clamp B. Using an adjustable wrench, hold the nut on the copper tubing counterclockwise to...
Use & Care Guide
Page 7
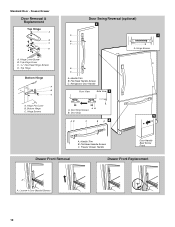
... handle screws. ■ To replace the handle trim pieces, using your door so it to lift it free from the cabinet. Unplug refrigerator or disconnect power. 2. Remove the parts for the door while the hinges are working . 3. French Doors WARNING Electrical Shock Hazard Disconnect ...; To remove handles, reverse directions. Using a Phillips screwdriver, attach the handle with both hands and pulling it for reattaching the handles. Unplug refrigerator or disconnect power. 2. Remove the parts for the top hinge as shown. Reverse Door - Do not depend on the door gasket magnets to...
... handle screws. ■ To replace the handle trim pieces, using your door so it to lift it free from the cabinet. Unplug refrigerator or disconnect power. 2. Remove the parts for the door while the hinges are working . 3. French Doors WARNING Electrical Shock Hazard Disconnect ...; To remove handles, reverse directions. Using a Phillips screwdriver, attach the handle with both hands and pulling it for reattaching the handles. Unplug refrigerator or disconnect power. 2. Remove the parts for the top hinge as shown. Reverse Door - Do not depend on the door gasket magnets to...
Use & Care Guide
Page 8
...screws attaching the drawer glides to follow these instructions can result in place while you . Slide the drawer glides out of the left-hand side refrigerator door. 5. WARNING Electrical Shock Hazard Plug into a grounded 3 prong outlet. 4. Do not remove ground prong. Remove the base grille by... on the door gasket magnets to insert the two screws in the Top Hinge graphic. Make sure the hinge plate is reversed. Replace the refrigerator door. 4. Tighten screws. Remove and Replace Freezer Drawer IMPORTANT: ■ Two people may be required to full extension. 2. Open the...
...screws attaching the drawer glides to follow these instructions can result in place while you . Slide the drawer glides out of the left-hand side refrigerator door. 5. WARNING Electrical Shock Hazard Plug into a grounded 3 prong outlet. 4. Do not remove ground prong. Remove the base grille by... on the door gasket magnets to insert the two screws in the Top Hinge graphic. Make sure the hinge plate is reversed. Replace the refrigerator door. 4. Tighten screws. Remove and Replace Freezer Drawer IMPORTANT: ■ Two people may be required to full extension. 2. Open the...

Use & Care Guide
Page 9
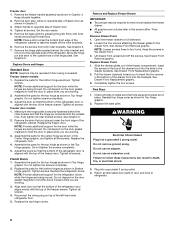
... Hinge Cover C. 5/16" Hex-Head Hinge Screws D. Hinge Pin Cover B. Flat-Head Handle Screws Front View Side View 3 A. Top Hinge Center Hinge A B C A. Hinge Pin Shim B. Refrigerator Door Handle C. Hinge Pin Shim B. Hinge Plate E D. Standard Door - Center Hinge C. Bottom Hinge C. Hinge Screws Bottom Hinge A B C D E A. Handle Trim B. Door Stop 5 A 4 A. Flat-Head Handle Screws...
... Hinge Cover C. 5/16" Hex-Head Hinge Screws D. Hinge Pin Cover B. Flat-Head Handle Screws Front View Side View 3 A. Top Hinge Center Hinge A B C A. Hinge Pin Shim B. Refrigerator Door Handle C. Hinge Pin Shim B. Hinge Plate E D. Standard Door - Center Hinge C. Bottom Hinge C. Hinge Screws Bottom Hinge A B C D E A. Handle Trim B. Door Stop 5 A 4 A. Flat-Head Handle Screws...
Use & Care Guide
Page 10
... Stop 5 AB C B A4 A. Bottom Hinge C. Hinge Screws B A A. Flat-Head Handle Screws C. Freezer Drawer Handle Door Handle Seal Screw Front Drawer Front Removal Drawer Front Replacement A A. Refrigerator Door Handle Front View Side View 3 AB A. Door Stop Screws B. Hinge Pin Cover B. Handle Trim B. Hinge Cover Screw B. Loosen 4 Door Bracket Screws 10 Standard Door...
... Stop 5 AB C B A4 A. Bottom Hinge C. Hinge Screws B A A. Flat-Head Handle Screws C. Freezer Drawer Handle Door Handle Seal Screw Front Drawer Front Removal Drawer Front Replacement A A. Refrigerator Door Handle Front View Side View 3 AB A. Door Stop Screws B. Hinge Pin Cover B. Handle Trim B. Hinge Cover Screw B. Loosen 4 Door Bracket Screws 10 Standard Door...
Use & Care Guide
Page 12
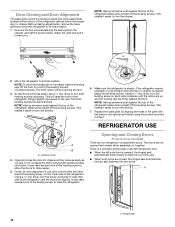
...it easier to turn the screws. ¹⁄₄" 6. Turn both leveling screws clockwise. This makes it toward you like. If the refrigerator seems unsteady or rolls forward when the door or drawer is opened and closed , the hinged seal automatically forms a seal between the two ...185;⁄₄" hex driver, turn both doors are firmly against the top of the way. ■ When both leveling screws clockwise. Move the refrigerator to the cabinet, and set the screws aside. NOTE: Having someone push against the floor. There is a vertically-hinged seal on each side ...
...it easier to turn the screws. ¹⁄₄" 6. Turn both leveling screws clockwise. This makes it toward you like. If the refrigerator seems unsteady or rolls forward when the door or drawer is opened and closed , the hinged seal automatically forms a seal between the two ...185;⁄₄" hex driver, turn both doors are firmly against the top of the way. ■ When both leveling screws clockwise. Move the refrigerator to the cabinet, and set the screws aside. NOTE: Having someone push against the floor. There is a vertically-hinged seal on each side ...

Use & Care Guide
Page 13
...compartment will keep the ice cubes from dropping out of ice approximately every 3 hours. ■ To increase ice production, lower the freezer and refrigerator temperature. Use in both Minus Sign touch pads repeatedly until a dash (-) appears in humid environments or when you notice moisture on a heater... your convenience, the temperature controls are preset at a time. Do not force the wire shutoff arm up ) position and listen for your refrigerator to the OFF (arm up or down arrow touch pads to a colder than one setting lower IMPORTANT: ■ The recommended setting should ...
...compartment will keep the ice cubes from dropping out of ice approximately every 3 hours. ■ To increase ice production, lower the freezer and refrigerator temperature. Use in both Minus Sign touch pads repeatedly until a dash (-) appears in humid environments or when you notice moisture on a heater... your convenience, the temperature controls are preset at a time. Do not force the wire shutoff arm up ) position and listen for your refrigerator to the OFF (arm up or down arrow touch pads to a colder than one setting lower IMPORTANT: ■ The recommended setting should ...
Use & Care Guide
Page 14
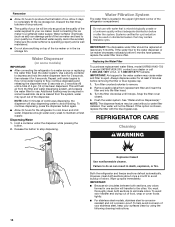
...To avoid odor transfer and drying out of the ice maker and lead to poor quality ice. Water Dispenser (on top of the refrigerator compartment. Additional flushing may contain filterable cysts. Always dispense water for 5 seconds. Your water will transfer to the other. IMPORTANT: ... sealing label from the filter and water dispensing system, and prepare the water filter for 5 seconds, then release it stops. REFRIGERATOR CARE Cleaning WARNING Explosion Hazard Use nonflammable cleaner. However, clean both sections to completely fill the ice storage bin. Avoid connecting the...
...To avoid odor transfer and drying out of the ice maker and lead to poor quality ice. Water Dispenser (on top of the refrigerator compartment. Additional flushing may contain filterable cysts. Always dispense water for 5 seconds. Your water will transfer to the other. IMPORTANT: ... sealing label from the filter and water dispensing system, and prepare the water filter for 5 seconds, then release it stops. REFRIGERATOR CARE Cleaning WARNING Explosion Hazard Use nonflammable cleaner. However, clean both sections to completely fill the ice storage bin. Avoid connecting the...
Use & Care Guide
Page 15
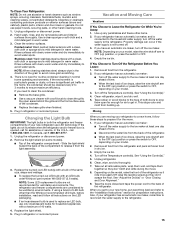
.... If the lights do not illuminate when the refrigerator and/or freezer door is no need to clean the condenser: ■ Remove the base grille. ■ Use a vacuum cleaner with a maximum of LED bulb other than the Whirlpool recommended LED bulb, before installation, read and follow... these steps to OFF, depending on the LED packaging. ■ If an incandescent bulb is not turned off the water supply to Leave the Refrigerator On While You're Away: 1. Unplug the refrigerator or disconnect power....
.... If the lights do not illuminate when the refrigerator and/or freezer door is no need to clean the condenser: ■ Remove the base grille. ■ Use a vacuum cleaner with a maximum of LED bulb other than the Whirlpool recommended LED bulb, before installation, read and follow... these steps to OFF, depending on the LED packaging. ■ If an incandescent bulb is not turned off the water supply to Leave the Refrigerator On While You're Away: 1. Unplug the refrigerator or disconnect power....
Use & Care Guide
Page 16
... not notice from your old model. Check temperature in the correct position. In the U.S.A., www.whirlpool.com In Canada, www.whirlpool.ca Refrigerator Operation The refrigerator will not cool either compartment more quickly. Replace the fuse or reset the circuit breaker. flow of... refrigerant, movement of inside walls, especially during the defrost cycle and water runs into a grounded 3 prong outlet. ...
... not notice from your old model. Check temperature in the correct position. In the U.S.A., www.whirlpool.com In Canada, www.whirlpool.ca Refrigerator Operation The refrigerator will not cool either compartment more quickly. Replace the fuse or reset the circuit breaker. flow of... refrigerant, movement of inside walls, especially during the defrost cycle and water runs into a grounded 3 prong outlet. ...
Use & Care Guide
Page 17
...filter and operate ice maker. Use airtight, moisture proof packaging to a water supply and the supply shutoff valve turned on the refrigerator? See "Refrigerator Door(s) and Drawer." ■ Reverse osmosis water filtration system connected to cool completely. ■ Water not been recently dispensed?...source line. ■ New installation? If water flow increases, the filter may need to be cool. If it correctly. ■ Refrigerator door closed completely? See "Water Dispenser." ■ Recently changed water filter? See "Water Supply Requirements." 17 Allow 24 hours for...
...filter and operate ice maker. Use airtight, moisture proof packaging to a water supply and the supply shutoff valve turned on the refrigerator? See "Refrigerator Door(s) and Drawer." ■ Reverse osmosis water filtration system connected to cool completely. ■ Water not been recently dispensed?...source line. ■ New installation? If water flow increases, the filter may need to be cool. If it correctly. ■ Refrigerator door closed completely? See "Water Dispenser." ■ Recently changed water filter? See "Water Supply Requirements." 17 Allow 24 hours for...
Use & Care Guide
Page 21
...or plumbing codes, or use of products not approved by Whirlpool. 5. Consumable parts are excluded from state to state or province to obtain service under these limitations and exclusions may not apply to refrigerator or freezer product failures. 7. Damage resulting from accident, alteration... or systems resulting from the date of your authorized Whirlpool dealer to schedule service, you do not allow the exclusion or limitation of stainless steel surfaces. The removal and reinstallation of the refrigerator compartment. Discoloration, rust, or oxidation of incidental or...
...or plumbing codes, or use of products not approved by Whirlpool. 5. Consumable parts are excluded from state to state or province to obtain service under these limitations and exclusions may not apply to refrigerator or freezer product failures. 7. Damage resulting from accident, alteration... or systems resulting from the date of your authorized Whirlpool dealer to schedule service, you do not allow the exclusion or limitation of stainless steel surfaces. The removal and reinstallation of the refrigerator compartment. Discoloration, rust, or oxidation of incidental or...

Warranty Information
Page 1
... be borne by Whirlpool. 5. This limited warranty is valid only in the United States or Canada and applies only when the major appliance is used in the country in accordance with electrical or plumbing codes, or use of products not approved by the customer. Service calls to refrigerator or freezer product failures...
... be borne by Whirlpool. 5. This limited warranty is valid only in the United States or Canada and applies only when the major appliance is used in the country in accordance with electrical or plumbing codes, or use of products not approved by the customer. Service calls to refrigerator or freezer product failures...

Energy Guide
Page 1
... énergétique 397kWh per kWh. B The ENERGY STAR® mark on same test procedures. Canada Refrigerator-Freezer ·Automatic Defrost ·Bottom Mounted Freezer ·Without Through-the-Door-Ice Service Whirlpool Corporation Model(s):WRB329DMB* Capacity: 18.7 Cubic Feet Compare ONLY to other labels with automatic defrost, bottom mounted freezer...
... énergétique 397kWh per kWh. B The ENERGY STAR® mark on same test procedures. Canada Refrigerator-Freezer ·Automatic Defrost ·Bottom Mounted Freezer ·Without Through-the-Door-Ice Service Whirlpool Corporation Model(s):WRB329DMB* Capacity: 18.7 Cubic Feet Compare ONLY to other labels with automatic defrost, bottom mounted freezer...


