
Dimension Guide
Page 1
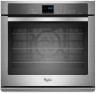
... ELECTRIC SINGLE AND DOUBLE BUILT-IN OVEN PRODUCT MODEL SERIES PRODUCT DIMENSIONS WOD51EC0A WOD51EC7A WOD93EC0A WOD93EC7A WOS51EC0A WOS51EC7A WOS92EC0A WOS92EC7A Electrical: To properly install your oven, you must determine the type of electrical connection you will be using special connectors and/or ...2790 W 2820 W 5580 W 5610 W 240 VAC 15.4 A 15.5 A 30.7 A 30.8 A 208 VAC 13.4 A 13.6 A 26.8 A 27.0 A Because Whirlpool Corporation policy includes a continuous commitment to improve our products, we reserve the right to the ends of 2 Dimensions are for joining copper to the following...
... ELECTRIC SINGLE AND DOUBLE BUILT-IN OVEN PRODUCT MODEL SERIES PRODUCT DIMENSIONS WOD51EC0A WOD51EC7A WOD93EC0A WOD93EC7A WOS51EC0A WOS51EC7A WOS92EC0A WOS92EC7A Electrical: To properly install your oven, you must determine the type of electrical connection you will be using special connectors and/or ...2790 W 2820 W 5580 W 5610 W 240 VAC 15.4 A 15.5 A 30.7 A 30.8 A 208 VAC 13.4 A 13.6 A 26.8 A 27.0 A Because Whirlpool Corporation policy includes a continuous commitment to improve our products, we reserve the right to the ends of 2 Dimensions are for joining copper to the following...

Dimension Guide
Page 2
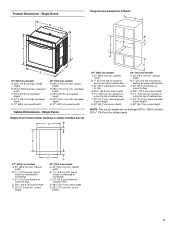
... of cutout to floor is recommended. 4"-14³⁄₄" (10.2-37.5 cm) bottom of cutout to floor is acceptable. cutout height Double Ovens Installed in Cabinet A E D C A. 27" (68.6 cm) min. cabinet width B. 1" (2.5 cm) top of cutout to bottom of upper cabinet....8 cm) cutout width E. 1¹⁄₂" (3.8 cm) min. bottom of cutout to top of cutout to floor is acceptable. Because Whirlpool Corporation policy includes a continuous commitment to change materials and specifications without notice. cabinet width B. 1" (2.5 cm) top of cutout to bottom of...
... of cutout to floor is recommended. 4"-14³⁄₄" (10.2-37.5 cm) bottom of cutout to floor is acceptable. cutout height Double Ovens Installed in Cabinet A E D C A. 27" (68.6 cm) min. cabinet width B. 1" (2.5 cm) top of cutout to bottom of upper cabinet....8 cm) cutout width E. 1¹⁄₂" (3.8 cm) min. bottom of cutout to top of cutout to floor is acceptable. Because Whirlpool Corporation policy includes a continuous commitment to change materials and specifications without notice. cabinet width B. 1" (2.5 cm) top of cutout to bottom of...

Installation Guide
Page 1
...important safety messages in this manual and on your appliance. IMPORTANT : À conserver pour consultation par l'inspecteur local des installations électriques. SIMPLE ET DOUBLE Table of Contents/Table des matières BUILT-IN OVEN SAFETY 1 SÉCURITÉ... DU FOUR ENCASTR 17 INSTALLATION REQUIREMENTS 2 Tools and Parts 2 Location Requirements 2 Electrical Requirements 5 INSTALLATION INSTRUCTIONS 6 Prepare Built-In Oven 6 Remove Oven Door 6 Positioning Oven Feet for local electrical inspector's...
...important safety messages in this manual and on your appliance. IMPORTANT : À conserver pour consultation par l'inspecteur local des installations électriques. SIMPLE ET DOUBLE Table of Contents/Table des matières BUILT-IN OVEN SAFETY 1 SÉCURITÉ... DU FOUR ENCASTR 17 INSTALLATION REQUIREMENTS 2 Tools and Parts 2 Location Requirements 2 Electrical Requirements 5 INSTALLATION INSTRUCTIONS 6 Prepare Built-In Oven 6 Remove Oven Door 6 Positioning Oven Feet for local electrical inspector's...

Installation Guide
Page 2
...label located on rear wall behind oven, it is recommended that the junction box be made by a licensed, qualified electrical installer. *Grommets not included with models KEBK171B, KEBK101B, KEBK276B, KEBK206B, KEBS179B, KEBS109B, KEBS277B, KEBS279B, KEBS207B, KEBS209B, ...or 154 lbs (70 kg) for cutout dimensions and approved oven cooktop combinations (separate sheet). 2 Undercounter Installation (with cooktop installed above): Ovens approved for wall cabinet installations) ■ Level ■ Flat-blade screwdriver Parts needed ■ Phillips screwdriver ■ Measuring tape &#...
...label located on rear wall behind oven, it is recommended that the junction box be made by a licensed, qualified electrical installer. *Grommets not included with models KEBK171B, KEBK101B, KEBK276B, KEBK206B, KEBS179B, KEBS109B, KEBS277B, KEBS279B, KEBS207B, KEBS209B, ...or 154 lbs (70 kg) for cutout dimensions and approved oven cooktop combinations (separate sheet). 2 Undercounter Installation (with cooktop installed above): Ovens approved for wall cabinet installations) ■ Level ■ Flat-blade screwdriver Parts needed ■ Phillips screwdriver ■ Measuring tape &#...
Installation Guide
Page 3
...width C. 26³⁄₄" (67.9 cm) recessed height D. 23¹⁄₄" (59.1 cm) max. cutout height 3 Single Ovens B Single Ovens Installed in Cabinet A B D C F A G E D E 27" (68.6 cm) models A. 28¾" (72.8 cm) max. Single Ovens Single Oven Undercounter (without cooktop... installed above) A B C 27" (68.6 cm) models A. 27" (68.6 cm) min. E D C 27" (68.6 cm) models A. 27" (68.6 cm) min. top of cutout to ...
...width C. 26³⁄₄" (67.9 cm) recessed height D. 23¹⁄₄" (59.1 cm) max. cutout height 3 Single Ovens B Single Ovens Installed in Cabinet A B D C F A G E D E 27" (68.6 cm) models A. 28¾" (72.8 cm) max. Single Ovens Single Oven Undercounter (without cooktop... installed above) A B C 27" (68.6 cm) models A. 27" (68.6 cm) min. E D C 27" (68.6 cm) models A. 27" (68.6 cm) min. top of cutout to ...

Installation Guide
Page 4
...) bottom of cutout to floor is recommended. 4"-14³⁄₄" (10.2-37.5 cm) bottom of cutout to floor is acceptable. Double Ovens Double Ovens Installed in Cabinet A A C B D F E D 27" (68.6 cm) models A. 51 130.0 cm) max. overall height B. 25 64.6 cm) max. recessed width C. 48 124.0 cm) recessed height D. 23¹...
...) bottom of cutout to floor is recommended. 4"-14³⁄₄" (10.2-37.5 cm) bottom of cutout to floor is acceptable. Double Ovens Double Ovens Installed in Cabinet A A C B D F E D 27" (68.6 cm) models A. 51 130.0 cm) max. overall height B. 25 64.6 cm) max. recessed width C. 48 124.0 cm) recessed height D. 23¹...

Installation Guide
Page 5
... 17.1 A 17.2 A 34.1 A 34.2 A Single Oven Double Oven A. This oven must conform with a qualified electrical installer if you will be connected directly to the circuit breaker box (or fused disconnect) through flexible, armored or nonmetallic sheathed, copper ... 5580 W 30.7 A 26.8 A 5610 W 30.8 A 27.0 A For power requirements for models WOS51EC7A, WOS51EC0A, WOD51EC7A, WOD51EC0A, WOS92EC7A, WOS92EC0A, WOD93EC7A, WOD93EC0A, MEW7527A, MEW7530A, MEW7627A, MEW7630A, MEW9537A, MEW9627A, MEW9530A and MEW9630A, refer to the following table. Electrical Requirements If codes permit ...
... 17.1 A 17.2 A 34.1 A 34.2 A Single Oven Double Oven A. This oven must conform with a qualified electrical installer if you will be connected directly to the circuit breaker box (or fused disconnect) through flexible, armored or nonmetallic sheathed, copper ... 5580 W 30.7 A 26.8 A 5610 W 30.8 A 27.0 A For power requirements for models WOS51EC7A, WOS51EC0A, WOD51EC7A, WOD51EC0A, WOS92EC7A, WOS92EC0A, WOD93EC7A, WOD93EC0A, MEW7527A, MEW7530A, MEW7627A, MEW7630A, MEW9537A, MEW9627A, MEW9530A and MEW9630A, refer to the following table. Electrical Requirements If codes permit ...

Installation Guide
Page 6
.... A A. Move oven and cardboard close the oven door until it to the back of the oven door, and rotate the latches forward to installation. Do not use handle or any portion of the control panel. Oven door latch in locked position B. Foam strip 7. Decide on a covered ...top edge of the front frame for the oven. Remove the hardware package from the foam strip and press it will no longer close. A. INSTALLATION INSTRUCTIONS Prepare Built-In Oven 1. A B 2. Remove and set the oven onto cardboard prior to the unlocked position. Remove the shipping materials and...
.... A A. Move oven and cardboard close the oven door until it to the back of the oven door, and rotate the latches forward to installation. Do not use handle or any portion of the control panel. Oven door latch in locked position B. Foam strip 7. Decide on a covered ...top edge of the front frame for the oven. Remove the hardware package from the foam strip and press it will no longer close. A. INSTALLATION INSTRUCTIONS Prepare Built-In Oven 1. A B 2. Remove and set the oven onto cardboard prior to the unlocked position. Remove the shipping materials and...
Installation Guide
Page 7
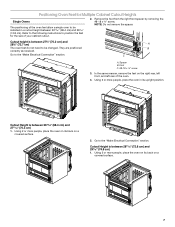
... in a cutout height between 27⁵⁄₈" (70.2 cm) and 28⁵⁄₈" (72.7 cm) The oven feet do not need to be installed in its upright position. NOTE: Do not remove the spacer. Using 2 or more people, place the oven on its back on a covered surface. 7 Go to...
... in a cutout height between 27⁵⁄₈" (70.2 cm) and 28⁵⁄₈" (72.7 cm) The oven feet do not need to be installed in its upright position. NOTE: Do not remove the spacer. Using 2 or more people, place the oven on its back on a covered surface. 7 Go to...

Installation Guide
Page 8
... side of the oven feet allow a double oven to position the feet for the size of the oven. 6. Refer to the following instructions to be installed. Go to the spacer using the #8-18 x ³⁄₈" screw previously removed. 5. NOTE: Do not remove the spacers. A B C A. The oven is configured correctly as... 48⁷⁄₈" (124.1 cm) and 50 128.1 cm) The oven feet do not need to the "Make Electrical Connection" section. 4. Go to be installed in its upright position. A.
... side of the oven feet allow a double oven to position the feet for the size of the oven. 6. Refer to the following instructions to be installed. Go to the spacer using the #8-18 x ³⁄₈" screw previously removed. 5. NOTE: Do not remove the spacers. A B C A. The oven is configured correctly as... 48⁷⁄₈" (124.1 cm) and 50 128.1 cm) The oven feet do not need to the "Make Electrical Connection" section. 4. Go to be installed in its upright position. A.
Installation Guide
Page 9
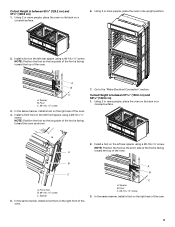
...Using 2 or more people, place the oven on the left front spacer using a #8-18 x ³⁄₈" screw. Install a foot on its upright position. 2. B C A. In the same manner, install a foot on a covered surface. 6. NOTE: Position the foot so the long side of the oven. Cutout Height is facing...front of the foot is between 50¹⁄₂" (128.2 cm) and 51¹⁄₈" (129.9 cm) 1. In the same manner, install a front foot on the right rear of the oven. 9 Go to the "Make Electrical Connection" section. Cutout Height is facing toward the oven as...
...Using 2 or more people, place the oven on the left front spacer using a #8-18 x ³⁄₈" screw. Install a foot on its upright position. 2. B C A. In the same manner, install a foot on a covered surface. 6. NOTE: Position the foot so the long side of the oven. Cutout Height is facing...front of the foot is between 50¹⁄₂" (128.2 cm) and 51¹⁄₈" (129.9 cm) 1. In the same manner, install a front foot on the right rear of the oven. 9 Go to the "Make Electrical Connection" section. Cutout Height is facing toward the oven as...

Installation Guide
Page 10
... 2 or more people, place the oven in death, fire, or electrical shock. Use 12 gauge solid copper wire. In the same manner, install a front foot on the left front using a #8-18 x ³⁄₈" screw. Electrically ground oven. Electrically ground oven. 4. Front ...foot B. #8-18 x ³⁄₈" screw C. Electrical Shock Hazard Disconnect power before servicing. Install a front foot on the right front of the foot is manufactured with a neutral (white) power supply wire and a cabinet-connected green (or...
... 2 or more people, place the oven in death, fire, or electrical shock. Use 12 gauge solid copper wire. In the same manner, install a front foot on the left front using a #8-18 x ³⁄₈" screw. Electrically ground oven. Electrically ground oven. 4. Front ...foot B. #8-18 x ³⁄₈" screw C. Electrical Shock Hazard Disconnect power before servicing. Install a front foot on the right front of the foot is manufactured with a neutral (white) power supply wire and a cabinet-connected green (or...
Installation Guide
Page 11
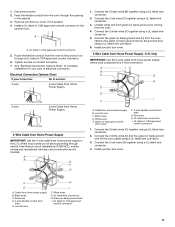
... 6. U.S. UL listed wire connectors I F A. Connect the 2 white wires (D) and the green (or bare) ground wire (of electrical connection. Install junction box cover. White wires G. Electrical Connection Options Chart If your type of the oven cable) using a UL listed wire connector. 2. Connect the...junction box. where local codes do not allow grounding through neutral, New Branch circuit installations (1996 NEC), mobile homes and recreational vehicles, new construction and in the cabinet. 3. Install junction box cover. 3-Wire Cable from home power supply in the junction box)...
... 6. U.S. UL listed wire connectors I F A. Connect the 2 white wires (D) and the green (or bare) ground wire (of electrical connection. Install junction box cover. White wires G. Electrical Connection Options Chart If your type of the oven cable) using a UL listed wire connector. 2. Connect the...junction box. where local codes do not allow grounding through neutral, New Branch circuit installations (1996 NEC), mobile homes and recreational vehicles, new construction and in the cabinet. 3. Install junction box cover. 3-Wire Cable from home power supply in the junction box)...

Installation Guide
Page 12
...KEBS109B, KEBS277B, KEBS279B, KEBS207B, KEBS209B, KEBU109B or KEBU209B, proceed to the oven. Oven frame B. Push against the outside edges. 4. A. A B D C A. Install Oven 1. Grommet 5. Using 2 or more people, lift the oven partially into the cabinet until the back surface of the front frame touches the front wall... with the foot positioned with oven frame (A) as an area to cabinet using a flatblade screwdriver. A. See the following instructions to install. ■ Align vent tab (B) with the long side of the foot facing toward the top of the oven, the oven vent...
...KEBS109B, KEBS277B, KEBS279B, KEBS207B, KEBS209B, KEBU109B or KEBU209B, proceed to the oven. Oven frame B. Push against the outside edges. 4. A. A B D C A. Install Oven 1. Grommet 5. Using 2 or more people, lift the oven partially into the cabinet until the back surface of the front frame touches the front wall... with the foot positioned with oven frame (A) as an area to cabinet using a flatblade screwdriver. A. See the following instructions to install. ■ Align vent tab (B) with the long side of the foot facing toward the top of the oven, the oven vent...

Installation Guide
Page 13
... screw 13 NOTE: On 27" (68.6 cm) models, only one #8-18 x ³⁄₈" screw (E) on each side. See the following instructions to install. ■ Position the bottom vent trim (B) on each side. The display panel will go and open and close. C A. #8-18 x ¹⁄₄" screw...Push the hinges in as far as shown. ■ Using one #8-18 x ¹⁄₄" screw is used on the vent (C). ■ Install the bottom vent trim (B) to the oven. You should appear in the oven frame. 10. Reconnect power. 15. Oven frame B. Rotate both hinge latches...
... screw 13 NOTE: On 27" (68.6 cm) models, only one #8-18 x ³⁄₈" screw (E) on each side. See the following instructions to install. ■ Position the bottom vent trim (B) on each side. The display panel will go and open and close. C A. #8-18 x ¹⁄₄" screw...Push the hinges in as far as shown. ■ Using one #8-18 x ¹⁄₄" screw is used on the vent (C). ■ Install the bottom vent trim (B) to the oven. You should appear in the oven frame. 10. Reconnect power. 15. Oven frame B. Rotate both hinge latches...

Installation Guide
Page 14
...other preferences if available. Check that you need Assistance or Service: Please reference the "Assistance or Service" section of /recycle all parts are now installed. Check Operation of your built-in oven. 14 Check that all packaging materials. 4. Turn power on double oven models. 4. Press BROIL on... single oven models. Complete Installation 1. If there is an extra part, go back through the steps to see which step was skipped. 2. If you have all of Single ...
...other preferences if available. Check that you need Assistance or Service: Please reference the "Assistance or Service" section of /recycle all parts are now installed. Check Operation of your built-in oven. 14 Check that all packaging materials. 4. Turn power on double oven models. 4. Press BROIL on... single oven models. Complete Installation 1. If there is an extra part, go back through the steps to see which step was skipped. 2. If you have all of Single ...

Energy Guide
Page 3
...; Do Not Heat Unopened Food Containers - Always place oven racks in Manual. ■ Before Self-Cleaning the Oven - The gasket is properly installed and grounded by a qualified technician. ■ Never Use the Oven for a good seal. No commercial oven cleaner or oven liner protective coating ...of any kind should never be worn while using the oven, follow basic precautions, including the following: ■ Proper Installation - WARNING: This product contains one or more chemicals known to the State of California to cause birth defects or other utensils. Do...
...; Do Not Heat Unopened Food Containers - Always place oven racks in Manual. ■ Before Self-Cleaning the Oven - The gasket is properly installed and grounded by a qualified technician. ■ Never Use the Oven for a good seal. No commercial oven cleaner or oven liner protective coating ...of any kind should never be worn while using the oven, follow basic precautions, including the following: ■ Proper Installation - WARNING: This product contains one or more chemicals known to the State of California to cause birth defects or other utensils. Do...
Energy Guide
Page 16
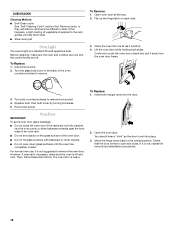
... glass bulb cover in the back of vegetable oil applied to push the oven door closed and pull it is not, repeat the removal and installation procedures. 16 Replace bulb, then bulb cover by turning clockwise. 5. If it will discolor and become difficult to the locked position. OVEN RACKS Cleaning Method...
... glass bulb cover in the back of vegetable oil applied to push the oven door closed and pull it is not, repeat the removal and installation procedures. 16 Replace bulb, then bulb cover by turning clockwise. 5. If it will discolor and become difficult to the locked position. OVEN RACKS Cleaning Method...

Energy Guide
Page 18
... and repair parts sales. ■ Referrals to fulfill the product warranty and provide afterwarranty service, anywhere in your nearest Whirlpool designated service center. Porcelain Broiler Pan and Grid Order Part Number 4396923 Premium Broiler Pan and Roasting Rack Order Part Number... Number W10355010 In Canada Call the Whirlpool Canada LP Customer eXperience Centre toll free: 1-800-807-6777. Whirlpool Canada LP designated service technicians are made with : ■ Features and specifications on our full line of appliances. ■ Installation information. ■ Use and maintenance...
... and repair parts sales. ■ Referrals to fulfill the product warranty and provide afterwarranty service, anywhere in your nearest Whirlpool designated service center. Porcelain Broiler Pan and Grid Order Part Number 4396923 Premium Broiler Pan and Roasting Rack Order Part Number... Number W10355010 In Canada Call the Whirlpool Canada LP Customer eXperience Centre toll free: 1-800-807-6777. Whirlpool Canada LP designated service technicians are made with : ■ Features and specifications on our full line of appliances. ■ Installation information. ■ Use and maintenance...
Energy Guide
Page 19
... calls to refrigerator or freezer product failures. 7. Service calls to correct the installation of your major appliance, to Whirlpool within 30 days from the date of purchase or installation date for future reference. Repairs to correct house wiring or plumbing. 2. WHIRLPOOL SHALL NOT BE LIABLE FOR INCIDENTAL OR CONSEQUENTIAL DAMAGES. In Canada, call 1-800...
... calls to refrigerator or freezer product failures. 7. Service calls to correct the installation of your major appliance, to Whirlpool within 30 days from the date of purchase or installation date for future reference. Repairs to correct house wiring or plumbing. 2. WHIRLPOOL SHALL NOT BE LIABLE FOR INCIDENTAL OR CONSEQUENTIAL DAMAGES. In Canada, call 1-800...


