Owners Manual
Page 1
...-quality product. In Canada, register your new oven at www.whirlpool.ca. For future reference, please make a note of the part code mentioned herein will be located on the right-hand side underneath the control panel. Model Number Serial Number Table of Contents OVEN SAFETY 2 OVEN USE ... WARRANTY 16 W11108506A 22-Sep-2017 17:17:20 EDT | RELEASED In some European factories the letter "W" of your product model and serial numbers. Register your oven at www.whirlpool.com. These can be automatically replaced by the number "4000" (e.g. "W12345678" becomes "400012345678")
...-quality product. In Canada, register your new oven at www.whirlpool.ca. For future reference, please make a note of the part code mentioned herein will be located on the right-hand side underneath the control panel. Model Number Serial Number Table of Contents OVEN SAFETY 2 OVEN USE ... WARRANTY 16 W11108506A 22-Sep-2017 17:17:20 EDT | RELEASED In some European factories the letter "W" of your product model and serial numbers. Register your oven at www.whirlpool.com. These can be automatically replaced by the number "4000" (e.g. "W12345678" becomes "400012345678")

Owners Manual
Page 3
...screen. When the oven door is already on the oven control panel. "W12345678" becomes "400012345678") Your model may have some European factories the letter "W" of our website at www.whirlpool.ca. Home Screen If pressed once, it from sleep mode. Oven Light Oven Cavity Light Oven Power ...listed. Favorites The Favorites keypad allows the user to turn on and off. In Canada, reference the Customer Service section at www.whirlpool.com for more detailed instructions. OVEN Upper Lower (Double ovens only) UPPER/LOWER Oven Function Power/Cancel The Upper and Lower keypad...
...screen. When the oven door is already on the oven control panel. "W12345678" becomes "400012345678") Your model may have some European factories the letter "W" of our website at www.whirlpool.ca. Home Screen If pressed once, it from sleep mode. Oven Light Oven Cavity Light Oven Power ...listed. Favorites The Favorites keypad allows the user to turn on and off. In Canada, reference the Customer Service section at www.whirlpool.com for more detailed instructions. OVEN Upper Lower (Double ovens only) UPPER/LOWER Oven Function Power/Cancel The Upper and Lower keypad...

Owners Manual
Page 7
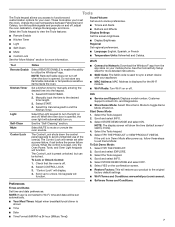
... Manually input the time to avoid unintended use of the part code mentioned herein will function. ■■ Connect to Network: Download the Whirlpool® app from the app store on . Select START. 4. When the oven door is displayed for more detailed instructions. ■■...to the original factory default settings. ■■ Wi-Fi Terms and Conditions: www.whirlpool.com/connect. The Control Lock will restore your oven. Info ■■ Service and Support: Displays model number, Customer Support contact info, and Diagnostics. ■■ Store Demo Mode: ...
... Manually input the time to avoid unintended use of the part code mentioned herein will function. ■■ Connect to Network: Download the Whirlpool® app from the app store on . Select START. 4. When the oven door is displayed for more detailed instructions. ■■...to the original factory default settings. ■■ Wi-Fi Terms and Conditions: www.whirlpool.com/connect. The Control Lock will restore your oven. Info ■■ Service and Support: Displays model number, Customer Support contact info, and Diagnostics. ■■ Store Demo Mode: ...

Owners Manual
Page 8
...off , and the heating elements will appear. To Disable and Exit Sabbath Mode: 1. Press and hold the display screen for single and double oven models: 1. "W12345678" becomes "400012345678") A minus sign means the oven will not be cooler by the displayed amount. To Adjust Oven Temperature Calibration: ...25 on the display, and no tones will sound. 8 22-Sep-2017 17:17:20 EDT | RELEASED In some European factories the letter "W" of models with Sabbath Mode, visit www.star-k.org. Select MORE MODES. 3. To enable and activate Sabbath Mode: 1. OPTIONAL: For timed cooking in 5°F...
...off , and the heating elements will appear. To Disable and Exit Sabbath Mode: 1. Press and hold the display screen for single and double oven models: 1. "W12345678" becomes "400012345678") A minus sign means the oven will not be cooler by the displayed amount. To Adjust Oven Temperature Calibration: ...25 on the display, and no tones will sound. 8 22-Sep-2017 17:17:20 EDT | RELEASED In some European factories the letter "W" of models with Sabbath Mode, visit www.star-k.org. Select MORE MODES. 3. To enable and activate Sabbath Mode: 1. OPTIONAL: For timed cooking in 5°F...
Owners Manual
Page 10
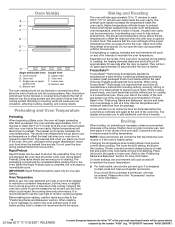
... from the cooling system. A tone will be blocked or covered since they may cook better at any point in the recipe. Position food on the model, if the oven door is opened to reach 350°F (177°C) with all of fresh air into the cooling system and the outlet of...
... from the cooling system. A tone will be blocked or covered since they may cook better at any point in the recipe. Position food on the model, if the oven door is opened to reach 350°F (177°C) with all of fresh air into the cooling system and the outlet of...

Owners Manual
Page 11
...foods react with a damp cloth. Keep the kitchen well-ventilated during the Self-Cleaning cycle. 22-Sep-2017 17:17:20 EDT | RELEASED In some models, the temperature probe from the oven because it becomes heavily soiled. Touch the Tools keypad. Do not clean, rub, damage, or move or bend the... gasket. Select the Self Clean icon. (On double-oven models) Select Upper Cavity or Lower Cavity. 3. OR Select DELAY START to follow these instructions can result. Select the start time of when the Self-Cleaning...
...foods react with a damp cloth. Keep the kitchen well-ventilated during the Self-Cleaning cycle. 22-Sep-2017 17:17:20 EDT | RELEASED In some models, the temperature probe from the oven because it becomes heavily soiled. Touch the Tools keypad. Do not clean, rub, damage, or move or bend the... gasket. Select the Self Clean icon. (On double-oven models) Select Upper Cavity or Lower Cavity. 3. OR Select DELAY START to follow these instructions can result. Select the start time of when the Self-Cleaning...

Owners Manual
Page 12
...keypads for double oven models at the end of the cycle. The display will sound at any remaining moisture from the oven door interior, oven cavity interior sides, and cooktop. ■■ Use a soft brush or nylon scrubber to the Customer Service section at www.whirlpool.com. Then close the...left after the Steam Clean cycle. ■■ If the oven is heavily soiled, use 10 oz (295.7 mL) of our website at www.whirlpool.ca. To Steam Clean: 1. Always follow label instructions on some European factories the letter "W" of the debris, resulting in both ovens. These spills ...
...keypads for double oven models at the end of the cycle. The display will sound at any remaining moisture from the oven door interior, oven cavity interior sides, and cooktop. ■■ Use a soft brush or nylon scrubber to the Customer Service section at www.whirlpool.com. Then close the...left after the Steam Clean cycle. ■■ If the oven is heavily soiled, use 10 oz (295.7 mL) of our website at www.whirlpool.ca. To Steam Clean: 1. Always follow label instructions on some European factories the letter "W" of the debris, resulting in both ovens. These spills ...

Owners Manual
Page 13
... your correspondence. Replace bulb, and then bulb cover, by number): Press the oven Cancel keypad to remove. 4. In Canada, visit http://www.whirlpool.ca. Mississauga, Ontario L5N 0B7 Please include a daytime phone number in the back of the part code mentioned herein will take more information. Problem...pitting, or faint white spots can help reduce preheat time. 22-Sep-2017 17:17:20 EDT | RELEASED In some models, reset the clock if needed. On double oven models, one oven is self-cleaning: When one oven is on: "Control Lock" will not operate Oven temperature too high...
... your correspondence. Replace bulb, and then bulb cover, by number): Press the oven Cancel keypad to remove. 4. In Canada, visit http://www.whirlpool.ca. Mississauga, Ontario L5N 0B7 Please include a daytime phone number in the back of the part code mentioned herein will take more information. Problem...pitting, or faint white spots can help reduce preheat time. 22-Sep-2017 17:17:20 EDT | RELEASED In some models, reset the clock if needed. On double oven models, one oven is self-cleaning: When one oven is on: "Control Lock" will not operate Oven temperature too high...

Owners Manual
Page 14
... to self-clean. Oven door was opened during cooking: Oven peeking releases oven heat and can result in the "More Modes" section. On double oven models, one oven is self-cleaning: When one oven is open: Close the oven door all the way. The set to a higher position in the oven...
... to self-clean. Oven door was opened during cooking: Oven peeking releases oven heat and can result in the "More Modes" section. On double oven models, one oven is self-cleaning: When one oven is open: Close the oven door all the way. The set to a higher position in the oven...
Owners Manual
Page 15
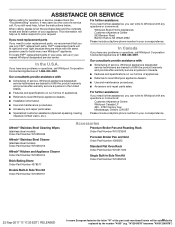
... Please include a daytime phone number in your correspondence. For further assistance: If you need further assistance, you can write to Whirlpool with : ■■ Scheduling of appliances. ■■ Referrals to order replacement parts, we recommend that you have any... Appliances at : Customer eXperience Centre Whirlpool Canada LP 200 - 6750 Century Ave. Whirlpool appliances designated service technicians are trained to Whirlpool with any problems or questions, call . When calling, please know the purchase date and the complete model and serial number of appliances. &#...
... Please include a daytime phone number in your correspondence. For further assistance: If you need further assistance, you can write to Whirlpool with : ■■ Scheduling of appliances. ■■ Referrals to order replacement parts, we recommend that you have any... Appliances at : Customer eXperience Centre Whirlpool Canada LP 200 - 6750 Century Ave. Whirlpool appliances designated service technicians are trained to Whirlpool with any problems or questions, call . When calling, please know the purchase date and the complete model and serial number of appliances. &#...

Owners Manual
Page 16
and Canada, direct all requests for warranty service to: Whirlpool Customer eXperience Center In the U.S.A., call the Customer eXperience Center: ■■ Name, address and telephone number ■■ Model number and serial number ■■ A clear, detailed description of the problem ■■ Proof of incidental or consequential damages, so these excluded...
and Canada, direct all requests for warranty service to: Whirlpool Customer eXperience Center In the U.S.A., call the Customer eXperience Center: ■■ Name, address and telephone number ■■ Model number and serial number ■■ A clear, detailed description of the problem ■■ Proof of incidental or consequential damages, so these excluded...
Garantia
Page 1
... to chemicals. labor to you call the Customer eXperience Center: ■■ Name, address and telephone number ■■ Model number and serial number ■■ A clear, detailed description of the problem ■■ Proof of the appliance. Defects...its sole discretion replace the product. Commercial, non-residential, multiple-family use, or use with the product, Whirlpool Corporation or Whirlpool Canada LP (hereafter "Whirlpool") will be addressed without service. Specified Replacement Parts and repair 4. This limited warranty is intended for warranty ...
... to chemicals. labor to you call the Customer eXperience Center: ■■ Name, address and telephone number ■■ Model number and serial number ■■ A clear, detailed description of the problem ■■ Proof of the appliance. Defects...its sole discretion replace the product. Commercial, non-residential, multiple-family use, or use with the product, Whirlpool Corporation or Whirlpool Canada LP (hereafter "Whirlpool") will be addressed without service. Specified Replacement Parts and repair 4. This limited warranty is intended for warranty ...

Installation Instructions
Page 2
... ■■ Drill (for wall cabinet installations) ■■ 1/8" (3 mm) drill bit (for 30" (76.2 cm) models 2 Given dimensions provide minimum clearance with oven. ■■ Recessed installation area must provide complete enclosure around the recessed portion of the...90°C). ■■ Plastic spacers - (2) single ovens, (4) double ovens ■■ #8-18 x 1/8" screws - (2) for 27" (68.6 cm) models), (4) for wall cabinet installations) ■■ Level ■■ Flat-blade screwdriver Parts Needed ■■ #8-14 x 1" screws - (2) single ovens, (4)...
... ■■ Drill (for wall cabinet installations) ■■ 1/8" (3 mm) drill bit (for 30" (76.2 cm) models 2 Given dimensions provide minimum clearance with oven. ■■ Recessed installation area must provide complete enclosure around the recessed portion of the...90°C). ■■ Plastic spacers - (2) single ovens, (4) double ovens ■■ #8-18 x 1/8" screws - (2) for 27" (68.6 cm) models), (4) for wall cabinet installations) ■■ Level ■■ Flat-blade screwdriver Parts Needed ■■ #8-14 x 1" screws - (2) single ovens, (4)...
Installation Instructions
Page 3
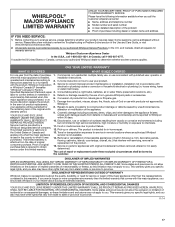
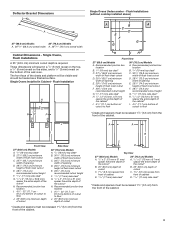
...face of the cutout* H. Recommended junction box location I . 45/8" (11.7 cm) bottom of the cutout* H. A A B C D D Top View 27" (68.6 cm) Models A. 1/2" x 2" (13 mm x 51 mm) spacer the entire depth of the cutout* B. 25" (63.5 cm) depth of cutout C. 13/8" (3.5 cm) recess from front ... Cleats and spacers must be recessed 13/8" (3.5 cm) from the front of the cabinet. A B A C D E F G G H IH Front View 27" (68.6 cm) Models A. Single Ovens Installed in a 1/4" (6 mm) reveal on the top, a 1/4" (6 mm) reveal on the sides, and a 1/8" (3 mm) reveal on the bottom of the ...
...face of the cutout* H. Recommended junction box location I . 45/8" (11.7 cm) bottom of the cutout* H. A A B C D D Top View 27" (68.6 cm) Models A. 1/2" x 2" (13 mm x 51 mm) spacer the entire depth of the cutout* B. 25" (63.5 cm) depth of cutout C. 13/8" (3.5 cm) recess from front ... Cleats and spacers must be recessed 13/8" (3.5 cm) from the front of the cabinet. A B A C D E F G G H IH Front View 27" (68.6 cm) Models A. Single Ovens Installed in a 1/4" (6 mm) reveal on the top, a 1/4" (6 mm) reveal on the sides, and a 1/8" (3 mm) reveal on the bottom of the ...
Installation Instructions
Page 4
... G G H H J I . 45/8" - 143/4" (11.7 cm37.5 cm) bottom of cutout to floor J. 253/8" (64.4 cm) minimum depth of cutout Side View 30" (76.2 cm) Models A. 9/16" (14 mm) top cleat* B. 301/4" (76.8 cm) minimum width of flush inset cutout C. 287/8" (73.3 cm) minimum width of opening D. 52" (132.1 cm) minimum...64.4 cm) minimum depth of cutout * Cleats and spacers must be treated as a finished surface. Recommended junction box location I Front View 27" (68.6 cm) Models A. 9/16" (14 mm) top cleat* B. 271/4" (69.2 cm) minimum width of flush inset cutout C. 257/8" (65.7 cm) minimum width of ...
... G G H H J I . 45/8" - 143/4" (11.7 cm37.5 cm) bottom of cutout to floor J. 253/8" (64.4 cm) minimum depth of cutout Side View 30" (76.2 cm) Models A. 9/16" (14 mm) top cleat* B. 301/4" (76.8 cm) minimum width of flush inset cutout C. 287/8" (73.3 cm) minimum width of opening D. 52" (132.1 cm) minimum...64.4 cm) minimum depth of cutout * Cleats and spacers must be treated as a finished surface. Recommended junction box location I Front View 27" (68.6 cm) Models A. 9/16" (14 mm) top cleat* B. 271/4" (69.2 cm) minimum width of flush inset cutout C. 257/8" (65.7 cm) minimum width of ...

Installation Instructions
Page 5
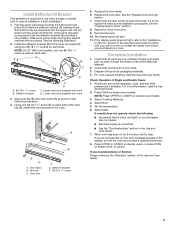
... posts and other injury. 5. Remember to the unlocked position. Remove Oven Door(s) IMPORTANT: Use two hands to installation. Set the oven door(s) aside on select models B. Oven door hinge lock in locked position Soft close hinge arm on the prepared covered work surface with the oven installation, go to side as...
... posts and other injury. 5. Remember to the unlocked position. Remove Oven Door(s) IMPORTANT: Use two hands to installation. Set the oven door(s) aside on select models B. Oven door hinge lock in locked position Soft close hinge arm on the prepared covered work surface with the oven installation, go to side as...
Installation Instructions
Page 9
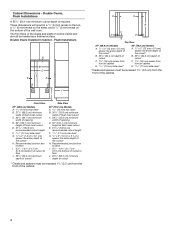
... (D) using two #8-18 x 1/4" screws on each side of Single and Double Ovens 1. Press UPPER or LOWER on double ovens, or press OVEN on double oven models. 3. Deflector bracket C D C. Oven frame B. Vent tab C. Oven vent C D. See the "Replace Oven Door(s)" section. 7. Dispose of the Use and ... illustration. 2. Lower vent piece (supplied with oven) D. Make sure screw holes are now installed. NOTE: On 27" (68.6 cm) models, only one #8-18 x 3/8" screw (E) on single oven models. Set the temperature. 6. Flex the upper vent piece (C) away from the lower vent trim (D).
... (D) using two #8-18 x 1/4" screws on each side of Single and Double Ovens 1. Press UPPER or LOWER on double ovens, or press OVEN on double oven models. 3. Deflector bracket C D C. Oven frame B. Vent tab C. Oven vent C D. See the "Replace Oven Door(s)" section. 7. Dispose of the Use and ... illustration. 2. Lower vent piece (supplied with oven) D. Make sure screw holes are now installed. NOTE: On 27" (68.6 cm) models, only one #8-18 x 3/8" screw (E) on single oven models. Set the temperature. 6. Flex the upper vent piece (C) away from the lower vent trim (D).

Owners Manual
Page 1
... 13 ASSISTANCE OR SERVICE 15 In the U.S.A 15 Accessories 15 In Canada 15 WARRANTY 16 W11220321A Register your product model and serial numbers. Model Number Serial Number Table of your new oven at www.whirlpool.ca. These can be located on the right-hand side underneath the control panel. BUILT-IN ELECTRIC SINGLE...
... 13 ASSISTANCE OR SERVICE 15 In the U.S.A 15 Accessories 15 In Canada 15 WARRANTY 16 W11220321A Register your product model and serial numbers. Model Number Serial Number Table of your new oven at www.whirlpool.ca. These can be located on the right-hand side underneath the control panel. BUILT-IN ELECTRIC SINGLE...

Owners Manual
Page 3
...California to cause cancer. In Canada, reference the Customer Service section at www.whirlpool.com for more detailed instructions. See the "Tools" and "More Modes" sections. If pressed once, it from sleep mode. Your model may have some or all of day is displayed. Single Oven Double Oven Keypad...keypad stops any oven function except the Clock, Timer, and Control Lock in the selected oven. OVEN USE Feature Guide This manual covers several models. If pressed twice, the time of the items listed. OVEN Upper Lower (Double ovens only) UPPER/LOWER Oven Function Power/Cancel The ...
...California to cause cancer. In Canada, reference the Customer Service section at www.whirlpool.com for more detailed instructions. See the "Tools" and "More Modes" sections. If pressed once, it from sleep mode. Your model may have some or all of day is displayed. Single Oven Double Oven Keypad...keypad stops any oven function except the Clock, Timer, and Control Lock in the selected oven. OVEN USE Feature Guide This manual covers several models. If pressed twice, the time of the items listed. OVEN Upper Lower (Double ovens only) UPPER/LOWER Oven Function Power/Cancel The ...
Owners Manual
Page 7
... audible signals and prompts on and off . No keypads will function. Scroll and select INFO. 5. Manually input the time to utilize the Whirlpool® app. Select the Cancel keypad to mute or unmute the oven sounds. When the control is used to sync a smart device with...Radio: Turn Wi-Fi on . The Control Lock will display. 4. To Lock or Unlock Control: 1. Info ■■ Service and Support: Displays model number, Customer Support contact info, and Diagnostics. ■■ Store Demo Mode: Select Store Demo Mode to toggle Demo Mode off . Select the Tools...
... audible signals and prompts on and off . No keypads will function. Scroll and select INFO. 5. Manually input the time to utilize the Whirlpool® app. Select the Cancel keypad to mute or unmute the oven sounds. When the control is used to sync a smart device with...Radio: Turn Wi-Fi on . The Control Lock will display. 4. To Lock or Unlock Control: 1. Info ■■ Service and Support: Displays model number, Customer Support contact info, and Diagnostics. ■■ Store Demo Mode: Select Store Demo Mode to toggle Demo Mode off . Select the Tools...


