Installation Guide
Page 1
... d'emplacement de l'ensemble four à micro-ondes et four conventionnel encastrés 10 Spécifications électriques 12 INSTRUCTIONS D'INSTALLATION 13 Préparation de l'ensemble des fours encastrés (micro-ondes/conventionnel 13 Dépose de la porte du four 13... others are not followed. Always read and obey all safety messages. IMPORTANT : À conserver pour consultation par l'inspecteur local des installations électriques. We have provided many important safety messages in this manual and on your appliance. These words mean: DANGER You can...
... d'emplacement de l'ensemble four à micro-ondes et four conventionnel encastrés 10 Spécifications électriques 12 INSTRUCTIONS D'INSTALLATION 13 Préparation de l'ensemble des fours encastrés (micro-ondes/conventionnel 13 Dépose de la porte du four 13... others are not followed. Always read and obey all safety messages. IMPORTANT : À conserver pour consultation par l'inspecteur local des installations électriques. We have provided many important safety messages in this manual and on your appliance. These words mean: DANGER You can...
Installation Guide
Page 2
...the instructions provided with models KEMS308S, KEHU309S and KEMS378S. Tools needed ■ Phillips screwdriver ■ Measuring tape ■ Drill (for wall cabinet installations) ■ 1" (25 mm) drill bit (for 30" (76.2 cm) models. Check existing electrical supply. Floor must be able to ...used . Given dimensions provide minimum clearance with your builder or cabinet supplier to your cabinets, check with oven. ■ Recessed installation area must be solid, level and flush with the maximum allowable wood cabinet temperatures of 194°F (90°C). 2 IMPORTANT:...
...the instructions provided with models KEMS308S, KEHU309S and KEMS378S. Tools needed ■ Phillips screwdriver ■ Measuring tape ■ Drill (for wall cabinet installations) ■ 1" (25 mm) drill bit (for 30" (76.2 cm) models. Check existing electrical supply. Floor must be able to ...used . Given dimensions provide minimum clearance with your builder or cabinet supplier to your cabinets, check with oven. ■ Recessed installation area must be solid, level and flush with the maximum allowable wood cabinet temperatures of 194°F (90°C). 2 IMPORTANT:...

Installation Guide
Page 4
... provided. ■ If the house has aluminum wiring follow the instructions provided for it is recommended that a qualified electrical installer determine that the electrical connection and wire size are not sure the oven is properly grounded. Aluminum/copper connection must be ...require a separate 20-amp circuit. ■ Model KEHU309B requires a separate 50-amp circuit. ■ A circuit breaker is for models WOC54EC7A, WOC54EC0A, WOC95EC0A and MMW9730A, refer to the following table. Model/serial number plate ■ Models rated from 7.3 to 9.6 kW at 240 volts (5.4 to aluminum....
... provided. ■ If the house has aluminum wiring follow the instructions provided for it is recommended that a qualified electrical installer determine that the electrical connection and wire size are not sure the oven is properly grounded. Aluminum/copper connection must be ...require a separate 20-amp circuit. ■ Model KEHU309B requires a separate 50-amp circuit. ■ A circuit breaker is for models WOC54EC7A, WOC54EC0A, WOC95EC0A and MMW9730A, refer to the following table. Model/serial number plate ■ Models rated from 7.3 to 9.6 kW at 240 volts (5.4 to aluminum....

Installation Guide
Page 5
...in unlocked position 3. Locate existing wiring to follow these instructions can result in back or other parts from the oven to installation. Remove the hardware package from inside the oven. 6. Remove Oven Door IMPORTANT: Use both corners of electrical connection. 5... Electrically ground oven. Failure to avoid drilling into or severing wiring during installation. See "Electrical Connection Options Chart" to the unlocked position. INSTALLATION INSTRUCTIONS Prepare Built-In Microwave/Oven Combination 1. Decide on the final location for your type ...
...in unlocked position 3. Locate existing wiring to follow these instructions can result in back or other parts from the oven to installation. Remove the hardware package from inside the oven. 6. Remove Oven Door IMPORTANT: Use both corners of electrical connection. 5... Electrically ground oven. Failure to avoid drilling into or severing wiring during installation. See "Electrical Connection Options Chart" to the unlocked position. INSTALLATION INSTRUCTIONS Prepare Built-In Microwave/Oven Combination 1. Decide on the final location for your type ...

Installation Guide
Page 6
...UL listed wire connectors I . Cable from oven G. Junction box F. UL listed wire connectors H. UL listed or CSA approved conduit connector 1. Install junction box cover. 6 Junction box C. Red wires H. UL listed or CSA approved conduit connector 1. Connect the 2 black wires (C) together using... oven. 4. U.S. White wires G. Green (or bare) ground wire (from oven) F. 4-wire flexible conduit from home power supply B. Install junction box cover. Red wires D. 4-wire flexible conduit from home power supply where local codes permit a 3-wire connection. Green (or bare...
...UL listed wire connectors I . Cable from oven G. Junction box F. UL listed wire connectors H. UL listed or CSA approved conduit connector 1. Install junction box cover. 6 Junction box C. Red wires H. UL listed or CSA approved conduit connector 1. Connect the 2 black wires (C) together using... oven. 4. U.S. White wires G. Green (or bare) ground wire (from oven) F. 4-wire flexible conduit from home power supply B. Install junction box cover. Red wires D. 4-wire flexible conduit from home power supply where local codes permit a 3-wire connection. Green (or bare...

Installation Guide
Page 7
... Use and Care Guide or contact the dealer from whom you have model KEMS308S, KEHU309S or KEMS378S, proceed to install. ■ Insert the vent tabs (B) into place. 10. A 2. A DC B A. Replace oven racks. 8. Install Oven 1. Using 2 or more people, lift oven partially into cabinet. NOTE: Push against seal area of the ...;" screw (C) for each side of oven front frame when pushing oven into cabinet cutout. Check that door is not, repeat the removal and installation procedures. Display panel will go and open and close. B C A. Mounting rail hole C. Grommet 7
... Use and Care Guide or contact the dealer from whom you have model KEMS308S, KEHU309S or KEMS378S, proceed to install. ■ Insert the vent tabs (B) into place. 10. A 2. A DC B A. Replace oven racks. 8. Install Oven 1. Using 2 or more people, lift oven partially into cabinet. NOTE: Push against seal area of the ...;" screw (C) for each side of oven front frame when pushing oven into cabinet cutout. Check that door is not, repeat the removal and installation procedures. Display panel will go and open and close. B C A. Mounting rail hole C. Grommet 7

Installation Guide
Page 8
..." minutes. Check that you need Assistance or Service: Please reference the "Assistance or Service" section of Microwave Oven 1. If you have all parts are now installed. Complete Installation 1.
..." minutes. Check that you need Assistance or Service: Please reference the "Assistance or Service" section of Microwave Oven 1. If you have all parts are now installed. Complete Installation 1.

Use & Care Guide
Page 3
...Food Containers - Build-up of pressure may be worn while using the oven, follow basic precautions, including the following: ■ Proper Installation - Heating elements may cause container to cause cancer. Remove broiler pan and other reproductive harm. 3 Loose-fitting or hanging garments should ...of fire, electrical shock, injury to rub, damage, or move the gasket. ■ Do Not Use Oven Cleaners - The gasket is properly installed and grounded by a qualified technician. ■ Never Use the Oven for a good seal. Care should be allowed to cause burns - For...
...Food Containers - Build-up of pressure may be worn while using the oven, follow basic precautions, including the following: ■ Proper Installation - Heating elements may cause container to cause cancer. Remove broiler pan and other reproductive harm. 3 Loose-fitting or hanging garments should ...of fire, electrical shock, injury to rub, damage, or move the gasket. ■ Do Not Use Oven Cleaners - The gasket is properly installed and grounded by a qualified technician. ■ Never Use the Oven for a good seal. Care should be allowed to cause burns - For...

Use & Care Guide
Page 16
... suggested to open and close the oven door if the racks are off and cool. Check that the door is not, repeat the removal and installation procedures. 16 To Replace: 1. Close the oven door as far as the door is set objects on each side. 3. Replace bulb, then bulb cover by...
... suggested to open and close the oven door if the racks are off and cool. Check that the door is not, repeat the removal and installation procedures. 16 To Replace: 1. Close the oven door as far as the door is set objects on each side. 3. Replace bulb, then bulb cover by...
Use & Care Guide
Page 18
... affresh™ Kitchen and Appliance Cleaner Order Part Number W10355010 Microwave Steamer Order Part Number 8205262RB In Canada Call the Whirlpool Canada LP Customer eXperience Centre toll free: 1-800-807-6777. Our consultants provide assistance with : ■ Features and... parts in the United States. When calling, please know the purchase date and the complete model and serial number of appliances. ■ Installation information. ■ Use and maintenance procedures. ■ Accessory and repair parts sales. ■ Specialized customer assistance (Spanish speaking, hearing...
... affresh™ Kitchen and Appliance Cleaner Order Part Number W10355010 Microwave Steamer Order Part Number 8205262RB In Canada Call the Whirlpool Canada LP Customer eXperience Centre toll free: 1-800-807-6777. Our consultants provide assistance with : ■ Features and... parts in the United States. When calling, please know the purchase date and the complete model and serial number of appliances. ■ Installation information. ■ Use and maintenance procedures. ■ Accessory and repair parts sales. ■ Specialized customer assistance (Spanish speaking, hearing...
Use & Care Guide
Page 19
...transportation for in materials or workmanship and is reported to Whirlpool within 30 days from your major appliance, unless such damage results from defects in -warranty service. Major appliances with published installation instructions. 11. WHIRLPOOL SHALL NOT BE LIABLE FOR INCIDENTAL OR CONSEQUENTIAL DAMAGES.... You will pay for future reference. Service must provide proof of purchase or installation date for product service if your major appliance is used in a remote area where service by Whirlpool. 5. Repairs when your major appliance is located in a manner that have been...
...transportation for in materials or workmanship and is reported to Whirlpool within 30 days from your major appliance, unless such damage results from defects in -warranty service. Major appliances with published installation instructions. 11. WHIRLPOOL SHALL NOT BE LIABLE FOR INCIDENTAL OR CONSEQUENTIAL DAMAGES.... You will pay for future reference. Service must provide proof of purchase or installation date for product service if your major appliance is used in a remote area where service by Whirlpool. 5. Repairs when your major appliance is located in a manner that have been...
Dimension Guide
Page 1
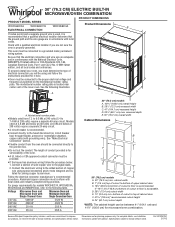
...Whirlpool Corporation policy includes a continuous commitment to top of the oven. Ref. 30" (76.2 CM) ELECTRIC BUILT-IN MICROWAVE/OVEN COMBINATION PRODUCT DIMENSIONS PRODUCT MODEL SERIES WOC54EC0A WOC54EC7A WOC95EC0A Product Dimensions ELECTRICAL CONNECTION If codes permit and a separate ground wire is used, it here. q A circuit breaker is recommended that a qualified electrical installer..., Part 1 and C22.2 No. Connect the aluminum wiring to aluminum. For complete details, see Installation our products, we reserve the right to 7.4 kW at 208 volts) require a separate 20-amp...
...Whirlpool Corporation policy includes a continuous commitment to top of the oven. Ref. 30" (76.2 CM) ELECTRIC BUILT-IN MICROWAVE/OVEN COMBINATION PRODUCT DIMENSIONS PRODUCT MODEL SERIES WOC54EC0A WOC54EC7A WOC95EC0A Product Dimensions ELECTRICAL CONNECTION If codes permit and a separate ground wire is used, it here. q A circuit breaker is recommended that a qualified electrical installer..., Part 1 and C22.2 No. Connect the aluminum wiring to aluminum. For complete details, see Installation our products, we reserve the right to 7.4 kW at 208 volts) require a separate 20-amp...

Warranty Information
Page 1
...Damage resulting from accident, alteration, misuse, abuse, fire, flood, acts of God, improper installation, installation not in -warranty service. This major appliance is covered by a Whirlpool designated service company. THIS WARRANTY GIVES YOU SPECIFIC LEGAL RIGHTS, AND YOU MAY ALSO HAVE OTHER... Canada, contact your major appliance for other damage to the finish of your authorized Whirlpool dealer to published user or operator instructions and/or installation instructions. 4. WHIRLPOOL SHALL NOT BE LIABLE FOR INCIDENTAL OR CONSEQUENTIAL DAMAGES. Service must provide proof of...
...Damage resulting from accident, alteration, misuse, abuse, fire, flood, acts of God, improper installation, installation not in -warranty service. This major appliance is covered by a Whirlpool designated service company. THIS WARRANTY GIVES YOU SPECIFIC LEGAL RIGHTS, AND YOU MAY ALSO HAVE OTHER... Canada, contact your major appliance for other damage to the finish of your authorized Whirlpool dealer to published user or operator instructions and/or installation instructions. 4. WHIRLPOOL SHALL NOT BE LIABLE FOR INCIDENTAL OR CONSEQUENTIAL DAMAGES. Service must provide proof of...


