Dimension Guide
Page 1
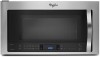
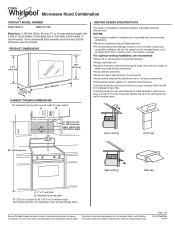
... q using caulking compound to seal exterior wall or roof opening around cap q not installing 2 elbows together, for architectural designer and builder/contractor reference only. Specifications subject to.../31- Instructions packed with a fuse or circuit breaker. Microwave Hood Combination PRODUCT MODEL NUMBER WMH73521C WMH76719C Electrical: A 120-Volt, 60-Hz, AC-only, 15- It is intended for...W10652354A 1/16/14 Exact dimensions may vary depending on type of 2 Ref. Because Whirlpool Corporation policy includes a continuous commitment to open fully. NOTES: q Vent materials needed...
... q using caulking compound to seal exterior wall or roof opening around cap q not installing 2 elbows together, for architectural designer and builder/contractor reference only. Specifications subject to.../31- Instructions packed with a fuse or circuit breaker. Microwave Hood Combination PRODUCT MODEL NUMBER WMH73521C WMH76719C Electrical: A 120-Volt, 60-Hz, AC-only, 15- It is intended for...W10652354A 1/16/14 Exact dimensions may vary depending on type of 2 Ref. Because Whirlpool Corporation policy includes a continuous commitment to open fully. NOTES: q Vent materials needed...
Dimension Guide
Page 2
.... The total length of the vent system including straight vent, elbow(s), transitions and wall or roof caps must be installed to improve Dimensions are for either type of 2 Ref. A D E F G A. Vent extensio A. Wall ... 25.4 cm) vent system = 73 ft (22.2 m) total A B 6 ft (1.8 m) 2 ft (0.6 m) C A. Because Whirlpool Corporation policy includes a continuous commitment to keep the damper from sticking. For complete details, see Installation our products, we reserve the right to change materials and specifications without notice. Specifications subject to change without...
.... The total length of the vent system including straight vent, elbow(s), transitions and wall or roof caps must be installed to improve Dimensions are for either type of 2 Ref. A D E F G A. Vent extensio A. Wall ... 25.4 cm) vent system = 73 ft (22.2 m) total A B 6 ft (1.8 m) 2 ft (0.6 m) C A. Because Whirlpool Corporation policy includes a continuous commitment to keep the damper from sticking. For complete details, see Installation our products, we reserve the right to change materials and specifications without notice. Specifications subject to change without...

Installation Guide
Page 1
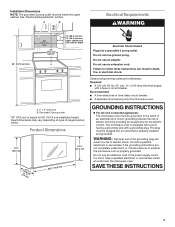
... tell you what the potential hazard is, tell you how to Wall 8 Prepare Upper Cabinet 8 Install Damper Assembly 9 Install the Microwave Oven 9 Complete Installation 10 VENTING DESIGN SPECIFICATIONS 11 ASSISTANCE 12 Replacement Parts 12 Accessories 12 MICROWAVE HOOD COMBINATION SAFETY Your safety... All safety messages will follow the safety alert symbol and either the word "DANGER" or "WARNING." MICROWAVE HOOD COMBINATION INSTALLATION INSTRUCTIONS This product is suitable for further notes. This symbol alerts you don't immediately follow instructions. These words mean: DANGER...
... tell you what the potential hazard is, tell you how to Wall 8 Prepare Upper Cabinet 8 Install Damper Assembly 9 Install the Microwave Oven 9 Complete Installation 10 VENTING DESIGN SPECIFICATIONS 11 ASSISTANCE 12 Replacement Parts 12 Accessories 12 MICROWAVE HOOD COMBINATION SAFETY Your safety... All safety messages will follow the safety alert symbol and either the word "DANGER" or "WARNING." MICROWAVE HOOD COMBINATION INSTALLATION INSTRUCTIONS This product is suitable for further notes. This symbol alerts you don't immediately follow instructions. These words mean: DANGER...

Installation Guide
Page 2
...1/4" x 2" lag screws ■ Scissors ■ 1½" (3.8 cm) diam. The piece inside upper cabinet. The location must be installed. See "Rectangular to separate the template from the top of 150 lbs (68 kg), which includes microwave oven and items placed inside the...charcoal filter may not be combined. A B C D E FG H A 1/4-20 x 3" round-head bolts (2) B. 1/4-20 x 3" flat-head bolts (2) C. See "Installation Dimensions" illustration. ■ Minimum one 2" x 4" (50.8 x 101.6 mm) wood wall stud and minimum 3/8" (10 mm) thickness drywall or plaster/lath within cabinet ...
...1/4" x 2" lag screws ■ Scissors ■ 1½" (3.8 cm) diam. The piece inside upper cabinet. The location must be installed. See "Rectangular to separate the template from the top of 150 lbs (68 kg), which includes microwave oven and items placed inside the...charcoal filter may not be combined. A B C D E FG H A 1/4-20 x 3" round-head bolts (2) B. 1/4-20 x 3" flat-head bolts (2) C. See "Installation Dimensions" illustration. ■ Minimum one 2" x 4" (50.8 x 101.6 mm) wood wall stud and minimum 3/8" (10 mm) thickness drywall or plaster/lath within cabinet ...
Installation Guide
Page 3
... fuse or circuit breaker. Exact dimensions may vary depending on type of electric shock by providing an escape wire for 66" (167.6 cm) installation height. Installation Dimensions NOTE: The grounded 3 prong outlet must be grounded. A B Electrical Requirements WARNING 66" (167.6 cm) min. 30" (76.2 ...185;₈⁵c"⁄)₁m₆") 29⁷⁄₈" (76.0 cm) Electrical Shock Hazard Plug into an outlet that is properly installed and grounded. Recommended: ■ A time-delay fuse or time-delay circuit breaker. ■ A separate circuit serving only this microwave...
... fuse or circuit breaker. Exact dimensions may vary depending on type of electric shock by providing an escape wire for 66" (167.6 cm) installation height. Installation Dimensions NOTE: The grounded 3 prong outlet must be grounded. A B Electrical Requirements WARNING 66" (167.6 cm) min. 30" (76.2 ...185;₈⁵c"⁄)₁m₆") 29⁷⁄₈" (76.0 cm) Electrical Shock Hazard Plug into an outlet that is properly installed and grounded. Recommended: ■ A time-delay fuse or time-delay circuit breaker. ■ A separate circuit serving only this microwave...

Installation Guide
Page 4
... the work surface, cover the work surface. 1. A A. Louvered damper vent covers 4 Wall Venting Installation Only 1. Keep damper plate and screws together and set it aside. 3. B A. INSTALLATION INSTRUCTIONS Remove Mounting Plate Depending on your model, the mounting plate may be in the foam packaging, or...venting system. Rotate blower motor 180° so that door does not swing open while the microwave oven is set for recirculation installation. A Keep the damper assembly in case the venting method is changed, or the microwave oven is attached to the back of...
... the work surface, cover the work surface. 1. A A. Louvered damper vent covers 4 Wall Venting Installation Only 1. Keep damper plate and screws together and set it aside. 3. B A. INSTALLATION INSTRUCTIONS Remove Mounting Plate Depending on your model, the mounting plate may be in the foam packaging, or...venting system. Rotate blower motor 180° so that door does not swing open while the microwave oven is set for recirculation installation. A Keep the damper assembly in case the venting method is changed, or the microwave oven is attached to the back of...

Installation Guide
Page 5
..., gently snip out the rectangular vent covers on the damper plate removed in Step 3 of the microwave oven. Screws C. Roof Venting Installation Only 1. Lower blower motor back into the slots in Step 1. Exhaust port IMPORTANT: If blower motor is not correctly oriented, the...the microwave oven. 7. Make sure damper plate tabs are inserted into the slots in Step 3 cannot be poor. 5 Repeat Step 3 from "Wall Venting Installation Only." 2. Damper plate B. Screws C. Slots 9. Secure damper plate with 2 screws removed in Step 1 of microwave oven with 2 screws removed in ...
..., gently snip out the rectangular vent covers on the damper plate removed in Step 3 of the microwave oven. Screws C. Roof Venting Installation Only 1. Lower blower motor back into the slots in Step 1. Exhaust port IMPORTANT: If blower motor is not correctly oriented, the...the microwave oven. 7. Make sure damper plate tabs are inserted into the slots in Step 3 cannot be poor. 5 Repeat Step 3 from "Wall Venting Installation Only." 2. Damper plate B. Screws C. Slots 9. Secure damper plate with 2 screws removed in Step 1 of microwave oven with 2 screws removed in ...
Installation Guide
Page 6
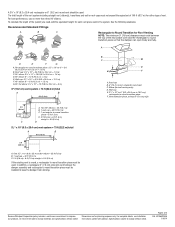
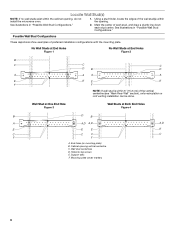
... Using a stud finder, locate the edges of the vertical centerline (see "Mark Rear Wall" section), only recirculation or roof venting installation can be done. End holes (on mounting plate) B. Support tabs F. Mounting plate center markers 6 Wall Stud at One End ... D B D A A A A E E E E F F NOTE: If wall stud is within 6" (15.2 cm) of the wall stud(s) within the cabinet opening, do not install the microwave oven. 1. Holes for lag screws E. See illustrations in "Possible Wall Stud Configurations." Locate Wall Stud(s) NOTE: If no wall studs exist within the...
... Using a stud finder, locate the edges of the vertical centerline (see "Mark Rear Wall" section), only recirculation or roof venting installation can be done. End holes (on mounting plate) B. Support tabs F. Mounting plate center markers 6 Wall Stud at One End ... D B D A A A A E E E E F F NOTE: If wall stud is within 6" (15.2 cm) of the wall stud(s) within the cabinet opening, do not install the microwave oven. 1. Holes for lag screws E. See illustrations in "Possible Wall Stud Configurations." Locate Wall Stud(s) NOTE: If no wall studs exist within the...

Installation Guide
Page 7
... in "Locate Wall Stud(s)" section. 7 Make sure the mounting plate is the venting cutout area. 13. Mark Rear Wall The microwave oven must be installed on the wall, making sure it is level, and that its bottom edge is aligned to complete the 12" x 4" (30.5 x 10.2 cm...) rectangle. A A. Cardboard template C. If the end holes are 3 installation configurations. With the support tabs facing forward (see illustrations in "Locate Wall Stud(s)" section), align the mounting plate center markers to figures 1 and 2 in "...
... in "Locate Wall Stud(s)" section. 7 Make sure the mounting plate is the venting cutout area. 13. Mark Rear Wall The microwave oven must be installed on the wall, making sure it is level, and that its bottom edge is aligned to complete the 12" x 4" (30.5 x 10.2 cm...) rectangle. A A. Cardboard template C. If the end holes are 3 installation configurations. With the support tabs facing forward (see illustrations in "Locate Wall Stud(s)" section), align the mounting plate center markers to figures 1 and 2 in "...
Installation Guide
Page 8
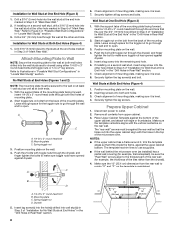
... hole(s) drilled into the upper cabinet align with toggle nut through the drywall, and finger tighten the bolts to go through both ends. 1. Installation for the toggle nuts to make sure toggle nut has opened against drywall. No Wall Studs at End Holes (Figures 1 and 2) NOTE: The.... Check alignment of the mounting plate facing forward, insert 1/4-20 x 3" round-head bolts through the wall and to open . 3. Spring toggle nut D. Installation for Wall Stud at One End Hole" in the "Drill Holes in Rear Wall" section. 2. The "rear wall" arrows must be secured to outlet. ...
... hole(s) drilled into the upper cabinet align with toggle nut through the drywall, and finger tighten the bolts to go through both ends. 1. Installation for the toggle nuts to make sure toggle nut has opened against drywall. No Wall Studs at End Holes (Figures 1 and 2) NOTE: The.... Check alignment of the mounting plate facing forward, insert 1/4-20 x 3" round-head bolts through the wall and to open . 3. Spring toggle nut D. Installation for Wall Stud at One End Hole" in the "Drill Holes in Rear Wall" section. 2. The "rear wall" arrows must be secured to outlet. ...

Installation Guide
Page 9
...the power supply cord. A B A. This hole is closed and taped shut. 3. Using a keyhole saw, cut out the rectangular area. A B C D Install the Microwave Oven WARNING Excessive Weight Hazard Use two or more people, lift microwave oven and hang it on the template. IMPORTANT: The control side...B. Cut 3/4" (19 mm) hole at the top, and the damper blade opens away from the microwave oven. NOTE: To avoid damage to move and install microwave oven. Mounting plate B. Check that the damper blade hinge is the heavy side. B A A. Support tabs 4. Cut the 1¹⁄₂" ...
...the power supply cord. A B A. This hole is closed and taped shut. 3. Using a keyhole saw, cut out the rectangular area. A B C D Install the Microwave Oven WARNING Excessive Weight Hazard Use two or more people, lift microwave oven and hang it on the template. IMPORTANT: The control side...B. Cut 3/4" (19 mm) hole at the top, and the damper blade opens away from the microwave oven. NOTE: To avoid damage to move and install microwave oven. Mounting plate B. Check that the damper blade hinge is the heavy side. B A A. Support tabs 4. Cut the 1¹⁄₂" ...

Installation Guide
Page 10
...Damper assembly (under the raised tabs of 1 minute at least one person holding it in death, fire, or electrical shock. 2. Install filters. Bolts For Roof Venting Installation Only 1. Long tab F. Do not use an extension cord. Do not use an adapter. Replace the fuse or reset the ...instructions can result in place, insert bolts through the cabinet cutout so that the long tab of the damper assembly slides under vent) Complete Installation 1. The blocks must be adjusted, skip steps 7-9. 7. Refer to the User Instructions for future use. 10 Loosen mounting plate screws. ...
...Damper assembly (under the raised tabs of 1 minute at least one person holding it in death, fire, or electrical shock. 2. Install filters. Bolts For Roof Venting Installation Only 1. Long tab F. Do not use an extension cord. Do not use an adapter. Replace the fuse or reset the ...instructions can result in place, insert bolts through the cabinet cutout so that the long tab of the damper assembly slides under vent) Complete Installation 1. The blocks must be adjusted, skip steps 7-9. 7. Refer to the User Instructions for future use. 10 Loosen mounting plate screws. ...

Installation Guide
Page 11
... performance ■ using uniformly sized vents ■ using caulking compound to seal exterior wall or roof opening around cap ■ not installing 2 elbows together, for optimal hood performance If venting through the roof, and rectangular to seal all joints in "Recommended Vent Length." ...with microwave hood combination. ■ We do not recommend using roof or wall caps that the damper can open fully. For optimal venting installation, we recommend: ■ using a flexible metal vent. ■ To avoid possible product damage, be sure there is proper clearance ...
... performance ■ using uniformly sized vents ■ using caulking compound to seal exterior wall or roof opening around cap ■ not installing 2 elbows together, for optimal hood performance If venting through the roof, and rectangular to seal all joints in "Recommended Vent Length." ...with microwave hood combination. ■ We do not recommend using roof or wall caps that the damper can open fully. For optimal venting installation, we recommend: ■ using a flexible metal vent. ■ To avoid possible product damage, be sure there is proper clearance ...

Installation Guide
Page 12
...piece = 5 ft (1.5 m) D. 2 ft (0.6 m) + 6 ft (1.8 m) straight = 8 ft (2.4 m) If the existing vent is round, a rectangular to round transition piece must be installed to keep the damper from your model number located on the front facing of the microwave oven opening . Accessories Filler Panel Kits are available from... Call your authorized dealer or service center for equivalent lengths. You will need , add the equivalent lengths of the installation hardware needs to round transition piece must be found on the front frame of the system you will need additional assistance...
...piece = 5 ft (1.5 m) D. 2 ft (0.6 m) + 6 ft (1.8 m) straight = 8 ft (2.4 m) If the existing vent is round, a rectangular to round transition piece must be installed to keep the damper from your model number located on the front facing of the microwave oven opening . Accessories Filler Panel Kits are available from... Call your authorized dealer or service center for equivalent lengths. You will need , add the equivalent lengths of the installation hardware needs to round transition piece must be found on the front frame of the system you will need additional assistance...

Warranty Information
Page 1
... comprehensive warranty than the limited warranty that vary from state to state or province to or furnished with published installation instructions. 11. WARRANTY Whirlpool Corporation Major Appliance Warranty ONE YEAR LIMITED WARRANTY For one -year limited warranty of the original unit. This ...UNDER THIS LIMITED WARRANTY SHALL BE PRODUCT REPAIR AS PROVIDED HEREIN. Service calls to correct the installation of your major appliance for product service if your authorized Whirlpool dealer to refrigerator or freezer product failures. 7. Costs associated with original model/serial numbers ...
... comprehensive warranty than the limited warranty that vary from state to state or province to or furnished with published installation instructions. 11. WARRANTY Whirlpool Corporation Major Appliance Warranty ONE YEAR LIMITED WARRANTY For one -year limited warranty of the original unit. This ...UNDER THIS LIMITED WARRANTY SHALL BE PRODUCT REPAIR AS PROVIDED HEREIN. Service calls to correct the installation of your major appliance for product service if your authorized Whirlpool dealer to refrigerator or freezer product failures. 7. Costs associated with original model/serial numbers ...

Use & Care Guide
Page 1
...alert symbol and either the word "DANGER" or "WARNING." Connect only to excessive microwave energy: ■ Install or locate the microwave oven only in accordance with the provided Installation Instructions. ■ Read all safety messages. These words mean: DANGER You can kill or hurt you what... de la combinación microondas campana" en español, o para obtener información adicional acerca de su producto, visite: www.whirlpool.com Tenga listo su número de modelo completo. This symbol alerts you to reduce the chance of others . IMPORTANT SAFETY INSTRUCTIONS When ...
...alert symbol and either the word "DANGER" or "WARNING." Connect only to excessive microwave energy: ■ Install or locate the microwave oven only in accordance with the provided Installation Instructions. ■ Read all safety messages. These words mean: DANGER You can kill or hurt you what... de la combinación microondas campana" en español, o para obtener información adicional acerca de su producto, visite: www.whirlpool.com Tenga listo su número de modelo completo. This symbol alerts you to reduce the chance of others . IMPORTANT SAFETY INSTRUCTIONS When ...
Use & Care Guide
Page 3
... with a fuse or circuit breaker. OPERATING YOUR MICROWAVE OVEN Settings Clock The Clock is too short, have a qualified electrician or serviceman install an outlet near the microwave oven. Cook functions may be turned off . Touch and hold the Cancel control for heat circulation" appears ... the vent fan cannot be plugged into a grounded 3 prong outlet. Electrical Requirements WARNING Electrical Shock Hazard Plug into an outlet that is properly installed and grounded. Failure to cancel Light Timer. Required: ■ A 120 volt, 60 Hz, AC only, 15- or 20-amp electrical supply...
... with a fuse or circuit breaker. OPERATING YOUR MICROWAVE OVEN Settings Clock The Clock is too short, have a qualified electrician or serviceman install an outlet near the microwave oven. Cook functions may be turned off . Touch and hold the Cancel control for heat circulation" appears ... the vent fan cannot be plugged into a grounded 3 prong outlet. Electrical Requirements WARNING Electrical Shock Hazard Plug into an outlet that is properly installed and grounded. Failure to cancel Light Timer. Required: ■ A 120 volt, 60 Hz, AC only, 15- or 20-amp electrical supply...
Use & Care Guide
Page 5
... grille, tilt the grille forward, lift it heats, and adjusts the cooking time accordingly. Add More Time At the end of starting the cook cycle. Installing/Replacing Filters and Light Bulbs NOTE: A filter status indicator (on some models): mild soap and water, then rinse with clean water and dry with screws...
... grille, tilt the grille forward, lift it heats, and adjusts the cooking time accordingly. Add More Time At the end of starting the cook cycle. Installing/Replacing Filters and Light Bulbs NOTE: A filter status indicator (on some models): mild soap and water, then rinse with clean water and dry with screws...

Use & Care Guide
Page 7
... shall be borne by the customer. Service calls to correct the installation of original purchase date is required to or furnished with the product, Whirlpool Corporation or Whirlpool Canada LP (hereafter "Whirlpool") will be repaired in the home and only in-home service is... manner that vary from state to state or province to published user or operator instructions and/or installation instructions. 4. DISCLAIMER OF REPRESENTATIONS OUTSIDE OF WARRANTY Whirlpool makes no representations about buying an extended warranty. EXCLUSION OF INCIDENTAL AND CONSEQUENTIAL DAMAGES YOUR SOLE AND...
... shall be borne by the customer. Service calls to correct the installation of original purchase date is required to or furnished with the product, Whirlpool Corporation or Whirlpool Canada LP (hereafter "Whirlpool") will be repaired in the home and only in-home service is... manner that vary from state to state or province to published user or operator instructions and/or installation instructions. 4. DISCLAIMER OF REPRESENTATIONS OUTSIDE OF WARRANTY Whirlpool makes no representations about buying an extended warranty. EXCLUSION OF INCIDENTAL AND CONSEQUENTIAL DAMAGES YOUR SOLE AND...


