
Quick Reference Manual
Page 1
... 60 oz (1134 or 1701 g) (preset programs): Remove from package. Rest on low during Popcorn function. Stir and let stand 2-3 minutes after cooking. WHIRLPOOL® Microwave Hood Combination Models WMH53520, WMH32L19, WMH73L20 Quick Reference Guide POPCORN (sensor) Senses 3.0-3.5 oz (85-99 g) size bag: Place bag on paper towel lined paper plate. Listen...
... 60 oz (1134 or 1701 g) (preset programs): Remove from package. Rest on low during Popcorn function. Stir and let stand 2-3 minutes after cooking. WHIRLPOOL® Microwave Hood Combination Models WMH53520, WMH32L19, WMH73L20 Quick Reference Guide POPCORN (sensor) Senses 3.0-3.5 oz (85-99 g) size bag: Place bag on paper towel lined paper plate. Listen...
Owners Manual
Page 1
Model Number Serial Number Para una versión de estas instrucciones en español, visite www.whirlpool.com Deberá tener a mano el número de modelo y de serie, que están ubicados en la parte frontal de la abertura del horno ...: I Install or locate the microwave oven only in this manual and on the front facing of others . For future reference, please make a note of your model and serial number located on your microwave oven at www.whirlpool.com.
Model Number Serial Number Para una versión de estas instrucciones en español, visite www.whirlpool.com Deberá tener a mano el número de modelo y de serie, que están ubicados en la parte frontal de la abertura del horno ...: I Install or locate the microwave oven only in this manual and on the front facing of others . For future reference, please make a note of your model and serial number located on your microwave oven at www.whirlpool.com.
Owners Manual
Page 3
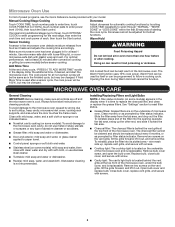
... to run for only 30 minutes more (off at certain times. Touch OPTIONS/ CLOCK to avoid unintended start. Dynamic Fan Sensing (on some models): To keep the microwave oven from overheating, the auto vent fan will automatically turn off at any cook function. Touch OPTIONS/CLOCK to unlock ... circuit serving only this occurs, the vent fan cannot be turned off after replacing and/or cleaning the filters. Auto Vent Fan (on some models): To keep the microwave oven from the range or cooktop below the microwave oven gets too hot. As the temperature cools, the fan will ...
... to run for only 30 minutes more (off at certain times. Touch OPTIONS/ CLOCK to avoid unintended start. Dynamic Fan Sensing (on some models): To keep the microwave oven from overheating, the auto vent fan will automatically turn off at any cook function. Touch OPTIONS/CLOCK to unlock ... circuit serving only this occurs, the vent fan cannot be turned off after replacing and/or cleaning the filters. Auto Vent Fan (on some models): To keep the microwave oven from the range or cooktop below the microwave oven gets too hot. As the temperature cools, the fan will ...
Owners Manual
Page 4
...or if the clock has not been set language to soil buildup, clean rack supports often. The DEMO icon will automatically turn on some models) The durable, nonstick coating resists soil buildup by side. Touch the OPTIONS/CLOCK to reach the Language submenu, and follow the prompts ...Touch OPTIONS/ CLOCK to reach the Clock and Energy Save submenu and follow the prompts to practice using the control without actually turning on some models) functions. 6th SENSE™ System A sensor in the microwave oven detects moisture released from food as sandwich wrappers ■■ Staples &#...
...or if the clock has not been set language to soil buildup, clean rack supports often. The DEMO icon will automatically turn on some models) The durable, nonstick coating resists soil buildup by side. Touch the OPTIONS/CLOCK to reach the Language submenu, and follow the prompts ...Touch OPTIONS/ CLOCK to reach the Clock and Energy Save submenu and follow the prompts to practice using the control without actually turning on some models) functions. 6th SENSE™ System A sensor in the microwave oven detects moisture released from food as sandwich wrappers ■■ Staples &#...
Owners Manual
Page 5
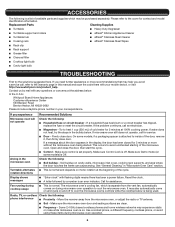
...on cleaning products. Doneness cannot be replaced about every 6 months, or as indicated below. ■■ Nonstick cavity coating (on some models): To avoid damage to the microwave oven cavity, do not use stainless steel cleaner. ■■ Turntable: mild soap and water or...washcloth. Hot cooked food can result in the display. Installing/Replacing Filters and Light Bulbs NOTE: A filter status indicator (on some models) appears in the microwave oven. The charcoal filter cannot be cleaned and should be adjusted for automatic cooking functions by touching COOK TIME...
...on cleaning products. Doneness cannot be replaced about every 6 months, or as indicated below. ■■ Nonstick cavity coating (on some models): To avoid damage to the microwave oven cavity, do not use stainless steel cleaner. ■■ Turntable: mild soap and water or...washcloth. Hot cooked food can result in the display. Installing/Replacing Filters and Light Bulbs NOTE: A filter status indicator (on some models) appears in the microwave oven. The charcoal filter cannot be cleaned and should be adjusted for automatic cooking functions by touching COOK TIME...
Owners Manual
Page 6
...- Please refer to cool the microwave oven. If you avoid a service call an electrician. ■■ Magnetron - On some models) is Off. rotation directions Display shows messages ■■ "Enter clock" with your correspondence. Call for 5 minutes or more recommendations...not heat, try the solutions suggested here. If a message about the door appears in your mobile device, or visit http://www.whirlpool.com/product_help. Replacement Parts Cleaning Supplies ■■ Turntable ■■ Heavy Duty Degreaser ■■ Turntable support and rollers...
...- Please refer to cool the microwave oven. If you avoid a service call an electrician. ■■ Magnetron - On some models) is Off. rotation directions Display shows messages ■■ "Enter clock" with your correspondence. Call for 5 minutes or more recommendations...not heat, try the solutions suggested here. If a message about the door appears in your mobile device, or visit http://www.whirlpool.com/product_help. Replacement Parts Cleaning Supplies ■■ Turntable ■■ Heavy Duty Degreaser ■■ Turntable support and rollers...
Owners Manual
Page 7
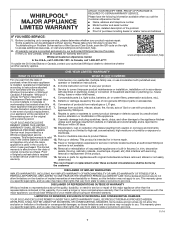
... eXperience Center www.whirlpool.com/product_help In the U.S.A., call 1-800-807-6777. If you call the Customer eXperience Center: ■■ Name, address and telephone number ■■ Model number and serial number ■■ A clear, detailed description of the problem ■...PURCHASE IS REQUIRED TO OBTAIN WARRANTY SERVICE. Before contacting us to arrange service, please determine whether your authorized Whirlpool dealer to or furnished with original model/serial numbers removed, altered or not easily warranty. Please take a few minutes to review the Troubleshooting or...
... eXperience Center www.whirlpool.com/product_help In the U.S.A., call 1-800-807-6777. If you call the Customer eXperience Center: ■■ Name, address and telephone number ■■ Model number and serial number ■■ A clear, detailed description of the problem ■...PURCHASE IS REQUIRED TO OBTAIN WARRANTY SERVICE. Before contacting us to arrange service, please determine whether your authorized Whirlpool dealer to or furnished with original model/serial numbers removed, altered or not easily warranty. Please take a few minutes to review the Troubleshooting or...

Installation Instructions
Page 2
...9632; 3/4" (1.9 cm) hole saw ■■ Caulking gun and weatherproof caulking compound ■■ Duct tape Parts Needed For information on model, charcoal filters may be sure to back of microwave oven) E. 1/4" x 2" lag screws (2) ■■ Cardboard template (part of wall... structures, be combined. Materials Needed Standard fittings for wood studs. See User Instructions.) NOTE: Depending on model, aluminum grease filter and charcoal filter may not be included. Read and follow the instructions provided with any tools listed here. &#...
...9632; 3/4" (1.9 cm) hole saw ■■ Caulking gun and weatherproof caulking compound ■■ Duct tape Parts Needed For information on model, charcoal filters may be sure to back of microwave oven) E. 1/4" x 2" lag screws (2) ■■ Cardboard template (part of wall... structures, be combined. Materials Needed Standard fittings for wood studs. See User Instructions.) NOTE: Depending on model, aluminum grease filter and charcoal filter may not be included. Read and follow the instructions provided with any tools listed here. &#...

Installation Instructions
Page 3
...thickness drywall or plaster/lath within cabinet opening where the microwave oven will not discolor , delaminate, or sustain other damages. Check with your model, skip "Remove Cardboard Template" steps if full carton box is at least 3 inches of clearance between the wall and the microwave oven...If cabinets are using a rectangular-to-round transition piece, the 3" (7.6 cm) clearance needs to make sure there is used will be purchased from Whirlpool. 12" DEEPER 14" 14" DEEPER 15" I bar mounting plate fr om the wall. The location must be inside upper cabinet. Grounded 3 ...
...thickness drywall or plaster/lath within cabinet opening where the microwave oven will not discolor , delaminate, or sustain other damages. Check with your model, skip "Remove Cardboard Template" steps if full carton box is at least 3 inches of clearance between the wall and the microwave oven...If cabinets are using a rectangular-to-round transition piece, the 3" (7.6 cm) clearance needs to make sure there is used will be purchased from Whirlpool. 12" DEEPER 14" 14" DEEPER 15" I bar mounting plate fr om the wall. The location must be inside upper cabinet. Grounded 3 ...

Installation Instructions
Page 5
... grip or use the door or door handle while the microwave oven is being handled. Exhaust Port 6. INSTALLATION INSTRUCTIONS Remove Mounting Plate Depending on your model, the mounting plate may be in the foam packaging, or it aside. 3. Tape the microwave oven door closed so that exhaust ports face the back...
... grip or use the door or door handle while the microwave oven is being handled. Exhaust Port 6. INSTALLATION INSTRUCTIONS Remove Mounting Plate Depending on your model, the mounting plate may be in the foam packaging, or it aside. 3. Tape the microwave oven door closed so that exhaust ports face the back...

Installation Instructions
Page 11
... available at the bottom of microwave oven still tilted, thread power supply cord through 9. 8. Mounting plate B. With front of mounting plate. Place a washer on your model, it in place, insert bolts through 6. 11. Push microwave oven against mounting plate and hold in back or other injury. If adjustment is closed and...
... available at the bottom of microwave oven still tilted, thread power supply cord through 9. 8. Mounting plate B. With front of mounting plate. Place a washer on your model, it in place, insert bolts through 6. 11. Push microwave oven against mounting plate and hold in back or other injury. If adjustment is closed and...

Installation Instructions
Page 14
... total A B 6 pi (1.8 m) 2 pi (0.6 m) C D A. The filler panels come in pairs. You will need your dealer to keep the damper from your model and serial numbers located on the front frame of the microwave oven opening . Two 90° elbows = 20 ft (6.1 m) B. 1 wall cap = 40 ft (12.2... is a list of vent. Recommended Vent Length A 31⁄4" x 10" (8.3 x 25.4 cm) rectangular or 6" (15.2 cm) round vent should be found on the model and serial number plate, which is round, a rectangular to -round transition piece = 5 ft (1.5 m) D. 2 ft (0.6 m) + 6 ft (1.8 m) straight = 8 ft...
... total A B 6 pi (1.8 m) 2 pi (0.6 m) C D A. The filler panels come in pairs. You will need your dealer to keep the damper from your model and serial numbers located on the front frame of the microwave oven opening . Two 90° elbows = 20 ft (6.1 m) B. 1 wall cap = 40 ft (12.2... is a list of vent. Recommended Vent Length A 31⁄4" x 10" (8.3 x 25.4 cm) rectangular or 6" (15.2 cm) round vent should be found on the model and serial number plate, which is round, a rectangular to -round transition piece = 5 ft (1.5 m) D. 2 ft (0.6 m) + 6 ft (1.8 m) straight = 8 ft...
Dimension Guide
Page 1
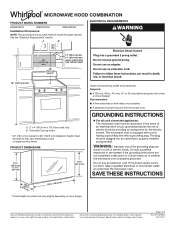
... A. 2" x 4" (50.8 mm x 101.6 mm) wall stud B. Exact dimensions may vary depending on door design. MICROWAVE HOOD COMBINATION PRODUCT MODEL NUMBERS WMH53521H WMH75021H WMH78019H Installation Dimensions: NOTE: The grounded 3 prong outlet must be grounded. A B ELECTRICAL REQUIREMENTS 30" (76.2 cm) min. ...8328;" (76.0 cm) * Overall depth of product will vary slightly depending on type of electric shock. Because Whirlpool Corporation includes a continuous commitment to improve our products, we reserve the right to change materials and specifications without notice...
... A. 2" x 4" (50.8 mm x 101.6 mm) wall stud B. Exact dimensions may vary depending on door design. MICROWAVE HOOD COMBINATION PRODUCT MODEL NUMBERS WMH53521H WMH75021H WMH78019H Installation Dimensions: NOTE: The grounded 3 prong outlet must be grounded. A B ELECTRICAL REQUIREMENTS 30" (76.2 cm) min. ...8328;" (76.0 cm) * Overall depth of product will vary slightly depending on type of electric shock. Because Whirlpool Corporation includes a continuous commitment to improve our products, we reserve the right to change materials and specifications without notice...


