User Instructions
Page 1
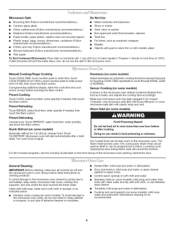
...informaci6n adicional acerca de su producto, visite: www.whirlpool.com Tenga listo su nQmero de modelo completo. Your safety and the safety of others . This is , tell you how to excessive microwave energy: m Install or locate the microwave oven only in TROUBLESHOOTING, please visit our website ... You can happen if the instructions are not followed. IMPORTANT SAFETY INSTRUCTIONS When using the microwave oven. You will follow instructions. for purchasing this manual and on your model and serial number located on the front facing of injury, and tell you don't immediately ...
...informaci6n adicional acerca de su producto, visite: www.whirlpool.com Tenga listo su nQmero de modelo completo. Your safety and the safety of others . This is , tell you how to excessive microwave energy: m Install or locate the microwave oven only in TROUBLESHOOTING, please visit our website ... You can happen if the instructions are not followed. IMPORTANT SAFETY INSTRUCTIONS When using the microwave oven. You will follow instructions. for purchasing this manual and on your model and serial number located on the front facing of injury, and tell you don't immediately ...
User Instructions
Page 2
...object between the oven front face and the door or allow the container to accumulate on models with this feature). [] Do not store any other utensil into the container. Stir the...on . [] Use care when cleaning the vent-hood filter. Carefully attend the microwave oven when paper, plastic, or other than manufacturer's recommended accessories, in this microwave oven outdoors. m Liquids, such as water, ... electric shock. [] Suitable for use above ranges with maximum width of fire in the oven cavity: - Grease should be allowed to accumulate on hood or filter. [] Do not use paper products...
...object between the oven front face and the door or allow the container to accumulate on models with this feature). [] Do not store any other utensil into the container. Stir the...on . [] Use care when cleaning the vent-hood filter. Carefully attend the microwave oven when paper, plastic, or other than manufacturer's recommended accessories, in this microwave oven outdoors. m Liquids, such as water, ... electric shock. [] Suitable for use above ranges with maximum width of fire in the oven cavity: - Grease should be allowed to accumulate on hood or filter. [] Do not use paper products...
User Instructions
Page 3
... an extension cord. Touch and hold the Cancel control for only 30 minutes more (off (on some models) Use only for the electric current. Touch Options or Setup control to whether the microwave oven is too short, have a qualified electrician or serviceman install an outlet near the...be used independently during preset or sensor (on . Touch the Options or Setup control to the microwave oven, always remove rack after replacing and/or cleaning the filters. Comes on some models) The durable, nonstick coating resists soil buildup by providing an escape wire for 2-level cooking. ...
... an extension cord. Touch and hold the Cancel control for only 30 minutes more (off (on some models) Use only for the electric current. Touch Options or Setup control to whether the microwave oven is too short, have a qualified electrician or serviceman install an outlet near the...be used independently during preset or sensor (on . Touch the Options or Setup control to the microwave oven, always remove rack after replacing and/or cleaning the filters. Comes on some models) The durable, nonstick coating resists soil buildup by providing an escape wire for 2-level cooking. ...
User Instructions
Page 4
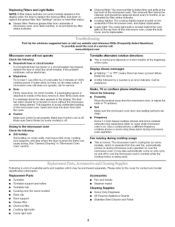
... mild soap, water and a soft cloth or sponge, or as indicated below. • Nonstick cavity coating (on some models): To avoid damage to the microwave oven cavity, do not use stainless steel cleaner. If dish becomes hot and the water stays cool, do not use metal...rack supports, and area where the door touches the frame clean. Preset Cooking Sensor Cooking (on some models) ! Warm Hold (on some models) A sensor in for at least 3 minutes. Touch 1Ib DEFROST. Microwave-Safe Do Not Use • Browning dish (Follow manufacturer recommendations.) • Ceramic glass, glass •...
... mild soap, water and a soft cloth or sponge, or as indicated below. • Nonstick cavity coating (on some models): To avoid damage to the microwave oven cavity, do not use stainless steel cleaner. If dish becomes hot and the water stays cool, do not use metal...rack supports, and area where the door touches the frame clean. Preset Cooking Sensor Cooking (on some models) ! Warm Hold (on some models) A sensor in for at least 3 minutes. Touch 1Ib DEFROST. Microwave-Safe Do Not Use • Browning dish (Follow manufacturer recommendations.) • Ceramic glass, glass •...
User Instructions
Page 5
... still does not operate, call . Make sure Control Lock is off . Turntable alternates rotation directions • This is normal. www.whirlpool.com Microwave oven will not operate Check the following: • Household fuse or circuit breaker If a household fuse has blown or a circuit breaker has... our website and reference FAQs (Frequently Asked Questions) to heat 1 cup (250 mL) of the cycle. Make sure Demo Mode (on some models) is off . Control Make sure control is on. Frequency Some 2.4 GHz-based cordless phones and home wireless networks may also automatically come on ...
... still does not operate, call . Make sure Control Lock is off . Turntable alternates rotation directions • This is normal. www.whirlpool.com Microwave oven will not operate Check the following: • Household fuse or circuit breaker If a household fuse has blown or a circuit breaker has... our website and reference FAQs (Frequently Asked Questions) to heat 1 cup (250 mL) of the cycle. Make sure Demo Mode (on some models) is off . Control Make sure control is on. Frequency Some 2.4 GHz-based cordless phones and home wireless networks may also automatically come on ...
User Instructions
Page 6
..., SO THESE EXCLUSIONS OR LIMITATIONS MAY NOT APPLY TO YOU. Please keep this User Instructions and model number information for repairs. Service must be borne by a Whirlpool designated service company. Repairs when your major appliance is used for other damage to the finish of...Whirlpool at : Whirlpool Brand Home Appliances Customer eXperience Center 553 Benson Road Benton Harbor, MI 49022-2692 Please include a daytime phone number in materials or workmanship and is reported to the Internet and you need further assistance, you on the upper or lower front facing of the microwave...
..., SO THESE EXCLUSIONS OR LIMITATIONS MAY NOT APPLY TO YOU. Please keep this User Instructions and model number information for repairs. Service must be borne by a Whirlpool designated service company. Repairs when your major appliance is used for other damage to the finish of...Whirlpool at : Whirlpool Brand Home Appliances Customer eXperience Center 553 Benson Road Benton Harbor, MI 49022-2692 Please include a daytime phone number in materials or workmanship and is reported to the Internet and you need further assistance, you on the upper or lower front facing of the microwave...
Installation Instructions
Page 1
... 8. Attach Mounting Plate to and including 36" (91.4 cm) wide. These installation instructions cover different models. Electrical Requirements 3.. We have provided many important safety messages in RearWall 7.. All safety messages will follow instructions. Mark RearWall 7.. Tableof Contents MICROWAVE HOOD COMBINATION SAFETY 1 INSTALLATION REQUIREMENTS 2. Location Requirements 2.. Prepare Upper Cabinet 8.. Always read and obey all safety...
... 8. Attach Mounting Plate to and including 36" (91.4 cm) wide. These installation instructions cover different models. Electrical Requirements 3.. We have provided many important safety messages in RearWall 7.. All safety messages will follow instructions. Mark RearWall 7.. Tableof Contents MICROWAVE HOOD COMBINATION SAFETY 1 INSTALLATION REQUIREMENTS 2. Location Requirements 2.. Prepare Upper Cabinet 8.. Always read and obey all safety...
Installation Instructions
Page 2
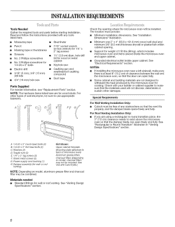
...3" flat-head bolts (2) C. Power supply cord bushing (1) H. Materials needed • Standard fittings for wood studs. Support for weight of wall structures, be combined. See "Electrical Requirements" section. Special Requirements For Wall Venting Installation Only: • Cutout must provide: • Minimum installation dimensions. Washers (2) D. Toggle...not designed to back of microwave oven) Aluminum grease filters Charcoal filters (Depending on model, aluminum grease filter and charcoal filter may not be free of clearance between the wall and the microwave oven, so that the ...
...3" flat-head bolts (2) C. Power supply cord bushing (1) H. Materials needed • Standard fittings for wood studs. Support for weight of wall structures, be combined. See "Electrical Requirements" section. Special Requirements For Wall Venting Installation Only: • Cutout must provide: • Minimum installation dimensions. Washers (2) D. Toggle...not designed to back of microwave oven) Aluminum grease filters Charcoal filters (Depending on model, aluminum grease filter and charcoal filter may not be free of clearance between the wall and the microwave oven, so that the ...
Installation Instructions
Page 10
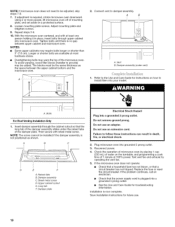
... by operating the vent fan. 5. If the microwave oven does not operate: • Check that a household fuse has not blown, or that the power supply cord is plugged into your model. [ lq A. Connect vent to follow these instructions can result in ...and Care Guide for future use. 10 Loosemn ountinpglatescrewsA.djusmt ountinpglateand retightesncrews. 9. Bolts For Roof Venting Installation Only 1. Plug microwave oven into a grounded 3 prong outlet. ightebnoltsuntitlhereisnogap betweeunppecr abineatndmicrowavoeven. Damper plate Electrical Shock Hazard Plug into grounded 3 prong ...
... by operating the vent fan. 5. If the microwave oven does not operate: • Check that a household fuse has not blown, or that the power supply cord is plugged into your model. [ lq A. Connect vent to follow these instructions can result in ...and Care Guide for future use. 10 Loosemn ountinpglatescrewsA.djusmt ountinpglateand retightesncrews. 9. Bolts For Roof Venting Installation Only 1. Plug microwave oven into a grounded 3 prong outlet. ightebnoltsuntitlhereisnogap betweeunppecr abineatndmicrowavoeven. Damper plate Electrical Shock Hazard Plug into grounded 3 prong ...
Installation Instructions
Page 12
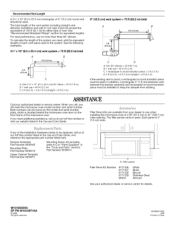
...elbow = 25 ft (7.6 m) B. 1 waft cap = 40 ft (12.2 m) C. 2 ft (O.6 m) + 6 ft (1.8 m) straight = 8 ft (2.4 m) 6" (15.2 cm) vent system = 73 ft (22.2 m) total A B 4 6 ft (1.8 m) _..i.........2..f.t.......T (0.8m_ C D A. Two 90 ° elbows = 20 ft (6.1 m) B. 1 wall cap = 40 ft (12.2 m) C. 1 rectangular to round transition piece = 5 ft (1.5 m) D. 2 ft (0.6 m) + 6 ft (1.8 m) straight = 8 ft (2.4 m) If...the damper assembly and rectangular to be replaced, call , you need the microwave oven model number and serial number. Filler panels Filler Panel Kit Number 8171336 8171337 8171338...
...elbow = 25 ft (7.6 m) B. 1 waft cap = 40 ft (12.2 m) C. 2 ft (O.6 m) + 6 ft (1.8 m) straight = 8 ft (2.4 m) 6" (15.2 cm) vent system = 73 ft (22.2 m) total A B 4 6 ft (1.8 m) _..i.........2..f.t.......T (0.8m_ C D A. Two 90 ° elbows = 20 ft (6.1 m) B. 1 wall cap = 40 ft (12.2 m) C. 1 rectangular to round transition piece = 5 ft (1.5 m) D. 2 ft (0.6 m) + 6 ft (1.8 m) straight = 8 ft (2.4 m) If...the damper assembly and rectangular to be replaced, call , you need the microwave oven model number and serial number. Filler panels Filler Panel Kit Number 8171336 8171337 8171338...


