Use & Care Guide
Page 1
W10434259C MICROWAVE OVEN Use & Care Guide For questions about features, operation/performance, parts, accessories or service, call: 1-800-253-1301. www.whirlpool.com Table of Contents 2 Model WMC50522 or visit our website at...
W10434259C MICROWAVE OVEN Use & Care Guide For questions about features, operation/performance, parts, accessories or service, call: 1-800-253-1301. www.whirlpool.com Table of Contents 2 Model WMC50522 or visit our website at...
Use & Care Guide
Page 2
...7 Cancel 7 Tones 7 Clock 7 Timer 7 Control Lock 7 Language 7 Weight Entry Mode 7 MICROWAVE OVEN USE 8 Food Characteristics 8 Cooking Guidelines 8 Cookware and Dinnerware 9 Aluminum Foil and Metal 9 Microwave Cooking Power 9 Manual Cooking 10 Cooking in Stages 10 Favorite 10 Sensor Cooking 10 Quick Touch Menu... (sensor and non-sensor 11 Weight Defrost / Timed Defrost 12 MICROWAVE OVEN CARE 13 General Cleaning 13 TROUBLESHOOTING ...
...7 Cancel 7 Tones 7 Clock 7 Timer 7 Control Lock 7 Language 7 Weight Entry Mode 7 MICROWAVE OVEN USE 8 Food Characteristics 8 Cooking Guidelines 8 Cookware and Dinnerware 9 Aluminum Foil and Metal 9 Microwave Cooking Power 9 Manual Cooking 10 Cooking in Stages 10 Favorite 10 Sensor Cooking 10 Quick Touch Menu... (sensor and non-sensor 11 Weight Defrost / Timed Defrost 12 MICROWAVE OVEN CARE 13 General Cleaning 13 TROUBLESHOOTING ...
Use & Care Guide
Page 3
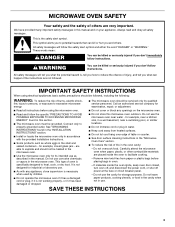
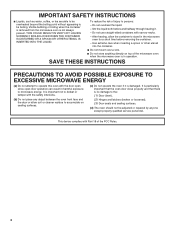
...safety messages will tell you what can be grounded. Do not leave paper products, cooking utensils, or food in the cavity when not in oven. - MICROWAVE OVEN SAFETY Your safety and the safety of others . Connect only to heat, cook, or dry food. All safety messages will follow instructions. Remove...ties from heated surfaces. ■ Do not let cord hang over edge of table or counter. ■ See door surface cleaning instructions in the "Microwave Oven Care" section. ■ To reduce the risk of fire in the shell and sealed containers - Do not use . ■ As with the ...
...safety messages will tell you what can be grounded. Do not leave paper products, cooking utensils, or food in the cavity when not in oven. - MICROWAVE OVEN SAFETY Your safety and the safety of others . Connect only to heat, cook, or dry food. All safety messages will follow instructions. Remove...ties from heated surfaces. ■ Do not let cord hang over edge of table or counter. ■ See door surface cleaning instructions in the "Microwave Oven Care" section. ■ To reduce the risk of fire in the shell and sealed containers - Do not use . ■ As with the ...
Use & Care Guide
Page 4
...both before removing the container. - It is important not to defeat or tamper with the door open since open-door operation can result in the microwave oven for a short time before and halfway through heating it is not always present. Do not overheat the liquid. - Do not use straight-sided... containers with Part 18 of injury to persons: - After heating, allow soil or cleaner residue to accumulate on top of the microwave oven when the microwave oven is no damage to the: (1) Door (bent), (2) Hinges and latches (broken or loosened), (3) Door seals and sealing surfaces. (d) The...
...both before removing the container. - It is important not to defeat or tamper with the door open since open-door operation can result in the microwave oven for a short time before and halfway through heating it is not always present. Do not overheat the liquid. - Do not use straight-sided... containers with Part 18 of injury to persons: - After heating, allow soil or cleaner residue to accumulate on top of the microwave oven when the microwave oven is no damage to the: (1) Door (bent), (2) Hinges and latches (broken or loosened), (3) Door seals and sealing surfaces. (d) The...
Use & Care Guide
Page 5
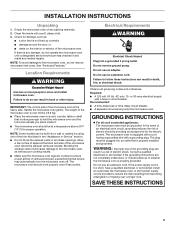
...codes and ordinances. See "Parts and Features." Location Requirements WARNING Excessive Weight Hazard Use two or more people to the microwave oven, do not operate the microwave oven until a designated service technician has checked it and made any packing materials. 2. Recommended: ■ A time-delay ... cloth. 3. Do not use of the grounding plug can be at the back and side of the microwave oven. The microwave oven should work properly once it . ■ The microwave oven should be built into a grounded 3 prong outlet. Clean the inside it has cooled. A short power...
...codes and ordinances. See "Parts and Features." Location Requirements WARNING Excessive Weight Hazard Use two or more people to the microwave oven, do not operate the microwave oven until a designated service technician has checked it and made any packing materials. 2. Recommended: ■ A time-delay ... cloth. 3. Do not use of the grounding plug can be at the back and side of the microwave oven. The microwave oven should work properly once it . ■ The microwave oven should be built into a grounded 3 prong outlet. Clean the inside it has cooled. A short power...
Use & Care Guide
Page 6
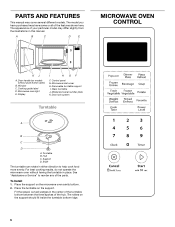
... Fit the raised, curved wedges in either direction to reorder any of the features shown here. Door handle (on the microwave oven cavity bottom. 2. Microwave oven light E. Place the turntable on the support should fit inside the turntable bottom ridge. 6 The rollers on the support. ...Window C. Control panel G. Cooking guide label D. A B C D E MICROWAVE OVEN CONTROL K J A. PARTS AND FEATURES This manual may differ slightly from the illustrations in place. Microwave inlet cover H. Support D. The appearance of the hub. For best cooking results, do...
... Fit the raised, curved wedges in either direction to reorder any of the features shown here. Door handle (on the microwave oven cavity bottom. 2. Microwave oven light E. Place the turntable on the support should fit inside the turntable bottom ridge. 6 The rollers on the support. ...Window C. Control panel G. Cooking guide label D. A B C D E MICROWAVE OVEN CONTROL K J A. PARTS AND FEATURES This manual may differ slightly from the illustrations in place. Microwave inlet cover H. Support D. The appearance of the hub. For best cooking results, do...
Use & Care Guide
Page 7
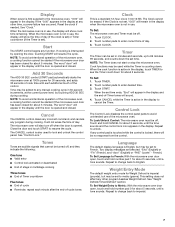
...interrupted by touching ADD 30 SEC during cooking. Touch CANCEL while the Timer is active in the display, touch TIMER to Metric: With the microwave oven door open , touch and hold number pad 0 for about 5 seconds. Touch and hold CANCEL for about 5 minutes. Time may be ...cook function is active in the display to enter desired time. 3. Language The default display language is English, but may be started if the microwave oven door has been closed for about 5 seconds, until a tone sounds. See "Weight Defrost/Timed Defrost" section. French). This setting does not...
...interrupted by touching ADD 30 SEC during cooking. Touch CANCEL while the Timer is active in the display, touch TIMER to Metric: With the microwave oven door open , touch and hold number pad 0 for about 5 seconds. Touch and hold CANCEL for about 5 minutes. Time may be ...cook function is active in the display to enter desired time. 3. Language The default display language is English, but may be started if the microwave oven door has been closed for about 5 seconds, until a tone sounds. See "Weight Defrost/Timed Defrost" section. French). This setting does not...

Use & Care Guide
Page 8
...to top. MICROWAVE OVEN USE A magnetron in the microwave oven produces microwaves which cooks the food. ■ To avoid damage to the microwave oven, do not lean on or allow children to swing on the microwave oven door. ■ To avoid damage to the microwave oven, do not operate microwave oven when it ... paper bags and newspaper, should not be dried in microwave oven. ■ Paraffin wax will not melt in the microwave oven because it does not absorb microwaves. ■ Use oven mitts or pot holders when removing containers from microwave oven. ■ Do not overcook potatoes. The length of...
...to top. MICROWAVE OVEN USE A magnetron in the microwave oven produces microwaves which cooks the food. ■ To avoid damage to the microwave oven, do not lean on or allow children to swing on the microwave oven door. ■ To avoid damage to the microwave oven, do not operate microwave oven when it ... paper bags and newspaper, should not be dried in microwave oven. ■ Paraffin wax will not melt in the microwave oven because it does not absorb microwaves. ■ Use oven mitts or pot holders when removing containers from microwave oven. ■ Do not overcook potatoes. The length of...
Use & Care Guide
Page 9
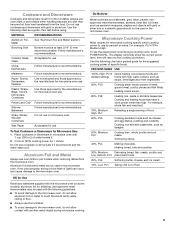
... LEVEL. For example, PL7=70%= Medium-High. The display will briefly show the current power level, then will return to the microwave oven. Cooking and heating foods that need a cook power lower than high. Heating bread, rolls and pastries. 30%, Medium- Melamine Follow... manufacturer's recommendations. To Test Cookware or Dinnerware for use . Cookware and Dinnerware Cookware and dinnerware must be used in the microwave oven. Use the following chart as a guide, then test before using. Ceramic Glass, Glass Acceptable for 1 minute. If not used properly...
... LEVEL. For example, PL7=70%= Medium-High. The display will briefly show the current power level, then will return to the microwave oven. Cooking and heating foods that need a cook power lower than high. Heating bread, rolls and pastries. 30%, Medium- Melamine Follow... manufacturer's recommendations. To Test Cookware or Dinnerware for use . Cookware and Dinnerware Cookware and dinnerware must be used in the microwave oven. Use the following chart as a guide, then test before using. Ceramic Glass, Glass Acceptable for 1 minute. If not used properly...
Use & Care Guide
Page 10
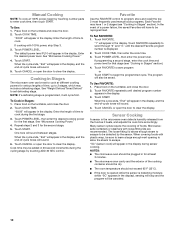
...; The room temperature should be canceled. 10 Touch POWER LEVEL, then enter the desired cooking power for at least 3 minutes. ■ The microwave oven cavity and the exterior of time to clear the display. Cook time may include a defrosting stage. "1" will sound. 4. To Use FAVORITE: .... Manual Cooking NOTE: To cook at 100% power, begin the programmed cycle. When the cycle ends, "End" will appear in Stages The microwave oven can be saved. Touch START. Microwavesafe containers or steamers with 100% power, skip Step 3. 3. The program will appear in Stages: 1. "...
...; The room temperature should be canceled. 10 Touch POWER LEVEL, then enter the desired cooking power for at least 3 minutes. ■ The microwave oven cavity and the exterior of time to clear the display. Cook time may include a defrosting stage. "1" will sound. 4. To Use FAVORITE: .... Manual Cooking NOTE: To cook at 100% power, begin the programmed cycle. When the cycle ends, "End" will appear in Stages The microwave oven can be saved. Touch START. Microwavesafe containers or steamers with 100% power, skip Step 3. 3. The program will appear in Stages: 1. "...
Use & Care Guide
Page 11
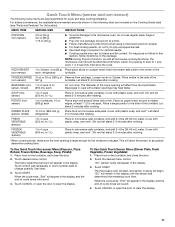
... 2. MENU ITEM SERVING SIZE INSTRUCTIONS POPCORN (non-sensor) 3.3 oz (94 g) 3.0 oz (85 g) 1.75 oz (50 g) ■ To avoid damage to the microwave oven, do not try to escape. NOTE: During Popcorn function, as with a fork. BEVERAGE (non- 1 or 2 cups, 8 oz sensor, reheat) (250 mL) .... Place on the turntable, and close the door. 2. Touch desired menu control. Place food on paper towel, around turntable edges, at all microwave cooking functions, the microwave oven should be attended at least 1" (2.5 cm) apart. SOUP (nonsensor) 1 to 4 cups (250 mL to 1 L) Place in this section...
... 2. MENU ITEM SERVING SIZE INSTRUCTIONS POPCORN (non-sensor) 3.3 oz (94 g) 3.0 oz (85 g) 1.75 oz (50 g) ■ To avoid damage to the microwave oven, do not try to escape. NOTE: During Popcorn function, as with a fork. BEVERAGE (non- 1 or 2 cups, 8 oz sensor, reheat) (250 mL) .... Place on the turntable, and close the door. 2. Touch desired menu control. Place food on paper towel, around turntable edges, at all microwave cooking functions, the microwave oven should be attended at least 1" (2.5 cm) apart. SOUP (nonsensor) 1 to 4 cups (250 mL to 1 L) Place in this section...
Use & Care Guide
Page 12
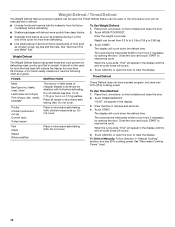
...defrost less than deep blocks. 2. Place all meats in the display, and the end-of irregular shaped cuts should not be used , or the microwave oven can be interrupted briefly to 2.86 kg). 3. Timed Defrost does not have a preset program, but uses only 30% (PL3) cooking power. Close... the door and touch START to clear the display. See "Microwave Cooking Power" chart. 12 When the cycle ends, "End" will sound. 4. Touch START. The cycle may be manually set from fruit juice containers)...
...defrost less than deep blocks. 2. Place all meats in the display, and the end-of irregular shaped cuts should not be used , or the microwave oven can be interrupted briefly to 2.86 kg). 3. Timed Defrost does not have a preset program, but uses only 30% (PL3) cooking power. Close... the door and touch START to clear the display. See "Microwave Cooking Power" chart. 12 When the cycle ends, "End" will sound. 4. Touch START. The cycle may be manually set from fruit juice containers)...
Use & Care Guide
Page 13
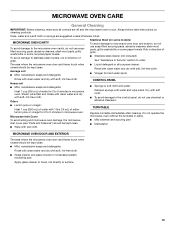
...washcloths or some paper towels. Odors CONTROL PANEL ■ Sponge or soft cloth and water: Dampen sponge with soft, lint-free cloth. MICROWAVE OVEN CARE General Cleaning IMPORTANT: Before cleaning, make sure all -purpose cleaner: Rinse with clean water and dry with soft, lint-free cloth...with clean water and dry with wet cloth. Do not operate the microwave oven without the turntable in place. ■ Mild cleanser and scouring pad ■ Dishwasher MICROWAVE OVEN DOOR AND EXTERIOR The area where the microwave oven door and frame touch when closed should be kept clean. ■...
...washcloths or some paper towels. Odors CONTROL PANEL ■ Sponge or soft cloth and water: Dampen sponge with soft, lint-free cloth. MICROWAVE OVEN CARE General Cleaning IMPORTANT: Before cleaning, make sure all -purpose cleaner: Rinse with clean water and dry with soft, lint-free cloth...with clean water and dry with wet cloth. Do not operate the microwave oven without the turntable in place. ■ Mild cleanser and scouring pad ■ Dishwasher MICROWAVE OVEN DOOR AND EXTERIOR The area where the microwave oven door and frame touch when closed should be kept clean. ■...
Use & Care Guide
Page 14
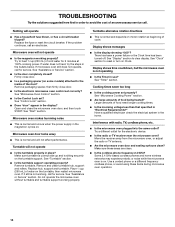
...rotation at 100% cooking power. Interference with radio, TV, cordless phone, etc. ■ Is the microwave oven plugged into the same outlet? Make sure these items during microwave oven operation. 14 Try to reset or turn on . Turntable will not operate ■ Is the magnetron ...bullets below. Display shows time countdown, but the microwave oven is sitting securely on . Move the receiver away from the microwave oven, or adjust the radio or TV antenna. ■ Are the microwave oven door and sealing surfaces clean? Microwave oven will not operate ■ Is the turntable properly...
...rotation at 100% cooking power. Interference with radio, TV, cordless phone, etc. ■ Is the microwave oven plugged into the same outlet? Make sure these items during microwave oven operation. 14 Try to reset or turn on . Turntable will not operate ■ Is the magnetron ...bullets below. Display shows time countdown, but the microwave oven is sitting securely on . Move the receiver away from the microwave oven, or adjust the radio or TV antenna. ■ Are the microwave oven door and sealing surfaces clean? Microwave oven will not operate ■ Is the turntable properly...
Use & Care Guide
Page 15
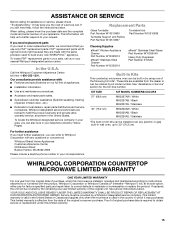
... either pay for factory specified parts and repair labor to 30" (76.2 cm). Whirlpool designated service technicians are trained to your appliance. WHIRLPOOL CORPORATION COUNTERTOP MICROWAVE LIMITED WARRANTY ONE YEAR LIMITED WARRANTY For one -year limited warranty of purchase, when this...Part Number W10355049 Heavy Duty Degreaser Part Number 31552A Built-In Kits This countertop microwave oven can write to Whirlpool Corporation with the product, Whirlpool Corporation or Whirlpool Canada LP (hereafter "Whirlpool") will be provided by the remaining one year from the original date of...
... either pay for factory specified parts and repair labor to 30" (76.2 cm). Whirlpool designated service technicians are trained to your appliance. WHIRLPOOL CORPORATION COUNTERTOP MICROWAVE LIMITED WARRANTY ONE YEAR LIMITED WARRANTY For one -year limited warranty of purchase, when this...Part Number W10355049 Heavy Duty Degreaser Part Number 31552A Built-In Kits This countertop microwave oven can write to Whirlpool Corporation with the product, Whirlpool Corporation or Whirlpool Canada LP (hereafter "Whirlpool") will be provided by the remaining one year from the original date of...

Warranty Information
Page 1
...This countertop microwave oven can also look in your telephone directory Yellow Pages. Service must be covered by using one year from the original date of the original unit. This information will help , follow the instructions below . WHIRLPOOL CORPORATION COUNTERTOP MICROWAVE LIMITED ...it was purchased. This limited warranty is required to obtain service or replacement under this microwave is installed, operated and maintained according to instructions attached to Whirlpool Corporation with : ■ Features and specifications on our full line of original purchase ...
...This countertop microwave oven can also look in your telephone directory Yellow Pages. Service must be covered by using one year from the original date of the original unit. This information will help , follow the instructions below . WHIRLPOOL CORPORATION COUNTERTOP MICROWAVE LIMITED ...it was purchased. This limited warranty is required to obtain service or replacement under this microwave is installed, operated and maintained according to instructions attached to Whirlpool Corporation with : ■ Features and specifications on our full line of original purchase ...

Installation Guide
Page 1
... 9 Préparation de l'ouverture d'encastrement/dans le placard............9 Installation du four à micro-ondes 10 Installation du cadre de la trousse de garniture 11 MICROWAVE OVEN SAFETY Your safety and the safety of injury, and tell you what the potential hazard is the safety alert symbol. All safety messages will tell...
... 9 Préparation de l'ouverture d'encastrement/dans le placard............9 Installation du four à micro-ondes 10 Installation du cadre de la trousse de garniture 11 MICROWAVE OVEN SAFETY Your safety and the safety of injury, and tell you what the potential hazard is the safety alert symbol. All safety messages will tell...
Installation Guide
Page 2
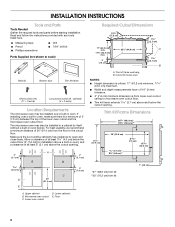
...Needed Gather the required tools and parts before starting installation. For best usability, we recommend a minimum distance of the lower oven cutout and the microwave oven cutout floor. Make sure the surrounding cabinetry has clearance to scale) Rails (2) Bottom duct Trim kit frame Short screws (...tape ■ Pencil ■ Phillips screwdriver ■ Drill ■ 7/64" drill bit Parts Supplied (not shown to open and close freely. Microwave oven cutout C. Trim Kit Frame Dimensions 26⁷⁄₈" (68.2 cm)** 29³⁄₄" (75.6 cm)** 18⁷⁄₈" (...
...Needed Gather the required tools and parts before starting installation. For best usability, we recommend a minimum distance of the lower oven cutout and the microwave oven cutout floor. Make sure the surrounding cabinetry has clearance to scale) Rails (2) Bottom duct Trim kit frame Short screws (...tape ■ Pencil ■ Phillips screwdriver ■ Drill ■ 7/64" drill bit Parts Supplied (not shown to open and close freely. Microwave oven cutout C. Trim Kit Frame Dimensions 26⁷⁄₈" (68.2 cm)** 29³⁄₄" (75.6 cm)** 18⁷⁄₈" (...
Installation Guide
Page 3
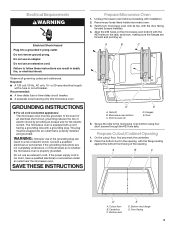
... A time-delay fuse or time-delay circuit breaker. ■ A separate circuit serving only this microwave oven. Gently turn microwave oven onto its top, with a fuse or circuit breaker. Microwave oven bottom C. On the cutout floor, find and mark the centerline. 2. Centerline C. Bottom duct E ... Electrical Shock Hazard Plug into an outlet that is properly grounded. A B C D A. Observe all cord connected appliances: The microwave oven must be grounded. Short screws (4) E D. Consult a qualified electrician or serviceman if the grounding instructions are not completely understood, ...
... A time-delay fuse or time-delay circuit breaker. ■ A separate circuit serving only this microwave oven. Gently turn microwave oven onto its top, with a fuse or circuit breaker. Microwave oven bottom C. On the cutout floor, find and mark the centerline. 2. Centerline C. Bottom duct E ... Electrical Shock Hazard Plug into an outlet that is properly grounded. A B C D A. Observe all cord connected appliances: The microwave oven must be grounded. Short screws (4) E D. Consult a qualified electrician or serviceman if the grounding instructions are not completely understood, ...
Installation Guide
Page 4
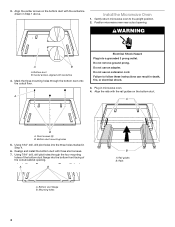
...in Step 4. 6. Rail guides B. 3. Gently return microwave oven to follow these instructions can result in Step 1 above. A B A. Mounting holes 4 B A. Install the Microwave Oven 1. Do not remove ground prong. Bottom duct flange B. Position microwave oven near cutout opening . Center arrows, aligned with the ...Bottom duct B. Align the center arrows on the bottom duct. A Electrical Shock Hazard Plug into the three holes marked in microwave oven. 4. Failure to its upright position. 2. Align the rails with three short screws. 7. Short screws (3) B. Realign and ...
...in Step 4. 6. Rail guides B. 3. Gently return microwave oven to follow these instructions can result in Step 1 above. A B A. Mounting holes 4 B A. Install the Microwave Oven 1. Do not remove ground prong. Bottom duct flange B. Position microwave oven near cutout opening . Center arrows, aligned with the ...Bottom duct B. Align the center arrows on the bottom duct. A Electrical Shock Hazard Plug into the three holes marked in microwave oven. 4. Failure to its upright position. 2. Align the rails with three short screws. 7. Short screws (3) B. Realign and ...


