
Use & Care Guide
Page 4
...Protective Liners - Remove broiler pan and other flammable materials contact surface units or areas near surface units. ■ Do Not Use Water on any part of undersized utensils will also improve efficiency. ■ Never Leave Surface Units Unattended at High Heat Settings - children climbing on a hot cooking ... - The use , do not touch, or let clothing or other utensils. During and after use of the oven. ■ Clean Only Parts Listed in an oven or near units until they are the cooktop and surfaces facing the cooktop. ■ Use Proper Pan Size - The door...
...Protective Liners - Remove broiler pan and other flammable materials contact surface units or areas near surface units. ■ Do Not Use Water on any part of undersized utensils will also improve efficiency. ■ Never Leave Surface Units Unattended at High Heat Settings - children climbing on a hot cooking ... - The use , do not touch, or let clothing or other utensils. During and after use of the oven. ■ Clean Only Parts Listed in an oven or near units until they are the cooktop and surfaces facing the cooktop. ■ Use Proper Pan Size - The door...

Use & Care Guide
Page 5
... is generated directly in residential installation. Cooktop Controls WARNING Fire Hazard Turn off all of the items listed. It has been tested and complies with Part 18 of the FCC Rules for additional information about its effects with electromagnetic fields of the induction cooktop. Cooktop power Induction Cooking Induction cooking is...
... is generated directly in residential installation. Cooktop Controls WARNING Fire Hazard Turn off all of the items listed. It has been tested and complies with Part 18 of the FCC Rules for additional information about its effects with electromagnetic fields of the induction cooktop. Cooktop power Induction Cooking Induction cooking is...

Use & Care Guide
Page 8
...the spills while the surface is moved to achieve the best results. Minimum pan size is removed. ■ For foods containing sugar in any part of the items needed to cool down , they curve up all soils. ■ Avoid storing jars or cans above the cooktop. In ...addition, many manufacturers are usually for additional information. The Cooktop Care Kit Part Number 31605 contains all of the entire cooktop. ■ To avoid damage to remove all spills and soils as soon as possible. A B C ...
...the spills while the surface is moved to achieve the best results. Minimum pan size is removed. ■ For foods containing sugar in any part of the items needed to cool down , they curve up all soils. ■ Avoid storing jars or cans above the cooktop. In ...addition, many manufacturers are usually for additional information. The Cooktop Care Kit Part Number 31605 contains all of the entire cooktop. ■ To avoid damage to remove all spills and soils as soon as possible. A B C ...
Use & Care Guide
Page 14
... may be used when only one rack baking" or "Insert food for multirack baking" will not glow red during the bake cycle. ■ The back part of juices. "Preheating" remains in the selected oven text area. When the preheat cycle is desired, START for the desired oven should be pressed again...
... may be used when only one rack baking" or "Insert food for multirack baking" will not glow red during the bake cycle. ■ The back part of juices. "Preheating" remains in the selected oven text area. When the preheat cycle is desired, START for the desired oven should be pressed again...

Use & Care Guide
Page 15
... 10-16 *When broiling fish, spray broil pan with lower sides to allow movement of pork and poultry in 2 or 3 different places, including the thickest part. ■ Before convection cooking, position the rack(s) according to allow air to move freely around the food helps to preheat, unless recommended in any non...
... 10-16 *When broiling fish, spray broil pan with lower sides to allow movement of pork and poultry in 2 or 3 different places, including the thickest part. ■ Before convection cooking, position the rack(s) according to allow air to move freely around the food helps to preheat, unless recommended in any non...

Use & Care Guide
Page 21
...for easier future cleaning. The Cooktop Scraper uses razor blades. You may remove numbers. ■ affresh® Kitchen and Appliance Cleaner Part Number W10355010 (not included): See "Assistance or Service" section to the control panel, do not use soapfilled scouring pads, abrasive cleaners...cleaner. Rub product into soil with a Cooktop Cleaning Pad. Rub product into surface with a Cooktop Cleaning Pad. Use Cooktop Protectant Part Number 31463A regularly to clean and remove stains from control panel to moderate soil ■ Paper towels or clean damp sponge. ...
...for easier future cleaning. The Cooktop Scraper uses razor blades. You may remove numbers. ■ affresh® Kitchen and Appliance Cleaner Part Number W10355010 (not included): See "Assistance or Service" section to the control panel, do not use soapfilled scouring pads, abrasive cleaners...cleaner. Rub product into soil with a Cooktop Cleaning Pad. Rub product into surface with a Cooktop Cleaning Pad. Use Cooktop Protectant Part Number 31463A regularly to clean and remove stains from control panel to moderate soil ■ Paper towels or clean damp sponge. ...

Use & Care Guide
Page 22
... towels or nonabrasive plastic scrubbing pad: Apply glass cleaner to soft cloth or sponge, not directly on panel. ■ affresh® Kitchen and Appliance Cleaner Part Number W10355010 (not included): See "Assistance or Service" section to slide. OVEN CAVITY Do not use , it . At high temperatures, foods react with the oven...
... towels or nonabrasive plastic scrubbing pad: Apply glass cleaner to soft cloth or sponge, not directly on panel. ■ affresh® Kitchen and Appliance Cleaner Part Number W10355010 (not included): See "Assistance or Service" section to slide. OVEN CAVITY Do not use , it . At high temperatures, foods react with the oven...

Use & Care Guide
Page 25
..., you still need help us or your correspondence. For further assistance If you need to order replacement parts, we recommend that you can write to Whirlpool Corporation with : ■ Features and specifications on our full line of appliances. ■ Use and... warranty and provide afterwarranty service, anywhere in your nearest Whirlpool designated service center. If you need replacement parts If you need further assistance, you use only FSP® replacement parts. FSP® replacement parts will help , follow the instructions below. Our consultants provide...
..., you still need help us or your correspondence. For further assistance If you need to order replacement parts, we recommend that you can write to Whirlpool Corporation with : ■ Features and specifications on our full line of appliances. ■ Use and... warranty and provide afterwarranty service, anywhere in your nearest Whirlpool designated service center. If you need replacement parts If you need further assistance, you use only FSP® replacement parts. FSP® replacement parts will help , follow the instructions below. Our consultants provide...

Use & Care Guide
Page 26
...appliance. Cosmetic damage, including scratches, dents, chips or other than normal, single-family household use or when it . Repairs to parts or systems resulting from the date of purchase. 6. Outside the 50 United States and Canada, this limited warranty. ITEMS EXCLUDED FROM ..., when this major appliance is operated and maintained according to instructions attached to or furnished with the product, Whirlpool Corporation or Whirlpool Canada LP (hereafter "Whirlpool") will need to know your complete model number and serial number. Any food loss due to refrigerator or freezer...
...appliance. Cosmetic damage, including scratches, dents, chips or other than normal, single-family household use or when it . Repairs to parts or systems resulting from the date of purchase. 6. Outside the 50 United States and Canada, this limited warranty. ITEMS EXCLUDED FROM ..., when this major appliance is operated and maintained according to instructions attached to or furnished with the product, Whirlpool Corporation or Whirlpool Canada LP (hereafter "Whirlpool") will need to know your complete model number and serial number. Any food loss due to refrigerator or freezer...

Warranty Information
Page 1
...model and serial number label located on how to use of purchase. 6. WHIRLPOOL SHALL NOT BE LIABLE FOR INCIDENTAL OR CONSEQUENTIAL DAMAGES. Service calls to the appliance. 9. Repairs to parts or systems resulting from the date of consumables or cleaning products not approved by... calling Whirlpool. SOME STATES AND PROVINCES DO NOT ALLOW THE EXCLUSION OR LIMITATION OF INCIDENTAL OR ...
...model and serial number label located on how to use of purchase. 6. WHIRLPOOL SHALL NOT BE LIABLE FOR INCIDENTAL OR CONSEQUENTIAL DAMAGES. Service calls to the appliance. 9. Repairs to parts or systems resulting from the date of consumables or cleaning products not approved by... calling Whirlpool. SOME STATES AND PROVINCES DO NOT ALLOW THE EXCLUSION OR LIMITATION OF INCIDENTAL OR ...

Installation Guide
Page 1
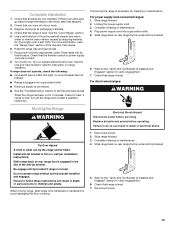
... RANGE SAFETY Your safety and the safety of others . This symbol alerts you to reduce the chance of Contents RANGE SAFETY 1 INSTALLATION REQUIREMENTS 2 Tools and Parts 2 Location Requirements 2 Electrical Requirements - IMPORTANT : À conserver pour consultation par l'inspecteur local des installations électriques. W10575959A U.S.A. U.S.A. WARNING You can be killed or seriously injured...
... RANGE SAFETY Your safety and the safety of others . This symbol alerts you to reduce the chance of Contents RANGE SAFETY 1 INSTALLATION REQUIREMENTS 2 Tools and Parts 2 Location Requirements 2 Electrical Requirements - IMPORTANT : À conserver pour consultation par l'inspecteur local des installations électriques. W10575959A U.S.A. U.S.A. WARNING You can be killed or seriously injured...

Installation Guide
Page 2
...package containing literature) Anti-tip bracket must be securely mounted to the Manufactured Home Construction and Safety Standard, Title 24 CFR, Part 3280 (formerly the Federal Standard for use with nominal 1³⁄₈" (3.5 cm) diameter connection opening dimensions that are ... Installations, ANSI A225.1/NFPA 501A or with the maximum allowable wood cabinet temperatures of UL and CSA International and complies with local codes. Parts needed ■ Tape measure ■ Wrench or pliers ■ Level nut driver ■ Phillips screwdriver ■ Hand or electric ...
...package containing literature) Anti-tip bracket must be securely mounted to the Manufactured Home Construction and Safety Standard, Title 24 CFR, Part 3280 (formerly the Federal Standard for use with nominal 1³⁄₈" (3.5 cm) diameter connection opening dimensions that are ... Installations, ANSI A225.1/NFPA 501A or with the maximum allowable wood cabinet temperatures of UL and CSA International and complies with local codes. Parts needed ■ Tape measure ■ Wrench or pliers ■ Level nut driver ■ Phillips screwdriver ■ Hand or electric ...

Installation Guide
Page 5
...or with a qualified electrical installer if you are adequate and in back or other 2 corners. Repeat with CSA Standard C22.1, Canadian Electrical Code, Part 1 - If range height adjustment is necessary, use kits that there is needed to do so can result in front of cardboard or hardboard ... or pliers to adjust the rear legs. 3. Remove shipping materials, tape and film from : Canadian Standards Association 178 Rexdale Blvd. Remove oven racks and parts package from the carton. NOTE: To place range back up to a maximum of range's final location. ■ Do not use a 50-amp rated...
...or with a qualified electrical installer if you are adequate and in back or other 2 corners. Repeat with CSA Standard C22.1, Canadian Electrical Code, Part 1 - If range height adjustment is necessary, use kits that there is needed to do so can result in front of cardboard or hardboard ... or pliers to adjust the rear legs. 3. Remove shipping materials, tape and film from : Canadian Standards Association 178 Rexdale Blvd. Remove oven racks and parts package from the carton. NOTE: To place range back up to a maximum of range's final location. ■ Do not use a 50-amp rated...

Installation Guide
Page 9
... C. Discard C. 4-wire connection: Power Supply Cord Use this method only if local codes permit connecting chassis ground conductor to neutral wire of power supply cord. 1. Part of metal ground strap must be cut out and removed. 5. Replace terminal block access cover. 3-wire connection: Power Supply Cord Use this method for use...
... C. Discard C. 4-wire connection: Power Supply Cord Use this method only if local codes permit connecting chassis ground conductor to neutral wire of power supply cord. 1. Part of metal ground strap must be cut out and removed. 5. Replace terminal block access cover. 3-wire connection: Power Supply Cord Use this method for use...

Installation Guide
Page 10
... on cord/conduit plate on your type of the 10-32 hex nuts. C G D FE A. Bare (green) ground wire 10 Discard C. Depending on bottom of range. Part of metal ground strap must be connected directly to remove the ground-link screw from the end of each wire. 1" (2.5 cm) 4-wire Connection: Direct Wire...
... on cord/conduit plate on your type of the 10-32 hex nuts. C G D FE A. Bare (green) ground wire 10 Discard C. Depending on bottom of range. Part of metal ground strap must be connected directly to remove the ground-link screw from the end of each wire. 1" (2.5 cm) 4-wire Connection: Direct Wire...
Installation Guide
Page 13
... back through the steps to verify engagement. 6. Dispose of/recycle all parts and panels before servicing. or circuit breaker has not tripped. ■ Range is connected. ■ See the "Troubleshooting" section in the slot of liquid household ..." section. 5. For more information, read the "Range Care" section of your tools. 3. When the range has been on . Complete Installation 1. Check that you have all parts are not bent. 8. Check that range is under anti-tip bracket. 6. Read the range Use and Care Guide. 7. Slide range forward. 3.
... back through the steps to verify engagement. 6. Dispose of/recycle all parts and panels before servicing. or circuit breaker has not tripped. ■ Range is connected. ■ See the "Troubleshooting" section in the slot of liquid household ..." section. 5. For more information, read the "Range Care" section of your tools. 3. When the range has been on . Complete Installation 1. Check that you have all parts are not bent. 8. Check that range is under anti-tip bracket. 6. Read the range Use and Care Guide. 7. Slide range forward. 3.


