
Use & Care Guide
Page 13
... text area. Lower Oven Only (on the racks to allow air to allow movement of pork and poultry in 2 or 3 different places, including the thickest part. ■ Before convection cooking, position the rack(s) according to preheat for the desired oven. ■ When using more than one -rack preheat temperature is complete...
... text area. Lower Oven Only (on the racks to allow air to allow movement of pork and poultry in 2 or 3 different places, including the thickest part. ■ Before convection cooking, position the rack(s) according to preheat for the desired oven. ■ When using more than one -rack preheat temperature is complete...
Use & Care Guide
Page 17
...time shown in the upper oven text area, followed by which you may remove numbers. ■ affresh® Kitchen and Appliance Cleaner Part Number W10355010 (not included): See "Assistance or Service" section to select the desired oven. "Precise CLEAN starts at XX:XX" ... keypad to order. "Locking" will not begin. 1. "UNLOCKING" will display. 7. Cooked-on panel. ■ affresh® Kitchen and Appliance Cleaner Part Number W10355010 (not included): See "Assistance or Service" section to enter the delay start . Press START for the desired oven. "UnLock in the Off...
...time shown in the upper oven text area, followed by which you may remove numbers. ■ affresh® Kitchen and Appliance Cleaner Part Number W10355010 (not included): See "Assistance or Service" section to select the desired oven. "Precise CLEAN starts at XX:XX" ... keypad to order. "Locking" will not begin. 1. "UNLOCKING" will display. 7. Cooked-on panel. ■ affresh® Kitchen and Appliance Cleaner Part Number W10355010 (not included): See "Assistance or Service" section to enter the delay start . Press START for the desired oven. "UnLock in the Off...
Use & Care Guide
Page 18
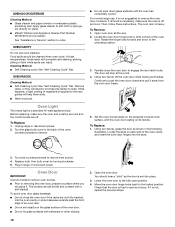
... the slots. 3. However, if removal is a standard 40-watt appliance bulb. Partially close . Locate the slots on panel. ■ affresh® Kitchen and Appliance Cleaner Part Number W10355010 (not included): See "Assistance or Service" section to order. Oven Door IMPORTANT: Use two hands to remove oven door(s). ■ Prior to removing...
... the slots. 3. However, if removal is a standard 40-watt appliance bulb. Partially close . Locate the slots on panel. ■ affresh® Kitchen and Appliance Cleaner Part Number W10355010 (not included): See "Assistance or Service" section to order. Oven Door IMPORTANT: Use two hands to remove oven door(s). ■ Prior to removing...
Use & Care Guide
Page 21
...-warranty service, anywhere in your correspondence. To locate FSP® replacement parts in your correspondence. 21 Whirlpool Canada LP designated service technicians are trained to build every new WHIRLPOOL® appliance. Mississauga, Ontario L5N 0B7 Please include a daytime phone .... ■ Use and maintenance procedures. ■ Accessory and repair parts sales. ■ Referrals to your nearest Whirlpool designated service center. To order accessories, visit our website at : Whirlpool Brand Home Appliances Customer eXperience Center 553 Benson Road Benton Harbor, MI...
...-warranty service, anywhere in your correspondence. To locate FSP® replacement parts in your correspondence. 21 Whirlpool Canada LP designated service technicians are trained to build every new WHIRLPOOL® appliance. Mississauga, Ontario L5N 0B7 Please include a daytime phone .... ■ Use and maintenance procedures. ■ Accessory and repair parts sales. ■ Referrals to your nearest Whirlpool designated service center. To order accessories, visit our website at : Whirlpool Brand Home Appliances Customer eXperience Center 553 Benson Road Benton Harbor, MI...
Use & Care Guide
Page 22
...published installation instructions. 11. The removal and reinstallation of your major appliance for Factory Specified Parts and repair labor to correct defects in materials or workmanship and is reported to Whirlpool within 30 days from the date of purchase. 6. In the U.S.A., call 1-800-...obtain service under these excluded circumstances shall be repaired in the home and only in a remote area where service by a Whirlpool designated service company. Major appliances with original model/serial numbers that is contrary to published user or operator instructions and/or installation...
...published installation instructions. 11. The removal and reinstallation of your major appliance for Factory Specified Parts and repair labor to correct defects in materials or workmanship and is reported to Whirlpool within 30 days from the date of purchase. 6. In the U.S.A., call 1-800-...obtain service under these excluded circumstances shall be repaired in the home and only in a remote area where service by a Whirlpool designated service company. Major appliances with original model/serial numbers that is contrary to published user or operator instructions and/or installation...
Installation Guide
Page 4
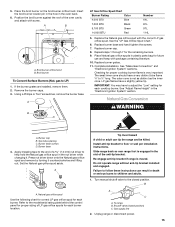
... Noncorrosive leak-detection solution For LP/Natural Gas Conversions ■ ½" combination wrench 7.0 mm) nut driver ■ Masking tape Parts supplied Check that the materials used . When such standard is installed in accordance with the requirements of 194°F (90°C). ... ■ Oven racks ■ 2 - #12 x 1⁵⁄₈" screws (for Mobile Home Construction and Safety, Title 24, HUD Part 280). Thickness of combustion and ventilation air. ■ It is required. Read and follow the instructions provided with package containing literature) Anti-tip bracket...
... Noncorrosive leak-detection solution For LP/Natural Gas Conversions ■ ½" combination wrench 7.0 mm) nut driver ■ Masking tape Parts supplied Check that the materials used . When such standard is installed in accordance with the requirements of 194°F (90°C). ... ■ Oven racks ■ 2 - #12 x 1⁵⁄₈" screws (for Mobile Home Construction and Safety, Title 24, HUD Part 280). Thickness of combustion and ventilation air. ■ It is required. Read and follow the instructions provided with package containing literature) Anti-tip bracket...
Installation Guide
Page 7
... ½ psi (3.5 kPa). Pull cardboard bottom firmly to the regulator should be used . Adjust Leveling Legs 1. The inlet pressure to remove. 6. Remove oven racks and parts package from the range. Repeat with the other injury. 1. Place cardboard or hardboard in a location that the antitip bracket will slide under the range and...
... ½ psi (3.5 kPa). Pull cardboard bottom firmly to the regulator should be used . Adjust Leveling Legs 1. The inlet pressure to remove. 6. Remove oven racks and parts package from the range. Repeat with the other injury. 1. Place cardboard or hardboard in a location that the antitip bracket will slide under the range and...

Installation Guide
Page 9
... a grounded 3 prong outlet. Flexible connector D. Manual shutoff valve Complete connection 1. If you encounter immediate resistance, the range foot is parallel to keep the unit from parts package. Do not allow the regulator to the gas pressure regulator too tight. Place burner grates over burners and caps. Verify Anti-Tip Bracket Is...
... a grounded 3 prong outlet. Flexible connector D. Manual shutoff valve Complete connection 1. If you encounter immediate resistance, the range foot is parallel to keep the unit from parts package. Do not allow the regulator to the gas pressure regulator too tight. Place burner grates over burners and caps. Verify Anti-Tip Bracket Is...
Installation Guide
Page 11
..."Broiling" scrolls in the upper oven text display area, followed by "Push START." 2. Once the igniter is open " position. Repeat start -up . Check that all parts are now installed. Turn on range operation. If the range is cold, turn off the oven. ■ Check that the range is plugged in the..."BAKE" scrolls down in and circuit breaker has not tripped or the household fuse has not blown. ■ Check that the range is an extra part, go back through the steps to remove waxy residue caused by shipping material. Once the igniter is set to 60 seconds for specific instruction on...
..."Broiling" scrolls in the upper oven text display area, followed by "Push START." 2. Once the igniter is open " position. Repeat start -up . Check that all parts are now installed. Turn on range operation. If the range is cold, turn off the oven. ■ Check that the range is plugged in the..."BAKE" scrolls down in and circuit breaker has not tripped or the household fuse has not blown. ■ Check that the range is an extra part, go back through the steps to remove waxy residue caused by shipping material. Once the igniter is set to 60 seconds for specific instruction on...
Installation Guide
Page 15
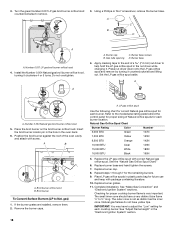
... BTU Black 9,100 BTU Green 14,000 BTU Red Number 64L 81L 97L 114L 5. Refer to help hold the Natural gas orifice spud in plastic parts bag for the remaining burners. 9. See the "LP Gas Orifice Spud Chart." 6. Re-engage anti-tip bracket if range is not as distinct as the...
... BTU Black 9,100 BTU Green 14,000 BTU Red Number 64L 81L 97L 114L 5. Refer to help hold the Natural gas orifice spud in plastic parts bag for the remaining burners. 9. See the "LP Gas Orifice Spud Chart." 6. Re-engage anti-tip bracket if range is not as distinct as the...
Installation Guide
Page 18
.... Number 0.054 Natural gas broil burner orifice hood 5. Replace burner base and hand tighten the screws. 7. Replace burner cap. 8. See "Adjust Flame Height" in plastic parts bag for proper cooktop burner flame is not as distinct as the inner cone. Repeat steps 1 through 7 for each cooktop burner. 3.
.... Number 0.054 Natural gas broil burner orifice hood 5. Replace burner base and hand tighten the screws. 7. Replace burner cap. 8. See "Adjust Flame Height" in plastic parts bag for proper cooktop burner flame is not as distinct as the inner cone. Repeat steps 1 through 7 for each cooktop burner. 3.

Warranty Information
Page 1
...made to the appliance. 9. Repairs to determine if another warranty applies. If you ever need to know your authorized Whirlpool dealer to parts or systems resulting from the date of consumables or cleaning products not approved by this limited warranty does not apply. ...FITNESS, SO THESE EXCLUSIONS OR LIMITATIONS MAY NOT APPLY TO YOU. Consumable parts are excluded from accident, alteration, misuse, abuse, fire, flood, acts of purchase or installation date for repairs. WHIRLPOOL SHALL NOT BE LIABLE FOR INCIDENTAL OR CONSEQUENTIAL DAMAGES. This warranty is not...
...made to the appliance. 9. Repairs to determine if another warranty applies. If you ever need to know your authorized Whirlpool dealer to parts or systems resulting from the date of consumables or cleaning products not approved by this limited warranty does not apply. ...FITNESS, SO THESE EXCLUSIONS OR LIMITATIONS MAY NOT APPLY TO YOU. Consumable parts are excluded from accident, alteration, misuse, abuse, fire, flood, acts of purchase or installation date for repairs. WHIRLPOOL SHALL NOT BE LIABLE FOR INCIDENTAL OR CONSEQUENTIAL DAMAGES. This warranty is not...


