
Use & Care Guide
Page 3
...product contains one or more information, contact your gas supplier from a neighbor's phone. WARNING: If the information in your appliance. Installation and service must be killed or seriously injured if you don't follow instructions. These words mean: DANGER You can be detected by a ...qualified installer, service agency or the gas supplier. RANGE SAFETY Your safety and the safety of others . Follow the gas supplier's instructions....
...product contains one or more information, contact your gas supplier from a neighbor's phone. WARNING: If the information in your appliance. Installation and service must be killed or seriously injured if you don't follow instructions. These words mean: DANGER You can be detected by a ...qualified installer, service agency or the gas supplier. RANGE SAFETY Your safety and the safety of others . Follow the gas supplier's instructions....
Use & Care Guide
Page 4
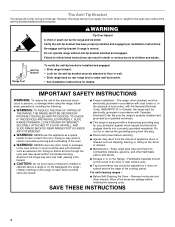
..., and other utensils. SAVE THESE INSTRUCTIONS 4 Re-engage anti-tip bracket if range is under anti-tip bracket. • See installation instructions for your protection against shock hazard and should be plugged directly into a properly grounded receptacle. children climbing on the backguard of ...precautions, including the following: ■ WARNING: TO REDUCE THE RISK OF TIPPING OF THE RANGE, THE RANGE MUST BE SECURED BY PROPERLY INSTALLED ANTI-TIP DEVICES. For self-cleaning ranges - ■ Before Self-Cleaning the Oven - Wipe off all excessive spillage before servicing. ...
..., and other utensils. SAVE THESE INSTRUCTIONS 4 Re-engage anti-tip bracket if range is under anti-tip bracket. • See installation instructions for your protection against shock hazard and should be plugged directly into a properly grounded receptacle. children climbing on the backguard of ...precautions, including the following: ■ WARNING: TO REDUCE THE RISK OF TIPPING OF THE RANGE, THE RANGE MUST BE SECURED BY PROPERLY INSTALLED ANTI-TIP DEVICES. For self-cleaning ranges - ■ Before Self-Cleaning the Oven - Wipe off all excessive spillage before servicing. ...

Use & Care Guide
Page 5
.... Left front control knob B. If you wish to use LP gas, an LP Gas Conversion Kit is factory-set for cooking smaller quantities of the Installation Instructions for a tripped circuit breaker or blown household fuse. To Set: 1. Push in death or fire. Gas tube opening IMPORTANT: Do not obstruct the flow...
.... Left front control knob B. If you wish to use LP gas, an LP Gas Conversion Kit is factory-set for cooking smaller quantities of the Installation Instructions for a tripped circuit breaker or blown household fuse. To Set: 1. Push in death or fire. Gas tube opening IMPORTANT: Do not obstruct the flow...

Use & Care Guide
Page 19
...burner. Level the range. See "Sealed Surface Burners" section. ■ Is propane gas being used ? Contact a service technician or see Installation Instructions. Surface burner makes popping noises ■ Is the burner wet? See "Sabbath Mode" section. 19 TROUBLESHOOTING Try the solutions suggested here... been set ? Burner sparks but the burner does not light? See "Cookware" section. ■ Is the control knob set ? See the Installation Instructions. See "Cooktop Controls" section. ■ Is the range level? Let it snaps open from the gas lines. ■ Is the electronic...
...burner. Level the range. See "Sealed Surface Burners" section. ■ Is propane gas being used ? Contact a service technician or see Installation Instructions. Surface burner makes popping noises ■ Is the burner wet? See "Sabbath Mode" section. 19 TROUBLESHOOTING Try the solutions suggested here... been set ? Burner sparks but the burner does not light? See "Cookware" section. ■ Is the control knob set ? See the Installation Instructions. See "Cooktop Controls" section. ■ Is the range level? Let it snaps open from the gas lines. ■ Is the electronic...
Use & Care Guide
Page 20
... Cooking" section. ■ Is the oven temperature above 400°F (205°C)? Oven cooking results not what expected ■ Is the range level? See the Installation Instructions. ■ Is the proper temperature set ? See "Baking" section. ■ Is the proper bakeware being used? See "Positioning Racks and Bakeware" section. ■ Is...
... Cooking" section. ■ Is the oven temperature above 400°F (205°C)? Oven cooking results not what expected ■ Is the range level? See the Installation Instructions. ■ Is the proper temperature set ? See "Baking" section. ■ Is the proper bakeware being used? See "Positioning Racks and Bakeware" section. ■ Is...
Use & Care Guide
Page 21
...This information will fit right and work right because they are made with any questions or concerns at www.whirlpool.com. Whirlpool designated service technicians are trained to order replacement parts, we recommend that you can also look in Canada. ...cost of your correspondence. 21 Our consultants provide assistance with : ■ Features and specifications on our full line of appliances. ■ Installation information. ■ Use and maintenance procedures. ■ Accessory and repair parts sales. ■ Specialized customer assistance (Spanish speaking, hearing ...
...This information will fit right and work right because they are made with any questions or concerns at www.whirlpool.com. Whirlpool designated service technicians are trained to order replacement parts, we recommend that you can also look in Canada. ...cost of your correspondence. 21 Our consultants provide assistance with : ■ Features and specifications on our full line of appliances. ■ Installation information. ■ Use and maintenance procedures. ■ Accessory and repair parts sales. ■ Specialized customer assistance (Spanish speaking, hearing ...
Use & Care Guide
Page 22
...home of your major appliance for product service if your sales slip together for in accordance with published installation instructions. 11. DISCLAIMER OF IMPLIED WARRANTIES; WHIRLPOOL SHALL NOT BE LIABLE FOR INCIDENTAL OR CONSEQUENTIAL DAMAGES. This limited warranty is valid only in the ...appliance, unless such damage results from defects in accordance with electrical or plumbing codes, or use of purchase or installation date for future reference. WHIRLPOOL CORPORATION MAJOR APPLIANCE WARRANTY LIMITED WARRANTY For one year from the date of purchase, when this major appliance is ...
...home of your major appliance for product service if your sales slip together for in accordance with published installation instructions. 11. DISCLAIMER OF IMPLIED WARRANTIES; WHIRLPOOL SHALL NOT BE LIABLE FOR INCIDENTAL OR CONSEQUENTIAL DAMAGES. This limited warranty is valid only in the ...appliance, unless such damage results from defects in accordance with electrical or plumbing codes, or use of purchase or installation date for future reference. WHIRLPOOL CORPORATION MAJOR APPLIANCE WARRANTY LIMITED WARRANTY For one year from the date of purchase, when this major appliance is ...
Installation Guide
Page 2
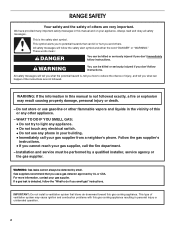
...gas supplier's instructions. • If you and others are not followed. WARNING You can kill or hurt you cannot reach your gas supplier. Installation and service must be killed or seriously injured if you use a gas detector approved by UL or CSA. IMPORTANT: Do not...of ventilation system may result causing property damage, personal injury or death. - All safety messages will tell you what can be detected by a qualified installer, service agency or the gas supplier. If a gas leak is the safety alert symbol. RANGE SAFETY Your safety and the safety of others . ...
...gas supplier's instructions. • If you and others are not followed. WARNING You can kill or hurt you cannot reach your gas supplier. Installation and service must be killed or seriously injured if you use a gas detector approved by UL or CSA. IMPORTANT: Do not...of ventilation system may result causing property damage, personal injury or death. - All safety messages will tell you what can be detected by a qualified installer, service agency or the gas supplier. If a gas leak is the safety alert symbol. RANGE SAFETY Your safety and the safety of others . ...

Installation Guide
Page 3
... to floor or wall. • Slide range back so rear range foot is engaged in death or serious burns to floor or wall per installation instructions. Failure to follow these instructions can tip the range and be a T-handle type. ■ A flexible gas connector, when used, must... not exceed 3 feet. Re-engage anti-tip bracket if range is moved. In the State of Massachusetts, the following installation instructions apply: ■ Installations and repairs must be performed by a qualified or licensed contractor, plumber, or gasfitter qualified or licensed by the State of the ...
... to floor or wall. • Slide range back so rear range foot is engaged in death or serious burns to floor or wall per installation instructions. Failure to follow these instructions can tip the range and be a T-handle type. ■ A flexible gas connector, when used, must... not exceed 3 feet. Re-engage anti-tip bracket if range is moved. In the State of Massachusetts, the following installation instructions apply: ■ Installations and repairs must be performed by a qualified or licensed contractor, plumber, or gasfitter qualified or licensed by the State of the ...
Installation Guide
Page 4
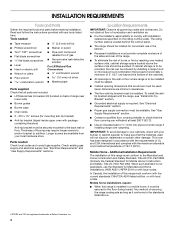
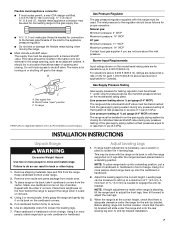
...with the current standards CAN/CSA-A240-latest edition, or with package containing literature) Anti-tip bracket must be installed. Additional Installation Requirements The installation of 194°F (90°C). Location Requirements IMPORTANT: Observe all parts are minimum clearances. ■ The...Gas Conversion Kit (located on the rating number plate. See "Gas Supply Requirements" section. ■ Contact a qualified floor covering installer to the Manufactured Home Construction and Safety Standard, Title 24 CFR, Part 3280 (formerly the Federal Standard for mounting anti-tip ...
...with the current standards CAN/CSA-A240-latest edition, or with package containing literature) Anti-tip bracket must be installed. Additional Installation Requirements The installation of 194°F (90°C). Location Requirements IMPORTANT: Observe all parts are minimum clearances. ■ The...Gas Conversion Kit (located on the rating number plate. See "Gas Supply Requirements" section. ■ Contact a qualified floor covering installer to the Manufactured Home Construction and Safety Standard, Title 24 CFR, Part 3280 (formerly the Federal Standard for mounting anti-tip ...
Installation Guide
Page 5
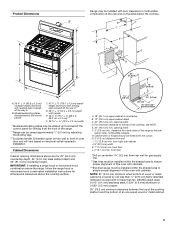
... wall I G C** KL A D H 8½" (21.6 cm) E*** F A. 35 90.8 ± 0.3 cm) cooktop height (minimum) with cabinets. ***Electrical plugs must be installed within the shaded area to ensure proper alignment of this oven with cabinets. For minimum clearance to the top of this oven with leveling legs... screwed all the way in B. from floor *Drill on centerline 1¼" (3.2 cm) from rear wall for gas supply line. **Gas lines must be installed within the shaded area to ensure proper alignment of the cooktop, see NOTE. B* B D C A E F J I . 1¹⁄₂" (3.8 ...
... wall I G C** KL A D H 8½" (21.6 cm) E*** F A. 35 90.8 ± 0.3 cm) cooktop height (minimum) with cabinets. ***Electrical plugs must be installed within the shaded area to ensure proper alignment of this oven with cabinets. For minimum clearance to the top of this oven with leveling legs... screwed all the way in B. from floor *Drill on centerline 1¼" (3.2 cm) from rear wall for gas supply line. **Gas lines must be installed within the shaded area to ensure proper alignment of the cooktop, see NOTE. B* B D C A E F J I . 1¹⁄₂" (3.8 ...
Installation Guide
Page 6
... Natural gas: This range is design-certified by a qualified service technician. latest edition or CAN/CGA B149 - Type of local codes, installation must conform with Natural gas. A smaller size pipe on the types of local codes, with American National Standard, National Fuel Gas Code ... within wide voltage limits, but proper grounding and polarity are necessary. Explosion Hazard Use a new CSA International approved gas supply line. Install a shut-off valve. With LP gas, piping or tubing size can be conducted according to follow these instructions can result in insufficient...
... Natural gas: This range is design-certified by a qualified service technician. latest edition or CAN/CGA B149 - Type of local codes, installation must conform with Natural gas. A smaller size pipe on the types of local codes, with American National Standard, National Fuel Gas Code ... within wide voltage limits, but proper grounding and polarity are necessary. Explosion Hazard Use a new CSA International approved gas supply line. Install a shut-off valve. With LP gas, piping or tubing size can be conducted according to follow these instructions can result in insufficient...
Installation Guide
Page 7
...the correct height, check that the antitip bracket will slide under the range and onto the rear leveling leg prior to anti-tip bracket installation. 7 Keep cardboard bottom under the range for turning on its back. 4. To place range on its individual manual shutoff valve during.... Before sliding range into a standing position, put a sheet of cardboard or hardboard in excess of opening , such as follows for Canada). INSTALLATION INSTRUCTIONS Unpack Range WARNING Excessive Weight Hazard Use two or more people, firmly grasp the range and gently lay it is necessary, use a wrench...
...the correct height, check that the antitip bracket will slide under the range and onto the rear leveling leg prior to anti-tip bracket installation. 7 Keep cardboard bottom under the range for turning on its back. 4. To place range on its individual manual shutoff valve during.... Before sliding range into a standing position, put a sheet of cardboard or hardboard in excess of opening , such as follows for Canada). INSTALLATION INSTRUCTIONS Unpack Range WARNING Excessive Weight Hazard Use two or more people, firmly grasp the range and gently lay it is necessary, use a wrench...
Installation Guide
Page 8
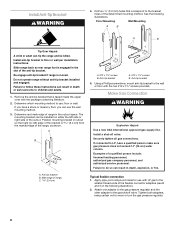
...with the package containing literature. 2. Using a Phillips screwdriver, mount anti-tip bracket to floor or wall per installation instructions. Install Anti-Tip Bracket WARNING 4. Install a shut-off valve. Securely tighten all gas connections. Mark edge of a qualified person include: licensed heating ...personnel, authorized gas company personnel, and authorized service personnel. The mounting bracket can tip the range and be installed on either the left ) edge of the flexible connector adapters (see B and G in death, explosion, or fire. Make...
...with the package containing literature. 2. Using a Phillips screwdriver, mount anti-tip bracket to floor or wall per installation instructions. Install Anti-Tip Bracket WARNING 4. Install a shut-off valve. Securely tighten all gas connections. Mark edge of a qualified person include: licensed heating ...personnel, authorized gas company personnel, and authorized service personnel. The mounting bracket can tip the range and be installed on either the left ) edge of the flexible connector adapters (see B and G in death, explosion, or fire. Make...

Installation Guide
Page 9
... B Electrical Shock Hazard Plug into a grounded 3 prong outlet. Manual shutoff valve Complete connection 1. A 2. WARNING B C D H G E F A. Do not use an extension cord. Verify Anti-Tip Bracket Is Installed and Engaged 1. H. C D A. Align recess in burner caps with a backsplash, it may crack the regulator and cause a gas leak. C. NOTE: If your foot against the bottom...
... B Electrical Shock Hazard Plug into a grounded 3 prong outlet. Manual shutoff valve Complete connection 1. A 2. WARNING B C D H G E F A. Do not use an extension cord. Verify Anti-Tip Bracket Is Installed and Engaged 1. H. C D A. Align recess in burner caps with a backsplash, it may crack the regulator and cause a gas leak. C. NOTE: If your foot against the bottom...
Installation Guide
Page 10
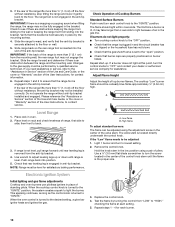
...in anti-tip bracket. Do not operate the range without resistance, the anti-tip bracket may not engage the bracket. NOTE: Range must be installed correctly. If burners do not light properly: ■ Turn cooktop control knob to the "open" position. ■ Check that the gas ...Light 1 burner and turn each control knob to light because of the range lifts more than ½" (1.3 cm) off the floor without anti-tip bracket installed and engaged. Remove the control knob. Test the flame by a qualified service technician. Repeat steps 1 - 4 for contact information. 6. If the rear ...
...in anti-tip bracket. Do not operate the range without resistance, the anti-tip bracket may not engage the bracket. NOTE: Range must be installed correctly. If burners do not light properly: ■ Turn cooktop control knob to the "open" position. ■ Check that the gas ...Light 1 burner and turn each control knob to light because of the range lifts more than ½" (1.3 cm) off the floor without anti-tip bracket installed and engaged. Remove the control knob. Test the flame by a qualified service technician. Repeat steps 1 - 4 for contact information. 6. If the rear ...
Installation Guide
Page 11
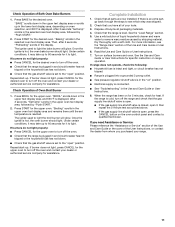
...If burner does not light, press CANCEL for it to light. Under certain conditions, it may take up to 60 seconds for assistance. Complete Installation 1. Check that you have all of Both Oven Bake Burners 1. If range does not operate, check the following: ■ Household fuse is... off the oven. ■ Check that all packaging materials. 4. "Baking" scrolls in the display. Check Operation of /recycle all parts are now installed. If burner does not light, press CANCEL for the upper oven to the "open " position. Read the Use and Care Guide or User Instructions....
...If burner does not light, press CANCEL for it to light. Under certain conditions, it may take up to 60 seconds for assistance. Complete Installation 1. Check that you have all of Both Oven Bake Burners 1. If range does not operate, check the following: ■ Household fuse is... off the oven. ■ Check that all packaging materials. 4. "Baking" scrolls in the display. Check Operation of /recycle all parts are now installed. If burner does not light, press CANCEL for the upper oven to the "open " position. Read the Use and Care Guide or User Instructions....

Installation Guide
Page 12
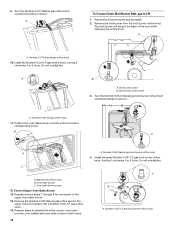
...the slot of the anti-tip bracket. Failure to follow these instructions can result in death or serious burns to floor or wall per installation instructions. gas to do so can result in death, explosion, or fire. Locate gas pressure regulator at the rear of a qualified ...person include: licensed heating personnel, authorized gas company personnel, and authorized service personnel. Slide range back so rear range foot is moved. Install a shut-off valve. Failure to LP) 1. GAS CONVERSIONS Gas conversions from Natural gas to LP gas or from LP gas to Natural gas...
...the slot of the anti-tip bracket. Failure to follow these instructions can result in death or serious burns to floor or wall per installation instructions. gas to do so can result in death, explosion, or fire. Locate gas pressure regulator at the rear of a qualified ...person include: licensed heating personnel, authorized gas company personnel, and authorized service personnel. Slide range back so rear range foot is moved. Install a shut-off valve. Failure to LP) 1. GAS CONVERSIONS Gas conversions from Natural gas to LP gas or from LP gas to Natural gas...
Installation Guide
Page 14
Remove the broil burner from the broil burner orifice hood. Install the Number 0.044 LP gas orifice hood, turning it clockwise 4 or 5 turns. A .044 B A. Turn the Number 0.054 Natural gas broil burner orifice hood counterclockwise to ... Natural gas orifice spud in the back of the upper oven bake burner. 13. Remove broil burner screw and set aside. 2. Bake burner orifice hood B. Install the green Number 0.037 LP gas broil burner orifice hood, turning it clockwise 4 or 5 turns. A To Convert Oven Broil Burner (Nat. The broil burner will...
Remove the broil burner from the broil burner orifice hood. Install the Number 0.044 LP gas orifice hood, turning it clockwise 4 or 5 turns. A .044 B A. Turn the Number 0.054 Natural gas broil burner orifice hood counterclockwise to ... Natural gas orifice spud in the back of the upper oven bake burner. 13. Remove broil burner screw and set aside. 2. Bake burner orifice hood B. Install the green Number 0.037 LP gas broil burner orifice hood, turning it clockwise 4 or 5 turns. A To Convert Oven Broil Burner (Nat. The broil burner will...
Installation Guide
Page 15
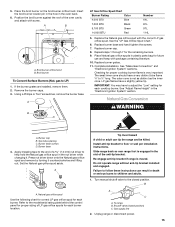
... Green 14,000 BTU Red Number 64L 81L 97L 114L 5. Replace the Natural gas orifice spud with package containing literature. 10. Complete installation. The small inner cone should have a very distinct blue flame ¼" to the closed position) C. LP gas flames have to follow...back. 6. Set the Natural gas orifice spud aside. Turn manual shutoff valve to ½" long. Gas supply line 2. If the burner grates are installed, remove them. 2. Repeat steps 1 through 7 for each cooktop burner. Checking for each burner. Natural Gas Conversion WARNING A. A A. Refer to the...
... Green 14,000 BTU Red Number 64L 81L 97L 114L 5. Replace the Natural gas orifice spud with package containing literature. 10. Complete installation. The small inner cone should have a very distinct blue flame ¼" to the closed position) C. LP gas flames have to follow...back. 6. Set the Natural gas orifice spud aside. Turn manual shutoff valve to ½" long. Gas supply line 2. If the burner grates are installed, remove them. 2. Repeat steps 1 through 7 for each cooktop burner. Checking for each burner. Natural Gas Conversion WARNING A. A A. Refer to the...


