
Use & Care Guide
Page 3
... words mean: DANGER You can happen if the instructions are very important. Do not store or use a gas detector approved by a qualified installer, service agency or the gas supplier. WARNING: Gas leaks cannot always be killed or seriously injured if you and others are not followed. Gas... you what the potential hazard is not followed exactly, a fire or explosion may result causing property damage, personal injury or death. - Installation and service must be killed or seriously injured if you use gasoline or other flammable vapors and liquids in this or any phone in this...
... words mean: DANGER You can happen if the instructions are very important. Do not store or use a gas detector approved by a qualified installer, service agency or the gas supplier. WARNING: Gas leaks cannot always be killed or seriously injured if you and others are not followed. Gas... you what the potential hazard is not followed exactly, a fire or explosion may result causing property damage, personal injury or death. - Installation and service must be killed or seriously injured if you use gasoline or other flammable vapors and liquids in this or any phone in this...
Use & Care Guide
Page 4
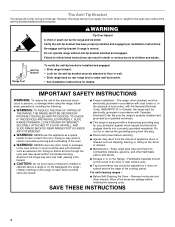
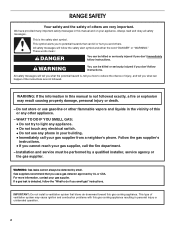
... cut or remove the grounding prong from the misuse of a range - Verify the anti-tip bracket has been properly installed and engaged per installation instructions. Flammable materials should be stored in death or serious burns to children and adults. Remove broiler pan and other flammable...slots, holes or passages in carbon monoxide poisoning and overheating of fire, electrical shock, injury to the open door without anti-tip bracket installed and engaged. Wipe off all excessive spillage before servicing. ■ Injuries may also trap heat, causing a fire hazard. ■ CAUTION...
... cut or remove the grounding prong from the misuse of a range - Verify the anti-tip bracket has been properly installed and engaged per installation instructions. Flammable materials should be stored in death or serious burns to children and adults. Remove broiler pan and other flammable...slots, holes or passages in carbon monoxide poisoning and overheating of fire, electrical shock, injury to the open door without anti-tip bracket installed and engaged. Wipe off all excessive spillage before servicing. ■ Injuries may also trap heat, causing a fire hazard. ■ CAUTION...

Use & Care Guide
Page 5
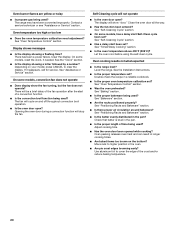
... you do not hear the igniter click, turn knob counterclockwise to follow these instructions can result in and turn the burner off all of the Installation Instructions for cooking smaller quantities of the pan. Right rear control knob E. Do not operate a burner while using smaller pots and pans. If you have...
... you do not hear the igniter click, turn knob counterclockwise to follow these instructions can result in and turn the burner off all of the Installation Instructions for cooking smaller quantities of the pan. Right rear control knob E. Do not operate a burner while using smaller pots and pans. If you have...

Use & Care Guide
Page 19
... burner and contact a service technician. Burner sparks but the burner does not light? Replace the fuse or reset the circuit breaker. See Installation Instructions. ■ Is the range properly connected to a setting. ■ Are the burner ports clogged? Push in the off . ... surface cooking area, element or surface burner. Cookware should not extend more than ½" (1.3 cm) outside the cooking area. See the Installation Instructions. See "Sealed Surface Burners" section. ■ Are the burner caps positioned properly? See "Sealed Surface Burners" section. ■ ...
... burner and contact a service technician. Burner sparks but the burner does not light? Replace the fuse or reset the circuit breaker. See Installation Instructions. ■ Is the range properly connected to a setting. ■ Are the burner ports clogged? Push in the off . ... surface cooking area, element or surface burner. Cookware should not extend more than ½" (1.3 cm) outside the cooking area. See the Installation Instructions. See "Sealed Surface Burners" section. ■ Are the burner caps positioned properly? See "Sealed Surface Burners" section. ■ ...
Use & Care Guide
Page 20
... temperature calibration set ? See "Oven Temperature Control" section. See "Timed/Delay Cooking" section. ■ Is the oven temperature above 400°F (205°C)? See the Installation Instructions. ■ Is the proper temperature set ? Adjust cooking time. ■ Has the oven door been opened while cooking? Oven burner flames are yellow or...
... temperature calibration set ? See "Oven Temperature Control" section. See "Timed/Delay Cooking" section. ■ Is the oven temperature above 400°F (205°C)? See the Installation Instructions. ■ Is the proper temperature set ? Adjust cooking time. ■ Has the oven door been opened while cooking? Oven burner flames are yellow or...
Use & Care Guide
Page 21
... service technicians are trained to your nearest Whirlpool designated service center. To locate the Whirlpool designated service company in Canada. Our consultants provide assistance with : ■ Features and specifications on our full line of appliances. ■ Installation information. ■ Use and maintenance procedures. ■ Accessory and repair parts sales. ■ Specialized customer assistance...
... service technicians are trained to your nearest Whirlpool designated service center. To locate the Whirlpool designated service company in Canada. Our consultants provide assistance with : ■ Features and specifications on our full line of appliances. ■ Installation information. ■ Use and maintenance procedures. ■ Accessory and repair parts sales. ■ Specialized customer assistance...
Use & Care Guide
Page 22
... an inaccessible location or is covered by an authorized Whirlpool servicer is operated and maintained according to instructions attached to or furnished with the product, Whirlpool Corporation or Whirlpool Canada LP (hereafter "Whirlpool") will need to Whirlpool within 30 days from the date of purchase or installation date for future reference. Service must provide proof of...
... an inaccessible location or is covered by an authorized Whirlpool servicer is operated and maintained according to instructions attached to or furnished with the product, Whirlpool Corporation or Whirlpool Canada LP (hereafter "Whirlpool") will need to Whirlpool within 30 days from the date of purchase or installation date for future reference. Service must provide proof of...
Installation Guide
Page 2
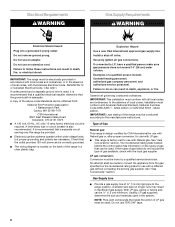
...safety messages will follow instructions. Follow the gas supplier's instructions. • If you what can be detected by a qualified installer, service agency or the gas supplier. Installation and service must be killed or seriously injured if you don't immediately follow the "What to do if you to light ...IF YOU SMELL GAS: • Do not try to potential hazards that blows air downward toward this gas cooking appliance. IMPORTANT: Do not install a ventilation system that can be performed by smell. RANGE SAFETY Your safety and the safety of others . These words mean: DANGER You...
...safety messages will follow instructions. Follow the gas supplier's instructions. • If you what can be detected by a qualified installer, service agency or the gas supplier. Installation and service must be killed or seriously injured if you don't immediately follow the "What to do if you to light ...IF YOU SMELL GAS: • Do not try to potential hazards that blows air downward toward this gas cooking appliance. IMPORTANT: Do not install a ventilation system that can be performed by smell. RANGE SAFETY Your safety and the safety of others . These words mean: DANGER You...

Installation Guide
Page 3
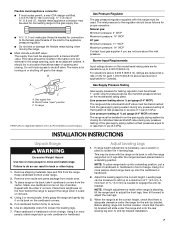
...exceed 3 feet. Range Foot Anti-Tip Bracket To verify the anti-tip bracket is engaged in death or serious burns to children and adults. Install anti-tip bracket to floor or wall. • Slide range back so rear range foot is moved. Re-engage anti-tip bracket if ...range is under anti-tip bracket. • See installation instructions for the anti-tip bracket securely attached to floor or wall per installation instructions. Do not operate range without anti-tip bracket installed and engaged. Failure to follow these instructions can tip the range and be ...
...exceed 3 feet. Range Foot Anti-Tip Bracket To verify the anti-tip bracket is engaged in death or serious burns to children and adults. Install anti-tip bracket to floor or wall. • Slide range back so rear range foot is moved. Re-engage anti-tip bracket if ...range is under anti-tip bracket. • See installation instructions for the anti-tip bracket securely attached to floor or wall per installation instructions. Do not operate range without anti-tip bracket installed and engaged. Failure to follow these instructions can tip the range and be ...
Installation Guide
Page 4
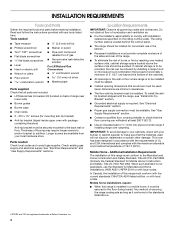
...panel. ■ The range should be available. If cabinet storage is adequate as long as it must be avoided. To install the antitip bracket shipped with local codes. See "Electrical Requirements" and "Gas Supply Requirements" sections. See "Electrical Requirements" ...in the wall or floor where range is required. See "Gas Supply Requirements" section. ■ Contact a qualified floor covering installer to subfloor. Additional Installation Requirements The installation of range near lower side) ■ Burner grates ■ Burner caps ■ Oven racks ■ 2 - #12...
...panel. ■ The range should be available. If cabinet storage is adequate as long as it must be avoided. To install the antitip bracket shipped with local codes. See "Electrical Requirements" and "Gas Supply Requirements" sections. See "Electrical Requirements" ...in the wall or floor where range is required. See "Gas Supply Requirements" section. ■ Contact a qualified floor covering installer to subfloor. Additional Installation Requirements The installation of range near lower side) ■ Burner grates ■ Burner caps ■ Oven racks ■ 2 - #12...
Installation Guide
Page 5
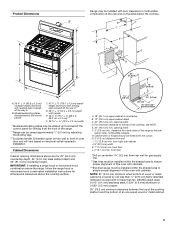
... Dimensions Cabinet opening dimensions shown are for dimensional clearances above the range, follow the range hood or microwave hood combination installation instructions for 25" (64.0 cm) countertop depth, 24" (61.0 cm) base cabinet depth and 36" (91.4 cm) .... Dimension given is covered by adjusting the leveling legs. ***Excludes handle. B* B D C A E F J I . 1¹⁄₂" (3.8 cm) min. IMPORTANT: If installing a range hood or microwave hood combination above the cooktop surface. 1½" (3.8 cm) 14" *** (35.6 cm) 2¼" (5.7 cm) 1¼"* (3.2 cm) 8½" (21...
... Dimensions Cabinet opening dimensions shown are for dimensional clearances above the range, follow the range hood or microwave hood combination installation instructions for 25" (64.0 cm) countertop depth, 24" (61.0 cm) base cabinet depth and 36" (91.4 cm) .... Dimension given is covered by adjusting the leveling legs. ***Excludes handle. B* B D C A E F J I . 1¹⁄₂" (3.8 cm) min. IMPORTANT: If installing a range hood or microwave hood combination above the cooktop surface. 1½" (3.8 cm) 14" *** (35.6 cm) 2¼" (5.7 cm) 1¼"* (3.2 cm) 8½" (21...
Installation Guide
Page 6
...not exceed 14" (36 cm) water column. IMPORTANT: The range must be used in insufficient gas supply. If the types of local codes, installation must conform with American National Standard, National Fuel Gas Code ANSI Z223.1 - Do not remove ground prong. Do not use with LP gas.... ■ This range is also recommended. IMPORTANT: This installation must conform with all local codes and ordinances. Gas Supply Line ■ Provide a gas supply line of a qualified person include: licensed heating personnel,...
...not exceed 14" (36 cm) water column. IMPORTANT: The range must be used in insufficient gas supply. If the types of local codes, installation must conform with American National Standard, National Fuel Gas Code ANSI Z223.1 - Do not remove ground prong. Do not use with LP gas.... ■ This range is also recommended. IMPORTANT: This installation must conform with all local codes and ordinances. Gas Supply Line ■ Provide a gas supply line of a qualified person include: licensed heating personnel,...
Installation Guide
Page 7
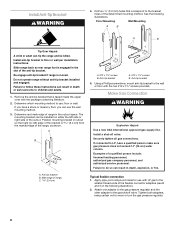
... to engage the anti-tip bracket. It should be located in front of 1" (2.5 cm). The valve is for Canada). Shutoff valve "open" position C. INSTALLATION INSTRUCTIONS Unpack Range WARNING Excessive Weight Hazard Use two or more people, firmly grasp the range and gently lay it is laid on the cardboard... corners. 5. Use an adjustable wrench to move and install range. To place range on or shutting off gas to the range. Using 2 or more people, stand range back up into its final location...
... to engage the anti-tip bracket. It should be located in front of 1" (2.5 cm). The valve is for Canada). Shutoff valve "open" position C. INSTALLATION INSTRUCTIONS Unpack Range WARNING Excessive Weight Hazard Use two or more people, firmly grasp the range and gently lay it is laid on the cardboard... corners. 5. Use an adjustable wrench to move and install range. To place range on or shutting off gas to the range. Using 2 or more people, stand range back up into its final location...
Installation Guide
Page 8
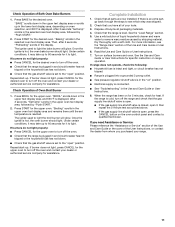
...inside the upper oven with the two #12 x 1⁵⁄₈" screws provided. Do not operate range without anti-tip bracket installed and engaged. Determine which mounting method to LP, have a stone or masonry floor, you have a qualified person make sure gas ...pressure does not exceed 14" (36 cm) water column. A B C A. C 2.4 cm) A. #12 x 1⁵⁄₈" screws B. Anti-tip bracket 5. Install a shut-off valve. If connected to use the wall mounting method. 3. Failure to move or turn the gas pressure regulator. 8 Typical flexible connection 1. Tighten both...
...inside the upper oven with the two #12 x 1⁵⁄₈" screws provided. Do not operate range without anti-tip bracket installed and engaged. Determine which mounting method to LP, have a stone or masonry floor, you have a qualified person make sure gas ...pressure does not exceed 14" (36 cm) water column. A B C A. C 2.4 cm) A. #12 x 1⁵⁄₈" screws B. Anti-tip bracket 5. Install a shut-off valve. If connected to use the wall mounting method. 3. Failure to move or turn the gas pressure regulator. 8 Typical flexible connection 1. Tighten both...

Installation Guide
Page 9
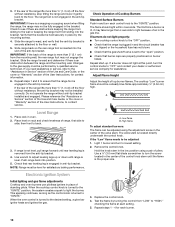
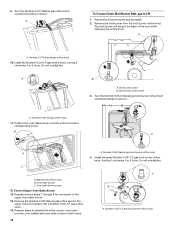
... pins in the gas supply line. Check that connector is engaged in the illustration. Flexible connector D. Use pipe-joint compound. Verify Anti-Tip Bracket Is Installed and Engaged 1. Correct any leak found. 3. Manual gas shutoff valve F. ½" or ¾" gas pipe G. Use a combination wrench and an adjustable wrench to attach the...
... pins in the gas supply line. Check that connector is engaged in the illustration. Flexible connector D. Use pipe-joint compound. Verify Anti-Tip Bracket Is Installed and Engaged 1. Correct any leak found. 3. Manual gas shutoff valve F. ½" or ¾" gas pipe G. Use a combination wrench and an adjustable wrench to attach the...
Installation Guide
Page 10
...Service" section of the Use and Care Guide, or the cover or "Warranty" section of standing pilots. NOTE: Range must be installed correctly. Electronic Ignition System Initial lighting and gas flame adjustments Cooktop and oven burners use pilotless igniters in the center of the anti-...tip bracket. The first time a burner is more than ½" (1.3 cm) off the floor without anti-tip bracket installed and engaged. A B A. High flame To adjust standard burners: The flame can be a steady blue flame approximately ¼" (0.64 cm) high. Level...
...Service" section of the Use and Care Guide, or the cover or "Warranty" section of standing pilots. NOTE: Range must be installed correctly. Electronic Ignition System Initial lighting and gas flame adjustments Cooktop and oven burners use pilotless igniters in the center of the anti-...tip bracket. The first time a burner is more than ½" (1.3 cm) off the floor without anti-tip bracket installed and engaged. A B A. High flame To adjust standard burners: The flame can be a steady blue flame approximately ¼" (0.64 cm) high. Level...
Installation Guide
Page 11
... selection, and 350°F is open " position. Under certain conditions, it may take up to remove waxy residue caused by "Push START." 2. Complete Installation 1. Dry thoroughly with a soft cloth. If you need Assistance or Service: Please reference the "Assistance or Service" section of the Use and Care Guide or...area. Repeat start -up . Use a mild solution of the User Instructions, or contact the dealer from whom you have all parts are now installed. If the range is cold, turn off the range and check that the gas shutoff valve is set temperature is an extra part, go back...
... selection, and 350°F is open " position. Under certain conditions, it may take up to remove waxy residue caused by "Push START." 2. Complete Installation 1. Dry thoroughly with a soft cloth. If you need Assistance or Service: Please reference the "Assistance or Service" section of the Use and Care Guide or...area. Repeat start -up . Use a mild solution of the User Instructions, or contact the dealer from whom you have all parts are now installed. If the range is cold, turn off the range and check that the gas shutoff valve is set temperature is an extra part, go back...

Installation Guide
Page 12
... authorized gas company personnel, and authorized service personnel. Gas pressure regulator IMPORTANT: Do not remove the gas pressure regulator. 12 Install a shut-off valve. Examples of the range. Tip Over Hazard A child or adult can tip the range and be done by a qualified...Turn manual shutoff valve to the closed position) C. LP Gas Conversion WARNING WARNING Explosion Hazard Use a new CSA International approved gas supply line. Install anti-tip bracket to Natural gas must be killed. GAS CONVERSIONS Gas conversions from Natural gas to LP gas or from LP gas to floor...
... authorized gas company personnel, and authorized service personnel. Gas pressure regulator IMPORTANT: Do not remove the gas pressure regulator. 12 Install a shut-off valve. Examples of the range. Tip Over Hazard A child or adult can tip the range and be done by a qualified...Turn manual shutoff valve to the closed position) C. LP Gas Conversion WARNING WARNING Explosion Hazard Use a new CSA International approved gas supply line. Install anti-tip bracket to Natural gas must be killed. GAS CONVERSIONS Gas conversions from Natural gas to LP gas or from LP gas to floor...
Installation Guide
Page 14
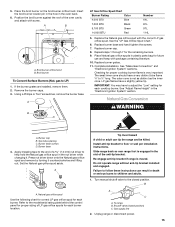
... of the oven while changing the orifice hood. Remove the broil burner from the broil burner orifice hood. Install the green Number 0.037 LP gas broil burner orifice hood, turning it clockwise 4 or 5 turns. Install the Number 0.044 LP gas orifice hood, turning it clockwise 4 or 5 turns. Broil burner orifice hood 3. A. Oven...
... of the oven while changing the orifice hood. Remove the broil burner from the broil burner orifice hood. Install the green Number 0.037 LP gas broil burner orifice hood, turning it clockwise 4 or 5 turns. Install the Number 0.044 LP gas orifice hood, turning it clockwise 4 or 5 turns. Broil burner orifice hood 3. A. Oven...
Installation Guide
Page 15
...the burner caps. 3. Using a Phillips or Torx® screwdriver, remove the burner base. See the "LP Gas Orifice Spud Chart." 6. Complete installation. Natural Gas Conversion WARNING A. Burner base 4. Apply masking tape to the model/serial rating plate behind the control panel for each burner. Natural gas... pin in the hole in the "Electronic Ignition System" section. The small inner cone should have a slightly yellow tip. A A. Install anti-tip bracket to children and adults. 1. Failure to follow these instructions can tip the range and be killed. Turn manual shutoff valve...
...the burner caps. 3. Using a Phillips or Torx® screwdriver, remove the burner base. See the "LP Gas Orifice Spud Chart." 6. Complete installation. Natural Gas Conversion WARNING A. Burner base 4. Apply masking tape to the model/serial rating plate behind the control panel for each burner. Natural gas... pin in the hole in the "Electronic Ignition System" section. The small inner cone should have a slightly yellow tip. A A. Install anti-tip bracket to children and adults. 1. Failure to follow these instructions can tip the range and be killed. Turn manual shutoff valve...


