

Use & Care Guide
Page 5
... liquid, using large pots and pans. All the surface burners will produce a flame. Only the burner with the control knob turned to use with your model. Burner base C. A B C D E A. Center burner (on the grate. Turn off . The large burners (16,000, 14,000 and 12,500 Btu/h [British... Units]) provide the highest heat setting, and are ideal for details on the valve shaft. Before setting a control knob, place filled cookware on some models) D. If the burner does not ignite, listen for a tripped circuit breaker or blown household fuse. Check for a clicking sound. To Set: 1....
... liquid, using large pots and pans. All the surface burners will produce a flame. Only the burner with the control knob turned to use with your model. Burner base C. A B C D E A. Center burner (on the grate. Turn off . The large burners (16,000, 14,000 and 12,500 Btu/h [British... Units]) provide the highest heat setting, and are ideal for details on the valve shaft. Before setting a control knob, place filled cookware on some models) D. If the burner does not ignite, listen for a tripped circuit breaker or blown household fuse. Check for a clicking sound. To Set: 1....
Use & Care Guide
Page 7
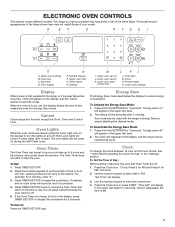
...: 1. min-min. The setting will turn the lights on when either door is open. Press the Clock icon. ELECTRONIC OVEN CONTROLS This manual covers different models. Settings M I O A. Press TIMER SET/OFF. 2. Press the number keypads to 9 hours and 59 minutes, and counts down the set the length of the... SET/OFF twice to cancel the Oven Timer and return to be activated after 5 minutes. The range you have to the time of your model. Timer set time of Day: Before setting, make sure the oven and Oven Timer are closed, press the Oven Light icon on the display...
...: 1. min-min. The setting will turn the lights on when either door is open. Press the Clock icon. ELECTRONIC OVEN CONTROLS This manual covers different models. Settings M I O A. Press TIMER SET/OFF. 2. Press the number keypads to 9 hours and 59 minutes, and counts down the set the length of the... SET/OFF twice to cancel the Oven Timer and return to be activated after 5 minutes. The range you have to the time of your model. Timer set time of Day: Before setting, make sure the oven and Oven Timer are closed, press the Oven Light icon on the display...
Use & Care Guide
Page 11
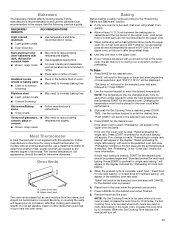
... at any time by "Push START." 2. Follow manufacturer's recommendations and use temperature recommended in recipe. ■ Place rack in the bottom third of doneness. On models without a temperature probe, use baking/ pizza stones at least ½" (1.3 cm) between the baking pan or casserole and the top burner in the display. The...
... at any time by "Push START." 2. Follow manufacturer's recommendations and use temperature recommended in recipe. ■ Place rack in the bottom third of doneness. On models without a temperature probe, use baking/ pizza stones at least ½" (1.3 cm) between the baking pan or casserole and the top burner in the display. The...
Use & Care Guide
Page 13
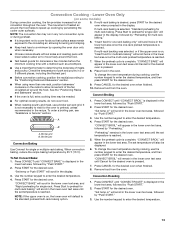
... change the oven temperature during cooking, use a broiler pan and grid. If multi-rack backing was selected, or if the upper oven is on some models) During convection cooking, the fan provides increased hot air circulation throughout the oven. "CONVECT BROIL" will appear in the lower oven text area, B followed by...
... change the oven temperature during cooking, use a broiler pan and grid. If multi-rack backing was selected, or if the upper oven is on some models) During convection cooking, the fan provides increased hot air circulation throughout the oven. "CONVECT BROIL" will appear in the lower oven text area, B followed by...
Use & Care Guide
Page 16
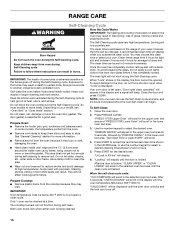
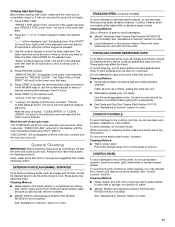
... spots can be cleaned at a time, and 24 hours must pass before the next Self-Clean can be set based on the usage of some models, the temperature probe from the oven. ■ Remove oven racks to keep them shiny and easy to remove soil. To Self-Clean: 1. Press PRECISE ... Time or push START" will not function during the Self-Cleaning cycle to move freely. The cooktop burners will scroll. 4. IMPORTANT: The health of your model, see "Oven Vent" or "Oven Vents" section. Self-clean the oven before it becomes heavily soiled. The door gasket is being certain not to help...
... spots can be cleaned at a time, and 24 hours must pass before the next Self-Clean can be set based on the usage of some models, the temperature probe from the oven. ■ Remove oven racks to keep them shiny and easy to remove soil. To Self-Clean: 1. Press PRECISE ... Time or push START" will not function during the Self-Cleaning cycle to move freely. The cooktop burners will scroll. 4. IMPORTANT: The health of your model, see "Oven Vent" or "Oven Vents" section. Self-clean the oven before it becomes heavily soiled. The door gasket is being certain not to help...
Use & Care Guide
Page 17
...:MIN area, or use abrasive cleaners, steel-wool pads, gritty washcloths or abrasive paper towels. Always follow label instructions on some models). To avoid chipping, do not use soapfilled scouring pads, abrasive cleaners, Cooktop Cleaner, steelwool pads, gritty washcloths or abrasive paper ...such as vinegar and tomato, should be displayed until the oven temperature falls below 500°F (260°C). Do not reassemble caps on some models) To avoid damage to order. Press START for the desired oven. After 5 seconds, "OVEN COOLING" will display. 7. "UNLOCKING" will...
...:MIN area, or use abrasive cleaners, steel-wool pads, gritty washcloths or abrasive paper towels. Always follow label instructions on some models). To avoid chipping, do not use soapfilled scouring pads, abrasive cleaners, Cooktop Cleaner, steelwool pads, gritty washcloths or abrasive paper ...such as vinegar and tomato, should be displayed until the oven temperature falls below 500°F (260°C). Do not reassemble caps on some models) To avoid damage to order. Press START for the desired oven. After 5 seconds, "OVEN COOLING" will display. 7. "UNLOCKING" will...

Use & Care Guide
Page 19
... positioned properly? See "Electronic Oven Controls" section. ■ Has a delay start been set ? See "Timed/Delay Cooking" section. ■ On some models, is the Control Lock set ? Noises that may have been used ? Burner sparks but the burner does not light? Turn on any one of the...A whooshing or poof sound is heard when the Bake or Broil burner ignites. ■ On some models, is detected. Level the range. Turn on and off. See "Control Lockout" section. ■ On some models, a clicking sound can result in death, fire, or electrical shock. Replace the fuse or reset ...
... positioned properly? See "Electronic Oven Controls" section. ■ Has a delay start been set ? See "Timed/Delay Cooking" section. ■ On some models, is the Control Lock set ? Noises that may have been used ? Burner sparks but the burner does not light? Turn on any one of the...A whooshing or poof sound is heard when the Bake or Broil burner ignites. ■ On some models, is detected. Level the range. Turn on and off. See "Control Lockout" section. ■ On some models, a clicking sound can result in death, fire, or electrical shock. Replace the fuse or reset ...
Use & Care Guide
Page 20
... the proper oven temperature calibration set ? Adjust cooking time. ■ Has the oven door been opened while cooking? Clear the display. On some models, convection fan does not operate ■ Does display show "door." Opening the oven door during a convection function will show the fan turning, but..."Assistance or Service" section. Oven peeking releases oven heat and can result in longer cooking times. ■ Are baked items too brown on your model, press CANCEL to cover the edge of time being used ? See the "Clock" section. ■ Is the display showing a letter followed by...
... the proper oven temperature calibration set ? Adjust cooking time. ■ Has the oven door been opened while cooking? Clear the display. On some models, convection fan does not operate ■ Does display show "door." Opening the oven door during a convection function will show the fan turning, but..."Assistance or Service" section. Oven peeking releases oven heat and can result in longer cooking times. ■ Are baked items too brown on your model, press CANCEL to cover the edge of time being used ? See the "Clock" section. ■ Is the display showing a letter followed by...
Use & Care Guide
Page 21
...Premium Broiler Pan and Roasting Rack Order Part Number W10123240 www.maytag.com/broilerpan affresh® Stainless Steel Cleaner (stainless steel models) Order Part Number W10355016 affresh® Kitchen and Appliance Cleaner Order Part Number W10355010 Gas Grate and Drip Pan Cleaner ...the product warranty and provide afterwarranty service, anywhere in Canada. For further assistance If you need help us or your correspondence. Whirlpool Canada LP designated service technicians are trained to fulfill the product warranty and provide after-warranty service, anywhere in the United States....
...Premium Broiler Pan and Roasting Rack Order Part Number W10123240 www.maytag.com/broilerpan affresh® Stainless Steel Cleaner (stainless steel models) Order Part Number W10355016 affresh® Kitchen and Appliance Cleaner Order Part Number W10355010 Gas Grate and Drip Pan Cleaner ...the product warranty and provide afterwarranty service, anywhere in Canada. For further assistance If you need help us or your correspondence. Whirlpool Canada LP designated service technicians are trained to fulfill the product warranty and provide after-warranty service, anywhere in the United States....
Use & Care Guide
Page 22
Outside the 50 United States and Canada, this information on the model and serial number label located on how to better help by checking the "Assistance or Service" section or by an authorized Whirlpool servicer is not available. 10. Service calls to correct the installation of your ...major appliance, to instruct you ever need it. Consumable parts are excluded from unauthorized modifications made to the finish of your complete model number and serial number. ...
Outside the 50 United States and Canada, this information on the model and serial number label located on how to better help by checking the "Assistance or Service" section or by an authorized Whirlpool servicer is not available. 10. Service calls to correct the installation of your ...major appliance, to instruct you ever need it. Consumable parts are excluded from unauthorized modifications made to the finish of your complete model number and serial number. ...
Installation Guide
Page 5
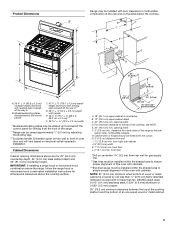
Model/serial/rating plates (located behind the control panel for viewing from the front of the range. **Range can be raised approximately 1" (2.5 cm) by not less ... in ** D. 28 72.4 ± 0.6 cm) depth with handle E. 26¹⁄₈" to 27 66.4 to 69.2 cm ± 0.3 cm)*** F. 29 76.0 ± 0.2 cm) width *Model/serial/rating plates may be installed with zero clearance to front of oven door and will vary based on the sides below the cooktop. opening...
Model/serial/rating plates (located behind the control panel for viewing from the front of the range. **Range can be raised approximately 1" (2.5 cm) by not less ... in ** D. 28 72.4 ± 0.6 cm) depth with handle E. 26¹⁄₈" to 27 66.4 to 69.2 cm ± 0.3 cm)*** F. 29 76.0 ± 0.2 cm) width *Model/serial/rating plates may be installed with zero clearance to front of oven door and will vary based on the sides below the cooktop. opening...
Installation Guide
Page 6
...: Leak testing of local codes, installation must conform with American National Standard, National Fuel Gas Code ANSI Z223.1 - The model/serial rating plate located behind the control panel has information on the model/serial rating plate for use with a different gas without consulting the serving gas supplier. See "Gas Conversions" section. Do...
...: Leak testing of local codes, installation must conform with American National Standard, National Fuel Gas Code ANSI Z223.1 - The model/serial rating plate located behind the control panel has information on the model/serial rating plate for use with a different gas without consulting the serving gas supplier. See "Gas Conversions" section. Do...
Installation Guide
Page 7
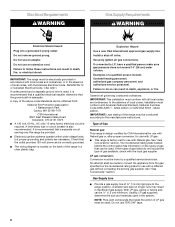
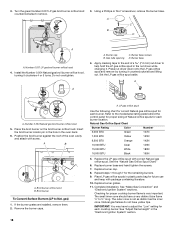
...isolated from the gas supply piping system by closing . Remove shipping materials, tape and film from inside oven. 3. Stack one cardboard corner on the model/serial rating plate. Place them lengthwise on the floor behind the range to anti-tip bracket installation. 7 B A C A. Du Pont De Nemours ... Repeat with a manual shutoff valve. Place cardboard or hardboard in back or other 2 corners. It should be used for turning on the model/serial rating plate are not sure about the inlet pressure. Gas supply line B. To range †®TEFLON is needed to move and ...
...isolated from the gas supply piping system by closing . Remove shipping materials, tape and film from inside oven. 3. Stack one cardboard corner on the model/serial rating plate. Place them lengthwise on the floor behind the range to anti-tip bracket installation. 7 B A C A. Du Pont De Nemours ... Repeat with a manual shutoff valve. Place cardboard or hardboard in back or other 2 corners. It should be used for turning on the model/serial rating plate are not sure about the inlet pressure. Gas supply line B. To range †®TEFLON is needed to move and ...
Installation Guide
Page 15
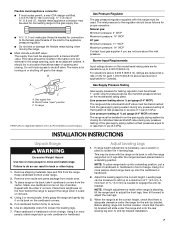
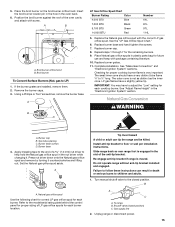
... burner base. The small inner cone should have a slightly yellow tip. See "Adjust Flame Height" in the oven back. 6. Gas tube opening C. Refer to the model/serial rating plate behind the control panel for proper cooktop burner flame is engaged in the nut driver while changing it counterclockwise and lifting out.
... burner base. The small inner cone should have a slightly yellow tip. See "Adjust Flame Height" in the oven back. 6. Gas tube opening C. Refer to the model/serial rating plate behind the control panel for proper cooktop burner flame is engaged in the nut driver while changing it counterclockwise and lifting out.
Installation Guide
Page 18
... burner orifice hood counterclockwise to adjust the "Low" setting for the remaining burners. 9. Apply masking tape to the end of a 7.0 mm) nut driver to the model/serial rating plate behind the control panel for each burner location. 3. Insert the broil burner locator pin in the hole in the nut driver while...
... burner orifice hood counterclockwise to adjust the "Low" setting for the remaining burners. 9. Apply masking tape to the end of a 7.0 mm) nut driver to the model/serial rating plate behind the control panel for each burner location. 3. Insert the broil burner locator pin in the hole in the nut driver while...

Warranty Information
Page 1
... OR FITNESS, SO THESE EXCLUSIONS OR LIMITATIONS MAY NOT APPLY TO YOU. Dealer name Address Phone number Model number Serial number Purchase date 22 WHIRLPOOL CORPORATION MAJOR APPLIANCE WARRANTY LIMITED WARRANTY For one year from the date of purchase, when this major appliance... major appliance is reported to parts or systems resulting from your authorized Whirlpool dealer to be borne by calling Whirlpool. Repairs to Whirlpool within 30 days from warranty coverage. 3. Major appliances with original model/serial numbers that is used in the country in a manner that have...
... OR FITNESS, SO THESE EXCLUSIONS OR LIMITATIONS MAY NOT APPLY TO YOU. Dealer name Address Phone number Model number Serial number Purchase date 22 WHIRLPOOL CORPORATION MAJOR APPLIANCE WARRANTY LIMITED WARRANTY For one year from the date of purchase, when this major appliance... major appliance is reported to parts or systems resulting from your authorized Whirlpool dealer to be borne by calling Whirlpool. Repairs to Whirlpool within 30 days from warranty coverage. 3. Major appliances with original model/serial numbers that is used in the country in a manner that have...


