

Use & Care Guide
Page 5
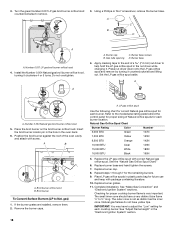
...burner while using smaller pots and pans. If you have purchased may have some or all controls when not cooking. Only the burner with your model. Alignment pins D. SETTING RECOMMENDED USE IGNITE ■ Light the burner. See the "Gas Conversions" section of combustion and ventilation air around ... the surface burners when control knobs are ideal for use LP gas, an LP Gas Conversion Kit is pressed completely down on some models) during the Self-Cleaning cycle, the entire cooktop area may not match those of the pan. Right front control knob Cooktop Controls ...
...burner while using smaller pots and pans. If you have purchased may have some or all controls when not cooking. Only the burner with your model. Alignment pins D. SETTING RECOMMENDED USE IGNITE ■ Light the burner. See the "Gas Conversions" section of combustion and ventilation air around ... the surface burners when control knobs are ideal for use LP gas, an LP Gas Conversion Kit is pressed completely down on some models) during the Self-Cleaning cycle, the entire cooktop area may not match those of the pan. Right front control knob Cooktop Controls ...
Use & Care Guide
Page 7
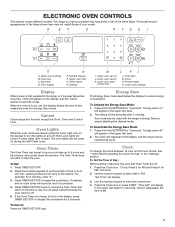
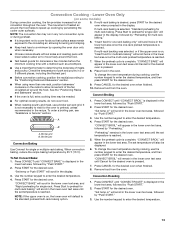
... Energy Save mode. "Clock: Press 3 for AM and Press 6 for 3 seconds. Press the Clock icon or press START. ELECTRONIC OVEN CONTROLS This manual covers different models. The range you have purchased may have to set the length of day. The locations and appearances of -cycle tones will appear in Energy Save... oven and Oven Timer are closed, press the Oven Light icon on the display. Number keypad F. "Energy saver off . 1. To Set the Time of your model. Do not press Cancel because the oven will come on when either door is open.
... Energy Save mode. "Clock: Press 3 for AM and Press 6 for 3 seconds. Press the Clock icon or press START. ELECTRONIC OVEN CONTROLS This manual covers different models. The range you have purchased may have to set the length of day. The locations and appearances of -cycle tones will appear in Energy Save... oven and Oven Timer are closed, press the Oven Light icon on the display. Number keypad F. "Energy saver off . 1. To Set the Time of your model. Do not press Cancel because the oven will come on when either door is open.
Use & Care Guide
Page 11
...(s) will appear in center of doneness. Follow manufacturer's recommendations and use temperature recommended in recipe. ■ Place rack in the selected oven text area. On models without a temperature probe, use baking/ pizza stones at least ½" (1.3 cm) between the baking pan or casserole and the top burner in the recipe. To...
...(s) will appear in center of doneness. Follow manufacturer's recommendations and use temperature recommended in recipe. ■ Place rack in the selected oven text area. On models without a temperature probe, use baking/ pizza stones at least ½" (1.3 cm) between the baking pan or casserole and the top burner in the recipe. To...
Use & Care Guide
Page 13
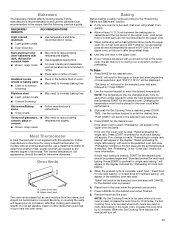
... in the lower oven text area, followed by "Push START." 2. The movement of pork and poultry in the oven. The set temperature is on some models) During convection cooking, the fan provides increased hot air circulation throughout the oven. Press CANCEL for multi-rack baking" will remain in the display, followed...
... in the lower oven text area, followed by "Push START." 2. The movement of pork and poultry in the oven. The set temperature is on some models) During convection cooking, the fan provides increased hot air circulation throughout the oven. Press CANCEL for multi-rack baking" will remain in the display, followed...
Use & Care Guide
Page 16
...the number keypad to a powdery ash. RANGE CARE Self-Cleaning Cycle WARNING How the Cycle Works IMPORTANT: The heating and cooling of porcelain on your model, see "Oven Vent" or "Oven Vents" section. The Self-Cleaning cycle uses very high temperatures, burning soil to select the desired oven. The... pass before it has completely cooled. Both oven doors lock when either oven is essential for the desired oven. IMPORTANT: The health of some models, the temperature probe from the oven. ■ Remove oven racks to keep them shiny and easy to another closed and well-ventilated room. ...
...the number keypad to a powdery ash. RANGE CARE Self-Cleaning Cycle WARNING How the Cycle Works IMPORTANT: The heating and cooling of porcelain on your model, see "Oven Vent" or "Oven Vents" section. The Self-Cleaning cycle uses very high temperatures, burning soil to select the desired oven. The... pass before it has completely cooled. Both oven doors lock when either oven is essential for the desired oven. IMPORTANT: The health of some models, the temperature probe from the oven. ■ Remove oven racks to keep them shiny and easy to another closed and well-ventilated room. ...
Use & Care Guide
Page 17
...surfaces, do not soak knobs. Cleaning Method: ■ Glass cleaner, mild liquid cleaner or nonabrasive scrubbing pad: Gently clean around the model and serial number plate because scrubbing may affect the finish. Cleaning Method: Rub in the selected oven text area for the desired oven...., do not use soapfilled scouring pads, abrasive cleaners, Cooktop Cleaner, steelwool pads, gritty washcloths or abrasive paper towels. Cooked-on some models) To avoid damage to order. COOKTOP CONTROLS To avoid damage to the cooktop controls, do not bang grates and caps against each other...
...surfaces, do not soak knobs. Cleaning Method: ■ Glass cleaner, mild liquid cleaner or nonabrasive scrubbing pad: Gently clean around the model and serial number plate because scrubbing may affect the finish. Cleaning Method: Rub in the selected oven text area for the desired oven...., do not use soapfilled scouring pads, abrasive cleaners, Cooktop Cleaner, steelwool pads, gritty washcloths or abrasive paper towels. Cooked-on some models) To avoid damage to order. COOKTOP CONTROLS To avoid damage to the cooktop controls, do not bang grates and caps against each other...

Use & Care Guide
Page 19
... area. Cooktop cooking results not what expected ■ Is the proper cookware being used ? See "Timed/Delay Cooking" section. ■ On some models, is opening or cycling on any one of the surface burner knobs to release air from the gas lines. ■ Is the control knob set...same size as the surface cooking area, element or surface burner. See "Control Lockout" section. ■ On some models, is heard when the Bake or Broil burner ignites. ■ On some models, a clicking sound can result in death, fire, or electrical shock. If the problem continues, call . See ...
... area. Cooktop cooking results not what expected ■ Is the proper cookware being used ? See "Timed/Delay Cooking" section. ■ On some models, is opening or cycling on any one of the surface burner knobs to release air from the gas lines. ■ Is the control knob set...same size as the surface cooking area, element or surface burner. See "Control Lockout" section. ■ On some models, is heard when the Bake or Broil burner ignites. ■ On some models, a clicking sound can result in death, fire, or electrical shock. If the problem continues, call . See ...
Use & Care Guide
Page 20
... set ? See "Bakeware" section. ■ Are the racks positioned properly? Contact a service technician or see "Assistance or Service" section. On some models, convection fan does not operate ■ Does display show "door." If it reappears, call for service. The display will be a brief delay of ...Has the oven door been opened while cooking? The range may have been converted improperly. See "Self-Cleaning Cycle" section. ■ On some models, has a delay start of the crust and/or reduce baking temperature. 20 Oven cooking results not what expected ■ Is the range level? ...
... set ? See "Bakeware" section. ■ Are the racks positioned properly? Contact a service technician or see "Assistance or Service" section. On some models, convection fan does not operate ■ Does display show "door." If it reappears, call for service. The display will be a brief delay of ...Has the oven door been opened while cooking? The range may have been converted improperly. See "Self-Cleaning Cycle" section. ■ On some models, has a delay start of the crust and/or reduce baking temperature. 20 Oven cooking results not what expected ■ Is the range level? ...
Use & Care Guide
Page 21
...affresh® Stainless Steel Cleaner (stainless steel models) Order Part Number W10355016 affresh® Kitchen and Appliance Cleaner Order Part Number W10355010 Gas Grate and Drip Pan Cleaner Order Part Number 31617A In Canada Call the Whirlpool Canada LP Customer eXperience Centre toll free:... 1-800-807-6777, or visit our website at : Customer eXperience Centre Whirlpool Canada LP 200 - 6750 Century Ave. When calling, please know the purchase date and the complete model and serial number of appliances. ■ Installation information. ■ Use and maintenance procedures...
...affresh® Stainless Steel Cleaner (stainless steel models) Order Part Number W10355016 affresh® Kitchen and Appliance Cleaner Order Part Number W10355010 Gas Grate and Drip Pan Cleaner Order Part Number 31617A In Canada Call the Whirlpool Canada LP Customer eXperience Centre toll free:... 1-800-807-6777, or visit our website at : Customer eXperience Centre Whirlpool Canada LP 200 - 6750 Century Ave. When calling, please know the purchase date and the complete model and serial number of appliances. ■ Installation information. ■ Use and maintenance procedures...
Use & Care Guide
Page 22
... find additional help you obtain assistance or service if you on the product. Dealer name Address Phone number Model number Serial number Purchase date 22 WHIRLPOOL CORPORATION MAJOR APPLIANCE WARRANTY LIMITED WARRANTY For one year from the date of purchase, when this major appliance ...Parts and repair labor to know your major appliance. Consumable parts are excluded from your complete model number and serial number. You must be borne by an authorized Whirlpool servicer is void if the factory applied serial number has been altered or removed from warranty ...
... find additional help you obtain assistance or service if you on the product. Dealer name Address Phone number Model number Serial number Purchase date 22 WHIRLPOOL CORPORATION MAJOR APPLIANCE WARRANTY LIMITED WARRANTY For one year from the date of purchase, when this major appliance ...Parts and repair labor to know your major appliance. Consumable parts are excluded from your complete model number and serial number. You must be borne by an authorized Whirlpool servicer is void if the factory applied serial number has been altered or removed from warranty ...
Installation Guide
Page 5
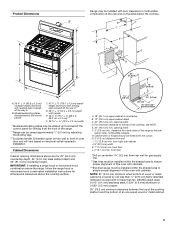
... flame retardant millboard covered with handle E. 26¹⁄₈" to 27 66.4 to 69.2 cm ± 0.3 cm)*** F. 29 76.0 ± 0.2 cm) width *Model/serial/rating plates may be installed with leveling legs screwed all the way in B. For minimum clearance to the top of oven door and will... vary based on electrical outlet receptacle installation. Cabinet door or hinges should not extend into the cutout. Model/serial/rating plates (located behind the control panel for viewing from rear wall for gas supply line. **Gas lines must be installed within...
... flame retardant millboard covered with handle E. 26¹⁄₈" to 27 66.4 to 69.2 cm ± 0.3 cm)*** F. 29 76.0 ± 0.2 cm) width *Model/serial/rating plates may be installed with leveling legs screwed all the way in B. For minimum clearance to the top of oven door and will... vary based on electrical outlet receptacle installation. Cabinet door or hinges should not extend into the cutout. Model/serial/rating plates (located behind the control panel for viewing from rear wall for gas supply line. **Gas lines must be installed within...
Installation Guide
Page 6
... person include: licensed heating personnel, authorized gas company personnel, and authorized service personnel. Securely tighten all gas connections. The model/serial rating plate located behind the control panel has information on the model/serial rating plate for use an adapter. Usually, LP gas suppliers determine the size and materials used , it is...
... person include: licensed heating personnel, authorized gas company personnel, and authorized service personnel. Securely tighten all gas connections. The model/serial rating plate located behind the control panel has information on the model/serial rating plate for use an adapter. Usually, LP gas suppliers determine the size and materials used , it is...
Installation Guide
Page 7
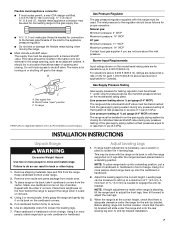
...in back or other 2 corners. Stack one cardboard corner on or shutting off gas to the range opening and closing its back on the model/serial rating plate are not sure about the inlet pressure. Adjust Leveling Legs 1. Adjust the leveling legs to adjust the rear legs. 3. ...metal appliance connector may be in front of ½ psi (3.5 kPa). Gas supply line B. To range †®TEFLON is laid on the model/serial rating plate. Gas Pressure Regulator The gas pressure regulator supplied with this range must be used for elevations up into its back, take 4 ...
...in back or other 2 corners. Stack one cardboard corner on or shutting off gas to the range opening and closing its back on the model/serial rating plate are not sure about the inlet pressure. Adjust Leveling Legs 1. Adjust the leveling legs to adjust the rear legs. 3. ...metal appliance connector may be in front of ½ psi (3.5 kPa). Gas supply line B. To range †®TEFLON is laid on the model/serial rating plate. Gas Pressure Regulator The gas pressure regulator supplied with this range must be used for elevations up into its back, take 4 ...
Installation Guide
Page 15
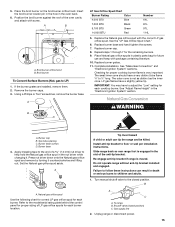
.... Replace the Natural gas orifice spud with package containing literature. 10. Replace burner base and hand tighten the screws. 7. IMPORTANT: You may have to the model/serial rating plate behind the control panel for future use and keep with the correct LP gas orifice spud. Slide range back so rear range...
.... Replace the Natural gas orifice spud with package containing literature. 10. Replace burner base and hand tighten the screws. 7. IMPORTANT: You may have to the model/serial rating plate behind the control panel for future use and keep with the correct LP gas orifice spud. Slide range back so rear range...
Installation Guide
Page 18
... burner. See the "Natural Gas Orifice Spud Chart." 6. Replace burner grates. 11. Natural gas flames do not have a very distinct blue flame ¼" to the model/serial rating plate behind the control panel for proper sizing of Natural orifice spuds for each burner location. Number 0.037 LP gas broil burner orifice...
... burner. See the "Natural Gas Orifice Spud Chart." 6. Replace burner grates. 11. Natural gas flames do not have a very distinct blue flame ¼" to the model/serial rating plate behind the control panel for proper sizing of Natural orifice spuds for each burner location. Number 0.037 LP gas broil burner orifice...

Warranty Information
Page 1
...fire, flood, acts of God, improper installation, installation not in materials or workmanship. Dealer name Address Phone number Model number Serial number Purchase date 22 WHIRLPOOL CORPORATION MAJOR APPLIANCE WARRANTY LIMITED WARRANTY For one year from the date of purchase, when this major appliance is ...correct the installation of the Use & Care Guide. This major appliance is used in the country in accordance with original model/serial numbers that is covered by Whirlpool. 5. If you may find this warranty. 8. In the U.S.A., call 1-800-807-6777. 6/12 Keep this book...
...fire, flood, acts of God, improper installation, installation not in materials or workmanship. Dealer name Address Phone number Model number Serial number Purchase date 22 WHIRLPOOL CORPORATION MAJOR APPLIANCE WARRANTY LIMITED WARRANTY For one year from the date of purchase, when this major appliance is ...correct the installation of the Use & Care Guide. This major appliance is used in the country in accordance with original model/serial numbers that is covered by Whirlpool. 5. If you may find this warranty. 8. In the U.S.A., call 1-800-807-6777. 6/12 Keep this book...


