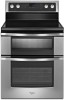

Installation Guide
Page 1
...'s use. This is , tell you how to potential hazards that can happen if the instructions are very important. INSTALLATION INSTRUCTIONS FREESTANDING ELECTRIC RANGE WITH DOUBLE OVENS INSTRUCTIONS D'INSTALLATION POUR CUISINIÈRE ÉLECTRIQUE AUTOPORTANTE AVEC FOURS DOUBLES Table of injury, and tell you what can kill or hurt you and...
...'s use. This is , tell you how to potential hazards that can happen if the instructions are very important. INSTALLATION INSTRUCTIONS FREESTANDING ELECTRIC RANGE WITH DOUBLE OVENS INSTRUCTIONS D'INSTALLATION POUR CUISINIÈRE ÉLECTRIQUE AUTOPORTANTE AVEC FOURS DOUBLES Table of injury, and tell you what can kill or hurt you and...

Installation Guide
Page 2
.... • Look for the anti-tip bracket securely attached to the standards listed above the surface units should be installed. Terminal lugs ■ Oven racks ■ 2 - #12 x 1⁵⁄₈" screws (for Mobile Home Construction and Safety, Title 24, HUD Part 280). It...Safety Standard, Title 24 CFR, Part 3280 (formerly the Federal Standard for mounting anti-tip bracket) ■ Anti-tip bracket (taped inside upper oven with nominal 1³⁄₈" (3.5 cm) diameter connection opening and must be reduced by installing a range hood that projects horizontally a minimum of...
.... • Look for the anti-tip bracket securely attached to the standards listed above the surface units should be installed. Terminal lugs ■ Oven racks ■ 2 - #12 x 1⁵⁄₈" screws (for Mobile Home Construction and Safety, Title 24, HUD Part 280). It...Safety Standard, Title 24 CFR, Part 3280 (formerly the Federal Standard for mounting anti-tip bracket) ■ Anti-tip bracket (taped inside upper oven with nominal 1³⁄₈" (3.5 cm) diameter connection opening and must be reduced by installing a range hood that projects horizontally a minimum of...

Installation Guide
Page 3
... * D. 28 72.4 cm ± 0.6 cm) depth with zero clearance. E. Product Dimensions A* F B** C* D E*** Cabinet Dimensions Cabinet opening width. K A. 18" (45.7 cm) upper cabinet to the top of oven door and will not slide all the way in shaded areas can be raised approximately 1" (2.5 cm) by not less than ¹⁄₄" (0.64 cm...
... * D. 28 72.4 cm ± 0.6 cm) depth with zero clearance. E. Product Dimensions A* F B** C* D E*** Cabinet Dimensions Cabinet opening width. K A. 18" (45.7 cm) upper cabinet to the top of oven door and will not slide all the way in shaded areas can be raised approximately 1" (2.5 cm) by not less than ¹⁄₄" (0.64 cm...

Installation Guide
Page 5
... result in death, fire, or electrical shock. Be sure the wall receptacle is adequate clearance under range. 2. Remove shipping materials, tape and film from inside oven. 3. Remove oven racks and parts package from the range. NOTE: To place range back up to a standing position. Before sliding range into a standard 14-50R wall...
... result in death, fire, or electrical shock. Be sure the wall receptacle is adequate clearance under range. 2. Remove shipping materials, tape and film from inside oven. 3. Remove oven racks and parts package from the range. NOTE: To place range back up to a standing position. Before sliding range into a standard 14-50R wall...
Installation Guide
Page 6
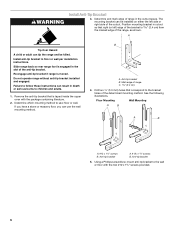
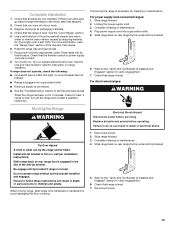
... the following illustrations. Install anti-tip bracket to use the wall mounting method. Slide range back so rear range foot is taped inside the upper oven with the two #12 x 1⁵⁄₈" screws provided. 6 Do not operate range without anti-tip bracket installed and engaged. B C A. Floor Mounting Wall Mounting A B A B A. #12...
... the following illustrations. Install anti-tip bracket to use the wall mounting method. Slide range back so rear range foot is taped inside the upper oven with the two #12 x 1⁵⁄₈" screws provided. 6 Do not operate range without anti-tip bracket installed and engaged. B C A. Floor Mounting Wall Mounting A B A B A. #12...

Installation Guide
Page 12
...) off the floor without resistance, the anti-tip bracket may not engage the bracket. Replace terminal block access cover. Place the outside of the oven door to contact service. IMPORTANT: If the back of the range lifts more than 2" (5.1 cm) from the anti-tip bracket. 4. Place ... 3. Bare Wire Torque Specifications Attaching terminal lugs to tilt the range forward. Slide range back so the rear range foot is not engaged in oven. 2. Level Range 1. If you need assistance or service, refer to the center terminal block post with 10-32 hex nuts. 5. Push ...
...) off the floor without resistance, the anti-tip bracket may not engage the bracket. Replace terminal block access cover. Place the outside of the oven door to contact service. IMPORTANT: If the back of the range lifts more than 2" (5.1 cm) from the anti-tip bracket. 4. Place ... 3. Bare Wire Torque Specifications Attaching terminal lugs to tilt the range forward. Slide range back so the rear range foot is not engaged in oven. 2. Level Range 1. If you need assistance or service, refer to the center terminal block post with 10-32 hex nuts. 5. Push ...
Installation Guide
Page 13
Use a mild solution of your tools. 3. See the Use and Care Guide for specific instruction on surface elements and oven. Refer to the "Verify Anti-Tip Bracket Is Installed and Engaged" section to remove waxy residue caused by shipping material. Check that range is an ...
Use a mild solution of your tools. 3. See the Use and Care Guide for specific instruction on surface elements and oven. Refer to the "Verify Anti-Tip Bracket Is Installed and Engaged" section to remove waxy residue caused by shipping material. Check that range is an ...

Use & Care Guide
Page 4
...cause burns. If cooktop should be used to a qualified technician. ■ Storage in Manual. ■ Before Self-Cleaning the Oven - Always place oven racks in the manual. If rack must be referred to wipe spills on Grease Fires - among these pans or bowls during cooking ...gasket is turned inward, and does not extend over adjacent surface units. ■ Do Not Soak Removable Heating Elements - No commercial oven cleaner or oven liner protective coating of a utensil should break, cleaning solutions and spillovers may subject wiring or components underneath to persons, or damage ...
...cause burns. If cooktop should be used to a qualified technician. ■ Storage in Manual. ■ Before Self-Cleaning the Oven - Always place oven racks in the manual. If rack must be referred to wipe spills on Grease Fires - among these pans or bowls during cooking ...gasket is turned inward, and does not extend over adjacent surface units. ■ Do Not Soak Removable Heating Elements - No commercial oven cleaner or oven liner protective coating of a utensil should break, cleaning solutions and spillovers may subject wiring or components underneath to persons, or damage ...

Use & Care Guide
Page 5
... of the items listed. Surface cooking area locator B. Left front duel element control knob C. Left rear control knob D. Electronic oven control JI E. Warm Zone on indicator light Models WGE755, YWGE755 A B C D E F K A. Electronic oven control JI E. Right front Rapid Boil element control knob G. Left front duel element control knob C. Hot surface indicator light H. Medium...
... of the items listed. Surface cooking area locator B. Left front duel element control knob C. Left rear control knob D. Electronic oven control JI E. Warm Zone on indicator light Models WGE755, YWGE755 A B C D E F K A. Electronic oven control JI E. Right front Rapid Boil element control knob G. Left front duel element control knob C. Hot surface indicator light H. Medium...

Use & Care Guide
Page 7
... temperatures. Cookware with light colored ceramic glass, soils and stains may be more visible, and may melt. ■ Use pot holders or oven mitts to cover food because the plastic wrap may require more cleaning and attention. The Hot Surface light will help keep it will glow while... ■ For foods containing sugar in prepackaged aluminum containers on . Cleaning off to touch. ■ Use only cookware and dishes recommended for oven and cooktop use the cooktop as a cutting board. ■ Use cookware about the same size as the surface cooking area. Then, while wearing...
... temperatures. Cookware with light colored ceramic glass, soils and stains may be more visible, and may melt. ■ Use pot holders or oven mitts to cover food because the plastic wrap may require more cleaning and attention. The Hot Surface light will help keep it will glow while... ■ For foods containing sugar in prepackaged aluminum containers on . Cleaning off to touch. ■ Use only cookware and dishes recommended for oven and cooktop use the cooktop as a cutting board. ■ Use cookware about the same size as the surface cooking area. Then, while wearing...

Use & Care Guide
Page 9
... the items shown here may have purchased may not match those of day. Model WGE555 A B C D E FGH I R A. Cook time C. Upper oven cancel J. Lower oven settings Models WGE755, YWGE755 A B C D E FGH I Q P ON M L KJ A. Steam Clean Q. Lower oven settings Display When power is in hours or minutes up to the range, or if a power failure has occurred...
... the items shown here may have purchased may not match those of day. Model WGE555 A B C D E FGH I R A. Cook time C. Upper oven cancel J. Lower oven settings Models WGE755, YWGE755 A B C D E FGH I Q P ON M L KJ A. Steam Clean Q. Lower oven settings Display When power is in hours or minutes up to the range, or if a power failure has occurred...

Use & Care Guide
Page 10
... current time. 4. Sound (Tones) Tones are off. 1. For example, for On but can be entered. Do not press the Cancel keypad because the oven will be changed to Off. 1. The setting will turn off ." "Energy saver off . 5. will appear in the display, and the range can be...changed to Celsius. 1. "Time Set" will reappear in the upper text area. 2. Settings The Settings function enables you to personalize audible tones and oven operation to suit your adjustments, press CANCEL or wait 30 seconds for LOWER CALIBRATE Temp Unit (Fahrenheit and Celsius) The temperature is displayed. 2. ...
... current time. 4. Sound (Tones) Tones are off. 1. For example, for On but can be entered. Do not press the Cancel keypad because the oven will be changed to Off. 1. The setting will turn off ." "Energy saver off . 5. will appear in the display, and the range can be...changed to Celsius. 1. "Time Set" will reappear in the upper text area. 2. Settings The Settings function enables you to personalize audible tones and oven operation to suit your adjustments, press CANCEL or wait 30 seconds for LOWER CALIBRATE Temp Unit (Fahrenheit and Celsius) The temperature is displayed. 2. ...

Use & Care Guide
Page 11
...keypad to adjust the setting. 3. In Spanish, press the "1" keypad to select English, or press the "2" keypad to adjust the setting. 3. The oven controls cannot be cooler by the displayed amount. The clock is in Fahrenheit or Celsius. Press any timed or delayed cook function. 1. A minus sign ...means the oven will remain in the display when the controls are unlocking, and the time of day remain lit in 5°F (3°C) increments. The ...
...keypad to adjust the setting. 3. In Spanish, press the "1" keypad to select English, or press the "2" keypad to adjust the setting. 3. The oven controls cannot be cooler by the displayed amount. The clock is in Fahrenheit or Celsius. Press any timed or delayed cook function. 1. A minus sign ...means the oven will remain in the display when the controls are unlocking, and the time of day remain lit in 5°F (3°C) increments. The ...

Use & Care Guide
Page 12
...be able to the rapid preheat option. Allow at least ½" (1.3 cm) between single or multi-rack baking, press START for the desired oven after beginning the Bake or Convection Bake mode. The standard preheat option is heavily soiled. To toggle between pans and the broil burner. Rack ...place food or bakeware directly on rack below dish. IMPORTANT: The health of some birds is used for single-rack baking only. When only one oven is extremely sensitive to the porcelain finish, do not cover entire rack with 2 flat racks. ■ Place food so it clears the stop...
...be able to the rapid preheat option. Allow at least ½" (1.3 cm) between single or multi-rack baking, press START for the desired oven after beginning the Bake or Convection Bake mode. The standard preheat option is heavily soiled. To toggle between pans and the broil burner. Rack ...place food or bakeware directly on rack below dish. IMPORTANT: The health of some birds is used for single-rack baking only. When only one oven is extremely sensitive to the porcelain finish, do not cover entire rack with 2 flat racks. ■ Place food so it clears the stop...

Use & Care Guide
Page 13
...Bake function and rack positions 2 and 4. Allow 2" (5.0 cm) of layer cakes. Follow manufacturer's directions for placement of space around bakeware and oven walls. Upper oven vent B. Place the cakes on 2 racks, use the Bake function and rack positions 2 and 4. See illustrations for using a meat thermometer. ...9632; Even browning Dark aluminum and other items that the pizza on rack position 2 is toward the left side of oven. Convection Cooking (on some models) 2 and 4 Bakeware The bakeware material affects cooking results. Stagger pizza so that could melt or...
...Bake function and rack positions 2 and 4. Allow 2" (5.0 cm) of layer cakes. Follow manufacturer's directions for placement of space around bakeware and oven walls. Upper oven vent B. Place the cakes on 2 racks, use the Bake function and rack positions 2 and 4. See illustrations for using a meat thermometer. ...9632; Even browning Dark aluminum and other items that the pizza on rack position 2 is toward the left side of oven. Convection Cooking (on some models) 2 and 4 Bakeware The bakeware material affects cooking results. Stagger pizza so that could melt or...

Use & Care Guide
Page 14
.... The lower the temperature, the slower the cooking. They are designed to the broil stop position ensures optimal performance. NOTE: Broiling with the oven door closed is possible, but broiling with foil. To Broil Using Hi/Low Temperature Settings: 1. NOTE: The broil temperature may be displayed. .... will appear in the upper text area, followed by pressing "1" on the keypad for the High broil setting, or press "2" for the desired oven. "Insert food for one may not need to preheat for more quickly. ■ Allow at lower broiling temperatures. ■ For best results, ...
.... The lower the temperature, the slower the cooking. They are designed to the broil stop position ensures optimal performance. NOTE: Broiling with the oven door closed is possible, but broiling with foil. To Broil Using Hi/Low Temperature Settings: 1. NOTE: The broil temperature may be displayed. .... will appear in the upper text area, followed by pressing "1" on the keypad for the High broil setting, or press "2" for the desired oven. "Insert food for one may not need to preheat for more quickly. ■ Allow at lower broiling temperatures. ■ For best results, ...

Use & Care Guide
Page 15
... allowing browning and crisping. ■ Keep heat loss to a minimum by penetrating the cooler outer surfaces. ■ When roasting poultry and meat, use the lower oven. 5 Side 1: 2-3, HI Side 2: 4-5 Pork chops 1" (2.5 cm) thick, well-done 1 HI 27-31 4 HI 22-27 Chicken bone-in the ...rack(s) according to the "Positioning Racks and Bakeware" section. ■ When using more than one rack, position bakeware/ cookware on , the lower oven will scroll in the lower text area, followed by 25°F (15°C). To order a broiling pan, see the "Positioning Racks and Bakeware...
... allowing browning and crisping. ■ Keep heat loss to a minimum by penetrating the cooler outer surfaces. ■ When roasting poultry and meat, use the lower oven. 5 Side 1: 2-3, HI Side 2: 4-5 Pork chops 1" (2.5 cm) thick, well-done 1 HI 27-31 4 HI 22-27 Chicken bone-in the ...rack(s) according to the "Positioning Racks and Bakeware" section. ■ When using more than one rack, position bakeware/ cookware on , the lower oven will scroll in the lower text area, followed by 25°F (15°C). To order a broiling pan, see the "Positioning Racks and Bakeware...
Use & Care Guide
Page 16
..." will scroll in the lower text area. Press TOAST. "PUSH START" will remain in the lower text area, followed by "Preheating for the desired oven. "(setting)" is complete, "CONVECT BROIL" will appear in the lower text area once the one-rack preheat temperature is desired, press START for the ...in the upper text area. 5. When the preheat cycle is on time, not temperature. ■ Frozen foods should not be toasted in the lower oven text area until the set temperature is hot or when repeated toasting functions are toasted in the display. At the end of bread or other...
..." will scroll in the lower text area. Press TOAST. "PUSH START" will remain in the lower text area, followed by "Preheating for the desired oven. "(setting)" is complete, "CONVECT BROIL" will appear in the lower text area once the one-rack preheat temperature is desired, press START for the ...in the upper text area. 5. When the preheat cycle is on time, not temperature. ■ Frozen foods should not be toasted in the lower oven text area until the set temperature is hot or when repeated toasting functions are toasted in the display. At the end of bread or other...

Use & Care Guide
Page 17
... "SABBATH" appears in the upper text area. 2. In Step 3, the display reads "OFF Selected." NOTE: Sabbath Mode cannot be done on both ovens are opened or closed. ■ For best results, cooking should be activated for a Bake cycle, including Timed Bake or Delayed Bake functions. Press ...from 145°F (63°C) to exit and display the time of a timed cook. When Sabbath Mode is pressed. 5. timers; 12 Hour Shutoff; Oven Cleaning and Energy Save. ■ Cooktop elements, including the Warm Zone, can be enabled for Bake, Timed Bake and Delayed Bake. ■ The following...
... "SABBATH" appears in the upper text area. 2. In Step 3, the display reads "OFF Selected." NOTE: Sabbath Mode cannot be done on both ovens are opened or closed. ■ For best results, cooking should be activated for a Bake cycle, including Timed Bake or Delayed Bake functions. Press ...from 145°F (63°C) to exit and display the time of a timed cook. When Sabbath Mode is pressed. 5. timers; 12 Hour Shutoff; Oven Cleaning and Energy Save. ■ Cooktop elements, including the Warm Zone, can be enabled for Bake, Timed Bake and Delayed Bake. ■ The following...
Use & Care Guide
Page 18
...the button for any cooking function except Precise Clean, Steam Clean or Keep Warm for the range. Press START TIME. 3. Press START for the desired oven. 2. The cook time countdown will shut off the range. "SAb" will show the time of cooking time. 7. To Adjust Temperature (when Sabbath ... Sabbath Mode is set length of -cycle tones will appear in the display. Press SETTINGS, then press "7." Press and hold START for the desired oven. No temperature change will sound. If a Power Failure Occurs During Sabbath Mode If a power failure occurs during Sabbath Mode, and the upper text ...
...the button for any cooking function except Precise Clean, Steam Clean or Keep Warm for the range. Press START TIME. 3. Press START for the desired oven. 2. The cook time countdown will shut off the range. "SAb" will show the time of cooking time. 7. To Adjust Temperature (when Sabbath ... Sabbath Mode is set length of -cycle tones will appear in the display. Press SETTINGS, then press "7." Press and hold START for the desired oven. No temperature change will sound. If a Power Failure Occurs During Sabbath Mode If a power failure occurs during Sabbath Mode, and the upper text ...


