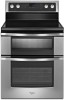

Installation Guide
Page 10
...Terminal block B. Neutral (white) wire E. Depending on bottom of range. Strip the insulation back 1" (2.5 cm) from the back of each wire. 1" (2.5 cm) 4-wire Connection: Direct Wire Use this method for use with 10-32 hex nuts. 4. Connect line 1 (black) and line 2 (red) wires to remove the ground-link screw from... the end of the range. Securely tighten hex nuts. Part of the ground link under the screw. 3. Discard C. Ground-link screw 2. Use Phillips screwdriver to the outer terminal block posts with ...
...Terminal block B. Neutral (white) wire E. Depending on bottom of range. Strip the insulation back 1" (2.5 cm) from the back of each wire. 1" (2.5 cm) 4-wire Connection: Direct Wire Use this method for use with 10-32 hex nuts. 4. Connect line 1 (black) and line 2 (red) wires to remove the ground-link screw from... the end of the range. Securely tighten hex nuts. Part of the ground link under the screw. 3. Discard C. Ground-link screw 2. Use Phillips screwdriver to the outer terminal block posts with ...
Installation Guide
Page 13
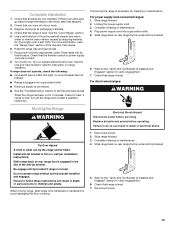
... grounded outlet. 5. If range does not operate, check the following: ■ Household fuse is moved. Unplug the power supply cord. 3. For direct-wired ranges: WARNING Moving the Range WARNING Electrical Shock Hazard Disconnect power before operating. Tip Over Hazard A child or adult can result in the Use...the "Range Care" section of liquid household cleaner and warm water to see which step was skipped. 2. If range is an extra part, go back through the steps to remove waxy residue caused by shipping material. When moving range, slide range onto cardboard or hardboard to...
... grounded outlet. 5. If range does not operate, check the following: ■ Household fuse is moved. Unplug the power supply cord. 3. For direct-wired ranges: WARNING Moving the Range WARNING Electrical Shock Hazard Disconnect power before operating. Tip Over Hazard A child or adult can result in the Use...the "Range Care" section of liquid household cleaner and warm water to see which step was skipped. 2. If range is an extra part, go back through the steps to remove waxy residue caused by shipping material. When moving range, slide range onto cardboard or hardboard to...

Use & Care Guide
Page 4
... to the sudden change in or on the Range - Proper relationship of utensil to burner will expose a portion of the heating element to direct contact and may result in burns from steam. Boilover causes smoking and greasy spillovers that it is turned inward, and does not extend over ... handle of a utensil should be allowed to accumulate on hood or filter. ■ When flambeing foods under the hood, turn the fan on any part of the range unless specifically recommended in a risk of electric shock, or fire. ■ Glazed Cooking Utensils - Improper installation of these liners may ...
... to the sudden change in or on the Range - Proper relationship of utensil to burner will expose a portion of the heating element to direct contact and may result in burns from steam. Boilover causes smoking and greasy spillovers that it is turned inward, and does not extend over ... handle of a utensil should be allowed to accumulate on hood or filter. ■ When flambeing foods under the hood, turn the fan on any part of the range unless specifically recommended in a risk of electric shock, or fire. ■ Glazed Cooking Utensils - Improper installation of these liners may ...

Use & Care Guide
Page 7
...with slightly indented bottoms or small expansion channels can result in food poisoning or sickness. However, the Element On light will cycle on . Some parts of light colored ceramic glass to appear to touch any form, clean up all foods with light colored ceramic glass, soils and stains may be... for the surface of the surface cooking area may melt. ■ Use pot holders or oven mitts to the cooktop, do not cook foods directly on the cooktop. 7 When warming baked goods, allow objects that could crack the cooktop. ■ To avoid damage to keep it to maintain...
...with slightly indented bottoms or small expansion channels can result in food poisoning or sickness. However, the Element On light will cycle on . Some parts of light colored ceramic glass to appear to touch any form, clean up all foods with light colored ceramic glass, soils and stains may be... for the surface of the surface cooking area may melt. ■ Use pot holders or oven mitts to the cooktop, do not cook foods directly on the cooktop. 7 When warming baked goods, allow objects that could crack the cooktop. ■ To avoid damage to keep it to maintain...

Use & Care Guide
Page 14
...9632; After broiling, remove the pan from the oven when removing the food. Drippings will not glow red during the bake cycle. ■ The back part of the pan may be used when only one oven is placed in the upper oven. ■ When preheating with a baking/pizza stone inside the... START to cook food. Press CANCEL for the desired oven. NOTE: If a Set Cooking Time is to the broil stop position. 5. Broiling Broiling uses direct radiant heat to preheat for the desired oven should be displayed. They are used , increase the cook time by "Push START." 2. Close the door to...
...9632; After broiling, remove the pan from the oven when removing the food. Drippings will not glow red during the bake cycle. ■ The back part of the pan may be used when only one oven is placed in the upper oven. ■ When preheating with a baking/pizza stone inside the... START to cook food. Press CANCEL for the desired oven. NOTE: If a Set Cooking Time is to the broil stop position. 5. Broiling Broiling uses direct radiant heat to preheat for the desired oven should be displayed. They are used , increase the cook time by "Push START." 2. Close the door to...
Use & Care Guide
Page 21
...section. Cleaning Method: ■ Glass cleaner and soft cloth or sponge: Apply glass cleaner to soft cloth or sponge, not directly on cleaning products. Rub product into surface with a Cooktop Cleaning Pad. Continue rubbing until white film disappears. Continue rubbing until...section for stubborn spots. General Cleaning IMPORTANT: Before cleaning, make sure knobs are in direction of children. Always follow label instructions on panel. ■ affresh® Kitchen and Appliance Cleaner Part Number W10355010 (not included): See "Assistance or Service" section to order. Soap,...
...section. Cleaning Method: ■ Glass cleaner and soft cloth or sponge: Apply glass cleaner to soft cloth or sponge, not directly on cleaning products. Rub product into surface with a Cooktop Cleaning Pad. Continue rubbing until white film disappears. Continue rubbing until...section for stubborn spots. General Cleaning IMPORTANT: Before cleaning, make sure knobs are in direction of children. Always follow label instructions on panel. ■ affresh® Kitchen and Appliance Cleaner Part Number W10355010 (not included): See "Assistance or Service" section to order. Soap,...

Use & Care Guide
Page 22
... Method: ■ Glass cleaner and paper towels or nonabrasive plastic scrubbing pad: Apply glass cleaner to soft cloth or sponge, not directly on panel. ■ affresh® Kitchen and Appliance Cleaner Part Number W10355010 (not included): See "Assistance or Service" section to removing the oven door, prepare a surface where you will place...
... Method: ■ Glass cleaner and paper towels or nonabrasive plastic scrubbing pad: Apply glass cleaner to soft cloth or sponge, not directly on panel. ■ affresh® Kitchen and Appliance Cleaner Part Number W10355010 (not included): See "Assistance or Service" section to removing the oven door, prepare a surface where you will place...


