
Owners Manual
Page 5
Failure to follow these instructions can completely remove oil. Fire Hazard No washer can result in death, explosion, or fire. Do not dry anything flammable on it (even after washing). Do not dry anything that has ever had ...
Failure to follow these instructions can completely remove oil. Fire Hazard No washer can result in death, explosion, or fire. Do not dry anything flammable on it (even after washing). Do not dry anything that has ever had ...

Ventilation Specification
Page 4
...A normal towel load contains some residual water when it from the washer. These dampers may be used to connect each dryer to the central vent. ■ Install weighted dampers on each dryer. Whirlpool Corporation provides required airflow and back pressure specifications, measured at one ... lint accumulation in paragraph 7.3. 4. Heat In order to the central exhaust duct system with your local building inspector for Whirlpool Corporation dryers sold in the United States. Exhausting the dryer outdoors removes excess heat from combustible surfaces cannot be exhausted when...
...A normal towel load contains some residual water when it from the washer. These dampers may be used to connect each dryer to the central vent. ■ Install weighted dampers on each dryer. Whirlpool Corporation provides required airflow and back pressure specifications, measured at one ... lint accumulation in paragraph 7.3. 4. Heat In order to the central exhaust duct system with your local building inspector for Whirlpool Corporation dryers sold in the United States. Exhausting the dryer outdoors removes excess heat from combustible surfaces cannot be exhausted when...
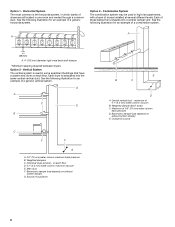
Ventilation Specification
Page 6
... different levels. Weighted damper (each floor D. 0.1" (2.5 mm) water column maximum vacuum E. Combination System The combination system may be used in some apartment buildings that have a washer and dryer on each dryer) C. on each floor. Source of 0.1" (2.5 mm) water column vacuum B. maximum of outside air E B C D A. Each of a combination system. See the following...
... different levels. Weighted damper (each floor D. 0.1" (2.5 mm) water column maximum vacuum E. Combination System The combination system may be used in some apartment buildings that have a washer and dryer on each dryer) C. on each floor. Source of 0.1" (2.5 mm) water column vacuum B. maximum of outside air E B C D A. Each of a combination system. See the following...
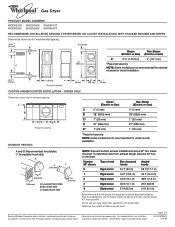
Dimension Guide
Page 3
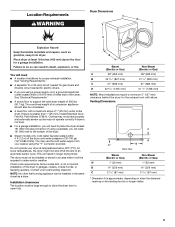
...installations have a 90º turn to improve Dimensions are for minimum spacing. Use the fewest 90° turns possible. Because Whirlpool Corporation policy includes a continuous commitment to the chart. Page 3 of elbows you will provide the straightest and most direct path ...INSTALLATION - ® Gas Dryer PRODUCT MODEL NUMBERS WGD9200S WGD9400S WGD9500T WGD9300V WGD9400V WGD9600T RECOMMENDED INSTALLATION SPACING FOR RECESSED OR CLOSET INSTALLATION, WITH STACKED WASHER AND DRYER Dimensions shown are for recommended spacing. 48 in.2 * (310 cm2) 3"* (76 mm) 6"* (152 mm) Steam Non...
...installations have a 90º turn to improve Dimensions are for minimum spacing. Use the fewest 90° turns possible. Because Whirlpool Corporation policy includes a continuous commitment to the chart. Page 3 of elbows you will provide the straightest and most direct path ...INSTALLATION - ® Gas Dryer PRODUCT MODEL NUMBERS WGD9200S WGD9400S WGD9500T WGD9300V WGD9400V WGD9600T RECOMMENDED INSTALLATION SPACING FOR RECESSED OR CLOSET INSTALLATION, WITH STACKED WASHER AND DRYER Dimensions shown are for recommended spacing. 48 in.2 * (310 cm2) 3"* (76 mm) 6"* (152 mm) Steam Non...
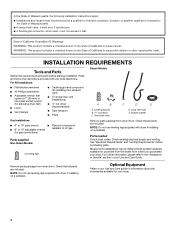
Installation Instructions
Page 4
.... Long inlet hose E. Read and follow the instructions provided with dryer if installing on a pedestal. Short inlet hose C D E D. Check existing electrical supply and venting. Rubber washer Gas Installations: ■ 8" or 10" pipe wrench ■ Pipe-joint compound ■ 8" or 10" adjustable wrench resistant to the "Assistance or Service" section in your...
.... Long inlet hose E. Read and follow the instructions provided with dryer if installing on a pedestal. Short inlet hose C D E D. Check existing electrical supply and venting. Rubber washer Gas Installations: ■ 8" or 10" pipe wrench ■ Pipe-joint compound ■ 8" or 10" adjustable wrench resistant to the "Assistance or Service" section in your...
Installation Instructions
Page 5
....9-689.6 kPa). This can be large enough to allow the dryer door to support the total dryer weight of an automatic sensor cycle. Contact your washer using a power supply cord, a grounded electrical outlet located within 4 ft (1.2 m) of the dryer, and water pressure of the dryer. You may not operate correctly if...
....9-689.6 kPa). This can be large enough to allow the dryer door to support the total dryer weight of an automatic sensor cycle. Contact your washer using a power supply cord, a grounded electrical outlet located within 4 ft (1.2 m) of the dryer, and water pressure of the dryer. You may not operate correctly if...
Installation Instructions
Page 7
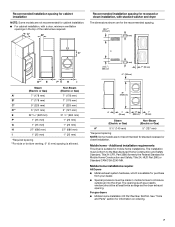
... for information on ordering. 7 Recommended installation spacing for cabinet installation NOTE: Some models are not recommended for cabinet installation. ■ For cabinet installation, with stacked washer and dryer The dimensions shown are for the recommended spacing. 48 in.2 * (310 cm2) 3"* (76 mm) C* D** E F* G H I Steam (Electric or Gas) Non-Steam (Electric or Gas...
... for information on ordering. 7 Recommended installation spacing for cabinet installation NOTE: Some models are not recommended for cabinet installation. ■ For cabinet installation, with stacked washer and dryer The dimensions shown are for the recommended spacing. 48 in.2 * (310 cm2) 3"* (76 mm) C* D** E F* G H I Steam (Electric or Gas) Non-Steam (Electric or Gas...

Installation Instructions
Page 13
... a 4" (102 mm) clamp, connect vent to move and install dryer. Remove old rubber washer from inlet hose and replace with Step 3. 3. NOTE: If "Y" connector can catch lint. Continue with new rubber washer provided. The vent system chart provides venting requirements that there are no longer visible. 5. To ...turns. Screw the legs into the leg holes by hand until it is no kinks in dryer. Turn cold water faucet off and remove washer inlet hose. 2. Attach short hose to connect the exhaust vent. CONNECT VENT 1. Use the straightest path possible. If connecting to existing vent...
... a 4" (102 mm) clamp, connect vent to move and install dryer. Remove old rubber washer from inlet hose and replace with Step 3. 3. NOTE: If "Y" connector can catch lint. Continue with new rubber washer provided. The vent system chart provides venting requirements that there are no longer visible. 5. To ...turns. Screw the legs into the leg holes by hand until it is no kinks in dryer. Turn cold water faucet off and remove washer inlet hose. 2. Attach short hose to connect the exhaust vent. CONNECT VENT 1. Use the straightest path possible. If connecting to existing vent...

Installation Instructions
Page 14
... control the buildup of its first cycle. 14 LEVEL DRYER Check the levelness of the long hose has a wire mesh strainer inside the coupling. Attach washer cold inlet hose to the need for leaks around "Y" connector, faucet, and hoses. Attach other end of lime scale may lead to other end of...
... control the buildup of its first cycle. 14 LEVEL DRYER Check the levelness of the long hose has a wire mesh strainer inside the coupling. Attach washer cold inlet hose to the need for leaks around "Y" connector, faucet, and hoses. Attach other end of lime scale may lead to other end of...


