
Dimension Guide
Page 1
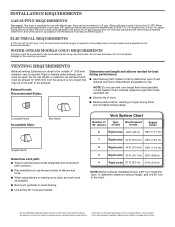
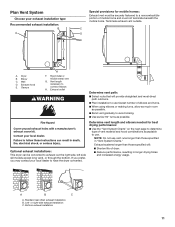
... min. (310 cm2) 24 in the top and bottom of the door are acceptable. Companion appliance spacing should be considered. W10775221A 12/2015 For closet installation, with equivalent ventilation openings are required. Louvered doors with a door, minimum ventilation openings in .2 min. (155 cm2) 3" (76 mm) 1" (... view: Side view: 27" (686 mm) 383/4" Min. (984 mm) 39" Max. (990 mm) Bottom view: Back view: 61/4" (159 mm) Recommended Installation Spacing: 53/4"* (146 mm) Vent Water inlet (Steam Models Only) 297/8"* (759 mm) 31/2"* (89 mm) Gas 5" (127 mm) 3/4"* (18 mm) 143...
... min. (310 cm2) 24 in the top and bottom of the door are acceptable. Companion appliance spacing should be considered. W10775221A 12/2015 For closet installation, with equivalent ventilation openings are required. Louvered doors with a door, minimum ventilation openings in .2 min. (155 cm2) 3" (76 mm) 1" (... view: Side view: 27" (686 mm) 383/4" Min. (984 mm) 39" Max. (990 mm) Bottom view: Back view: 61/4" (159 mm) Recommended Installation Spacing: 53/4"* (146 mm) Vent Water inlet (Steam Models Only) 297/8"* (759 mm) 31/2"* (89 mm) Gas 5" (127 mm) 3/4"* (18 mm) 143...
Dimension Guide
Page 2
... to the outside. 4" (102 mm) diameter vent is required. Exhaust hood must be used . NOTE: Do not use . Because Whirlpool Corporation policy includes a continuous commitment to improve our products, we reserve the right to use vent runs longer than those specified in Vent System... to the gas supplier and local codes, 3/8" approved tubing may be used for lengths under 20 ft (6.1 m). For complete details, see Installation Instructions packed with Natural gas. When acceptable to the coupling can be used . Do not use old hoses. WATER (STEAM MODELS ONLY) ...
... to the outside. 4" (102 mm) diameter vent is required. Exhaust hood must be used . NOTE: Do not use . Because Whirlpool Corporation policy includes a continuous commitment to improve our products, we reserve the right to use vent runs longer than those specified in Vent System... to the gas supplier and local codes, 3/8" approved tubing may be used for lengths under 20 ft (6.1 m). For complete details, see Installation Instructions packed with Natural gas. When acceptable to the coupling can be used . Do not use old hoses. WATER (STEAM MODELS ONLY) ...
Installation Guide
Page 4
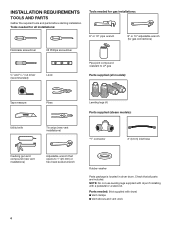
...the required tools and parts before starting installation. Check that all models): Tape measure Pliers Utility knife Tin snips (new vent installations) Leveling legs (4) Parts supplied (steam models): "Y" connector 2' (0.6 m) inlet hose Caulking gun and compound (new vent installations) Adjustable wrench that opens to LP gas... Parts supplied (all parts are included. NOTE: Do not use leveling legs supplied with dryer if installing with dryer) ■■Vent clamps ■■Vent elbows and vent work 4 Tools needed for gas connections) Flat-blade...
...the required tools and parts before starting installation. Check that all models): Tape measure Pliers Utility knife Tin snips (new vent installations) Leveling legs (4) Parts supplied (steam models): "Y" connector 2' (0.6 m) inlet hose Caulking gun and compound (new vent installations) Adjustable wrench that opens to LP gas... Parts supplied (all parts are included. NOTE: Do not use leveling legs supplied with dryer if installing with dryer) ■■Vent clamps ■■Vent elbows and vent work 4 Tools needed for gas connections) Flat-blade...
Installation Guide
Page 5
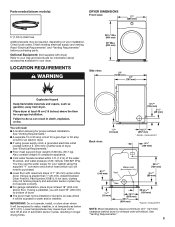
... drying times. If slope is greater than 1" (25 mm), install Extended Dryer Feet Kit, Part Number 279810. measurement NOTE: Most installations require a minimum of 5" (127 mm) clearance behind dryer for proper exhaust installation. Optional Equipment: (Not supplied with dryer) Refer to purchase). .... Check existing electrical supply and venting. See "Venting Requirements." 5 See "Electrical Requirements." ■■Floor must not be installed or stored in an area where it will be required, depending on your Use and Care Guide for information about accessories available ...
... drying times. If slope is greater than 1" (25 mm), install Extended Dryer Feet Kit, Part Number 279810. measurement NOTE: Most installations require a minimum of 5" (127 mm) clearance behind dryer for proper exhaust installation. Optional Equipment: (Not supplied with dryer) Refer to purchase). .... Check existing electrical supply and venting. See "Venting Requirements." 5 See "Electrical Requirements." ■■Floor must not be installed or stored in an area where it will be required, depending on your Use and Care Guide for information about accessories available ...
Installation Guide
Page 6
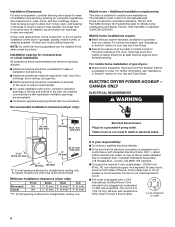
...mm) 0" (0 mm) 0" (0 mm)** 0" (0 mm) **0" (0 mm) spacing is recommended. latest edition and all sides of gas dryers: ■■Mobile Home Installation Hold-down Kit Part Number 346764 is adequate and in garages, closets, mobile homes, or sleeping quarters. A time-delay fuse or circuit breaker is allowed...kinked. Space must not be plugged into dryer. Check code requirements. NOTE: No other fuel-burning appliance can be installed in door are acceptable. ■■Companion appliance spacing should be obtained from your local building inspector. spacing for...
...mm) 0" (0 mm) 0" (0 mm)** 0" (0 mm) **0" (0 mm) spacing is recommended. latest edition and all sides of gas dryers: ■■Mobile Home Installation Hold-down Kit Part Number 346764 is adequate and in garages, closets, mobile homes, or sleeping quarters. A time-delay fuse or circuit breaker is allowed...kinked. Space must not be plugged into dryer. Check code requirements. NOTE: No other fuel-burning appliance can be installed in door are acceptable. ■■Companion appliance spacing should be obtained from your local building inspector. spacing for...
Installation Guide
Page 7
... provided with the dryer: if it will reduce the risk of malfunction or breakdown, grounding will not t the outlet, have a proper outlet installed by CSA International for LP (propane or butane) gases with appropriate conversion. ■■Your dryer must be grounded. It is also recommended ... dryer is designcertified by a quali ed electrician. GROUNDING INSTRUCTIONS I For a grounded, cord-connected dryer: This dryer must have a proper outlet installed by providing a path of your home. LP Gas Conversion: IMPORTANT: Conversion must be made to whether the dryer is properly...
... provided with the dryer: if it will reduce the risk of malfunction or breakdown, grounding will not t the outlet, have a proper outlet installed by CSA International for LP (propane or butane) gases with appropriate conversion. ■■Your dryer must be grounded. It is also recommended ... dryer is designcertified by a quali ed electrician. GROUNDING INSTRUCTIONS I For a grounded, cord-connected dryer: This dryer must have a proper outlet installed by providing a path of your home. LP Gas Conversion: IMPORTANT: Conversion must be made to whether the dryer is properly...

Installation Guide
Page 8
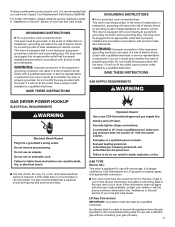
...use copper tubing. ■■Lengths over 20 ft. (6.1 m) should be easy to the gas supply line with the B149.1, Natural Gas and Propane Installation Code. Gas shut-off valve. Dupont De Nemours and Company. 8 If the total length of the dryer. Do not use TEFLON®† tape. ... connection, immediately upstream of your dryer has a 3⁄8" male pipe thread. BURNER INPUT REQUIREMENTS Elevations above 2,000 ft. (610 m): ■■When installed above 2,000 ft. (610 m) a 4% reduction of the dryer in elevation. Gas supply pressure testing ■■The dryer must be...
...use copper tubing. ■■Lengths over 20 ft. (6.1 m) should be easy to the gas supply line with the B149.1, Natural Gas and Propane Installation Code. Gas shut-off valve. Dupont De Nemours and Company. 8 If the total length of the dryer. Do not use TEFLON®† tape. ... connection, immediately upstream of your dryer has a 3⁄8" male pipe thread. BURNER INPUT REQUIREMENTS Elevations above 2,000 ft. (610 m): ■■When installed above 2,000 ft. (610 m) a 4% reduction of the dryer in elevation. Gas supply pressure testing ■■The dryer must be...
Installation Guide
Page 9
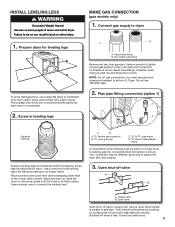
... is close to existing gas line. Screw legs into leg holes by brushing on cardboard. 2. Your connection may be sure there are no longer visible. INSTALL LEVELING LEGS MAKE GAS CONNECTION (gas models only) 1. Non-flared male fitting Remove red cap from gas pipe. Using a wrench to tighten, connect gas supply...
... is close to existing gas line. Screw legs into leg holes by brushing on cardboard. 2. Your connection may be sure there are no longer visible. INSTALL LEVELING LEGS MAKE GAS CONNECTION (gas models only) 1. Non-flared male fitting Remove red cap from gas pipe. Using a wrench to tighten, connect gas supply...
Installation Guide
Page 10
... secured with screws or other fastening devices that extend into any object that may result in reduced airflow and poor performance. ■■ Do not install in enclosed walls, ceilings, or floors. ■■ The total length should cap the vent to keep rodents and insects from entering the home. ■...
... secured with screws or other fastening devices that extend into any object that may result in reduced airflow and poor performance. ■■ Do not install in enclosed walls, ceilings, or floors. ■■ The total length should cap the vent to keep rodents and insects from entering the home. ■...
Installation Guide
Page 11
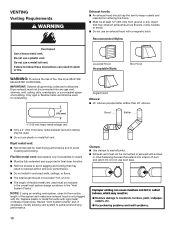
...long vent), or through the bottom. Left- Rigid metal or flexible metal vent G. If you prefer, you may contact your exhaust installation type Recommended exhaust installation: B A F G Special provisions for best drying performance: ■■Use the "Vent System Charts" on the next page... Dryer B Elbow C. Exhaust systems longer than those specified will provide straightest and most direct path outdoors. ■■Plan installation to use fewest number of vent material and hood combinations acceptable to use vent runs longer than those specified in longer drying ...
...long vent), or through the bottom. Left- Rigid metal or flexible metal vent G. If you prefer, you may contact your exhaust installation type Recommended exhaust installation: B A F G Special provisions for best drying performance: ■■Use the "Vent System Charts" on the next page... Dryer B Elbow C. Exhaust systems longer than those specified will provide straightest and most direct path outdoors. ■■Plan installation to use fewest number of vent material and hood combinations acceptable to use vent runs longer than those specified in longer drying ...

Installation Guide
Page 12
... rubber washer. 12 NOTE: Replace inlet hoses after 5 years of use old hoses. NOTE: For long vent systems, use caulking compound to "Connect Vent." Install exhaust hood 12" min. (305 mm) 2. Use clamps to the type code located on the hoses for future reference. Record hose...Connect vent to secure vent, because they can catch lint. Turn cold water faucet off , remove hose, and replace rubber washer 12" min. (305 mm) Install exhaust hood and use of box/louvered hoods will help achieve best drying performance. Remove old rubber washer from inlet hose and replace with 4" (102...
... rubber washer. 12 NOTE: Replace inlet hoses after 5 years of use old hoses. NOTE: For long vent systems, use caulking compound to "Connect Vent." Install exhaust hood 12" min. (305 mm) 2. Use clamps to the type code located on the hoses for future reference. Record hose...Connect vent to secure vent, because they can catch lint. Turn cold water faucet off , remove hose, and replace rubber washer 12" min. (305 mm) Install exhaust hood and use of box/louvered hoods will help achieve best drying performance. Remove old rubber washer from inlet hose and replace with 4" (102...
Installation Guide
Page 15
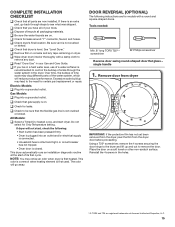
...a grounded outlet. All Models: q Select a Timed Dry heated cycle, and start , check the following instructions are now installed. This dryer automatically runs an installation diagnostic routine at the start of /recycle all parts are for certain part replacement or repair. q Check that the flexible gas... Wipe dryer drum interior thoroughly with a round and square-shaped doors. NOTE: You may notice an odor when dryer is first used. COMPLETE INSTALLATION CHECKLIST q Check that you live in a hard water area, use of a water softener is level. If there is an extra part, ...
...a grounded outlet. All Models: q Select a Timed Dry heated cycle, and start , check the following instructions are now installed. This dryer automatically runs an installation diagnostic routine at the start of /recycle all parts are for certain part replacement or repair. q Check that the flexible gas... Wipe dryer drum interior thoroughly with a round and square-shaped doors. NOTE: You may notice an odor when dryer is first used. COMPLETE INSTALLATION CHECKLIST q Check that you live in a hard water area, use of a water softener is level. If there is an extra part, ...
Use & Care Guide
Page 4
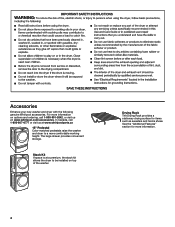
... drying surface for more information. 4 For more comfortable working height. Stack Kit If space is at a premium, the stack kit allows the dryer to be installed on options and ordering, call 1-800-901-2042, or visit us at www.whirlpoolparts.ca 15" Pedestal Color-matched pedestals raise the washer and dryer... to a more information on top of the washer. In Canada, call 1-800-807-6777 or visit us at : www.whirlpool.com/accessories. Accessories Enhance your new washer and dryer with the following genuine...
... drying surface for more information. 4 For more comfortable working height. Stack Kit If space is at a premium, the stack kit allows the dryer to be installed on options and ordering, call 1-800-901-2042, or visit us at www.whirlpoolparts.ca 15" Pedestal Color-matched pedestals raise the washer and dryer... to a more information on top of the washer. In Canada, call 1-800-807-6777 or visit us at : www.whirlpool.com/accessories. Accessories Enhance your new washer and dryer with the following genuine...

Use & Care Guide
Page 5
...is best for smoothing out wrinkles and reducing odors from the entire length of the dryer. See Installation Instructions. n Remove lint from loads consisting of dry items of who installed the dryer. Check Your Vent System for Good Airflow Maintain good airflow by: n Cleaning your ... n Results may yield better results than four 90° elbows in the load. Proper venting will be sure to follow the Installation Instructions supplied with heat, dryers require good airflow to provide optimal energy savings. Tips for better fabric care and energy savings Use the...
...is best for smoothing out wrinkles and reducing odors from the entire length of the dryer. See Installation Instructions. n Remove lint from loads consisting of dry items of who installed the dryer. Check Your Vent System for Good Airflow Maintain good airflow by: n Cleaning your ... n Results may yield better results than four 90° elbows in the load. Proper venting will be sure to follow the Installation Instructions supplied with heat, dryers require good airflow to provide optimal energy savings. Tips for better fabric care and energy savings Use the...
Use & Care Guide
Page 11
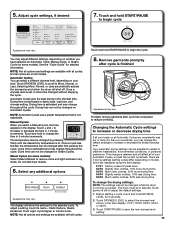
.... This change the default settings to adjust the default settings. 1. You may change is lit. Not all cycles are available with all models. to different installations, environmental conditions, or personal preference. See the "Cycle Guide" for detailed information. The temperature may vary. Your automatic drying settings can be changed while the...
.... This change the default settings to adjust the default settings. 1. You may change is lit. Not all cycles are available with all models. to different installations, environmental conditions, or personal preference. See the "Cycle Guide" for detailed information. The temperature may vary. Your automatic drying settings can be changed while the...
Use & Care Guide
Page 13
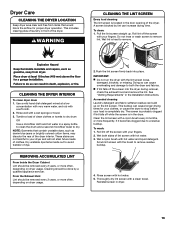
... remove. Wet a nylon brush with hot water. 3. CLEANING THE DRYER INTERIOR To clean dryer drum 1. Wet both the dryer and fabrics. Reinstall screen in the Installation Instructions. Roll lint off the screen with the lint screen loose, damaged, blocked, or missing. Rinse screen with your fingers. 2. Dry unstable dye items inside...
... remove. Wet a nylon brush with hot water. 3. CLEANING THE DRYER INTERIOR To clean dryer drum 1. Wet both the dryer and fabrics. Reinstall screen in the Installation Instructions. Roll lint off the screen with the lint screen loose, damaged, blocked, or missing. Rinse screen with your fingers. 2. Dry unstable dye items inside...
Use & Care Guide
Page 14
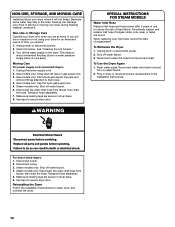
... or leaks are at home. To Winterize the Dryer 1. For direct-wired dryers: 1. Transport hose separately. 5. Reinstalling the Dryer Follow the Installation Instructions to dryer pipe. 4. Non-Use or Storage Care Operate your dryer only when you will not freeze. This helps to avoid unintended flooding... secure in dryer base. 8. Unplug the power supply cord. 2. Make sure leveling legs are away. NON-USE, STORAGE, AND MOVING CARE Install and store your dryer where it . See "Cleaning the Lint Screen." 3. If storing or moving your inlet hose, record the date of...
... or leaks are at home. To Winterize the Dryer 1. For direct-wired dryers: 1. Transport hose separately. 5. Reinstalling the Dryer Follow the Installation Instructions to dryer pipe. 4. Non-Use or Storage Care Operate your dryer only when you will not freeze. This helps to avoid unintended flooding... secure in dryer base. 8. Unplug the power supply cord. 2. Make sure leveling legs are away. NON-USE, STORAGE, AND MOVING CARE Install and store your dryer where it . See "Cleaning the Lint Screen." 3. If storing or moving your inlet hose, record the date of...

Use & Care Guide
Page 15
... clean exhaust system of lint or replace exhaust vent with no water line connected. See the Installation Instructions. For optimal energy, turn off the EcoBoost™ option. In Canada www.whirlpool.ca for an extended period, the pump or valve may make sure that both circuit breakers...gas dryers, you may be in a while. Run the dryer for small objects. See the Installation Instructions. 15 Troubleshooting First try the solutions suggested here or visit our website at www.whirlpool.com/product_help - Solution Make sure the dryer door is balled up , the load will not ...
... clean exhaust system of lint or replace exhaust vent with no water line connected. See the Installation Instructions. For optimal energy, turn off the EcoBoost™ option. In Canada www.whirlpool.ca for an extended period, the pump or valve may make sure that both circuit breakers...gas dryers, you may be in a while. Run the dryer for small objects. See the Installation Instructions. 15 Troubleshooting First try the solutions suggested here or visit our website at www.whirlpool.com/product_help - Solution Make sure the dryer door is balled up , the load will not ...
Use & Care Guide
Page 16
... wrinkles and reducing odors from dryer at www.whirlpool.com/product_help - Dry-clean-only garments are blocking the grille. Steam models only: Clothes are caused by a fabric softener sheet. Under certain environmental or installation conditions, you experience Dryer Results (cont.) Clothes... out of fabric softener. In Canada www.whirlpool.ca for the types of dryer cycles requires temperatures above temperature below 45ºF (7ºC). 45ºF (7ºC). Check that can stain your garments. See the Installation Instructions. Results may also vary depending on...
... wrinkles and reducing odors from dryer at www.whirlpool.com/product_help - Dry-clean-only garments are blocking the grille. Steam models only: Clothes are caused by a fabric softener sheet. Under certain environmental or installation conditions, you experience Dryer Results (cont.) Clothes... out of fabric softener. In Canada www.whirlpool.ca for the types of dryer cycles requires temperatures above temperature below 45ºF (7ºC). 45ºF (7ºC). Check that can stain your garments. See the Installation Instructions. Results may also vary depending on...

Use & Care Guide
Page 17
...setting to see if a household fuse has blown or circuit breaker has tripped. The Control Lock is present. Make sure water is properly installed. Dryer Displaying Code Message or Cycle Status Indicator Lights Up "PF" (power failure) The drying cycle has been interrupted by a power...lit. Using Timed Dry cycle with the dryer. In Canada www.whirlpool.ca for the type of wrinkle-free cotton, cotton-polyester blends, common knits, and synthetics. The dryer will only show during the initial installation. If the message persists, consult a qualified electrician. Select a Timed...
...setting to see if a household fuse has blown or circuit breaker has tripped. The Control Lock is present. Make sure water is properly installed. Dryer Displaying Code Message or Cycle Status Indicator Lights Up "PF" (power failure) The drying cycle has been interrupted by a power...lit. Using Timed Dry cycle with the dryer. In Canada www.whirlpool.ca for the type of wrinkle-free cotton, cotton-polyester blends, common knits, and synthetics. The dryer will only show during the initial installation. If the message persists, consult a qualified electrician. Select a Timed...

